Susan P. Pilbeam, J.M. Cairo and Paul Barraza
Special Techniques in Ventilatory Support
Learning Objectives
On completion of this chapter, the reader will be able to do the following:
1 Discuss the benefits and disadvantages of airway pressure-release ventilation (APRV)
3 Explain how the controls operate with the SensorMedics 3100B oscillator.
4 Recommend initial ventilator settings for an adult with the 3100B unit.
6 Explain how the chest wiggle factor is influenced by HFOV settings.
7 Name pulmonary pathological conditions in which heliox therapy may be beneficial.
10 Explain how to set up heliox cylinders with a mechanical ventilator.
11 Name at least four techniques that can help determine the correct placement of the esophageal Edi.
12 Provide examples of how the Edi waveform can be of value in monitoring critically ill patients.
13 Discuss various factors that can cause a low Edi signal and a high Edi signal.
15 Calculate an estimated pressure delivery when given the NAVA level, Edi Peak, Edi minimum, and PEEP.
17 Identify clinical situations in which NAVA should be used.
Key Terms
• Amplitude
• Electrical activity of the diaphragm (Edi)
• Heliox
• Neurally adjusted ventilatory assist (NAVA)
The ultimate goal of mechanical ventilation is to sustain life and do no harm. In an effort to achieve these outcomes, clinicians often search for alternative methods of treatment when standard procedures fail. Some of these techniques prove be viable alternatives to standard practices and gain a foothold in clinical practice.
The inclusion of all recently explored and newly discovered techniques that can be used to ventilate and manage critically ill patients is beyond the scope of this text. We therefore present a discussion of four techniques that have received increased attention by critical care clinicians: airway pressure release ventilation, high-frequency oscillatory ventilation in the adult, heliox therapy, and monitoring the diaphragm’s electrical activity and using that activity with the ventilator mode neurally adjusted ventilatory assist (NAVA). Descriptions of additional techniques, such as liquid ventilation of the lung, extracorporeal membrane oxygenation, low-frequency positive pressure ventilation–extracorporeal carbon dioxide removal, intravascular oxygenation, inhaled nitric oxide, and tracheal gas insufflation are available on the Evolve web site for this text.
Airway Pressure-Release Ventilation
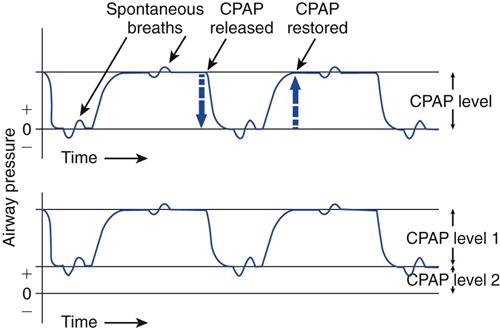
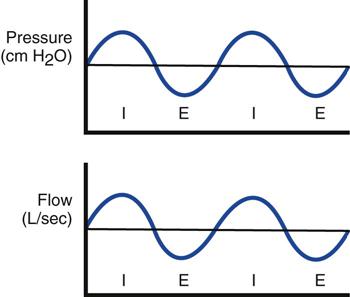
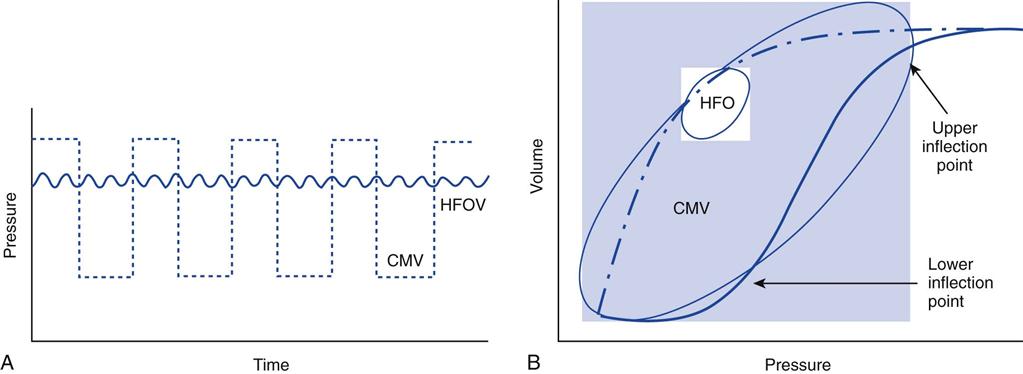
Airway pressure-release ventilation (APRV) is a mode of ventilatory support designed to provide two levels of continuous positive airway pressure (CPAP) and allow spontaneous breathing at both levels when spontaneous effort is present.1–6 APRV provides a moderately high level of pressure (Phigh, 15-30 cm H2O), which can be considered a baseline pressure. Phigh is occasionally interrupted with a brief time at lower pressure (Plow, 0-15 cm H2O). The brief interval at Plow is called release time (Fig. 23-1).
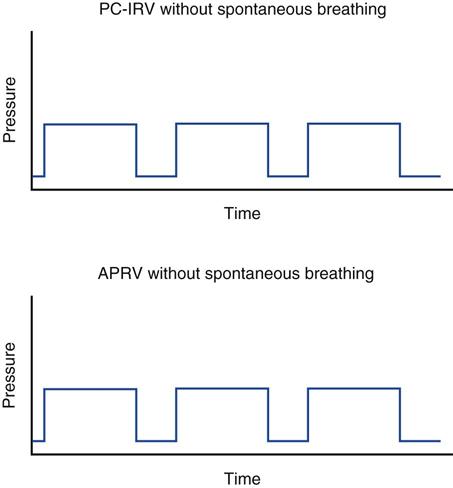
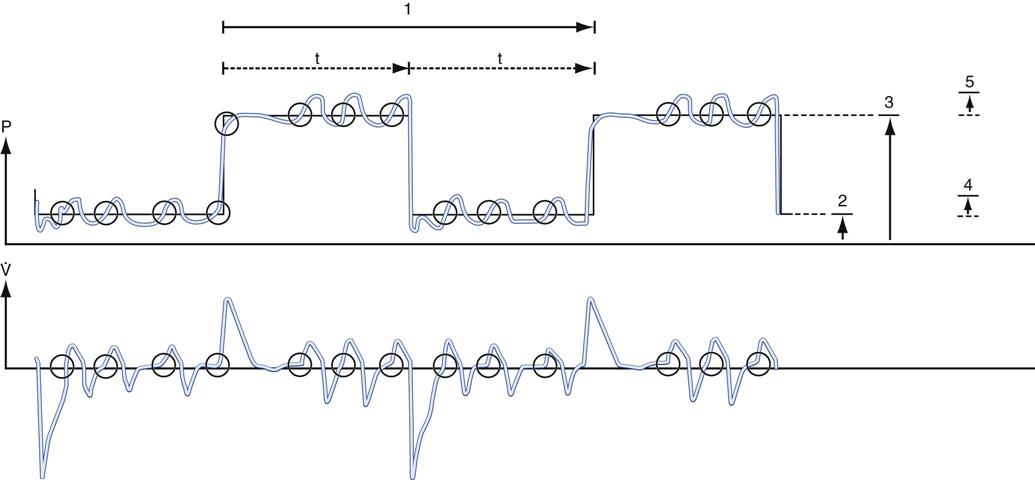
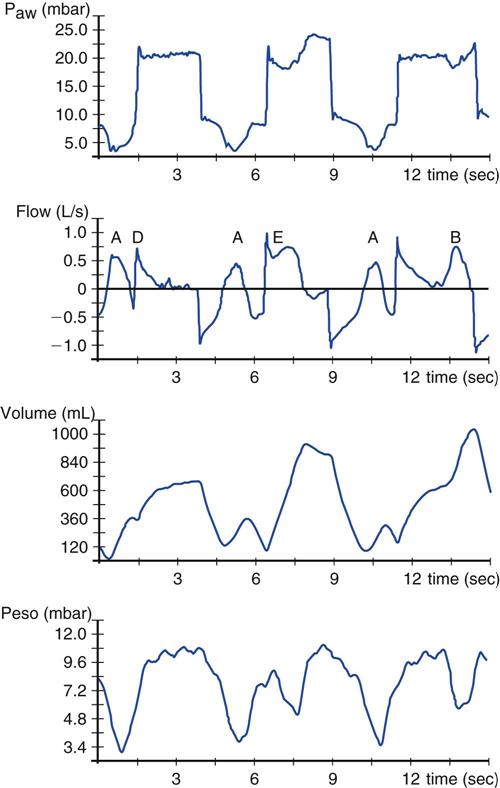
Both the high- and low-pressure levels are time triggered and time cycled when spontaneous efforts are not detected.7 With current generation ventilators, spontaneous breathing can be accompanied by patient triggering. During APRV, if the patient is not spontaneously breathing, the pressure curve looks like pressure-controlled inverse ratio ventilation (Fig. 23-2).8 When the patient is spontaneously breathing, the patient’s breathing activity can monitored on the ventilator’s display, particularly in the flow time and volume time scalars during ventilation (Fig. 23-3).9
Other Names
In Europe, APRV is referred to as bi-level airway pressure (BiPAP).7 It has also been called variable positive airway pressure, intermittent CPAP, CPAP with release, pressure-controlled inverse-ratio ventilation with spontaneous ventilation, upside-down intermittent mandatory ventilation, and biphasic CPAP.7,10,11 In the United States, BiPAP is often used to describe a technique in which intermittent PAP and expiratory PAP levels are set for noninvasive positive-pressure ventilation (NIV), where the inspiratory/expiratory (I : E) ratio is normal.7 (See Chapter 19 for more information on BiPAP with NIV.)
The Dräger Evita was the first ventilator in the United States to provide APRV. Subsequently, other ICU ventilators, such as the Hamilton G-5, the Puritan Bennett 840, the Drager v500, the CareFusion AVEA, and the Maquet Servoi incorporated APRV. Interestingly, each of these manufacturers uses a different terminology for describing the APRV mode. For example, the Servoi refers to APRV as Bi-vent; the Puritan Bennett 840 uses the term Bi-level; and the Hamilton G5 refers to APRV as Duo-PAP. The function of APRV may also be different with each ventilator. For example, the Puritan Bennett 840 Bi-level mode currently allows the setting of one pressure support level during both Phigh and Plow. On the other hand, the Servoi allows two levels of pressure support ventilation to be set independently, one for Phigh and a separate level for Plow. The benefits of pressure support with APRV have yet to be substantiated (Key Point 23-1).7,12
 Key Point 23-1
Because the function of ventilators is frequently changed with the addition of upgraded software versions, clinicians must become familiar with these upgrades on the ventilators they plan to use with patients.
ADVANTAGES Of APRV Compared With Conventional Ventilation
The original concept and the equipment for the application of APRV were first described by Stock et al in 1987.6,13 Subsequent investigations confirmed that APRV produced lower peak pressures, better oxygenation, less circulatory interference, and better gas exchange without compromising the patient’s hemodynamic status compared with conventional ventilation for the treatment of acute lung injury ALI and acute respiratory distress syndrome ARDS.3,4,6,12,14–16 APRV requires a lower minute ventilation than volume-control continuous mandatory ventilation (VC-CMV), suggesting a reduction in physiological dead space.9 It also provides better ventilation-perfusion matching compared with pressure-support ventilation.17 APRV improves gas exchange and lowers peak inspiratory pressure (PIP) in patients with ALI compared with patients receiving volume-controlled inverse-ratio ventilation (VC-IRV).18 When compared with pressure-controlled inverse ratio ventilation, APRV reduces peak and mean airway pressures, increases cardiac index, decreases central venous pressure, increases urine output, increases oxygen delivery, and reduces the need for sedation and paralysis.16,19 APRV also improves renal perfusion and function when spontaneous breathing is maintained.20
Because APRV can reduce airway pressure in patients with ALI/ARDS, it is also thought to be associated with a reduced risk of ventilator-induced lung injury (VILI). (Maximum alveolar pressure should be kept below 30 cm H2O to protect the lung. See Chapter 17 for additional information on VILI.) APRV may recruit consolidated lung areas over time and prevent repeated opening and closing of alveoli.9,12,21,22
Patients receiving APRV have also been shown to require less sedation and analgesia when compared with patients receiving continuous mandatory ventilation. Thus APRV appears to reduce anxiety and pain and improve patient comfort.23,24
Preserving Spontaneous Ventilation
Many of the advantages of APRV are likely attributable to the preservation of spontaneous breathing.1,12,24 For example, spontaneous breathing preserves the cyclic decrease in pleural pressure, which augments venous return, and thereby improving cardiac performance.17,25 Moreover, because the patient can breathe spontaneously, the need for sedation may be reduced.19,23,24
Normally, the mechanical delivery of air tends to ventilate areas receiving the least amount of perfusion. During a positive-pressure breath in a paralyzed patient, the diaphragm is displaced toward the abdomen, with the nondependent regions of the lung receiving the most ventilation. At the same time, dependent areas receive the best perfusion.26,27 Maintaining spontaneous ventilation tends to improve ventilation-perfusion matching by preferentially providing ventilation to dependent lung regions that receive the best blood flow.23,27
During positive-pressure ventilation, atelectasis can occur near the diaphragm when activity of this muscle is absent. However, if spontaneous breathing is preserved, the formation of atelectasis is offset by the activity of the diaphragm.28 In addition, maintaining spontaneous breathing may prevent atrophy of the diaphragm associated with the use of mechanical ventilation and paralytic agents.28 Figure 23-4 illustrates spontaneous ventilation during APRV.
APRV and Airway Pressures During Spontaneous Breathing
In older ventilators, the expiratory valve closed completely during inspiration and was therefore not interactive with the patient. Current ventilators have more active expiratory values, which tend to “float open” when inspiratory pressures slightly exceeds set pressures during pressure-targeted ventilation. As a result, newer ventilators accommodate spontaneous breathing during APRV without pressure build-ups. Because PIP during APRV does not significantly exceed the Phigh level, complications associated with high pressures, such as overdistention of the lungs and reduced cardiac output, may be minimized (the high-pressure limit must still be set at a safe level).
Disadvantages
Because APRV is a pressure-targeted mode of ventilation, volume delivery depends on lung compliance (CL), airway resistance (Raw), and the patient’s spontaneous effort. The patient’s volumes and gas exchange should be closely monitored. APRV does not completely support CO2 elimination; rather, it relies on spontaneous breathing.1,7 With increased Raw (increased time constants) such as occurs in patients with chronic obstructive pulmonary disease (COPD), the ability to eliminate CO2 may be reduced because of limited emptying of the lung during the short release periods.
Another problem is that not all ventilators that have an APRV mode allow for patient triggering of breaths in the phase from Phigh to Plow and Plow to Phigh.29–31 Consequently, some patient discomfort and increased work of breathing may occur during these interval changes.
Limited staff experience with this mode may make its implementation difficult in some cases. Adequate training time and offsite support services and backup from manufacturers are essential. The limited amount of clinical research available about this method of ventilation also makes determining evidence-based application problematic.
Initial Settings21,32,33
When initiating APRV, the practitioner sets two pressure levels and two time levels. The upper level of CPAP is set by using a high pressure or Phigh control. The lower pressure, or release pressure, is set with a Plow control. The duration of Phigh is set by using a timing control commonly called Thigh. The Plow time period is set with a timer for the low time period or a Tlow control.
The respiratory frequency is based on the Thigh and Tlow settings. For example, if Tlow is set at 0.5 second and Thigh is 5.0 seconds, the total cycle time will be Tlow plus Thigh, or 5.5 seconds. The I : E ratio will be 5 : 0.5, or 10 : 1. The respiratory rate will be equal to 60 seconds divided by the total time cycle. In this example, 60 s/5.5 s = 11 breaths/min, or 11 cycles/min.
Tidal volume and flow delivery depend on the same factors that affect VT and flow delivery in pressure-targeted ventilation: lung characteristics, patient effort, and pressure gradient (ΔP = Phigh − Plow). The higher this gradient, the more rapid the expiratory flow during release time and the higher the VT. Minute volume ( ) depends on the patient’s spontaneous effort during all time intervals plus the release interval volume change. Some clinicians suggest a target minute ventilation of 2 to 3 L/min less than the
  on conventional ventilation.21
Setting High Pressure
When changing from a conventional mode to APRV, the settings on the conventional ventilator can serve as a guide to the APRV settings. For example, if the patient’s plateau pressure (Pplateau) is 25 cm H2O during conventional ventilation, an initial setting of 25 cm H2O for Phigh is appropriate. Some clinicians use the mean airway pressure ( ) measured during conventional ventilation for the Phigh setting. Generally, a setting of 15 to 30 cm H2O is used. Phigh generally establishes an
  intended to maintain oxygenation by restoring functional residual capacity. Overdistention of the lung must be avoided, so a Phigh of 35 cm H2O is probably the maximum accepted level.12,21,34 Some practitioners have noted the use of Phigh up to 45 cm H2O, but this level may be damaging to the lungs unless the chest-wall compliance is reduced from abdominal distention or prone positioning.9,21
The use of Phigh may help in the recruitment of collapsed alveoli and the maintenance of these recruited units.18 It can take as long as 8 hours or longer for recruitment to occur. This is reflected in a progressive improvement in oxygenation and CL.18
Setting Low Pressure
Some practitioners recommend initially setting Plow at 0 cm H2O. A Plow of 0 cm H2O allows an unimpeded expiratory gas flow and a rapid drop in pressure.21,32,33
Setting High Time
Thigh is set at a minimum of 4.0 seconds.21,32 Values less than 4.0 seconds can affect the  in a negative way, losing the benefits of the APRV mode. The goal is to create a nearly continuous positive pressure that recruits collapsed alveoli, maintains recruitment, and optimizes oxygenation and compliance.21,32 Thigh can then be progressively increased to 12 to 15 seconds in 0.5- to 2.0-second intervals until the oxygenation target is achieved.21,32 Slow progression is better than the increase of the I : E ratio in large increments, such as 2 : 1 or 3 : 1.5,8,21 For example, if Thigh is 5 seconds and Tlow is 0.5 seconds (a 10 : 1 ratio) and Thigh is changed to 5.5 seconds, the ratio change is small (11 : 1).
Setting Low Time
During the release time, or Tlow, the patient exhales a volume of gas. This allows ventilation and removal of CO2 from the body. As soon as the release time period is complete, the higher level of CPAP is restored. The optimal duration of the release time and the setting of Plow are functions of the time constant of the respiratory system.5 VT depends on the CL, Raw, the duration of Tlow, and the amount of pressure drop.1 Complete exhalation of VT would occur in approximately 4 time constants, but the actual setting of Tlow has conflicting views.
In the late 1980s and early 1990s Tlow settings of 1 to 1.5 seconds were suggested.13,32 It was found that, in patients with ALI, after 1 second complete emptying of the lung occurred and after 2 seconds airway pressures remained stable with no further pressure leaving the lungs. For example, Davis et al35 intentionally increased Tlow to prevent auto-PEEP. They suspected that the presence of auto-PEEP was undesirable. In addition, many early trials with APRV were performed on patients with relatively normal or nearly normal pulmonary compliance, which added the variable of different pathological conditions to the study of Tlow settings.4,13,34 Some studies showed no significant deterioration in oxygenation or lung mechanics with a long release time.30,31 In fact, a release time of 1.0 second or less in some cases resulted in increases in partial pressure of carbon dioxide in the arteries (PaCO2 ) and dead space ventilation, indicating that ventilation was inadequate even when spontaneous breathing was present.2,21,29
What seems to be essential is that Tlow is established on the basis of the patient’s pulmonary condition. For example, in patients with ARDS and ALI, short Tlow settings are appropriate. Too long of a release time would interfere with oxygenation and allow lung units to collapse. In the view of some practitioners, alveolar recruitment is enhanced by preventing complete exhalation in the slower compartments of the lungs, thus producing regional auto-PEEP.21 This may help to maintain an open lung and avoid repeated collapse and reexpansion of alveoli.36–38 Atelectasis in the injured lung can develop in seconds when airway pressure drops below a certain critical value.21,34,39,40 In neonates with ARDS, this time may be as little as 0.2 second.41
Recently, a general consensus for using APRV in patients with ARDS has been to set Tlow between 0.5 and 1.0 second, typically at 0.8 second.21,32,33 The Tlow setting should generate regional intrinsic PEEP (areas of trapped air) and enhance alveolar recruitment.21,36 In actual practice, clinicians tend to rely on the evaluation of the expiratory gas flow waveform. When expiratory flow during a release period is approximately 50% to 75% of peak expiratory flow (T-PEFR), the airway pressure should be allowed to return to Phigh.21,32
It is worth mentioning that Tlow settings vary considerably among patients. Indeed, patients may require different settings as their lung condition changes. Establishing Tlow is therefore not yet an exact science and should be performed with caution and careful patient monitoring.
Adjusting Ventilation And Oxygenation21,32,33
Ventilation and PaCO2 are both determined by the release time and VT exchange during Tlow and by the patient’s spontaneous ventilation. If the PaCO2 is low and the patient’s spontaneous rate is low, the machine rate can be reduced by lengthening Thigh and/or reducing Tlow. This is done until either the spontaneous rate increases significantly or respiratory acidosis occurs. If the patient’s PaCO2 levels rise or tachypnea occurs, the rate can be increased.
If respiratory acidosis occurs, the patient should be evaluated for the level of sedation. It may be appropriate to reduce the level of sedation administered and allow more spontaneous ventilation. Following sedation evaluation and adjustment, if CO2 remains high, an increase in Phigh may be necessary. For example, suppose a patient has a pressure gradient of 20 cm H2O (Phigh – Plow; 20 – 0 cm H2O) and this gradient produces a VT during release of 400 mL. Imagine the patient’s pulmonary edema gets worse and the patient’s lungs are less compliant. For the same pressure gradient, the VT is now 300 mL. The Phigh level needs to be increased to increase the pressure gradient (Phigh – Plow) and effectively increase the VT level. In general, Phigh should not be allowed to increase above 30 cm H2O in order to avoid high alveolar pressures.
Another strategy for improving ventilation is shortening Thigh. A shorter Thigh will result in more releases per minute and increase the patient’s minute ventilation. Increasing Thigh should be done with caution since the Thigh/Phigh combination (higher pressure for a longer time) is what increases the mean airway pressure and the patient’s oxygenation. If Thigh is shortened so that the breath release is increased to more than 12 releases/minute, this may compromise oxygenation.32
Another option for improving minute ventilation is to be sure the release volume is optimized. If T-PEFR is >75% and oxygenation is acceptable, consider increasing Tlow by increments of .05 to 1.0 second increments to achieve a T-PEFR of 50%. The APRV Clinical Scenario below shows an example case of how changing Tlow can increase VT release. Tlow should not be extended to the point where closure of lung units can occurs (derecruitment).
Another alternative is to allow increased PaCO2 levels (permissive hypercapnia) and use sedation because this condition is uncomfortable for the patient. However, APRV patients may not have hypercapnia develop because they can achieve adequate ventilation on their own.
Oxygenation can generally be improved by increasing Phigh or FIO2. Phigh should not exceed 30 cm H2O to avoid overdistention injury to the lung. An additional strategy is to increase Thigh. The increase of Thigh and Phigh increase the mean airway pressure. The clinician should be sure that Tlow is set optimally for the patient. Oxygenation also seems to be enhanced when spontaneous ventilation is present. When maintaining adequate oxygenation is quite difficult, requiring high pressures and high FIO2 values, the prone position may be attempted and may provide improvement.35,37 Once oxygenation has improved, reduction of FIO2 is generally recommended until a value of less than 0.5 is achieved. Then Phigh can gradually be reduced.
 Clinical Scenario
APRV
A 73-year-old patient has severe pulmonary fibrosis and is awaiting a lung transplant. He is on APRV and has a pH of 7.27 and a PaCO2 63 mm Hg. VT during a release, with T-PEFR of 75%, ranges from 190 to 230 mL. Tlow is set at 0.6 sec. Oxygenation is currently acceptable. Tlow is progressively increased to 0.8 (T-PEFR of 50%) and the VT increase to 350 to 375 mL. The resulting ventilation change is a pH of 7.35 and a PaCO2 of 55 mm Hg. This is an example of how lengthening Tlow can result in a higher VT and improvement in ventilation in a patient with respiratory acidosis.
Discontinuation
Withdrawal of APRV can begin once the patient’s lung condition has improved enough so that support can be safely reduced. The technique for reducing support is to adjust Phigh and Thigh. Phigh should be reduced 2 to 3 cm H2O at a time and Thigh lengthened in 0.5- to 2.0-second increments, depending on the patient’s tolerance.32,33 (Simultaneously Tlow may be maintained or reduced.) Phigh is slowly decreased until it meets Plow. Plow may be elevated slightly during the same process. During the lowering of Phigh, some clinicians add pressure support to help compensate the spontaneous breathing efforts.7 Phigh and Plow pressures are intended to meet at the desired baseline, at which time the patient is essentially maintained at traditional CPAP or CPAP + PS. Before switching to CPAP, the Phigh should be approximately 14 to 16 cm H2O or less and the Thigh 12 to 15 seconds (Table 23-1).21,32
TABLE 23-1
Example of Weaning APRV Settings in an Uncomplicated Case of Acute Lung Injury
| Phigh (cm H2O) | Thigh (s) | Plow (cm H2O) | Tlow (s) | Calculated  (cm H2O) (cm H2O) |
| 35 | 4.0 | 0 | 0.8 | 29.2 |
| 33 | 4.5 | 0 | 0.8 | 28.0 |
| 30 | 5.0 | 0 | 0.8 | 25.9 |
| 28 | 5.5 | 0 | 0.8 | 24.4 |
| 26 | 6.0 | 0 | 0.8 | 22.9 |
| 23 | 7.0 | 0 | 0.8 | 20.6 |
| 20 | 8.0 | 0 | 0.8 | 18.2 |
| 18 | 10.0 | 0 | 0.8 | 16.7 |
| 15 | 12.0 | 0 | 0.8 | 14.1 |

APRV, Airway pressure release ventilation; ALI, acute lung injury;  , Mean airway pressure.
Following the final settings, the patient was transitioned to CPAP of 12 cm of water pressure.
From Frawley PM, Habashi NM: Airway pressure release ventilation: theory and practice, AACN Clin Issues 12:234, 2001.
As the patient’s condition improves, compliance will also generally improve. At Phigh under improving conditions, the functional residual capacity is quite high and the patient tries to breathe spontaneously at this high lung volume. Therefore, reducing the Phigh allows the patient to achieve an adequate VT at an appropriate functional residual capacity more easily. If tachypnea or respiratory acidosis occurs, or if the patient uses accessory muscles to breathe, the process should be stopped and the settings adjusted to more appropriate values.
Although APRV promises benefits such as lower PIP, better oxygenation, and reduced hazards associated with high airway pressure, there is minimal evidence to support these benefits.7 However, APRV is worth pursuing because of its potential for lung recruitment and improved ventilation/perfusion ratios, as well as it possibly minimizes the compromising effects of positive pressure on cardiovascular function, particularly in patients with ALI/ARDS.
High-Frequency Oscillatory Ventilation in the Adult
High-frequency oscillatory ventilation (HFOV) has been proposed as an alternative method of respiratory support in adult patients with ALI/ARDS. Although HFOV has been used in the neonatal population for some time, its use in the adult population has only recently begun to gain in popularity. The increased use of HFOV is based on the idea that it offers an alternative method of improving oxygenation in adult patients with ARDS and, at the same time, reduces the risks of VILI.
Theoretically, HFOV by its design helps recruit the lung and avoid lung injury.42–45 VTs with HFOV are quite small, with low alveolar pressures changes. Similarly, mPaw, which is comparable to PEEP, is maintained at an adequate level to recruit the lung while avoiding repeated collapse and expansion of alveoli.43 Overdistention of the lungs is avoided. Chapter 22 reviews the various forms of HFV, their mechanisms of action, and application in the newborn population. This section focuses on HFOV as used in the adult.
Although HFOV has been used since the late 1950s, its use in adults has only recently gained a solid footing in clinical practice.43,44–53 The slow adoption of using HFOV in the management of adults with ARDS may be the result of several factors. First, a commercial high-frequency oscillator with sufficient power to ventilate an adult was not available until the 1990s.54 Second, adult practitioners accustomed to using conventional ventilators were reluctant to use this technology. Indeed, in spite of its popularity among neonatal practitioners, actual outcome benefits of HFOV compared with conventional ventilation remained controversial and not well established.39,55–57
Two early series of case studies used high-frequency oscillation (HFO) in adult patients as a rescue technique following conventional ventilation.57,58 In these studies patients were maintained on high levels of conventional support (high PEEP, high PIP, high Pplateau, and high FiO2) before being switched to HFO. Both studies showed an improvement in gas exchange when patients were switched from conventional ventilation to HFO. Mortality rate in both studies was directly related to the length of time on conventional ventilation.
In a prospective, randomized, controlled trial comparing HFOV and pressure-control ventilation in adults with ARDS, HFOV was as effective and safe as pressure-control ventilation. The 30-day mortality rate for patients in the HFOV group was 37%, and the mortality rate for patients receiving conventional ventilation was 52%. Although better survival appeared to occur in the HFOV group, this finding was not statistically significant.59
Evidence that clearly demonstrates improved survival in adults with ARDS using HFOV is not currently available. Although HFOV may improve PaO2 in some patients and thereby allow FIO2 to be lowered, this improvement may only be transitory.60
Technical Aspects
High-frequency oscillatory ventilation is a method of HFV in which gas is oscillated at high frequencies (3-15 Hertz). The SensorMedics 3100B high-frequency oscillatory ventilator (SensorMedics, a division of CareFusion, Viasys Corp, Yorba Linda, Calif) is an example of an adult HFO currently available. It was approved by the Food and Drug Administration (FDA) for the U.S. market and introduced in 2001. Technical aspects of this specific ventilator are described elsewhere.61
In the 3100B, HFOs are produced by a reciprocating piston. The resulting flow waveform is an approximation of a sine wave (Fig. 23-5). With HFOV, pressure is positive in the airway during the inspiratory phase (forward stroke) and negative during the expiratory phase (return stroke). Thus both inspiration and expiration are active, resulting in bulk flow rather than jet pulsations.
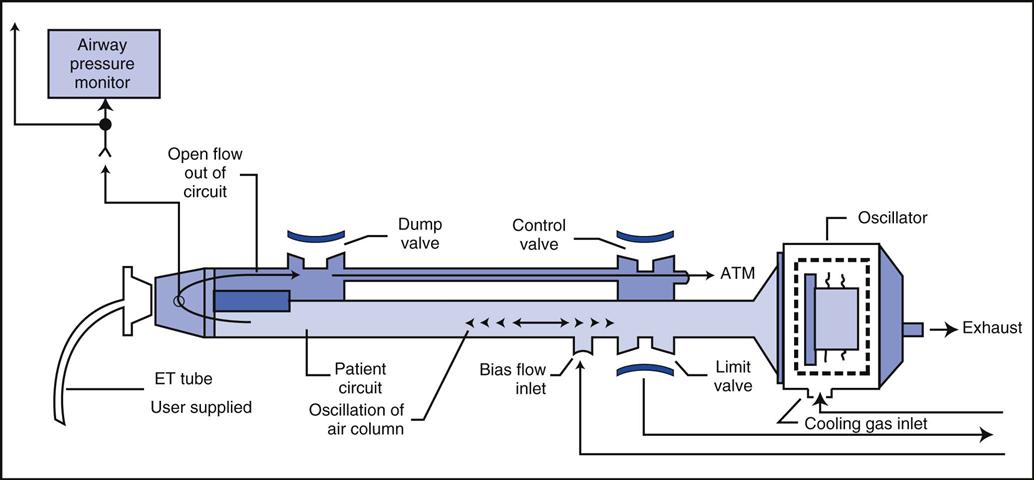
The diaphragm-shaped piston used in this device is magnetically driven, much like a stereo speaker. Gas is oscillated back and forth by the action of the diaphragm. The amplitude of the wave, which is set by the power control, determines the forward and backward excursion of the piston and thus helps determine VT. A low-compliance plastic circuit provides humidified bias flow of gas to the patient (Fig. 23-6).
Initial Control Settings
Because the use of HFOV is still being researched, the following recommendations for initial settings come from available published studies.54,55,59
Parameters that are set in HFOV include the following:
• mPaw (analogous to  on conventional ventilation)
• Power (the peak-to-trough pressure difference generated by the piston movement)
Maximum Airway Pressure
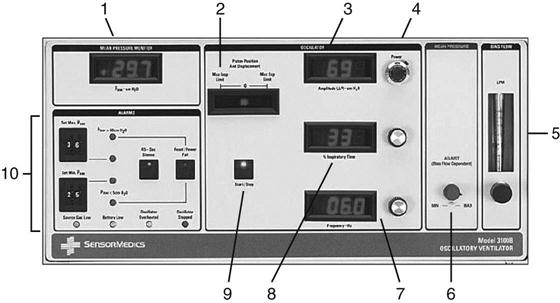
The mPaw is a direct control located on the front panel of the SensorMedics 3100B (Fig. 23-7). It is generated by a continuous flow of gas past the variable resistance of a mushroom valve. In the 3100B, the balloon or mushroom valve is located in the expiratory limb of the circuit (see Fig. 23-6). As the balloon is inflated, the outflow is restricted and the airway pressure increases. mPaw must be kept at the target value because it can drift. This drift can occur when other controls that affect mPaw are changed.
The mPaw directly affects PaO2 by changing lung volume. Initially, mPaw is set at 3 to 5 cm H2O above the observed  during conventional ventilation. A starting range is typically 25 to 30 cm H2O As the mPaw is increased, the volume in the lungs increases and the patient’s diaphragm is displaced downward. For example, one goal of mPaw in the neonatal population is to position the diaphragm between the eighth and ninth thoracic vertebrae on a chest radiograph. This position usually correlates with good lung expansion and an acceptable PaO2; it may also correlate with adequate lung expansion in the adult, that is, visualization of the ninth posterior rib above the level of the diaphragm in the midclavicular line on the chest radiograph.59,62 The mPaw should not be reduced during the first 24 hours to allow an adequate time for as many lung units as possible to be recruited. An exception to this is if mPaw is initially set too high. As previously mentioned, assessment of mPaw is done by observing the expansion of the thorax on a chest radiograph (Key Point 23-2). If hemodynamic monitoring is being used, further assessment of mean arterial pressure may include determining the ability of the right side of the heart to fill in the presence of the continuous high pressure in the thorax.
 Key Point 23-2
Wide swings in the mPaw value during ventilation might indicate leaks in the system, water in the expiratory circuit, or that the patient is making spontaneous breathing efforts.
Establishing appropriate mPaw during HFOV has been studied in an animal model.63 Setting mPaw at 1.5 times the lower inflection point of a static pressure-volume curve was sufficient to reestablish pre–lung injury PaO2.
Amplitude
Amplitude is adjusted by the power control and influences ventilation (PaCO2). The power control to the piston sets the amount of piston displacement and resulting amplitude of the oscillating waveform (Fig. 23-8).64 As amplitude is increased, the pressure gradient (ΔP) increases and VT increases. (In HFOV, the equation dictating ventilation is not f × VT, but f × VT2.)62 Adjusting the power control changes the amount of power going to the piston and the amount of piston displacement or forward-backward movement. Piston displacement affects ΔP created by a piston (oscillator) excursion (see Fig. 23-6). The settings control panel ranges from 1.0 to 10. It is adjusted by using a control located adjacent to the amplitude readout (see Fig. 23-7). A starting power setting of 6 to 7 is typical for adults. The appropriateness of the power setting is determined by observing chest-wall movement or “chest-wiggle factor” (CWF). Increased amplitude is also associated with increased chest wall movement. The CWF should be visible from the level of the clavicle to the mid-thigh. (Assessment of chest wiggle is difficult in obese patients.) Placing a pencil or tongue depressor on the leg at the mid-thigh level may provide a visual indicator of the wiggle at thigh level. In practice, some clinicians have found that a setting that results in a ΔP of 60 to 70 cm H2O around the mPaw settings is a good starting point until arterial blood gas (ABG) results can be obtained.64 Another recommended starting point for amplitude used by some clinicians is to determine the PaCO2 before HFOV and add 20 to this value. For example, if PaCO2 on conventional ventilation was 60 mm Hg, starting amplitude will be 80.
In addition to the actual power setting, other factors that affect the amplitude include the endotracheal tube (ET) size, Raw, and CL. Any changes in Raw and CL will affect the amplitude delivery.65 For example, at a specific power setting, a measured amplitude increase could be caused by an increase in Raw or a decrease in CL. The amplitude measured at the airway is significantly higher than the pressures delivered to the lung. The pressure delivery is attenuated by the ET, the branches of the bronchial tree, and the distance from the piston.
Frequency
The frequency setting controls the time allowed for the piston to move forward and back. It is a secondary control for ventilation. The available range is 3 to 15 Hz (180-900 cycles/min). Reducing the frequency causes a greater volume displacement and thus a larger VT and higher  . Conversely, increasing the frequency results in a smaller volume displacement and a smaller VT and lower
  . An initial setting for an adult is 5 to 6 Hz (300-360 cycles/min). One management strategy to reduce PaCO2 is to lower the frequency setting. It is not typically set lower than 3. Generally, once the frequency is established, it is usually not changed during the course of treatment. Occasionally some clinicians may change the frequency after changes in amplitude are made in an effort to alter the patient’s
  (low frequency tends to increase
  , and high frequency tends to decrease
  ).
).
Inspiratory Time Percent
The inspiratory time percent (TI%) represents the portion of the respiratory cycle that the piston spends in a forward motion. An initial setting of 33% (I : E of 1 : 2) is usually appropriate for an adult. The TI% control may also assist in CO2 elimination, but to a lesser extent than amplitude and frequency. For some patients, a TI% of 50% may improve ventilation (CO2 removal) and lung recruitment. Once this parameter is set, it is generally not changed.
Bias Flow
The bias flow control is usually the first parameter set when starting HFOV. A typical range for an adult is 25 to 40 L/min (e.g., 30 L/min). Changing the bias flow affects mPaw. If flow is inadequate, the set mPaw cannot be reached. Low flow may result in an increase in PaCO2 from inadequate washout of exhaled gas. If set bias flow is too high, it may inhibit carbon dioxide elimination from the dampening of active exhalation. The backward motion of the piston is responsible for active exhalation (Key Point 23-3). With a high bias flow the piston may only remove air from the circuit. This may also increase the PaCO2 and result in auto-PEEP.
 Key Point 23-3
In HFOV, during the expiratory phase the backward movement of the piston actively moves air out of the system.
Additional Settings
The FIO2 is usually set at 1.0 and decreased in increments of 0.1 (range, 0.05-0.10), as tolerated, to maintain the target range for PaO2 or oxygen saturation (SpO2) FIO2 may also be set similar to the way it is set with conventional ventilation and titrated based on SpO2 and ABGs. An ABG should be obtained 30 to 60 minutes after any change in mPaw, amplitude, or frequency.59
Before transferring a patient from a conventional ventilator to the oscillator, the FIO2 may be increased to 1.0. After transfer, a recruitment maneuver (RM) is recommended because the patient is briefly disconnected from the ventilator ( Box 23-1).64,65 Anytime the patient becomes disconnected, the recruitment maneuver (RM) should be repeated. Some institutions perform an RM on a regular basis, such as every 12 hours, if an FIO2 of more than 0.4 is required to maintain oxygenation. This would be appropriate as long as the patient responded to an RM with an improvement in oxygenation (Key Point 23-4).54
 Key Point 23-4
Lung recruitment may be an important aspect of HFOV, whether HFOV is being used as a rescue technique or as a primary mode to prevent VILI.
A few hours after initiation of HFOV, a chest radiograph should be obtained to determine the appropriateness of the mPaw setting. The chest radiograph is taken while the piston is turned on because the information desired is how well recruited the lungs are on the current setting. If more than 11 posterior ribs are showing, mPaw needs to be slowly decreased in increments of 2 cm H2O until an appropriate inflation point is reached.
Indication And Exclusion Criteria
Patients with ARDS weighing at least 35 kg and who are not responding to mechanical ventilation may be candidates for HFOV. Failure may be defined as the presence of unresponsive severe hypoxemia (FIO2 > 0.6; PEEP 10 cm H2O or more, with a PaO2 of 65 mm Hg or less) or a significant risk of VILI.59 Indications for HFOV depend on the institutional policy. Additional indications might include the following:
Criteria for the use of the SensorMedics 3100B HFO are listed in Box 23-2. One current exclusion criterion involves patients requiring aerosolized medications. Use of the small-volume ultrasonic-type nebulizers or a vibrating mesh nebulizer may provide a solution to the problem of aerosol delivery during HFOV.66 Further study of this topic is certainly warranted.
Monitoring, Assessment, And Adjustment
Before use, the oscillator should be calibrated according to the manufacturer’s recommendations. Because patients need to be suctioned regularly (at least every 12 hours), a closed-suction catheter system is placed in the patient circuit. The connection for a closed-suction catheter is typically placed at a right angle in the circuit. This may affect the oscillatory pressure waveform; therefore chest excursions need to be assessed after placing the system in the circuit. A suction catheter is still needed to help maintain airway patency. Some clinicians use an oxygen analyzer inline to provide continuous monitoring of delivered FIO2.
The 3100B uses a standard heated humidifier with a closed feed system to maintain water level, which can provide adequate humidification. The water-feed system needs to be pressurized to keep water flowing into the device. Humidification can be verified when condensate appears at the distal end of the inspiratory circuit. The circuit should be kept free of water. Because of condensate, frequent checking of the circuit is required.
To transition from conventional ventilation to HFOV, sedation and analgesics may be required. The patient is sedated because vigorous spontaneous breathing efforts should be avoided during HFOV. A strong spontaneous inspiration may reduce circuit pressures below 5 cm H2O, which can result in desaturation. A drop in pressure this low would also trigger a disconnect alarm and shut off the oscillator piston. For this reason patients are typically sedated with a combination of benzodiazepines (e.g., midazolam) and a narcotic (e.g., fentanyl).60,64 Paralysis with such agents as pancuronium, cisatracurium, or vecuronium may also be required, particularly for the first 30 minutes or so of the procedure. (See Chapter 15 for information on these medications.) When a paralyzing agent is used, train-of-four monitoring is recommended to reduce the risk of prolonged neuromuscular blockade. Ulnar nerve placement avoids the chest, upper air area, and thigh areas—where wiggling is present—and might interfere with monitoring. (See Chapter 15 for information on train-of-four monitoring.)
Once the patient is receiving HFO, the clinician should listen for bilateral breath sounds to determine whether the intensity of breath sounds is equal over both lungs. A reduction in intensity may indicate a pneumothorax or malpositioning of the ET. Breath and heart sounds may be difficult to hear, so other forms of assessment should be performed (e.g., determination of CL) once HFV is initiated. To check heart sounds, the piston must be momentarily stopped while the CPAP level is maintained. Disconnecting the patient would cause derecruitment of the lungs and is therefore not recommended (Case Study 23-1).
 Case Study 23-1
Patient Assessment During HFOV
A patient being ventilated by HFOV exhibits a sudden drop in SpO2, a reduction in chest-wiggle factor (CFW), tracheal deviation to the left, and a sudden drop in mPaw. What is the most likely cause of these sudden changes?
See Appendix A for the answer.
Chest-wiggle factor (CWF) should also be checked hourly. CWF may change with ET obstruction, right mainstem intubation, a pneumothorax, or an accidental extubation.55
Rotation of the patient is more difficult with HFOV than during conventional ventilation and must be done cautiously so as not to disconnect the patient or cause an accidental extubation. A circuit disconnect with a loss of pressure will cause the oscillator to stop. For this reason, a manual resuscitator with a PEEP valve attached should be kept at the bedside. (Note: A circuit disconnect may occur where the expiratory valve tubing attaches to the circuit.64) Continuous lateral rotation may be safely accomplished by using a specialized bed (e.g., RotoRest, KCI Medical, Oxon, UK).
Adjusting Settings To Maintain Arterial Blood Gas Goals
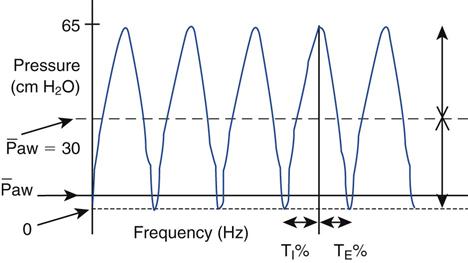
Oxygenation during HFOV is achieved primarily by maintaining the mPaw at a level sufficient to obtain optimal lung inflation.59 At a set level of amplitude, increases in mPaw result in increases in lung volume and available alveolar surface area. As long as cardiac output is not adversely affected, oxygenation generally improves (Fig. 23-9). (See Chapter 13 for lung recruitment strategies.) Conversely, decreases in mPaw result in a decrease in oxygenation if lung derecruitment occurs.
Stay updated, free articles. Join our Telegram channel

Full access? Get Clinical Tree


