CHAPTER 5 “The beginning is half of everything.” —Pythagoras The process of planning and obtaining percutaneous vascular access follows certain rules, and these rules should be followed in order to decrease the rate of potential complications.1-3 Three major, obligatory rules for every operator to follow are: (1) adequate knowledge of the medical history of the patient; (2) knowledge of the anatomy of the access site; and (3) focused preprocedural cardiovascular examination, with special attention on presence, strength, and quality of distal pulses, presence of bruits at arterial access sites, and presence and character of symptoms of intermittent claudication. The choice of access site depends on factors that can be divided into patient-specific and operator-preferred choices (Table 5.1).4-6 Aortic aneurysmal disease is not an absolute contraindication to femoral access, but it is generally recommended to use brachial or radial access as an alternative. TABLE 5.1Advantages and disadvantages of radial, brachial, and femoral access sites for left heart catheterization and angiography.
Vascular Access
Percutaneous Vascular Access
ADVANTAGE | DISADVANTAGE | |
Radial artery |
|
|
Brachial artery |
|
|
Femoral artery |
|
|
Femoral Artery Approach
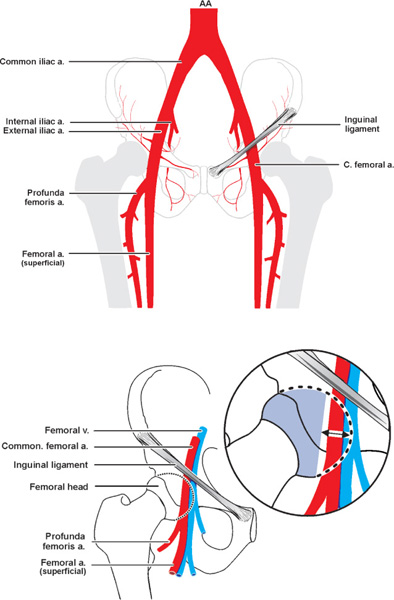
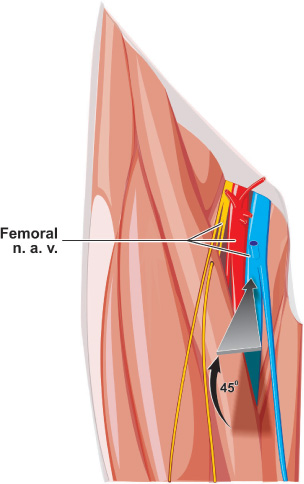
The right or left common femoral arteries are often used as vascular access sites for percutaneous diagnostic cardiac catheterization. It is recommended to avoid femoral access in patients with known, complex artificial aorto-ileo-femoral grafts, large abdominal aneurysms, and severe peripheral vascular disease. Femoral artery access should be also avoided on the side where a decreased femoral pulse is associated with auscultatory bruits and a history of intermittent claudication involving the thigh and gluteal muscles. If both right and left femoral arteries are adequate for cannulation, the right femoral artery is usually chosen as the preferred site of entry due to general convenience. Hair at an access site is removed before the procedure with electric clippers or a depilatory cream. Both inguinal areas are prepared and draped under sterile conditions. The operator identifies anatomical landmarks such as the anterior superior iliac spine and the os pubis. The inguinal ligament outlines the imaginary line connecting the above two structures in nonobese patients, and the point of maximal impulse of arterial pulsation is usually located between one-third and one-half of the distance from the medial end of the inguinal ligament (Figure 5.1). At this anticipated puncture site, an operator places the tip of the “mosquito” forceps and obtains a fluoroscopic image of the femoral head (this is especially indicated in obese patients, in whom the inguinal crease orientation may lead to a lower arterial stick). In the majority of adults, the common femoral artery bifurcates caudal to the middle of the femoral head, so the point above the middle of the femoral head and below the level of inguinal ligament is the optimal place for puncture. The operator places the tips of the four fingers of his hand over this area in order to localize the point of maximal impulse of the arterial pulse. Further tuning is done by placing the site of the maximal arterial impulse in between the tips of the index and middle fingers of the other hand. The path of the common femoral artery is outlined by positioning the tips of the index and middle fingers, slightly spread apart perpendicular to the patient’s inguinal ligament, in such a manner that the point of maximal arterial impulse is projected in the center of the imaginary line connecting the tips of those fingers.
The patient is notified that he/she might feel a needle stick accompanied by a burning sensation in the groin area, caused by the local anesthetic. Injection of the skin after localizing the site of arterial access gives the operator an opportunity to be more accurate and use less anesthetic to provide adequate local anesthesia. The skin and superficial tissue over the access site is anesthetized with a 25-gauge needle containing 5 mL of 1% warm lidocaine solution (warming the solution and mixing it with sodium bicarbonate in 10:1 proportion decreases the patient’s discomfort). If the patient is slim, this is all that is needed. Otherwise, a 22-gauge needle and additional 10 mL of the anesthetic may be required. Care should be exercised in not injecting the anesthetic into the vascular structure. If a patient feels pain at the site of access at any point while the operator is attempting to obtain access, additional anesthetic is delivered locally. If the pain is extremely sharp and radiating down into the leg, no anesthetic should be injected; instead, the needle should be immediately withdrawn and repositioned medially to avoid femoral nerve damage. After the tissue is anesthetized, 2 possible approaches (with and without early subcutaneous tunnel creation) to cannulate the common femoral artery are used. The method of choice for cannulation depends on the operator’s preference. A single anterior arterial wall stick should be the goal. In one method, the operator lightly holds an 18-gauge (0.049 inch in diameter), open-bore arterial access needle at the hub with the thumb and index fingers of the right hand (middle finger sometimes used to provide support for the needle), and inserts the needle at a 45-degree angle with the bevel pointed upwards through the skin above the maximum arterial impulse resting between the left index and middle fingers (Figure 5.2A). The operator considers the patient’s body habitus since it will affect the horizontal distance between the skin puncture site and the arteriotomy site, with thinner patients having a significantly shorter distance in comparison to obese individuals. This distance needs to be taken into account to prevent a high stick in obese patients. As the tip of the needle is gently advanced through the subcutaneous tissue, the operator tries to feel the arterial pulsation transmitted from the anterior wall of the artery to the needle hub. Up-and-down motion of the hub suggests correct passage towards the anterior surface of the artery; the needle should be gently advanced until a strong pulsatile blood return is observed, which suggests successful entry into the arterial lumen. When this occurs, the operator should avoid advancing the tip of the needle further. Side-to-side movements of the needle hub indicate that the needle has passed medial or lateral to the artery, and the needle needs to be withdrawn. When the tip of the needle is in the lumen of the common femoral artery, the J-tip 0.035-Fr guidewire is inserted and advanced through the needle into the vessel lumen (Figure 5.2B).
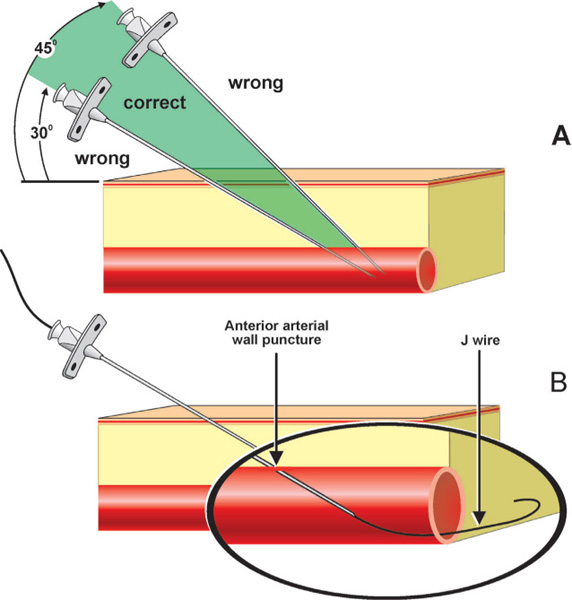
FIGURE 5.2Correct angle of entry into the artery is shown in Panel A and insertion of the guidewire in Panel B.
The needle is removed after a small nick of the skin is made with a scalpel at the level of needle entrance in order to ease the subsequent insertion of the sheath or dilator over the guidewire into the arterial lumen by gentle rotational movement. Once the sheath is appropriately positioned, the dilator and the guidewire are removed and cleaned. Approximately 2–3 mL arterial blood is aspirated through the sheath, and the sheath is flushed with 8–10 mL normal saline. The sheath side port is then connected to the manifold for femoral artery pressure recording.
When using a micropuncture needle after the access area is properly sterilized and anesthetized, the 21-gauge needle is inserted into the common femoral artery at 45 degrees. The stick should be neither too high nor too low in relation to the femoral head. When the artery is punctured, the backflow is not as pulsatile as with the 18-gauge needle. Next, a floppy-tipped, 0.01-inch guidewire is inserted through the needle and advanced into the artery under fluoroscopic guidance. The wire should appear free and mobile to ensure that it is in the vessel lumen. If the stick height is not optimal, then the needle and wire can be easily removed. After 3 minutes of manual pressure, access can be reattempted. When the 0.01-inch floppy wire is advanced into the common iliac artery, the needle is removed. Next, a 4-Fr micropuncture sheath with a 3-Fr dilator is advanced over the wire into the femoral artery. The wire and dilator are then removed from the sheath, and a regular 0.03-inch guidewire is inserted into the micropuncture sheath and advanced into the distal aorta. The micropuncture sheath can then be replaced with a standard sheath.
Brachial Artery Approach
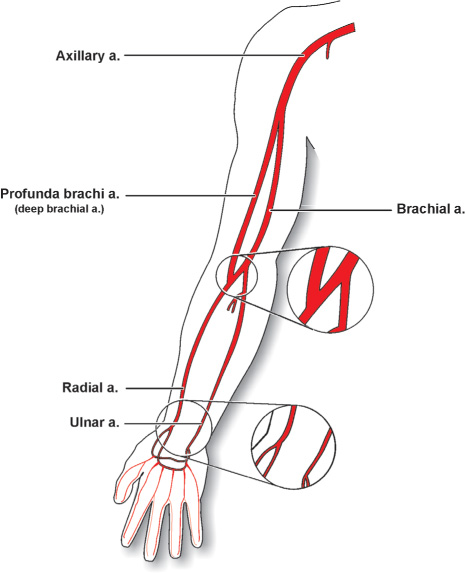
The right or left brachial artery can be used as access sites for percutaneous diagnostic cardiac catheterization.7 The left brachial artery is used by operators who prefer Judkins catheters, and the right brachial artery is usually chosen by operators who are accustomed to using multipurpose catheters. With right brachial access, the operator avoids the flow path of the left carotid artery with its potential risks; it is also more convenient for an operator, and the exposure to radiation is less.
When the site of access is prepared and draped under sterile conditions, the operator palpates the distal brachial artery slightly above the antecubital fossa (point of maximal impulse is usually located 1 cm above it) (Figure 5.3). The artery is superficial and fixed at this level, which makes it easy to access and to securely compress against the humerus if needed. Further tuning can be done as described for accessing the common femoral artery. The skin and superficial tissue over the access site is anesthetized with a 25-gauge needle containing 3–5 mL of 1% warm lidocaine solution. If the patient feels pain at the site of access at any point while attempting to cannulate the brachial artery, additional anesthetic should be delivered. If the pain is extremely sharp and radiating down into the arm, no anesthetic should be injected; instead, the needle should be withdrawn immediately and repositioned laterally to avoid median nerve damage. To cannulate the brachial artery, a single anterior arterial wall stick should be made. Some operators prefer to use a micropuncture kit with a 21-gauge access needle, but the standard 18-gauge access needle can also be used. The rest of the brachial access steps are routine and described with the femoral approach. Heparin 40 units/kg bolus should be administered intravenously as soon as access is obtained and anticoagulation time (ACT) checked to keep it > 200 seconds to avoid sheath thrombosis. To prevent arterial spasm, 100–200 mcg nitroglycerine or 3.0–5.0 mg of verapamil is injected into the artery through the side port of the sheath.
Radial Artery Approach
Prior to proceeding with accessing the radial artery, the Allen test can be performed to check if the palmar arch is intact.4 Ideally, in order to increase the validity of the test, pulse oximetry and plethysmography are utilized. The operator palpates the radial and ulnar arteries on the arm planned for the procedure. A pulse oximetry monitor is attached to the patient’s index finger; wave amplitude and oxygen saturation are observed and noted at baseline. The patient is asked to lift the tested arm and clench the fist, at which point the operator compresses both the ulnar and radial arteries, causing the disappearance of plethysmography waves. This maneuver allows the blood to drain from the hand. The hand subsequently is lowered, the fist is opened, and pressure over the ulnar artery is released. The Allen test is abnormal if ≥10 seconds are required for return of color to the hand. Plethysmography is observed for 2 minutes following release of the ulnar artery compression. The loss of pulse tracing with no recovery suggests an abnormal test and may suggest inappropriateness for radial catheterization, although this has become questionable after recent studies.8,9
After the site of access has been chosen, the patient’s arm is abducted, and the wrist is hyperextended and fixed. The needle access site is prepared and draped under sterile conditions. The operator informs the patient that the procedure is starting. If the patient feels pain at any time during the procedure, he/she is instructed to notify the operator. The operator palpates the radial artery and identifies the point of maximal impulse, which is usually located 1 cm from the styloid process, where the artery is superficial and can be securely compressed if needed (Figure 5.3). Further tuning is done by placing the site of the maximal arterial impulse between the tips of the index and middle fingers. At this point, the operator keeps the tips of the fingers slightly spread apart, maintaining mild, steady pressure outlining the path of the radial artery. The skin and superficial tissue over the access site are anesthetized with a 25-gauge needle containing 2–3 mL of 1% warm lidocaine solution. To cannulate the radial artery, the operator holds a 1.5-inch, 21-gauge needle lightly at the hub with the thumb and index fingers of the right hand (middle finger sometimes used to provide support for the needle), and inserts the needle at a 45-degree angle with the bevel pointed upwards through the skin at the site of maximal impulse between the left index and middle fingers.
The access needle is advanced until the initial pulsatile flow stops. Then the needle is slowly withdrawn to observe the return of pulsatile flow. Once the tip of the needle is in the arterial lumen, the J-tip, 0.02-inch, short guidewire is inserted and advanced through the needle into the vessel. The needle is then removed, and the 5-Fr Terumo pinnacle sheath on a dilator is advanced over the wire into the arterial lumen. To prevent arterial spasm, 3–5 mg of verapamil or 100–200 mcg nitroglycerine should be injected into the radial artery through the side port of the sheath. Heparin 40 units/kg bolus should be administered as soon as access is obtained in order to avoid sheath thrombosis.
Femoral Vein Approach
The right or left femoral vein is often used as access sites for diagnostic right heart catheterization (Figure 5.4) in the cardiac catheterization laboratory. The right femoral vein usually is chosen for general convenience. Identifying the position of the femoral vein in relation to the common femoral artery by vascular ultrasound prior to proceeding with cannulation is highly recommended.10 After both of the patient’s inguinal areas are appropriately prepared and draped under sterile conditions, the operator localizes the femoral arterial pulse as described above. The venous access site will be about 1.0–1.5 cm medial to and 1 cm inferior to the arterial pulsation. The skin and superficial tissue over the access site is anesthetized with a 25-gauge needle containing 5 mL of 1% warm lidocaine solution. After the tissue at the access site is well anesthetized, an 18-gauge needle connected to a 10 mL syringe with 2 mL of 1% lidocaine is inserted through the skin and is advanced at a 45- to 60-degree angle to the frontal plane with the tip pointing cephalad while a constant back pressure is maintained on the syringe. A single anterior venous wall stick should be the goal. Meanwhile, tips of the operator’s other hand’s fingers maintain mild, steady pressure outlining the path of the common femoral artery. When venous blood flow into the syringe is observed, the syringe is tilted down to 30 degrees to the skin level and free aspiration of blood reconfirmed. The syringe is disconnected from the needle hub, and the operator ensures that blood return persists and is not pulsatile. The J-tip, 0.035-inch guidewire is inserted and advanced through the needle up into the vessel lumen. The needle is removed, and a small nick of the skin at the level of the guidewire entrance is made with a scalpel in order to ease the insertion of the 7- to 8-Fr sheath into the vein.
Stay updated, free articles. Join our Telegram channel

Full access? Get Clinical Tree


