Every procedure performed in the cardiac catheterization laboratory has its own indications and contraindications. The same can be said about right heart catheterization (Tables 10.1 and 10.2). The majority of right heart catheterization procedures are done with a multilumen, 7- to 8-Fr, balloon-tipped flotation catheter with thermodilution cardiac output measurement capabilities.1,2 Prior to insertion, the operator checks the balloon for the presence of an air leak by inflating it under water, flushes the lumen of the catheter, zeroes the pressure transducer at the level of the mid right atrium, and ensures that no air bubbles are present in the tubing or in the catheter after its distal port is connected to the pressure transducer (to avoid “underdamped” or “overdamped” pressure tracings). Recorded pressure will be too low if a transducer is positioned too high and vice versa; for every inch that the heart is away from the reference point of the transducer, a 2 mm Hg degree of error will be introduced.
TABLE 10.1Indications for diagnostic right heart catheterization.
INDICATION | NOTES |
Acute myocardial infarction | Complicated by hypotension, HF, sinus tachycardia, RV infarction, or mechanical complications (VSD, tamponade, or acute MR) |
Assessment of volume status | When physical examination is unreliable |
Severe left ventricular failure | To guide inotropic, diuretic, and afterload reduction management |
Differentiation between various shock states | Cardiogenic, distributive, or hypovolemic; and guidance for therapies |
Risk stratification for patients during heart transplant evaluation | |
Cardiac tamponade | Although Echo is the diagnostic test of choice, PA cath may be used when Echo is not readily available or Echo findings are not diagnostic and risk or difficulty of pericardiocentesis is high. |
Assessment of level and magnitude of intracardiac shunt | Especially if TTE is nondiagnostic |
Differentiation between constrictive and restrictive cardiac physiology | |
Severe pulmonary hypertension |
TABLE 10.2Contraindications to diagnostic right heart catheterization.
ABSOLUTE | RELATIVE |
Right-sided endocarditis | Coagulopathy (INR > 2, platelets < 20 × 103/mm3) |
Mechanical tricuspid or pulmonic valve | Bioprosthetic tricuspid or pulmonic valve |
Thrombus or tumor in right heart chamber | Newly implanted pacemaker or defibrillator (unless fluoroscopic guidance is used) |
Terminal illness for which aggressive management is futile | LBBB (temporary pacing should be available) |
If left bundle branch block is present on the ECG, the right heart catheterization procedure should be done with extreme caution in order to avoid iatrogenic right bundle branch block that could result in complete heart block. It is recommended to have a temporary pacemaker ready in case a prolonged episode of iatrogenic complete heart block develops. After all appropriate preprocedure preparations are completed, the operator advances the tip of the catheter through the 7- to 8-Fr venous sheath up to the 20-cm mark on the catheter prior to inflating the balloon. This ensures that the tip of the catheter passes the tip of the sheath. It is extremely important to refrain from advancing the catheter if resistance is noted due to the risk of vessel perforation. After the balloon is inflated successfully and pressure is recorded, the operator advances the catheter antegrade toward the right heart under fluoroscopic guidance.
Femoral Vein Approach
When utilizing the femoral vein approach, the catheter is advanced through the inferior vena cava (IVC) towards the right atrium (RA) and subsequently into the superior vena cava (SVC) (Figure 10.1). While navigating the catheter through the IVC with the inflated balloon, deviation of the catheter tip from its paraspinal position may suggest entry into a branch vein (hepatic, renal).
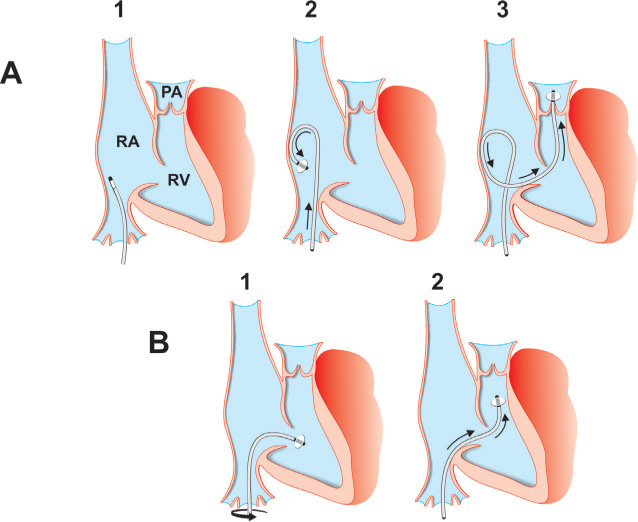
FIGURE 10.1The drawings show two approaches to accessing the pulmonary artery with a Swan-Ganz catheter via the femoral approach. Panel A: While in the RA, the Swan-Ganz catheter is torqued to direct the tip towards the lateral wall of the RA and is advanced until the tip touches the atrial wall. Further advancement of the catheter builds a loop that points its tip t towards the tricuspid valve, The catheter passes through the valve into the RV and PA upon further advancement. Panel B: The catheter tip is turned toward the patient’s left side by clockwise torque, positioned in the lower part of the RA towards its anteromedial wall, and advanced across the tricuspid valve into the RV. Next the catheter is torqued clockwise so that the tip turns cranially towards the RVOT.
To correct this error, the operator withdraws the catheter, torques it slightly, and then advances it. In order to place the catheter into the SVC, the operator slowly torques the catheter counterclockwise in PA view and directs the tip to the lateral wall of the RA (Figure 10.1A). Subsequent additional counterclockwise rotation and gentle advancement usually allows passage of the catheter tip into the SVC, which is contiguous with the posterolateral wall of the RA. These slow, step-by-step, counterclockwise (half-turn) rotations should be done using the fingers of both hands, with the right hand on catheter hub adaptor, and the left hand assisting in turning of the catheter near the end of the venous sheath. After each turn, a small amount of time is allowed for transmission of the torque that is applied at the base of the catheter. This step-wise rotation allows the operator to avoid catheter over-torqueing and kinking. To facilitate this process, minimal “in-and-out” movement of the catheter is performed. If this maneuver turns out to be unsuccessful, the operator disconnects the proximal end of the right heart catheter from the manifold and advances the J-tip, 0.025-inch guidewire through the catheter under fluoroscopic guidance. The operator places a 3-way stopcock on the proximal end of the guidewire and locks it to allow for easier torque of the wire, if needed, and to prevent the guidewire from being lost. After this is done, the operator slightly deflates the balloon and, while turning the catheter, probes for the ostium of the SVC by gently advancing and withdrawing the tip of the wire under fluoroscopic guidance. When the wire is safely positioned in the SVC, the right heart catheter slides over it and is placed near the junction of the innominate vein. This is followed by removal of the wire, with subsequent aspiration and flushing of the catheter, and SVC pressure recording.
Next, the operator aspirates from the distal port of the right heart catheter 1–2 mL blood, then sequentially attaches three 5-mL heparinized syringes to the manifold and aspirates 1–2 mL of blood from the SVC into each of those syringes to measure mean oxygen saturation. The catheter is flushed and withdrawn towards the lower SVC (near the junction with the RA), where the above-described procedure of obtaining blood samples for oximetry is repeated. The catheter is again flushed well and withdrawn into the RA, where the pressure tracings are recorded and 3 samples of blood are obtained in 3 positions (high, mid, and low RA), in the same way it was done for the SVC. The catheter is thoroughly flushed after each step.
Next, the balloon is inflated and the catheter tip is turned toward the patient’s left side by clockwise torque, positioned in the lower part of the RA towards its anteromedial wall, and advanced across the tricuspid valve into the RV, where pressure is recorded and 3 oximetry samples are obtained. If a shunt is suspected 3 samples of blood are obtained in 3 positions: mid RV, RV apex, and RV outflow tract (RVOT). Occasionally, the advancement of the catheter into the RV is met with difficulty. Three alternative approaches can be taken: First, the catheter is placed in the lower IVC, and then slow, clockwise torque is applied until the catheter tip is pointed to the right side of the patient’s body. When this is accomplished, the catheter with the inflated balloon is slowly advanced towards the hepatic vein. As it is placed in the hepatic vein, the operator advances the catheter gently, shaping the catheter curve. The catheter is brought back into the IVC and is advanced into the RA, where the steeper curve facilitates its advancement into the RV (Figure 10.1B). Second, while in the RA, the balloon is deflated, the catheter is gently torqued to direct the tip towards the lateral wall of the RA (approximately 9 to 11 o’clock on the screen), and is advanced gently until the tip touches the atrial wall. Further gentle, forward pressure applied to the catheter against the atrial wall causes a loop to form. Once the loop is formed, the balloon is inflated, causing the tip to point toward the tricuspid valve, so that with further pushing the tip passes through the tricuspid valve into the RV (Figure 10.1A). The third option is a combination of the first and second approaches with advancement of a 0.025-inch, J-tip guidewire. When the guidewire safely crosses the tricuspid valve and enters the RV, the catheter slides slowly over into the RV, the wire is removed, and the balloon is inflated.
Occasionally, some operators inject 1.5 mL normal saline or a half-and-half mixture of normal saline with contrast dye into the balloon, to allow gravity to help the balloon to cross through the tricuspid valve. When successful, the fluid is aspirated and the balloon reinflated with air. With the second approach, the process of advancing the catheter into the RVOT and into the main PA is simple, since this route corresponds to the natural curve of the catheter. Other approaches require some dexterity from the operator. In order to place the right heart catheter into the PA with the first approach, the catheter is positioned in the body of the RV away from its apex. The operator torques the catheter clockwise under fluoroscopic guidance. This clockwise rotation should be done by the operator using the fingers of both hands, with the right hand on the catheter hub adaptor, and the left hand assisting in turning the catheter near the end of the venous sheath. This maneuver is frequently accompanied by enlargement of the loop. Applying gentle back-traction takes the large curve off and maintains the same curve size. At a certain point, the catheter tip turns upward toward the RVOT. When this occurs, the operator should quickly advance the catheter into the PA. Advancement may be facilitated with the patient taking a deep breath, which augments pulmonary flow. In difficult cases, placing a 0.025-inch, J-tip guidewire to stiffen the catheter may facilitate its advancement into the PA. Occasionally, the catheter tip is placed in the RVOT, but advancement of an inflated balloon tipped catheter is not possible. In this case, a 0.025-inch, J-tip guidewire is run through the tip of the catheter towards the pulmonary valve. When the valve is successfully crossed, the balloon is deflated and the tip of the catheter slides gently over the wire into the main PA. The wire is then removed, and the balloon is inflated. Once in the left or right PA, the pressure tracing is recorded and oximetry samples are obtained. Then the catheter tip is advanced into the “wedge” position (occasionally asking the patient to take a deep breath or cough to facilitate positioning the tip of the catheter in the “wedge” position), where the PA occlusive pressure is recorded at the end of expiration. In cases where wedging the tip of the catheter is difficult, the operator releases a small amount (0.5 mL) of air from the balloon to decrease its size and slowly advances the catheter to facilitate wedging. The “wedge” pressure should be monitored carefully, to avoid “overwedging” since the likelihood of vessel rupture and infarction is directly proportional to the catheter being overwedged. The operator should avoid vigorous flushing of the catheter when in “wedge” position in order to prevent rupture of the vessel. If the operator is unsure of the correct “wedge” position, an oximetry sample should be obtained and measured to prove the true “wedge” position of the catheter tip (arterial O2 saturation). Other signs of optimal wedge position include a stationary tip position, characteristic waveforms, and mean wedge pressure less than mean PA pressure.
When “wedge” pressure is obtained, the catheter tip is moved back to the main PA and an attempt is made to advance it with the inflated balloon towards the opposite branch (usually right) of the PA. If the maneuver meets with difficulty, the operator uses a 0.025-inch wire to navigate the catheter toward the appropriate main branch. When the distal tip of the catheter is safely placed, the balloon is deflated, pressure is recorded, and oximetry samples are obtained. After this step, the catheter is flushed, withdrawn, and repositioned in the main PA, where oximetry samples are obtained and thermodilution cardiac output is measured. Simultaneously, the arterial sheath is flushed and 3 oximetry samples are obtained in order to calculate cardiac output with the Fick method (see Chapter 19).
Right Internal Jugular Vein Approach
When utilizing the right internal jugular (RIJ) vein approach for right heart catheterization, the catheter is advanced through the sheath towards the SVC, the balloon is inflated, and the vena caval pressure recorded (Figure 10.2).
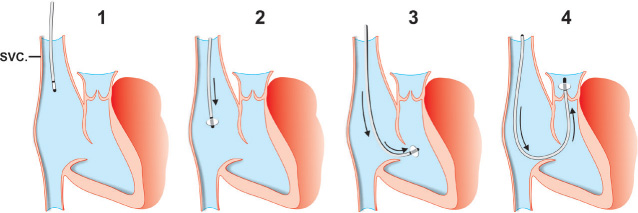
FIGURE 10.2The drawing illustrates the steps used in accessing the pulmonary artery with a Swan-Ganz catheter from the internal jugular, subclavian, or basilic vein approach.
Stay updated, free articles. Join our Telegram channel

Full access? Get Clinical Tree


