Proper, early post-cardiac catheterization care with continuous vital signs, O2 saturation, and ECG monitoring is extremely important for the safety of the patient, since even the best precatheterization evaluation and planning and a perfectly performed procedure can be ruined with careless postcatheterization care. After completion of the procedure, the operator reviews the obtained data and writes the final catheterization report.1 The final catheterization procedure report is to be organized into 3 primary sections, containing section-specific content (Table 17.1). The first section is a brief (single page), easily understood, focused summary of the salient points that is directed to the clinical community. All clinicians should not need to look further than this first section of the report to ascertain the procedures performed, diagnostic findings, and recommendations.
TABLE 17.1Important elements of the physician’s final cardiac catheterization report.
|
The second section is focused on images of the observed anatomy, findings, and results. Captured images (with or without annotations) can be included in this section. Finally, the third section includes the details of the procedure. This includes administrative data, the preprocedure history, most of the procedural detail, free-text descriptions of technical details, and other content relevant to the final procedure report.
Detailed samples of organization of the structured catheterization procedure report and diagnostic procedure report content are outlined in ACC/AHA/SCAI 2014 Health Policy Statement on Structured Reporting for the Cardiac Catheterization Laboratory: A Report of the American College of Cardiology Clinical Quality Committee.1
It is important to contact the referring physician and discuss the findings of the procedure. Based on this discussion, any required early postprocedural changes in the patient’s care will be implemented. The operator explains the final findings to the patient in layman’s terms, discusses potential options for therapy, and provides either printed pictures or a digital copy of the coronary angiography for the patient’s personal medical file. While the patient is in the cardiac catheterization observation unit, the nursing staff needs to be vigilant for early detection of symptoms and signs indicative of possible postprocedural complications, since even mild changes in a patient’s condition after cardiac catheterization may be a harbinger of impending hemodynamic compromise. A focal baseline neurologic examination conducted by the operator postprocedure is highly recommended, with particular attention toward any change from the preprocedural examination.
If the patient’s condition remains stable, and the access site has been checked, the operator instructs the patient to follow certain rules (Table 17.2). Compliance with these rules assists the normal healing process of the access site. No other restrictions or routine laboratory checks apply unless the patient’s condition has changed. The patient is informed about signs of possible late complications (Table 17.3) of cardiac catheterization and detailed information is provided about how to act if such conditions occur. After all these steps are completed and the patient’s appropriate follow-up is arranged, the patient can be discharged from the cardiac catheterization observation unit.
TABLE 17.2Temporary restrictions after cardiac catheterization.
Radial and Brachial Approaches:
|
Femoral Approach:
|
TABLE 17.3Possible late complications after cardiac catheterization.
|
Vascular Access Site Closure
MANUAL COMPRESSION
Despite its obvious limitations, such as patient discomfort, prolonged bedrest, and interruption of anticoagulation, manual compression is still considered the gold standard of achieving hemostasis post arterial sheath removal, since none of the closure devices in randomized trials were able to show a significant reduction in vascular complications.2-5 The process of removing the arterial sheath and achieving local hemostasis by digital pressure is relatively simple but requires adherence to certain rules. Prior to removing a sheath, the operator should make sure that the patient is positioned correctly. In case of femoral sheath removal, the patient should be in a recumbent position close to the edge of the bed, with the bed height adjusted so that the pressure vector applied by the operator’s fingers is oriented vertically to the femoral arterial access site. In cases of brachial or radial arterial sheath removal, the position of the patient and operator follows common sense of comfort for both. It is important for the operator that the patient’s vital signs can be seen on the monitor, intravenous access is working properly, 1 mg atropine solution is available, sterile 4 × 4 pads, alcohol swabs, suture removal kit, 10-mL syringe, and a pair of sterile gloves are on the table. The procedure is briefly explained to the patient, distal pulses are checked, the syringe is connected to the side port of the sheath, and 3–4 mL of blood is aspirated. The skin around the sheath entrance is cleaned by alcohol swabs and then a couple of 4 × 4 pads are placed just below the hub of the sheath. The operator positions the left hand (in case of right femoral artery access) and palpates the arterial pulse about 1–1.5 cm above the skin entrance of the sheath (the cutaneous landmark of the needle entry into the artery is located about 0.5–1 cm superior, due to the cranial direction of the entry needle during arterial access). The index finger is then placed on the pulse about 0.5–1 cm below the skin entrance of the sheath, so that the skin nick remains visible at all times for applied pressure control and detection of any bleeding due to insufficient or malpositioned manual pressure. After positioning the operator’s fingers on the pulse as described, the patient is notified that pressure will be applied at the site and asked to breathe normally and to relax. With the index finger slowly but steadily applying occlusive pressure to the distal artery, the sheath is withdrawn by the hub using the other hand. The operator allows a few seconds of bleeding before firm, direct, occlusive pressure is applied with the fingers at the proximal point and the pressure on the distal point applied by the index finger is released. As soon as complete occlusion of the proximal vessel is achieved, the operator gradually decreases the pressure applied by the middle and ring fingers until able to feel a femoral pulsation, which is suggestive of partial resumption of antegrade flow. Firm pressure is maintained for 3–5 minutes, after which digital pressure is gradually reduced over the next 10–15 minutes (5–10 minutes with 4-Fr sheath) with constant observation of the site. The operator uses the other hand to periodically palpate and check the area around the access site to prevent and/or detect early hematoma formation deep below the skin surface.
Once compression is released, the site is observed for a full minute, and distal pulses are checked. If bleeding resumes, another 10–15 minutes of pressure is applied. Otherwise, the access site is covered with a translucent, sterile adhesive plastic cover, and the patient is advised to remain in a horizontal position with head relaxed on the pillow for 1 hour with frequent site checks. If there are no signs of bleeding, the patient is placed at a 30- to 45-degree upright angle with the accessed leg straight for the remainder of the observation (total observation time: 4-Fr sheath, 2 hours; 5-Fr sheath, 3 hours, 6-Fr sheath, 4 hours). No pressure dressing, such as a sand bag, is recommended for the access site. A sand bag obstructs venous flow and does not decrease the rate of arterial bleeding; it obscures the vision of the operator, which can lead to a large amount of blood loss going unnoticed. After the observation period is completed, a physician checks the site for presence of a hematoma, active oozing, and new bruits and rechecks the distal pulses, leg motion, and sensitivity. The patient is asked to cough gently while the area is monitored. The patient is allowed to get up in the presence of a nurse and ambulate only after the above check is completed. The site is reinspected prior to discharge.
When dealing with manual compression of the access site in artificial ileo- or aorto-femoral grafts, the operator needs to exercise extra caution in order to not compress the graft completely, but rather apply minimal sufficient pressure to prevent bleeding from the site for 15–20 minutes. Occlusive pressure to the graft may lead to graft thrombosis and should be avoided.
Risk factors for recurrent bleeding which may cause the operator to modify duration of manual compression and observation include:
- •Severe atherosclerosis and calcification of the access vessel (loss of elasticity)
- •High blood pressure
- •Chronic renal insufficiency (dysfunctional platelets)
- •Obesity
- •Severe aortic regurgitation (wide pulse pressure)
- •Coagulopathy
- •Thrombocytopenia
- •Continuous GpIIb/IIIa receptor antagonist infusion
If periprocedural intravenous unfractionated heparin has been used, activated clotting time (ACT) should be checked prior to femoral arterial sheath removal. The femoral sheath can be safely removed if ACT is less than 180 seconds. In case of left and right cardiac catheterization, the femoral venous sheath should be flushed periodically while the arterial site compression is maintained, and removed after arterial hemostasis has been achieved.
VASCULAR CLOSURE DEVICES
The SyvekPatch (Marine Polymer Technologies, Danvers, MA, USA)6 and V+Pad (Angiotech Pharmaceuticals Inc., Vancouver, BC, Canada) are small pads frequently used to promote clot formation and stabilization at the femoral arterial access site.7,8 After palpating the proximal pulse and prior to sheath removal, the operator positions and fixes the edge of the patch under the middle finger so that the body of the patch covers the hub of the sheath. When the sheath is removed, backflow of blood wets the patch prior to proximal occlusive pressure being applied to the artery. Subsequently, the index finger of the same hand moves from the distal position to directly over the patch, where pressure is applied for 10–15 minutes until stable hemostasis is obtained. Once hemostasis has been confirmed, the dry adhesive translucent dressing is applied over the patch. The rest of the steps are identical to the steps described for manual compression. Within 24 hours, the water-moistened patch can be gently peeled off by the patient. The major advantages of these patches are absence of foreign body deployment into the access site; availability of the same access site for immediate use if needed; and ability to shorten the observation period and allow early ambulation (2 hours) of a patient. It is not recommended to use SyvekPatch or V+Pad for patients with artificial ileo-femoral or aorto-femoral grafts.
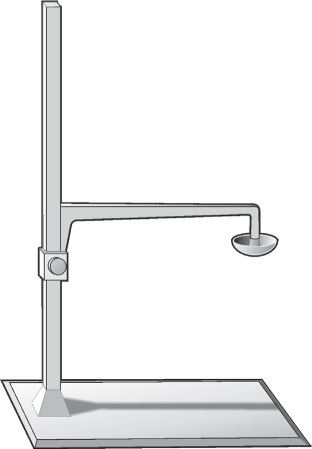
C-Arm Clamp
There are no advantages of using a C-arm clamp versus manual compression except for freeing up the staff to perform other duties in a busy catheterization laboratory, especially when prolonged manual compression of the site is required (Figure 17.1). Limitations include inability to regulate pressure easily and use in emergency. The C-arm clamp is a simple device which has a flat base and a reverse “L”-type arm attached to the base at 90 degrees. The distal tip of the device is attached to a disposable plastic disk. In order to correctly place the C-arm clamp, a patient is placed in recumbent position close to the edge of the bed where the hip of the patient rests directly over the flat base of the clamp. In the proper position, the movable transparent plastic disk, which plays the role of the pressure applicator for the C-arm clamp, should be projecting directly over the access site, slightly higher than the hub of the sheath, which has been moved back for about 1–1.5 cm, and direct moderate pressure is applied to the access site from the down motion of the plastic disk. The sheath is removed and occlusive pressure applied. The initial occlusive pressure is gradually released over 15 minutes without permitting bleeding from the puncture site and to allow distal blood circulation with close monitoring of distal pulses. The operator periodically palpates and checks the area around the access site to prevent and/or detect early hematoma formation deep below the skin surface.
Once arterial compression is completed, subsequent care of the access site is routine as described for manual compression. It is contraindicated to use a C-clamp for patients with artificial ileo-femoral or aorto-femoral grafts.
FemoStop
The advantages of a FemoStop (FemoStop plus, RADI Medical Systems AB, Uppsala, Sweden) over the C-arm clamp include easily controlled pressure monitoring, the ability to use it in acute situations, and preserved transportability of the patient (Figure 17.2). The FemoStop is a pneumatic pressure device used to obtain hemostasis after vascular sheath removal.7 It can be also effectively used to control compressible arterial pseudoaneurysms at the access site. The FemoStop device consists of a plastic arch, to which an air-cushioned, transparent dome is attached with a polyester belt, and a reusable pump. In order to correctly place the FemoStop device, the patient should be placed in a recumbent position where the hips and lower back of the patient rest directly over the polyester belt threaded into the fastening device of the plastic arch of the FemoStop.
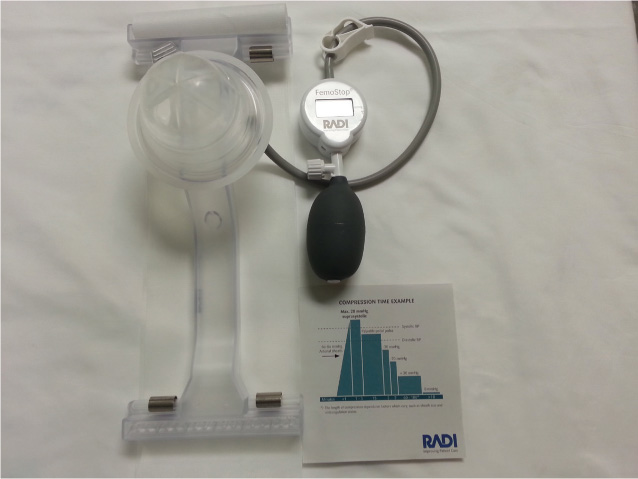
FIGURE 17.2The FemoStop (FemoStop plus, RADI Medical Systems AB, Uppsala, Sweden) is a pneumatic pressure device that offers an alternative to a C-clamp.
In the proper position, the movable, air-cushioned, transparent plastic disk/dome, which functions as a pressure applicator of the FemoStop device, should be projecting directly over the access site slightly above the hub of the sheath, which should be withdrawn about 1–1.5 cm. Once the system is ready for use, the operator peels off the protective lid, exposing the sterile surface of the dome, which has been already connected to a reusable precision-controlled manometer pump through the stopcock. Direct, moderate pressure is “dialed in” by pumping air into the dome as it sits over the site; the sheath is removed, and additional occlusive pressure is “dialed in.” The initial occlusive pressure is then gradually released over the next 3 minutes without permitting bleeding from the puncture site and allowing distal blood circulation with close monitoring of the quality of the distal pulses. The operator keeps the dome pressure above the patient’s diastolic pressure for the next 15 minutes, after which the dome pressure is gradually reduced to 40 mm Hg over the next 4 minutes and then further reduced to around 30 mm Hg. The duration of compression depends on several factors including sheath size and anticoagulation status. The operator periodically palpates and checks the area around the access site to prevent and/or detect early hematoma formation. Once arterial compression is completed, subsequent care of the access site is routine as described for manual compression. In case of a femoral venous sheath, the dome is inflated to 20–30 mm Hg and the sheath is removed. To minimize the risk of AV-fistula formation, venous hemostasis should be achieved prior to removal of the arterial sheath.
Both C-arm clamp and FemoStop mechanical compression devices have contraindications (Table 17.4) and adverse effects (Table 17.5) that may occur. Hence, the physician should carefully weigh the risks and benefits prior to application of these devices in each individual case.
TABLE 17.4Possible adverse effects.
|
TABLE 17.5Contraindications.
|
Obtaining Hemostasis of the Radial Arteriotomy Site
PREPARATION
Upon completion of cardiac catheterization, the operator withdraws blood and flushes the radial sheath with heparinized saline.8 The area of the wrist surrounding the arteriotomy site and the radial sheath are cleaned using a topical bacteriostatic agent such as chlorhexidine. The radial sheath is withdrawn for 2–3 cm. If any resistance is felt, or if the patient complains of significant pain or discomfort, the operator should consider injecting local/subcutaneous 1% lidocaine, and an intra-arterial vasodilator such as verapamil, or nitroglycerin, to ease vasospasm prior to reattempting partial sheath withdrawal.
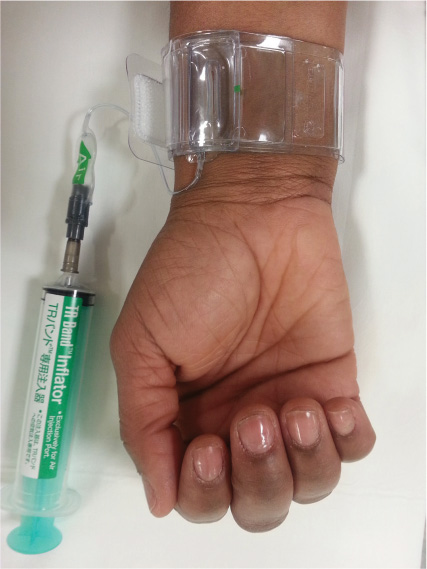
WRISTBAND AND SHEATH REMOVAL
The operator aligns the green marker located in the center of the compression wristband just proximal to where the sheath enters the arteriotomy site. The Velcro strap is fixed around the wrist (Figure 17.3). Approximately 15 mL of air volume is aspirated into the syringe included in the kit. This prefilled syringe is attached to the compression balloon side port of the wristband. With the syringe in one hand, air is injected into the compression balloon in order to inflate the wristband around the arteriotomy site, while pulling back and completely removing the arterial sheath with the other hand.
Stay updated, free articles. Join our Telegram channel

Full access? Get Clinical Tree


