CHAPTER 7
The Multipurpose Catheter
“Practice is everything.”
—Periander
Historical Background
The multipurpose catheter technique was introduced to Emory University Cardiac Catheterization Laboratories in 1972 by Spencer King. King learned this method from Fred Schoonmaker in Denver, Colorado.1 At Emory, the technique was further learned and later taught by John Douglas. The technique has been described also in a book published by King and Douglas.2 The descriptions of this method in this chapter attempt to add a few small points that have been picked up through the years by one of the authors (SDC) such that they can be passed on to individuals interested to learn this technique.3
It was the dream of Andreas Gruentzig that cardiac catheterization be performed as an outpatient with small catheters. He himself underwent a cardiac catheterization with small catheters performed by a cardiology fellow, Whit Whitworth, in order to prove that it could be done. After the procedure, he had a couple of hours of bed rest and went out dancing. That evening he developed a hematoma that caused him to hold pressure and take some more bed rest.
Gruentzig’s dream was also to have a cardiac catheterization laboratory dedicated to low-risk outpatients who could go directly to cardiac catheterization as a first procedure. In the early 1980s, this concept was realized. The Fisher Company had promised to provide Gruentzig and Emory the equipment (which was all digital), and plans were made to create a laboratory. A location was chosen in the tunnel level of Building A of The Emory Clinic, and construction was initiated. Unfortunately, Gruentzig lost his life in a plane crash in 1985 and never saw the laboratory completed.
The laboratory was opened in 1986 with the principles of Gruentzig in mind, and in the beginning, 4-Fr and 5-Fr Judkins catheters were used. These catheters were small and posed difficulty when used in large patients, those with aortic valve disease, and those with aortic ectasia. They were simply blown away by aortic stenosis/regurgitation jets and large stroke volumes. The 6-Fr multipurpose catheter came to the forefront because of its maneuverability and slightly larger inner diameter and was used originally without a sheath. The multipurpose catheter had been developed by Schoonmaker in 7-Fr and 8-Fr sizes. It was not until the outpatient concept was proven possible that the 6-Fr multipurpose catheter became popular. This led to smaller guiding systems for intervention in the 6-Fr size.
Currently, the 5-Fr multipurpose catheter is available and can be used in straightforward situations. Manipulation can be difficult because it kinks easily, does not take torque and rotation well, and is easily blown away by the flow jets of aortic stenosis and regurgitation as mentioned above.
The 6-Fr multipurpose catheter has stood the test of time at Emory for outpatient cardiac catheterization. Experience with the first 3,000 patients was reported in 1991,3 and to date more than 26,000 low-risk patients in the Andreas Gruentzig Outpatient Laboratory have been done with these catheters. With the increased use of closure devices, almost all patients are discharged home earlier and more comfortably after diagnostic cardiac catheterization.
Multipurpose Catheter Basics
Once femoral access has been obtained and a sheath is inserted, the J-tip guidewire should be advanced across the arch with the catheter following into the ascending aorta as discussed in previous chapters. The monitoring of catheter and wire placement into the ascending aorta should be done under fluoroscopic guidance in the RAO or LAO position. The wire should be removed, the catheter aspirated and connected to the manifold, and the catheter should be flushed. Care should be taken as the catheter–manifold connection is made to minimize any air entry in the system. The syringe should be checked for air by careful inspection and tapping upon it to move any bubbles toward the top of the syringe. It is safer to make the catheter–manifold connection with the heparinized saline port flowing forward in order to minimize any introduction of air. The syringe should have no bubbles to ensure a “bubble-free environment” and to prevent injection of microbubbles later. Once these connections are made, several aspirations and flushes should be made before the syringe is filled with contrast. Always watch for bubbles—even the contrast line can contain a few. When the contrast bottle is nearing empty and needs replacing, it is always good to replace the bottle before it is completely empty so as to avoid getting air within the system.
Torque and Rotation
The concepts of torque and rotation are important to understand as one learns the multipurpose technique. Both are necessary for success with this catheter. Torque is used to make rotation of the catheter tip happen. Torque may be applied to the catheter near the sheath edge by the left hand, but frequently rotation of the catheter tip will not occur until the catheter is moved slightly in and out of the sheath, transmitting the torque. The catheter is bound in several places, including the sheath, the iliac arteries, the aortic arch, and the point where the catheter touches the aortic wall. When torque is applied to the catheter, potential rotation builds up and will not release until the catheter is moved slightly in and out of the sheath. This effectively frees up the wire-braded catheter, allowing torque to be translated into rotation. Sometimes torque builds up so much that the catheter “helicopters” around in the ascending aorta, which is an undesirable event. The smaller the catheter, the more easily torque is stored, and the more spring-like it becomes. Larger catheters behave more like rods (i.e., rotation at the hub results in rotation at the tip). If torque is applied vigorously without tip rotation occurring, the catheter can kink and the arterial pressure will appear damped, or worse, a knot can form in the catheter (usually in the distal aorta or iliac arteries). This should be removed by reversing the direction of the initial torque until the kink is unwound (see also Chapter 6 for more details). Appreciation of these principles aids in learning how to manipulate both large and small catheters.
The manner in which the multipurpose catheter and manifold are held and manipulated is different from the conventional Judkins technique as described in Chapter 6. All catheter manipulations, including advancement, withdrawal, and torque application and rotation, are usually made with the left hand from the hub or most proximal part of the catheter at the sheath. The injection syringe and manifold are held with the right hand (Figure 7.1).
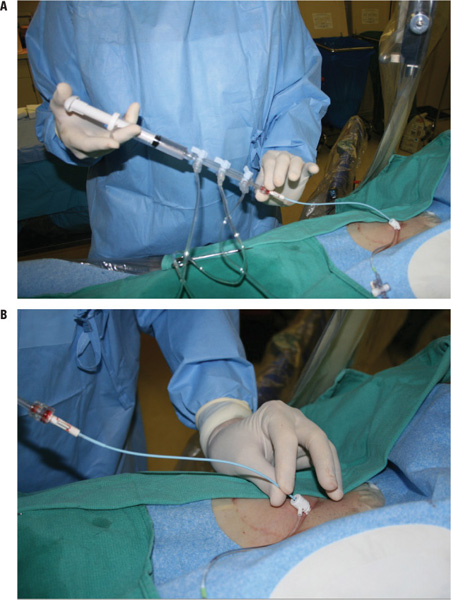
FIGURE 7.1Shown are illustrations of how to hold and manipulate (Panel A) the hub of the multipurpose catheter and (Panel B) the multipurpose catheter at the sheath. Panel A: The hub of the catheter is rotated which applies torque to the shaft of the catheter. The torque in the shaft of the catheter can then be transferred to the tip of the catheter with the left hand at the sheath hub. Panel B: The left hand is grasping the catheter near the sheath and manipulating the catheter as needed to transfer the torque that was previously applied to the catheter at the hub to the tip of the catheter.
This arrangement permits easy administration of small “tests” or puffs of contrast as the catheter position is changed with the pressure in the off position. When first learning this technique, it is best to use two hands on the catheter. The right hand is placed on the manifold with the thumb and index finger on the end of the manifold and hub of the catheter such that it can be rotated. The left hand is placed on the catheter close to the hub of the sheath. Rotation can be applied at the hub and then the left hand can transfer this rotation through the sheath and thus causing the tip of the catheter to move in the desirable location. The left hand can move the catheter in and out of the sheath to facilitate transfer of torque (Figure 7.2).
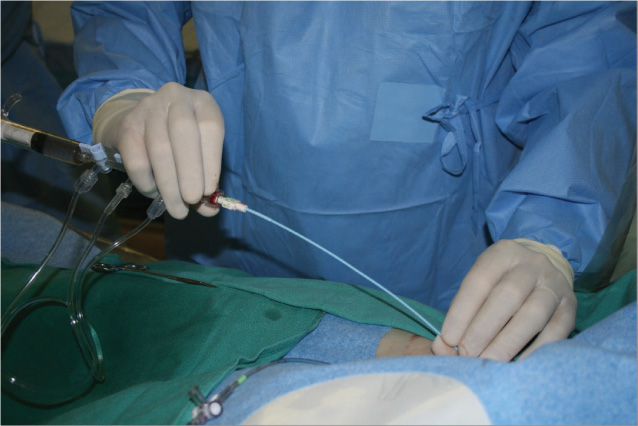
FIGURE 7.2The two-handed method consists of the following: The right hand is applying torque at the hub as the left hand manipulates this further at the sheath, transferring the torque through the sheath to the tip of the catheter.
As part of the catheterization procedure, one should always be watchful of the pressure tracings looking for damping or significant elevations or decreases in blood pressure. Each time the coronary artery is engaged or the catheter is positioned within the left ventricle, the pressure should be checked watching for damping or ventricularization of the pressure waveform. If the pressure is not normal, the catheter is obstructing an artery or is entrapped within the left ventricle. A small puff of contrast can also be helpful. Rapid run-off means that the catheter is not obstructing the artery and a full injection can be made safely.
Left Ventriculography with the Multipurpose Catheter
From the RAO position, the catheter can be advanced into the left ventricle. Sometimes, from the right coronary cusp (RCC), the catheter can be moved up and down, and with slight counterclockwise torque, it will fall across the aortic valve into the left ventricle. Otherwise, a loop can be made by counterclockwise rotation of the catheter so that it points posteriorly in the ascending aorta into the noncoronary cusp (NCC). Advancing with a small amount of clockwise torsion will then allow the catheter to form a loop and flip anterior, sometimes landing in the left coronary cusp (LCC). If the catheter fails to drop into the LCC, a loop will be formed above the sinotubular ridge. The catheter should then be rotated clockwise such that the tip points away from the operator (Figure 7.3).

FIGURE 7.3The multipurpose catheter is viewed from the RAO position. The loop is formed and points directly away from the operator poised to be prolapsed across the aortic valve or ready to drop down into the LCC when pulled up.
From this position, the loop can usually be advanced across the aortic cusp area into the left ventricle. The “knee” of the catheter will usually fall between the commissures and allow the catheter to prolapse into the left ventricle. The RAO view is favored for crossing into the left ventricle in order to prevent the tip of the multipurpose catheter from pointing too anteriorly and inadvertently entering into and passing down the right coronary artery (RCA) when it is advanced. Once in the left ventricle, the tip of the catheter should point slightly upward or superior and there should be slight up and down mobility indicating that it is free from the wall (Figure 7.4).
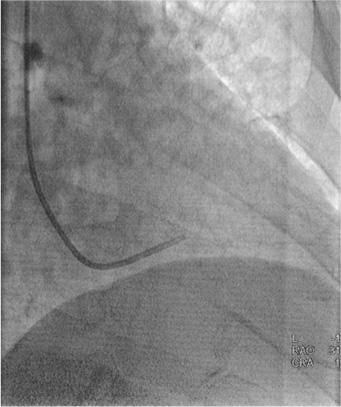
FIGURE 7.4The multipurpose catheter within the left ventricle: The tip is pointing slightly anterior and moves freely. If the tip is not freely mobile, this indicates that the tip is stuck within either the chords or the trabeculations.
In the LAO projection, the catheter should be directed slightly away from the septum. At this point, the left ventricular end-diastolic pressure (LVEDP) can be measured and ventriculography performed. It is always important to give a small test injection to ensure that the catheter tip is moving freely before ventriculography. A hand injection is usually adequate. For the best image, the patient should be asked to take about half a breath and “stop breathing” to keep the background still while the injection is done. If one asks the patient to “take a deep breath and hold it,” they frequently take a breath and do a Valsalva maneuver, which alters the dynamics of the situation and elevates the diaphragm.
 Video 7.1 shows left ventriculography with the multipurpose catheter in RAO projection, and
  Video 7.2 shows left ventriculography with the multipurpose catheter in LAO projection. An incorrect position of the multipurpose catheter for left ventriculography is featured in
  Video 7.3.
If a power injection is required due to a large ventricular chamber or to more accurately assess mitral regurgitation, a pigtail catheter is favored. After ventriculography, the contrast is flushed from the catheter for an accurate post-ventriculography LVEDP. Then the catheter can be withdrawn back into the aorta with the pressure turned on, noting the presence or absence of a gradient.
Right Coronary Artery (RCA) Cannulation
The RCA is cannulated by placing the catheter tip in the RCC from the RAO view. Clockwise rotation will result in the catheter moving anterior and into the RCC.
 Video 7.4 shows engagement of the RCA ostium with the multipurpose catheter in RAO projection. Then the catheter should be further manipulated from the LAO view, where two approaches are possible. The first is to view the catheter from the LAO position and simply pull back and rotate the tip clockwise from a position just above the RCC, exactly as is done with a JR catheter (Figure 7.5A). The second approach is to advance the catheter in the RCC from the 6 o’clock position in the LAO view watching for it to flatten out and allowing the tip to move toward and into the ostium of the RCA.
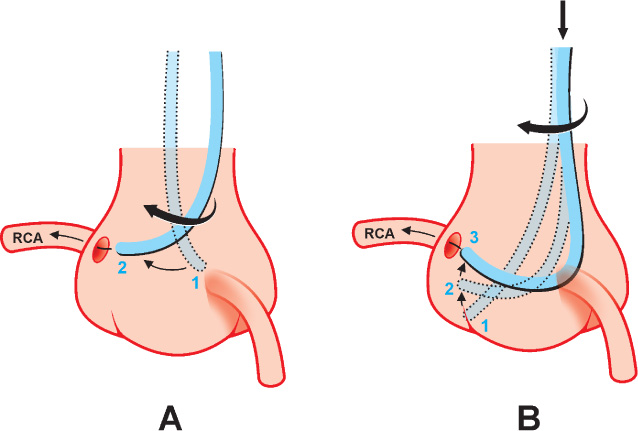
FIGURE 7.5To cannulate the RCA using the multipurpose catheter, an operator can either pull back and rotate the catheter tip from just above the RCC in LAO view (Panel A) or advance the catheter in the RCC from the 6 o’clock position in the LAO view watching for it to flatten out and allowing the tip to move toward and into the ostium of the RCA (Panel B).
Puffs of contrast can be used to better locate the position of the ostium (Figure 7.6). One should remember that the ostium of the RCA can be located in the bottom of the cusp, in the midportion of the cusp, at the sinotubular ridge, or it can arise in an unusual position as an anomaly.
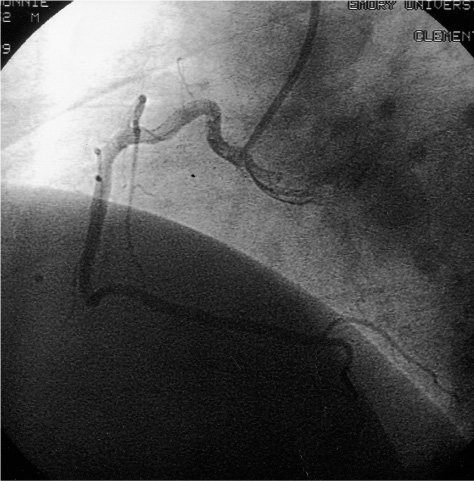
FIGURE 7.6Cannulation of the RCA with the multipurpose catheter is performed by sweeping around and slightly withdrawing the catheter, allowing the tip to engage the RCA.
 Video 7.5 shows engagement of the RCA with the multipurpose catheter in RAO projection. This can be done much like one does with the JR catheter as described in Chapter 6. It is easier to do when the RCA has an inferior orientation from the ostium rather than a superior orientation as seen above.
 Video 7.6 shows cannulation of the RCA with the multipurpose catheter in LAO projection. This method of cannulation may be more easily done if the first segment of the RCA is inferiorly oriented. However, if the first segment is oriented in a superior direction, it is still possible. Even right coronary arteries with an anterior take-off can be engaged with the multipurpose catheter using this “sweep-around” technique (Figure 7.7). Sometimes, when this anatomy is present, one can be deep within the artery before one realizes. When the pressure damps with clockwise rotation of the catheter, this might be the situation.
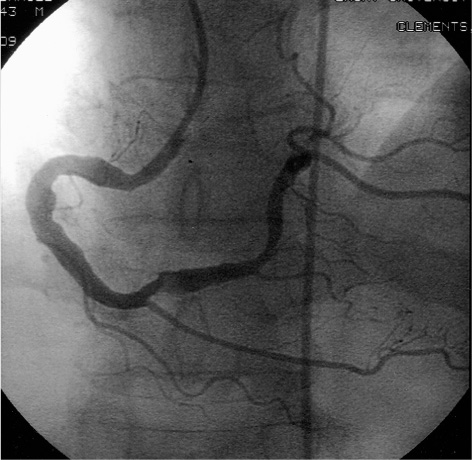
FIGURE 7.7Engagement of the RCA with the multipurpose catheter is achieved by sweeping around from the LAO view. This RCA ostium has a more anterior location, a situation that is more difficult to cannulate with a JR catheter.
Stay updated, free articles. Join our Telegram channel

Full access? Get Clinical Tree


