The first needle pericardiocentesis was performed in 1840 by Franz Schuh, a physician from Vienna.1 The indications and contraindications for the procedure are outlined in Tables 14.1 and 14.2, accordingly.
TABLE 14.1Indications for pericardiocentesis.
|
TABLE 14.2Contraindications to pericardiocentesis.
Relative Contraindications:
|
No absolute contraindications exist for the emergent procedure if it is performed with the purpose of treating cardiac tamponade. If pericardiocentesis is not emergent, performing right heart catheterization with recording of pressure tracings before and after pericardiocentesis is highly recommended. The ideal site of the needle entry characteristics are the maximal diameter of the fluid layer, the shortest distance to the fluid layer, and no vital structures in the needle path from the site of entry to the pericardial space.2
Pericardiocentesis can be done “blindly,” but it is preferable to use ECG, fluoroscopy, or ideally, echocardiography for guidance.3 Real-time cardiac ultrasound imaging allows the operator to choose the access site, avoid liver- and lung-tissue injury, measure the distance from the point of skin entrance of the needle to the pericardium, track the trajectory of the needle tip and assure its correct location by injecting agitated normal saline into the pericardial space for opacification. Echocardiography also allows the operator to assess the cardiac response to drainage and measure the volume of the residual pericardial content after the procedure. Although in case of an emergency the procedure can be performed at the patient’s bedside; it is best done in the cardiac catheterization laboratory, where cardiac hemodynamics can be recorded. The procedure should be performed after appropriate consent is obtained from the patient, followed by mild sedation, with continuous ECG, blood pressure, and pulse oximetry monitoring.
Subxiphoid Approach
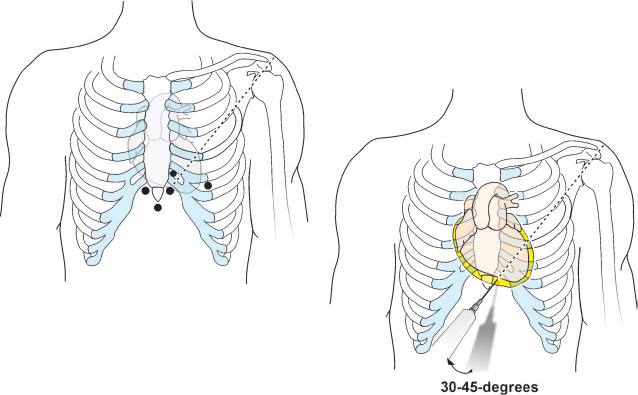
This is the most commonly used approach. The operator positions the patient at a 30- to 45-degree angle to assist with inferior pooling of fluid. The patient is asked to take shallow breaths in order to avoid significant movement of the diaphragm. The patient’s subxiphoid area is surgically draped under sterile conditions. The needle access site is 1–1.5 cm below the left costoxiphoid junction (Figure 14.1).
The skin and superficial tissue over the access site is anesthetized with a 25-gauge needle containing 5 mL of 1% warm lidocaine solution. To cover the anticipated access needle path, a 22-gauge needle and an additional 10 mL of the anesthetic are needed. The access needle utilized for pericardiocentesis is marked by a sterile marker at the approximate distance between the skin and pericardial effusion as measured by echocardiography. After the tissue at the access site is well anesthetized, an 18-gauge access needle connected to a 10-mL syringe (with 2 mL of 1% lidocaine) through a 3-way stopcock, is inserted and advanced at 30- to 45-degree angle through the skin towards the posterior aspect of the left shoulder under constant aspiration. Some physicians utilize the Polytef-sheathed needle.4 Upon entering the pericardial space, the Polytef sheath is advanced over the needle into the pericardial space and the needle withdrawn; the J-tip guidewire subsequently runs through the Polytef sheath and not through the needle. The operator may feel a discrete “pop” as the needle crosses the pericardium and enters the pericardial space, and back flow of pericardial fluid into the syringe is established. The needle is fixed and a second 10-mL syringe with 8 mL agitated saline mixed with 1 mL of air is attached to the 3-way stopcock, followed by injection into the pericardial space under echocardiographic visualization. If the needle tip is in the pericardial space, the injection of agitated saline will cause its opacification. In cases where the needle tip is in the RV cavity, the agitated saline will be quickly washed away by blood flow. Occasionally, due to a large pericardial effusion, injection of agitated saline might not be visible from certain echocardiographic views, so the view should be changed and the injection repeated. If fluoroscopic guidance is used, the needle position is confirmed with injection of contrast media. After making sure that position of the needle is correct, the syringe is disconnected from the needle and the 0.035-inch, J-tip guidewire is inserted and advanced through the needle into the pericardial space under fluoroscopic guidance. As the wire enters into the pericardial space, it will wrap around the heart. The needle is then removed, and a small nick of the skin is made with a scalpel at the level of guidewire entrance in order to ease the insertion of the 7- or 8-Fr dilator over the wire into the pericardial space. After the dilator is removed, the pericardiocentesis 7- or 8-Fr pigtail catheter is advanced over the guidewire into the pericardial space, and the guidewire is removed. The operator ensures that fluid return persists by aspirating it to a syringe connected to the hub of the catheter through the 3-way stopcock. Then the syringe is detached and the pressure tubing is attached to simultaneously record the pericardial pressure and the pressures from PAW, PA, RV, and RA sites. After these recordings are obtained, the pericardial pressure tubing is detached, a 60 mL syringe is reattached to the 3-way stopcock, and fluid is actively aspirated and redirected to the collecting bag, followed by gravity draining. The pericardial catheter is fixed to the skin with a couple of sutures and sterile dressing is applied. Fluoroscopy and chest x-ray are checked to exclude pneumothorax after completion of the procedure.
If an attempt to access the pericardial space with the needle is unsuccessful, the needle is withdrawn slowly, flushed, redirected, and another attempt is made. If 3 unsuccessful attempts are made, another approach should be utilized if possible. Otherwise surgical drainage is recommended. Every 24 hours for the next 48 to 72 hours, strict recording of the drainage volume is necessary. The drain should be aspirated and, if needed, flushed with sterile normal saline every 4–6 hours to ensure that the catheter is not obstructed and clotted. When and if the drainage volume becomes less than 30 mL/24 hours, the drainage catheter can be pulled. When pulling the drainage catheter, the operator should first ask the patient to take a breath and pull the catheter, during exhalation. At the end of exhalation, the patient is instructed to hold breathing, and an airtight dressing is placed across the access site. If the drainage rate remains higher, or if fluid becomes purulent, the catheter should be removed and surgical pericardial drainage pursued. Open surgical drainage offers several advantages, including complete drainage of the pericardial content, access to pericardial tissue for histopathologic and microbiologic diagnoses, the ability to drain loculated effusions and posterior effusions.
Apical Approach
The patient is placed supine with the head elevated at a 30- to 45-degree angle with a minor tilt towards left lateral decubitus position, and the left arm is positioned under the head. The needle access site and direction is dictated by real-time echocardiography. In general, the direction of the needle is towards the right shoulder tip. The rest of the technique and postprocedural management is identical to the subxiphoid approach as described.
WHAT IF AN OPERATOR ENCOUNTERS ONE OF THE FOLLOWING PROBLEMS?
Perforation of Heart Chamber
RA, RV, or LV perforation occur rarely during pericardiocentesis in a cardiac catheterization laboratory where fluoroscopic and echocardiographic guidance are actively used (see Chapter 10). The needle puncture site is usually self-sealing in the absence of coagulopathy.
Arterial Laceration
Arterial lacerations of the LAD with the apical approach, LIMA with the parasternal approach, and PDA with the subxiphoid approach are major complications, which can be easily recognized when the straw-colored pericardial fluid suddenly turns red with high O2 saturation. The cardiothoracic surgery team should be notified to proceed with emergent surgery if the patient’s hemodynamic status continues to deteriorate despite active aspiration of blood from the pericardial space and administration of intravenous fluids. Otherwise, after coronary and IMA angiography is completed and the laceration site is identified, endovascular repair can be attempted with a covered stent.
Occasionally, angiography does not reveal any source of arterial bleeding as suggested by high O2 saturations of blood obtained from drainage. High O2 saturation in pericardial fluid can be observed in patients with effusive constrictive pericarditis, especially if a relatively stiff wire was used to support advancement of the drainage catheter through the relatively rigid pericardial wall. This is caused by the presence of small arterial vessels in vascularized pericardial adhesions, which can get damaged during wire manipulations in the pericardial space. The reason for occasionally using a stiff wire is to better support the drainage catheter, which may start buckling at the entrance site of the rigid pericardial wall, especially if the wall was not well predilated with a dilator, causing loss of access. In such circumstance, the operator uses 1- or 2-Fr higher dilators than the drainage catheter to prevent the problem from reoccurring.
Stay updated, free articles. Join our Telegram channel

Full access? Get Clinical Tree


