As with most things in life, preparation is everything; that is, one must “plan the work, then work the plan.” The determination to embark on pacemaker implantation includes the assumption that the implanter has had the appropriate degree of training, has maintained proficiency in this area, and understands the specific indications for a particular procedure as delineated in the ACC/AHA/HRS guidelines for device implantation. The maintenance of a minimum procedural volume is essential, and, indeed, the number of implants performed by an individual is inversely related to the development of complications at the time of implantation. In addition, preparation entails anticipation of all the resources and personnel required to perform the operation, including a sterile operating arena (whether operating room or catheterization laboratory), standard operating room instruments, pacemaker leads and generators, corresponding pacer programmers, pacer system analyzers, anesthesia/sedation, fluoroscopy, and emergency equipment (e.g., pericardiocentesis sets). The presence of an experienced nurse or technician who can make the necessary threshold determinations is also indispensable. The role of the “pacemaker manufacturer’s representative” in this regard remains highly controversial and continues to raise both quality assurance issues and ethical concerns.
Deciding on an operating strategy is crucial. This is especially true in complicated cases—patients with pre-existing pacer or defibrillator systems with pacer dependence; patients with congenital cardiovascular abnormalities such as persistent superior vena cava syndrome with previous demonstration of subclavian vein thrombosis; or patients in whom individualization of therapy dictates something “special” (e.g., contralateral placement in a mastectomy patient, placement of the device as a function of the patient’s left-handedness or right-handedness, or cosmetic concerns necessitating a submammary implant).
The use of antibiotic prophylaxis before implantation has long been debated. Meta-analysis, however, suggests that prophylaxis may, indeed, be very important in minimizing device-related infections. Generally, an antistaphylococcal antibiotic is administered “on-call” to the procedure with continuation of this antibiotic for 24 hours following the implantation. The site of peripheral intravenous placement—this should be ipsilateral to the anticipated site of implant so as to allow for dye injection and radiographic imaging of central venous anatomy in cases where percutaneous subclavian or cephalic vein access is difficult—should also be considered preoperatively. The anticoagulated patient poses a particular challenge both preoperatively and perioperatively. Warfarin (Coumadin) is generally withdrawn to achieve an international normalized ratio (INR) of less than 2; cephalic cutdown and strict hemostasis are encouraged; and warfarin is resumed postoperatively, preferably without the adjunct of intravenous heparin or enoxaparin (with which significant pocket hematomas have occurred). Some have demonstrated, however, that implantation may take place without withholding warfarin and without untoward bleeding problems.
The choice (and number) of leads must also be considered. Passive-fixation leads are typically associated with less elevation in acute threshold level, but active-fixation leads may be selected when potential dislodgment is a significant concern. This might be anticipated, for example, in cases of smooth-walled dilated right ventricles, amputated atrial appendages in patients having undergone earlier open-heart surgery, or right ventricular outflow tract lead positioning. In addition, active-fixation leads may be more easily removed in the unlikely event that extraction is a future consideration. Pacing configuration (unipolar vs. bipolar) is also an important issue to contemplate. On the one hand, unipolar leads are typically smaller in diameter and easier to introduce; in many cases, two unipolar leads may be introduced primarily through a single venotomy or even through a single peel-away introducer. However, unipolar systems have many potential disadvantages, including myopectoral stimulation, myopotential inhibition, and sensing of unipolar spikes by simultaneously implanted defibrillators. On the other hand, bipolar lead systems have had a number of associated advisories related to insulation degradation and subclavian crush syndrome. Compatibility of the selected lead(s) with the designated pulse generator must be ensured.
Epicardial or subxiphoid placement of pacer systems is typically reserved for those individuals who cannot undergo effective pacing via the transvenous route (e.g., a patient who has a mechanical tricuspid valve replacement) or who are simultaneously undergoing thoracotomy for other reasons. Limited surgical approaches using a trans-atrial implantation technique have also been described.
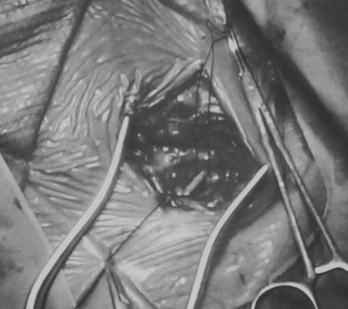
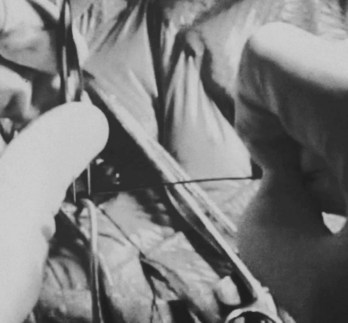
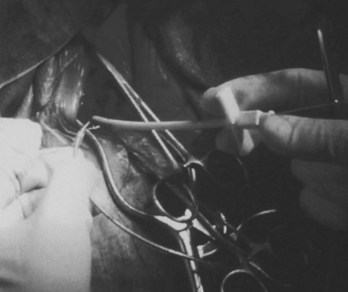
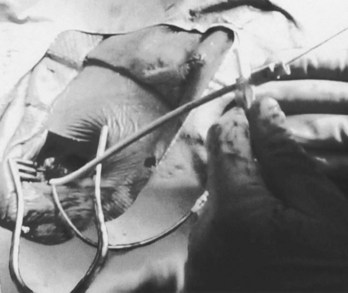
Transvenous pacing is usually the preferred route, with use of the cephalic vein, the subclavian vein, or the axillary vein; it is rare to employ the external or internal jugular veins. Identification of a reasonably sized brachial or antecubital vein by placing a tourniquet around the arm is a good predictor that the patient will have a usable cephalic vein more proximally. After meticulous preparation, draping, and administration of local anesthesia, a circumlinear incision is made; dissection follows down to the delto-pectoral fat pad, beneath which courses the cephalic vein (Figure 32-1). Many implanters choose to access the subclavian vein percutaneously before making such an incision, in the belief that the anatomies of the clavicle and the first rib are better appreciated “from the outside.” Nothing, however, precludes using the subclavian approach from within the incision if the cephalic vein is not encountered. The distinct advantages to looking for the cephalic vein first are as follows: (1) It avoids the potential risk of pneumothorax, subclavian artery puncture associated with attempts at subclavian vein puncture, or both; (2) it may avoid trauma to the lead incurred in the subclavian crush syndrome or associated with the peel-away introducer technique; (3) it provides yet another avenue of access not available to those implanters who are accustomed to only the subclavian puncture technique, and (4) in cases of subsequent revision, it allows the use of an unused subclavian vein. Ligatures are applied proximally and distally to the site of the venotomy (Figure 32-2). It is particularly important to tie off the distal ligature (usually with 3-0 silk) before introducing the lead to prevent significant back-bleeding should a small cephalic vein avulse with manipulation. Vein lifts that are typically supplied with the pacemaker electrodes can be abrasive; the author prefers to use a curved iris forceps. The lead should be visually inspected before introducing it to ensure that no defects are present at the very outset before manipulation.
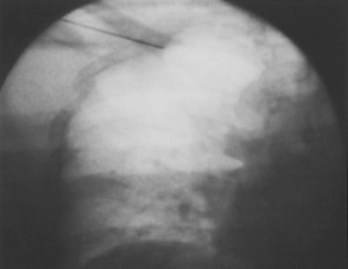
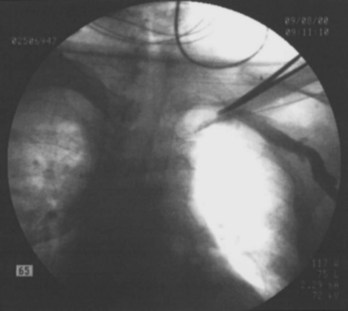
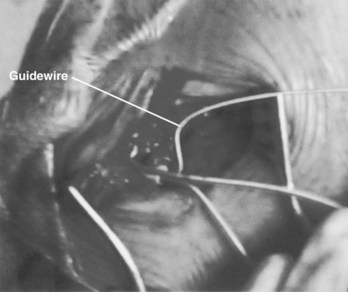
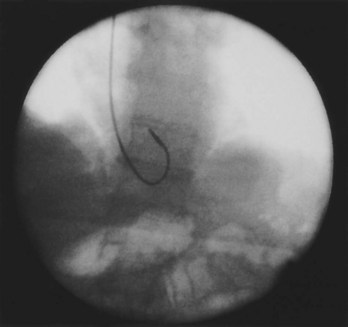
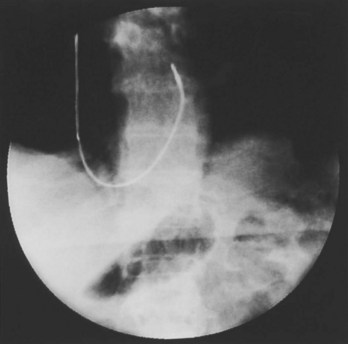
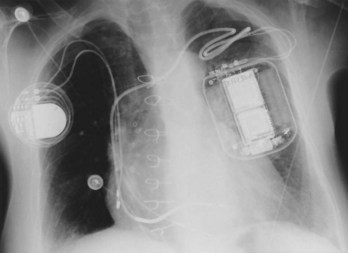
Often a venotomy through the cephalic vein will accommodate both atrial and ventricular leads. Occasionally, only one (or neither) may be introduced primarily, because the vein is either too small or tortuous. In such cases, one may consider introducing a guidewire through the cephalic vein and then using a peel-away introducer technique through the cephalic vein to introduce one or both leads (Ong-Barold technique; see Figures 32-3 and 32-4). Again, great care should be taken while advancing the introducer (use of a Gerard forceps to raise the flap of the venotomy may be helpful here) to avoid avulsing the cephalic vein, and fluoroscopic visualization of the advancing introducer may be helpful to track its course along the guidewire. Percutaneous subclavian vein access has been made possible largely by the peel-away introducer technique, which allows access to be achieved through the Seldinger technique and removal of the sheath subsequently from the retained pacemaker lead. A variety of techniques has been reported. The subclavian window approach entails puncturing near the apex of the angle formed by the first rib and clavicle and aiming medially and in the cephalic direction. The medial aspect of this approach has a better success rate and a lower risk of pneumothorax and vascular injury compared with a more lateral entry because the vein is a larger target and the apex of the lung is more laterally situated. The tighter binding between the first rib and clavicle may, however, result in the subclavian crush phenomenon with insulation failure, particularly in the case of bipolar coaxial polyurethane leads. The “safe introducer technique,” as described by Byrd, relates to a safety zone between the first rib and clavicle, extending laterally from the sternum in an arc. More lateral approaches may avoid soft tissue entrapment (subclavius muscle, costocoracoid ligament, and costoclavicular ligament) and may, therefore, extend lead longevity. Cannulation of the extrathoracic portion of the subclavian vein (the axillary vein) has been increasingly used, with puncture made anteriorly to the first rib, maneuvering posteriorly and medially, but remaining lateral to the juncture of the first rib and clavicle; in the more lateral locations, care must be taken to avoid puncturing the subclavian artery. The use of radiography has been advocated during the introduction of needles, whatever may be the technique chosen, to confirm point of entry and subsequent trajectory (Figure 32-5); in some cases, dye injection with venography may facilitate venipuncture (Figure 32-6), particularly in cases where access has been difficult and the risk of subclavian vein thrombosis exists. This may be particularly effective in guiding venipuncture when using the axillary vein approach. Occasionally, Doppler techniques to facilitate vein localization and venipuncture may be used. In patients who have superior vena cava, innominate vein obstruction, or both, stent dilation has been considered to achieve access without going to the contralateral chest. Once access to the subclavian vein has been achieved, an incision must be made to allow for the development of the pocket if the puncture was percutaneous and not from within the wound. The peel-away-introducer technique then allows for passage of the introducer over the guidewire and subsequent passage of the pacemaker lead through the introducer. If the leads are small (especially if unipolar), both may be guided through a single introducer. More commonly, the guidewire is retained after passage of the first lead to allow for the passage of a second introducer and pacemaker lead, which obviates the need for a second venipuncture (Figure 32-7); alternatively, two guidewires may be passed through a single percutaneous introducer with subsequent sliding of the introducer over each guidewire separately to provide independent access for each of two pacing leads. Occasionally, a recently introduced lead may cause problems (e.g., a need to switch from a passive fixation to active fixation lead) with loss of previously established venous access. In such cases, a blade may be used to slit the insulation of the lead to be sacrificed, a guidewire wedged through this insulation, and the lead advanced with a guidewire as a unit so that the guidewire enters the vascular space. With the guidewire held in place, the lead to be sacrificed may be advanced slightly so as to disengage it from the guidewire; in this manner, the guidewire is retained within the vascular space, the old lead may be removed, and a new lead may be placed through a peel-away introducer placed over the guidewire (Figure 32-8). The technique required for lead manipulation may vary as a function of the lead used and the cardiac chamber to be accessed. For right ventricular apex positioning, one approach is to prolapse the lead across the tricuspid valve (Figure 32-9). The other commonly employed approach is to create a curve on the stylet and guide the lead to the right ventricular outflow tract, subsequently withdrawing the lead until it drops into the right ventricular apex position (Figure 32-10); this approach ensures that passage has been achieved into the right side of the heart and reduces the inadvertent placement of the lead into the coronary sinus. With any lead manipulation, great care must be undertaken to avoid dislodgment of other leads already in place, particularly if these have been recently placed. In addition, placement of the leads may result in the induction of ventricular arrhythmias and trauma to the atrioventricular node or right bundle (of great concern in patients with pre-existing left bundle branch block), dictating the need for backup equipment for external pacing and defibrillation. Placement of the ventricular lead in patients with persistent left superior vena cava may be particularly challenging. The loop-de-loop technique is used in which the lead enters the dilated coronary sinus from the left superior vena cava and is banked off the right atrial wall to re-enter the right ventricular apex. An active fixation lead is recommended for stabilization of position in this case (Figure 32-11). Occasionally patients may require placement of the lead in the right ventricular outflow tract; for example, to minimize electrical interaction with a previously implanted right ventricular apex defibrillator lead, an active fixation bipolar lead should be employed (Figure 32-12). The optimal position for right ventricular pacing to promote cardiac hemodynamics (e.g., apical versus outflow tract) is still being debated, but to date, no definitive answer has been found.
Biventricular pacing has been increasingly used as a method to facilitate cardiac resynchronization therapy, most commonly during defibrillator placement and, to a lesser extent, to alleviate symptoms of heart failure in patients who are not candidates for defibrillator implantation. Placement of a second ventricular lead to enable left ventricular pacing has been accomplished via the coronary sinus approach, though epicardial or trans-septal approaches may on occasion be used. Engaging the coronary sinus can be difficult, especially in patients who have undergone previous cardiac surgery; it is most easily achieved via left-sided implantation. Of the many techniques that have been devised, the most common one is cannulation of the coronary sinus, which may be achieved with a deflectable electrophysiology catheter and confirmed by obtaining left atrial recordings. Thereafter, a sheath may be advanced over the electrophysiology catheter, which is then removed. Balloon-occlusive venography with dye injection may then delineate the coronary sinus anatomy and allow for subsequent placement of a coronary sinus lead into a branch allowing for biventricular pacing. This may require tracking of the lead along a guidewire, a so-called over-the-wire approach. Alternative methods to engage the coronary sinus ostium include searching with a glidewire over which a sheath is subsequently advanced and using special preformed catheters such as Amplatz catheters that allow for subsequent passage of a guidewire once the ostium is localized. On occasion, guidewires or glidewires may be necessary to maintain access within the coronary sinus while a separate sheath-guidewire combination is used to pass the coronary sinus lead. Fixation of coronary sinus leads is predominantly passive, though efforts are currently under way to develop alternative methods of fixation.
Manipulation of the atrial lead primarily entails using a straight stylet initially to pass the lead through the vein into the right atrium and then replacing it with a curved stylet. Great care must be exercised, as with manipulation of any stylet, to avoid getting heme on the stylet lest it occlude the lumen of the lead and thereby prevent the passage of other stylets that might be required. In the case of a preformed (J-shaped) passive-fixation atrial lead, engagement of the atrial appendage is the goal and may be appreciated fluoroscopically by the “dog wag” appearance of the engaged lead as it moves with atrial contraction. For active-fixation leads, it is important to test the screw mechanism before attempting passage. Active-fixation atrial leads are either preformed J-shaped ones or require the implanter to form a J by passage of a J-shaped stylet; in either case, it is useful to watch the screw mechanism extend under a magnified fluoroscopic image and then torque the body of the lead clockwise slightly for further stabilization. Less experienced implanters have the misconception that the use of an active-fixation lead per se ensures active fixation and greater stability. It is critical to test fluoroscopically for stability of the lead fixation with gentle traction, particularly as the J-shaped stylet is being withdrawn from the atrial lead. Ironically, better sensing and pacing thresholds may often be achieved with passive-fixation leads; however, active fixation enables positioning the leads in patients with prior atriotomy or who require positioning of the lead in a less orthodox location within the atrium. As to special positioning of atrial leads, some preliminary work has explored the potential benefit of preventing atrial fibrillation by pacing at the Bachmann’s bundle, by interatrial septum pacing, or by both. Dual-site right atrial pacing and bi-atrial synchronous pacing in some studies have been more effective in the prevention or reduction of atrial fibrillation, compared with single-site right and left atrial pacing. Typically, dual-site right atrial pacing consists of pacing simultaneously from leads positioned in the high right atrium and coronary sinus ostium; the proposed mechanism responsible for antifibrillatory effects is a reduction of activation times in the atrium, especially in areas of conduction delay.
A question that frequently arises is how best to place atrial leads in a patient who is in atrial fibrillation or flutter at the time of implantation. One approach is to acutely cardiovert the patient to sinus mechanism, provided no significant risk of thromboembolic phenomena (as assessed by recency of the arrhythmia, trans-esophageal echocardiography, previous anticoagulation, etc.) exists. Another method is to blindly position the lead and use an active-fixation lead, in particular, to allow for a variety of test positions as assessed by atrial signals and electrocardiographic mapping. Cardioversion could be undertaken thereafter in the latter case, or it may occur spontaneously in the case of the paroxysmal fibrillator.
In some situations, the implanter may opt for a single-lead dual-chamber system, particularly for patients with heart block but with normal sinus node function and without atrial arrhythmias. Current models allow for bipolar atrial sensing with ventricular pacing and sensing (unipolar or bipolar), although leads that also allow for atrial pacing have been studied. The advantage of this approach is that atrioventricular synchrony may be achieved with a single lead. It is important to size a patient with regard to cardiac configuration so as to choose a lead with appropriate spacing between the atrial bi-pole and ventricular electrodes. It is ideal to have the atrial electrodes contacting the atrial wall (as opposed to sitting in the blood pool), also allowing enough slack to accommodate changes in atrial electrode positioning that may arise with respiration or change in body position.
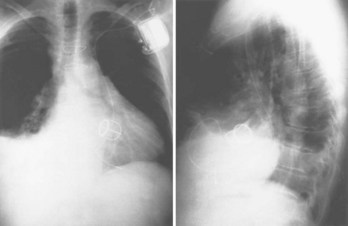
Fluoroscopic confirmation of positioning is important, not only in the anteroposterior views but also in utilizing right and left anterior oblique views to assess patients with anteriorly rotated hearts and either confirm or rule out the placement of a lead within the coronary sinus.
Following placement of the lead(s), use of the pacer system analyzer is crucial in evaluating sensing thresholds, pacing thresholds, and lead impedance and for the possibility of diaphragmatic stimulation at high output—either through atrial leads (phrenic nerve stimulation) or ventricular leads (through a thin-walled right ventricle). For active-fixation leads, whether in the atrium or in the ventricle, demonstration of an initial injury current is particularly useful in confirming fixation.
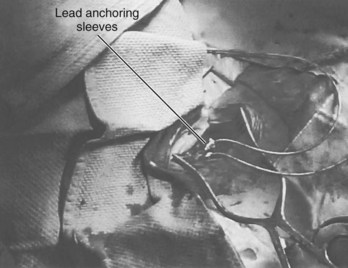
Perhaps the most important step in pacemaker implantation is lead anchoring. An anchoring sleeve minimizes trauma by being sutured (typically a 0-silk) to the underlying lead insulation, conductor, or both (Figure 32-13). The right balance must be achieved between anchoring the sleeve too securely and anchoring it not securely enough; it is easier to bury the sleeves with a purse-string suture with leads implanted via the cephalic route than via the subclavian route. In addition, repeat fluoroscopy should be undertaken once anchoring has been performed to make sure that lead position, redundancy, or both remain stable at baseline as well as with deep breathing. Enough slack should be provided to accommodate tall individuals, particularly those with large respiratory excursions, to prevent undue tension or retraction of the lead. The leads are then connected to the connector block of the generator; it is critical to ensure that the set screw sites are adequately tightened (including both poles in the case of bipolar leads) by gentle tugging on the lead. Application of sterile adhesive over the set screw site may minimize current drain through this locale.
Only gold members can continue reading.
Log In or
Register to continue
Related