The angiographer performing left and right cardiac catheterization should be familiar not only with the cardiac structures in general, but primarily the projections of those cardiac structures in different angiographic views.1,2 Left heart structures are outlined in different projections in Figures 9.1 and 9.2.
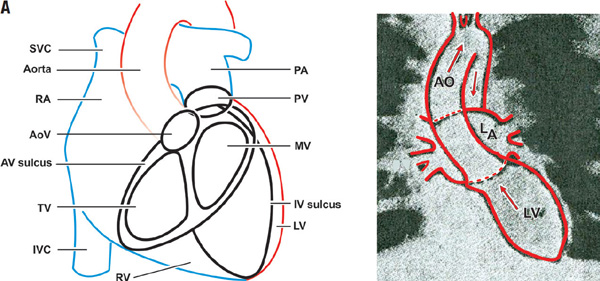
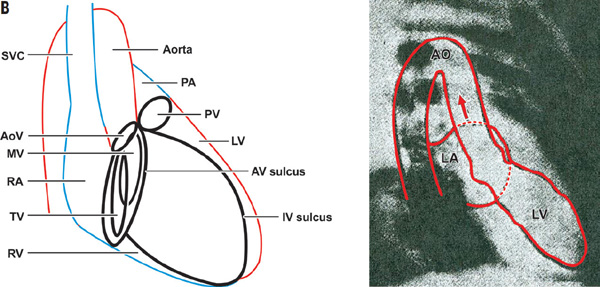
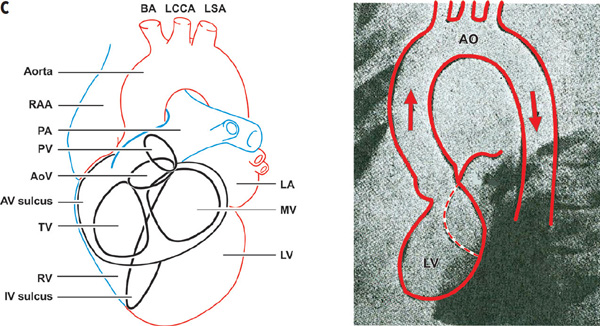
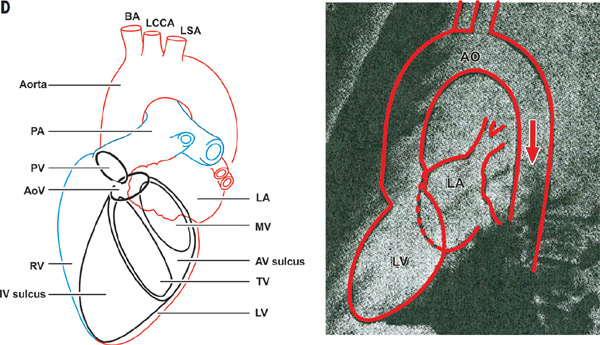
FIGURE 9.1The images show different views of the radiologic anatomy of the left heart and aorta with corresponding diagram. Panel A: PA view; Panel B: RAO view; Panel C: LAO view; Panel D: LL view.
Measuring left ventricular (LV) pressure with or without accompanied ventriculography is a routine part of any left heart catheterization procedure.
The general indications for LV catheterization are:
- Measuring LV end diastolic pressure
- Establishing presence of and measuring aortic valve, LV outflow, or intracavitary gradients
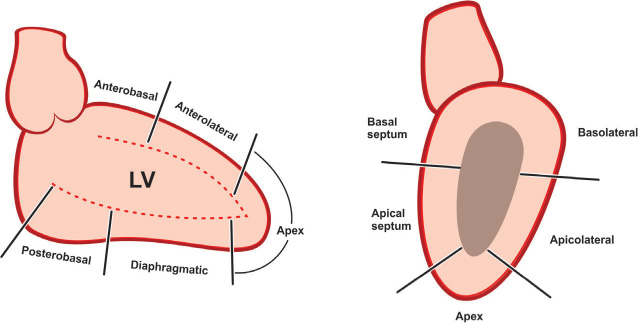
- Assessing LV systolic function, presence of segmental wall motion abnormalities and myocardial viability (noted by postextrasystolic contractile augmentation)
- Assessing severity of mitral regurgitation
- Establishing presence and severity of ventricular septal defects
- Assessing severity of mitral regurgitation
If LV end-diastolic pressure exceeds 25 mmHg, it is generally recommended not to perform left ventriculography unless the pressure is reduced by intravenous diuretics or sublingual nitroglycerin.
Certain restrictions and contraindications to the procedure are listed in Table 9.1.
TABLE 9.1Contraindications to left ventriculography.
* relative contraindication for ventriculography and pressure measurement
** absolute contraindication for ventriculography, no contraindication for pressure measurement
Entering the Left Ventricle
When planning to cross a severely stenotic aortic valve and anticipating difficulty, it is advised to give intravenous heparin bolus and keep the ACT above 200 seconds during the procedure. The guidewire should be removed and cleaned every 2 minutes and the catheters aspirated and flushed before every attempt to thread the guidewire.
THE ANGLED PIGTAIL CATHETER
The angled pigtail catheter (depicted in Chapter 3, Figure 3.8) is specifically designed to enter the LV and to prevent the tip of the catheter from aggressively contacting the endocardial surface. The distal tip of this catheter has 6 side holes to allow the rapid filling of the ventricular cavity with contrast and to avoid an excessive motion of the catheter in the LV during the injection phase. The operator advances the catheter over the 0.035-inch, J-tip guidewire through the arterial sheath to the aorta under fluoroscopic guidance, keeping the tip of the wire protruding beyond the tip of the catheter. Once the tip of the guidewire advances around the aortic arch, it gets fixed above the sinotubular junction. The catheter slides over the wire, and the wire is withdrawn. In 30-degree RAO projection, the catheter is rotated in the ascending aorta until the “pigtail” tip looks like the number “6” and oriented towards the left cusp. When this is achieved, the operator slowly advances the catheter towards the aortic valve. Occasionally, the catheter tip easily prolapses into the ventricular cavity, but frequently it gets caught by the aortic valve cusps. In such cases, a gentle push of the catheter will cause buckling of its distal end. Slow withdrawal with a slight clockwise rotation of the catheter straightens the distal segment, and the patient is asked to take a deep breath. With this maneuver, the catheter tip usually prolapses into the LV cavity, where it gets stabilized in the mid-ventricular position coaxial with the longitudinal axis of the LV. The LV systolic and end-diastolic pressures are measured and recorded on 200-mm and 50-mm scales on end-expiration. Once this is done, the operator fills the syringe with contrast and proceeds with a test injection into the LV cavity under fluoroscopic guidance in order to optimize catheter position and ensure that it is not lying against the LV wall or entrapped in the mitral valve apparatus, as described in Chapter 7.
If an atypical anatomic configuration, sclero-calcific changes of the aortic valve, or the use of small, 4-Fr or 5-Fr diameter catheters impedes the process of crossing the valve with the above-described method, one of the following techniques using guidewire support can be applied. First, the catheter slides over the 0.035-inch, J-tip guidewire until the tip of the wire gets covered by the tip of the catheter and the guidewire stays inside the catheter. The rest of the technique is identical to the one described earlier. Second, initial steps are the same as in the previous approach until the “pigtail” tip looks like the number “6.” At this point, the guidewire is advanced forward against the valve. Sometimes the guidewire slips straight across the valve, but if not, the operator gently pushes it forward until 3–4 cm of the distal end is buckled and curled back in the aortic sinus just as described above. Then the catheter is withdrawn slightly, followed by gentle withdrawal of the wire. When the curve of the guidewire straightens, it usually prolapses through the valve. If the tip of the catheter is placed too deep into the LV and/or twists with each beat, then it may be entangled in the subvalvular apparatus and requires repositioning.
While monitoring the LV pressure and ECG, the injector syringe is disconnected from the manifold, which then is connected to a power injector. To perform this maneuver safely, the technician manually runs contrast media through the tubing system connected to the injector until contrast is ejected from the distal tip of the tubing. At the same time, the operator allows the contrast from the bottle to run down through the manifold by opening the proximal port of the manifold. Then the operator hooks the distal end of the tubing from the injector to the manifold by using the fluid-to-fluid method. If some air has managed to remain in the tubing, gently tapping on the tubing with simultaneous aspiration of the air bubbles into the injector takes care of it. About 8–10 mL of blood from the LV is aspirated back into the automatic contrast injector, while the operator taps gently on the tubing and manifold in order to remove all bubbles before moving the contrast forward into the ventricle for test injection under fluoroscopy guidance. The injector filled with the contrast is positioned at 80 to 90 degrees so all the potentially present air bubbles in the closed system collect on the top surface of the dye, preventing their migration into the ventricle during the injection. After this step is completed and another check for the absence of air from the system is performed, the operator sets the final parameters for injection.
Once the catheter is sitting properly in the mid ventricle, the physician will inform the patient that he/she may feel a hot flush all over the body and the sensation of passing urine. Then the patient is asked to hold a breath while the operator takes the image and fixes the catheter at the hub of the sheath to prevent backward recoil, and orders contrast injection. Imaging in 60-degree LAO and 30-degree RAO projections is initiated and ventriculography is performed. Ventriculography should continue until the ventricle is clear of contrast.
The usual settings of the power injector for left ventriculography are 30–50 mL of contrast dye volume at an injection rate of 12–15 mL/second and gradual flow rate rise over 0.5–1.0 second when a 6-Fr pigtail catheter is used. The frame rate is set at 15 frames/second unless the patient is tachycardic. In such cases, the frame rate is set at 30 frames/second. These parameters and radiologic views vary based on individual patient characteristics and the purpose of the study. Large volume (50 mL) and high rates (15–20 mL/sec) of injection are needed with a dilated ventricle, in a patient with high cardiac output, or when assessing severity of mitral regurgitation (Table 9.2). In general, views for evaluation of severity of mitral regurgitation in biplane ventriculography are RAO 45-degree and LAO 60-degree with 25-degree cranial angulation, since these projections place the left atrium away from the spine, the left ventricle, and the descending aorta. The patient’s heart rate should be well controlled, since severity of mitral regurgitation cannot be adequately evaluated in patients with tachycardia, frequent premature contractions, or uncontrolled atrial fibrillation.
TABLE 9.2Angiographic classification of mitral regurgitation severity.
1.Mild (1+) – Minimal and incomplete opacification of the left atrium, which clears with each cardiac cycle 2.Moderate (2+) – Complete but faint opacification of the left atrium after several cardiac cycles 3.Moderate to Severe (3+) – Complete opacification of the left atrium after more than one cardiac cycle, with the same intensity as left ventricle 4.Severe (4+) – Complete and very intense opacification of the left atrium within one cardiac cycle, with opacification of pulmonary veins |
There are certain factors that may overestimate (any LVOT obstruction, systemic hypertension, premature beats, catheter entrapped in mitral subvalvular apparatus, catheter placed too close to the mitral valve) or underestimate (inappropriate catheter and/or contrast volume used, slow injection, severely dilated left ventricular cavity, catheter placed too distally) the severity of mitral regurgitation (Figure 9.3). Hence, the operator must take these factors into consideration when making a final conclusion on the grade of mitral regurgitation. On the other hand, for patients with a smaller ventricle or with decreased cardiac output, less volume (30 mL) and a lower rate (10–12 mL/second) should be used for qualitative assessment of LV systolic function and segmental wall motion on biplane views (Table 9.3).
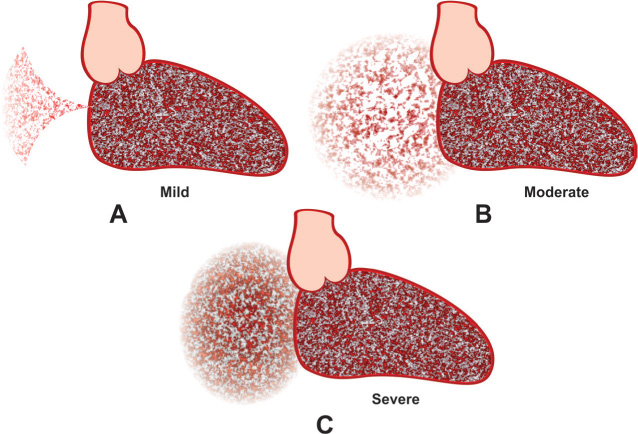
FIGURE 9.3Diagram of RAO view of left ventriculography in the presence of mitral regurgitation shows mild (Panel A), moderate (Panel B), and severe (Panel C) mitral regurgitation.
Stay updated, free articles. Join our Telegram channel

Full access? Get Clinical Tree


