The percutaneous intravascular endomyocardial cardiac biopsy procedure using flexible bioptome was introduced by Sakakibara and Konno in 19621 and subsequently improved by Caves and Stinson.2 Indications and contraindications3-6 for the procedure are outlined in Tables 13.1 and 13.2, respectively.
TABLE 13.1Indications for endomyocardial biopsy.
Right Ventricular Biopsy Major Indications:
Minor Indications:
|
Left Ventricular Biopsy
|
TABLE 13.2Contraindications to endomyocardial biopsy.
Absolute Contraindications
|
Relative Contraindications
|
The procedure is performed under mild sedation, with ECG, blood pressure, and pulse oximetry monitoring. Transthoracic 2D or 3D guidance7 for the intracardiac bioptome tip position can be used in addition to or instead of fluoroscopic guidance, especially in pregnant patients or patients where a specific site needs to be biopsied. To access RV endomyocardium, the RIJ and the femoral vein approaches are commonly used and will be described. The femoral artery approach for accessing the LV endomyocardium will also be described. Right heart catheterization with recording of pressure tracings before and after RV endomyocardial biopsy is highly recommended. When LV endomyocardial biopsy is performed, a simultaneous right heart catheterization is advised.
Jugular Vein Approach
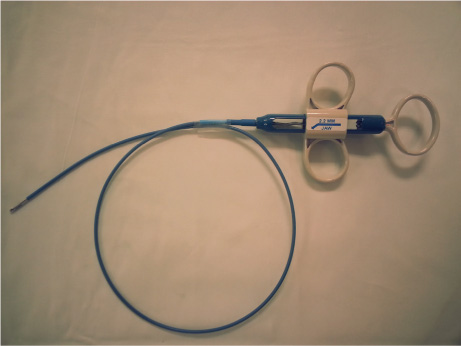
After jugular venous access is obtained, the operator inspects the preshaped bioptome to ensure proper function and wipes it with heparinized normal saline solution at the beginning of the procedure and then after each insertion attempt. The preshaped bioptome is handled with the thumbs and index fingers of both hands (Figure 13.1). The tip is held around 4–6 cm from the distal end with the left thumb and index finger, and the right thumb and index finger hold the bioptome 10–12 cm from the proximal end. This allows control of the forward motion and torque of the bioptome with the fingers of both hands.
The operator asks his/her assistant to hold the venous sheath while the tip of the bioptome, with closed jaws, is advanced and passed through it. The bioptome is advanced with the tip pointing to the patient’s right (to the lateral wall of the RA) under fluoroscopic guidance, and when the tip reaches the high RA lateral wall, the bioptome is gently torqued counterclockwise 180 degrees using the fingers of both hands simultaneously (Figure 13.2A), then slowly advanced through the tricuspid valve into the RV cavity (Figure 13.2B).
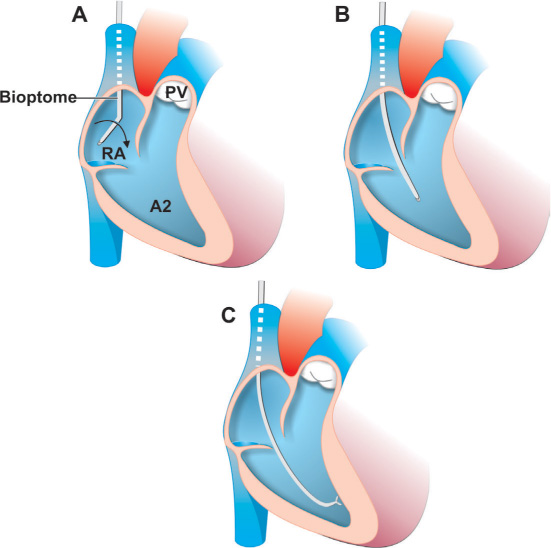
FIGURE 13.2The jugular vein approach for endomyocardial biopsy includes the following steps: Panel A: The bioptome is advanced with the tip pointing to the lateral wall of the RA under fluoroscopic guidance and torqued 180 degrees. Panel B: The bioptome is slowly advanced through the tricuspid valve into the RV cavity. Panel C: Once inside the RV cavity, the bioptome jaws are opened, bioptome is advanced to engage the interventricular septum, and a biopsy is obtained.
If the operator feels resistance while crossing the tricuspid valve, the bioptome should be withdrawn and another attempt made with some change in direction. Once the bioptome tip is in the RV apex, the operator withdraws the bioptome for 1 cm, torques it gently counterclockwise with the fingers of both hands so that the handle starts pointing to the posterior direction, perpendicular to the floor, and directs the tip posteriorly towards the interventricular septum. The plane of the septum is simulated by a 45-degree angle from the tip of the patient’s nose to the patient’s right shoulder. Slight advancement with the bioptome jaws closed is followed by a premature ventricular contraction, indicating contact with the ventricular rather than atrial endocardium. The operator obtains images of the bioptome at PA projection, where the bioptome should be visualized crossing the spine, its tip lying below the upper margin of the left hemidiaphragm, and at RAO 30-degree projection followed by LAO 60-degree projection to confirm correct position of the tip against the midportion of the interventricular septum. These views will help to discover unintentional positioning of the bioptome in the coronary sinus and infradiaphragmatic vein.
In patients with severe RV dilatation, rotation of the heart may occur in the chest, with a portion of the RV free wall wrapping around posteriorly, and this may lead to RV free wall biopsy despite a fluoroscopically correct position of the bioptome tip. The 2D or 3D echocardiographic images can be used for final confirmation of correct location of the tip of the bioptome against the interventricular septum. The bioptome is retracted about 1 cm, and the right hand of the operator moves to the biopsy handle, while the left hand remains on the bioptome body slightly above the hub of the venous sheath. The jaws of the bioptome are opened, and the bioptome is advanced to engage the interventricular septum (Figure 13.2C). As the septal wall is engaged, the operator gently closes the bioptome jaws and withdraws the bioptome with jaws closed under fluoroscopic guidance all the way out of the sheath, with the left hand of the operator holding the sheath in place. A minor tug is felt initially when withdrawing the bioptome. In cases where excessive resistance and multiple premature ventricular contractions are observed, bioptome withdrawal should be avoided; instead, the bioptome jaws should be opened and the bioptome withdrawn and repositioned.
In general, 4 to 6 tissue samples are obtained, one of which is used for frozen section. Tissue from the open jaws of the bioptome is removed by gently rinsing with saline and quickly preserved in 10% formalin solution to reduce the amount of contraction artifact. Free-floating biopsy samples in formalin solution suggests the presence of a significant amount of fat tissue, which could be one of the signs of RV dysplasia, or indicate RV perforation with epicardial fat sampling. After the procedure is completed, fluoroscopy of the chest is performed to rule out pneumothorax. The patient should be kept in the observation unit for one hour after an uncomplicated procedure before discharge.
Femoral Vein Approach
For the femoral vein approach, a 7- to 8-Fr, 85-cm disposable-sheath system with dilator (“dog-leg” sheath with a 135-degree angle bend) is advanced over the 0.038-inch guidewire through the short entry sheath into the RA (Figure 13.3A). The dilator and the guidewire are subsequently withdrawn, which usually causes the preformed distal segment of the “dog-leg” sheath to drop into the RV. If this does not occur, the tricuspid valve is crossed with the help of the wire. If the distal end of the sheath is not ending inside the RV, then the balloon-tipped catheter can be used to navigate the biopsy sheath into the RV. After passing the distal end of the “dog-leg” sheath, the balloon-tipped catheter will be inflated and directed into the RV. The catheter is advanced across the tricuspid valve into the RV, where pressure is recorded, the balloon deflated, and the “dog-leg” sheath moved over the balloon-tipped catheter into the RV (Figure 13.3B). After positioning the sheath in the RV, the catheter is removed and the sheath is flushed with heparinized normal saline. The side port of the sheath is connected to a slow, continuous intravenous infusion to prevent clot formation inside the sheath. The sheath is repeatedly flushed after each insertion attempt of the bioptome to prevent clot formation.
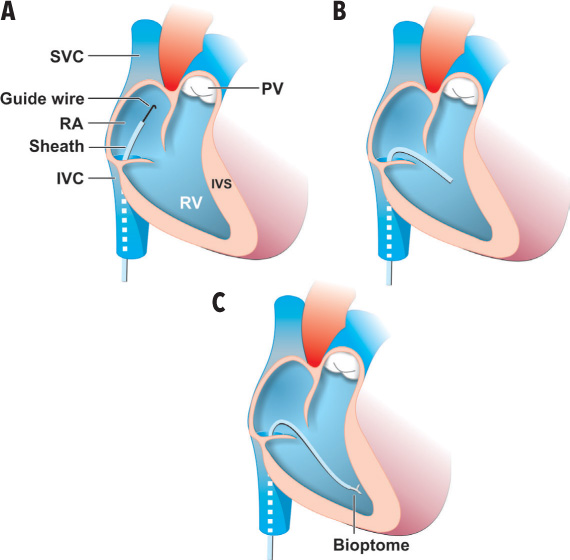
FIGURE 13.3The femoral vein approach for endomyocardial biopsy includes the following steps: Panel A: A “dog-leg” sheath with a 135-degree angle bend is advanced over the 0.038-inch guidewire through the short entry sheath into the RA. Panel B: The dilator and the guidewire are withdrawn, causing the preformed distal segment of the “dog-leg” sheath to drop into the RV. Panel C: The bioptome is advanced through the “dog-leg” sheath under fluoroscopic guidance; after confirmation via imaging that the tip is against the interventricular septum, a biopsy is taken and the bioptome removed.
Stay updated, free articles. Join our Telegram channel

Full access? Get Clinical Tree


