Cardiopulmonary Bypass
Ivan K. Crosby
Richard K. Zacour
INTRODUCTION
The incidence of technical complications associated with the use of cardiopulmonary bypass (CPB) has decreased greatly over the years, aided by the standardization of the equipment and techniques. The standardization of cannulation, cannulae, heart-lung machine, and myocardial protection has resulted in fewer iatrogenic complications such as aortic dissection, air embolism, or end-organ malperfusion. The use of such a standardized protocol is especially important for surgeons learning to use CPB, as well as for the other members of the operative team (anesthesiologists, nurses, and perfusionists), who will anticipate and prepare for each “next step” in the lengthy sequence of important steps in each operative procedure. The omission of one step (e.g., forgetting to give the heparin or forgetting to de-air the heart) can have devastating results in an otherwise well-performed operation. To facilitate the implementation of a standard protocol, all anesthesiologists, surgeons, and perfusionists should agree to standardization of their respective parts of the operation.
It goes without saying that surgeons-intraining should understand the perfusion circuitry, the priming solutions, maximum and minimum flow rates, safe levels of hemodilution during CPB, and the technical details of the system of myocardial protection being used. There should be an understanding of the chain of command, an appreciation of the areas of responsibility of each team member, and the need for open and concise communication among all team members during the course of the operative procedure.
Prior to going to the operating room the surgeon should have a plan for the operation, the expected pathology to be encountered, the type of incision best suited for this operation, the cannulation technique, the level of hypothermia, and the details of the myocardial protection to be used.
DEVELOPING A PLAN
Before each operation the surgeon must develop a plan for conducting the operation, especially the use and style of CPB. Although it is unnecessary for the anesthesiologist and perfusionists to know every technical detail of the planned procedure, it is critical that they understand the planned incisions, method of cannulating the heart and great vessels, the systemic and myocardial temperatures desired, the possible need for low flow or circulatory arrest, and any anticipated pathologic or anatomic variations that may require alterations in the plan of the procedure. It is advantageous for the surgeon to “think through” the entire operation before arriving in the operating room. This intellectual exercise begins by considering the critical elements of the planned operative procedure, which will determine the anatomic exposure required. For example, repair or replacement of the mitral valve requires maximum exposure of the right lateral aspect of the heart and the interatrial groove. Although neither the ventricles nor the left side of the heart need to be elevated, they must be able to be displaced into the left side of the pericardial cavity, or into the left pleural cavity. On the other hand, aortic valve replacement can usually be performed with simple aortic and right atrial cannulation “in situ,” and minimal manipulation or displacement of the ventricles. In general, coronary artery bypass grafting (CABG) requires exposure of all surfaces of the ventricles. Adequate exposure for the planned operation will be achieved by “suspending” or elevating the edges of the pericardium to make the relevant parts of the heart closer to the surface of the mediastinum, such that cannulation for CPB is easier, and the areas of the heart to be incised are closer to the surface. The operative plan will include the procedural steps of the operation, the technical details of the planned myocardial protection, and an estimate of the myocardial and systemic temperatures required for the specific operation.
EXPOSURE OF THE HEART
For CABG the best exposure of the heart is via a median sternotomy. For aortic valve procedures, either a full sternotomy or an upper hemisternotomy can be used. The full sternotomy makes it easier to insert a left ventricular (LV) vent through the right superior pulmonary vein, and to insert the retrograde cardioplegia cannula via the right atrium into the coronary sinus. A young surgeon should use the full sternotomy for all aortic valve procedures until he or she feels comfortable using the smaller “mini-valve” incision. Mitral valve operations require a different exposure. A large left atrium, as in long-standing mitral stenosis or mitral regurgitation, is easily approached by decompressing the heart using a vent and excellent venous drainage, using superior and inferior caval cannulae, and retrograde and antegrade cardioplegia. A vertical incision in the left atrium close to the interatrial groove is made, and using a mitral valve retractor the surgeon has a great view of the mitral valve. When the left atrium is small, as in acute bacterial endocarditis or severe mitral regurgitation following acute myocardial infarction, it
may be necessary to use caval snares, enter the right atrium, and incise the interatrial septum to expose the mitral valve. Again, although the surgeon might anticipate a “standard” valve or CABG procedure, he or she must always prepare for the unexpected: the valve that is irreparable; the infected aortic valve with a root abscess; the CABG patient with a shortage of suitable conduits; or the left internal mammary that is damaged during take-down, can it be salvaged and be a quality graft for the left anterior descending? Meticulous attention to technical details should prevent such calamitous iatrogenic problems such as sternal saw injuries to the right ventricle, ascending aorta or innominate artery, or unrecognized “sheathing” of the aortic cannula in the wall of the ascending aorta, causing fatal total aortic dissection. The time-honored adage “chance favors the prepared mind” is very appropriate for all surgeons performing cardiac surgery.
may be necessary to use caval snares, enter the right atrium, and incise the interatrial septum to expose the mitral valve. Again, although the surgeon might anticipate a “standard” valve or CABG procedure, he or she must always prepare for the unexpected: the valve that is irreparable; the infected aortic valve with a root abscess; the CABG patient with a shortage of suitable conduits; or the left internal mammary that is damaged during take-down, can it be salvaged and be a quality graft for the left anterior descending? Meticulous attention to technical details should prevent such calamitous iatrogenic problems such as sternal saw injuries to the right ventricle, ascending aorta or innominate artery, or unrecognized “sheathing” of the aortic cannula in the wall of the ascending aorta, causing fatal total aortic dissection. The time-honored adage “chance favors the prepared mind” is very appropriate for all surgeons performing cardiac surgery.
The careful communication between perfusionists, anesthesiologist, surgeon, and nurse is essential in preventing and dealing with crises during the operation.
PREPARATION
A member of the surgical team should be present in the operating room as soon as the patient arrives. The anesthesiologist and associates are responsible for the induction of anesthesia, endotracheal intubation, as well as placement of most monitoring devices. The induction of anesthesia should not commence until good intravenous lines have been inserted and stable EKG monitoring established. If a patient is hemodynamically unstable an arterial line and pulmonary artery catheter should be inserted prior to the induction of anesthesia.
Positioning the Patient
After the insertion of all monitoring lines and the administration of anesthesia, the patient is positioned for the appropriate surgical incisions. All pressure points are padded to prevent pressure necrosis of the skin or nerve damage. All monitoring cables, infusion lines, and EKG cables are secured to prevent displacement or disconnection during the operation. Most cardiac surgical procedures utilize a median sternotomy. This is best done when the sternum of the patient is parallel to the operating room floor. This is achieved by placing a padded roll transversely beneath the patient’s shoulders and a padded ring placed under the head. In coronary revascularization procedures both legs should be “frogged” to facilitate harvest of the saphenous vein conduits. If a radial artery graft is planned, the left arm should be on an arm board abducted from the left side of the table. When a submammary right thoracotomy is planned the right chest is elevated 30 degrees on a “bump” under the right scapula and another one is placed under the right hip. The patient’s right arm is at the side on the table.
Skin Preparation and Draping
After the anesthetized patient has been properly positioned, a protective screen is placed at the head of the table just superior to the manubrium of the patient. This serves two purposes: (a) it supports the weight of the sterile drapes; (b) it separates the anesthesia team from the sterile field. It is important that the framework of this “ether screen”—traditional name for it—allows easy access to the endotracheal tube and neck lines by the anesthesia team. Antibacterial skin preparation needs to commence prior to the patient’s arrival in the operating room. For at least 1 day prior to surgery the patient should have one or more showers and hair wash with chlorhexidine, and gentle scrubbing of the chest, abdomen, and groins with a soft foam scrubber. After positioning in the operating room, the lower neck, chest, abdomen, both groins, and for multivessel coronary revascularization procedures, both lower extremities are painted with a two-solution antibacterial skin prep. When the skin is dry an antibacterial adhesive plastic drape is applied covering all the areas that need to be accessible for surgical incisions. The rest of the traditional sterile drapes complete the draping of the patient.
For every open-heart operation it is important to prep and drape both groins to facilitate rapid institution of CPB before the sternum is opened, should it become necessary, or to permit insertion of femoral arterial monitoring lines or an intra-aortic balloon pump.
The height of the operating room table is usually a compromise between the height desired by the surgeon and that desired by the first assistant. Some surgeons feel that the table height is optimal when the surgeon’s wrists are 1-3 cm below the elbow height when operating. The assistants adjust their position and elevation to accommodate the surgeon. The operating room lights are positioned initially to give the best exposure for the sternal incision. Subsequent adjustments are made to illuminate the appropriate area of the heart being treated. For mitral valve operations one light is positioned behind the surgeon, midway between the head and right shoulder such that it shines directly on the mitral valve.
The heart-lung machine and cell-saving equipment are brought into position and the pump lines and suckers are passed off the field to the perfusionists and circulating nurse. The pump lines are secured to the drapes on the side of the table near the patient’s right hip in such a way that the operative field is not compromised and the surgeons are unhampered. The lines should be secured to the drapes such that even excessive force cannot displace them. Inexperienced members of the team are instructed not to touch or compress the lines.
Incisions
The most common incision for cardiac surgical procedures is the median sternotomy. The length of the incision requires consideration of safety, effective exposure of the appropriate parts of the heart, and cosmesis. Anatomic and pathologic variations require careful planning to avoid disaster. A large ascending aortic aneurysm pressing against the back of the sternum, severe pectus excavatum, a patent internal mammary graft, or a redo operation all require the sternotomy incision to be performed with great caution. The length of the sternotomy incision can be shortened for cosmetic reasons. The superior extent of the skin incision might be midway between the top of the manubrium and the manubriosternal junction. Inferiorly, the incision can be stopped at the superior aspect of the xiphisternum. Experienced surgeons will elevate the skin of the inferior margin of the sternotomy incision and divide the xiphoid process longitudinally along with the superior aspect of the linea alba, to allow effective exposure of the heart, but limiting the length of the skin incision. It is important for less-experienced surgeons not to compromise safety for cosmesis. When the sternal edges are spread using the sternal retractor the anterior aspect of the pericardium is clearly visible. The anterior layer of the pericardium is grasped with hemostats and the pericardium is incised from the acute angle of the heart inferiorly up to the pericardial reflection on the ascending aorta.
There are two basic techniques for elevating the heart closer to the sternal surface to facilitate exposure of the cardiac structures. One approach utilizes #1 silk traction sutures where the pericardium is stitched to the fascia at the edge of the sternal incision, or to the retractor itself. In the second technique two Kocher clamps grasp each side of the incised pericardium, the sternal retractor is loosened, and the edges of the pericardium in the Kocher
clamps are pulled up between the blades of the sternal retractor and the sternal edge. As the retractor is opened further the whole heart is elevated anteriorly giving excellent exposure. Caution should be used in spreading the sternal retractor too wide, as this can cause traction on the brachial plexus causing pain and numbness in the fourth and fifth fingers of the left hand postoperatively, or acute hypotension. If the length of the sternotomy skin incision is limited inferiorly, the pericardial incision should be carried down onto the diaphragm to give better exposure.
clamps are pulled up between the blades of the sternal retractor and the sternal edge. As the retractor is opened further the whole heart is elevated anteriorly giving excellent exposure. Caution should be used in spreading the sternal retractor too wide, as this can cause traction on the brachial plexus causing pain and numbness in the fourth and fifth fingers of the left hand postoperatively, or acute hypotension. If the length of the sternotomy skin incision is limited inferiorly, the pericardial incision should be carried down onto the diaphragm to give better exposure.
Heparin
Once the aortic and atrial pursestring sutures are in place, heparin should be administered. In some centers the heparin is given by the anesthesiologist into a central line. In other centers the surgeon will inject the heparin directly into the right atrial appendage so that there is no doubt that all the heparin is circulating. If the heparin is given through a peripheral IV line tragedy will ensue if that IV has infiltrated. The normal heparinizing dose is 300 units/kg of patient bodyweight (Table 36.1). Additionally, 4 U porcine heparin/ml of pump prime is injected directly into the CPB circuit. However, heparin activity is patient specific and may vary if underlying coagulation defects are present. Confirmation of systemic anticoagulation is achieved by performing an activated clotting time (ACT). An uncontaminated whole blood sample is sent for ACT measurement 3 to 5 minutes after the heparin has been given. This test measures heparin activity, which plays a more significant role in anticoagulation management than heparin concentration. The optimal ACT range for CPB has not been defined. Our protocol requires the ACT be >2.5 times the baseline ACT before initiating CPB, and maintained at >480 seconds during CPB. We prefer to maintain ACTs between 400 and 600 seconds because ACTs <180 seconds are dangerous and ACTs >600 seconds are unnecessary (Table 36.1). We monitor the ACT every 20 minutes during normothermic CPB, every 30 minutes for hypothermic CPB, and more frequently if the patient shows heparin resistance (Table 36.1).
Heparin Substitute
In situations where heparin cannot be used we go to bivalirudin (Angiomax). Our protocol is as follows:
50 mg in pump prime
1 mg/kg bolus 20 minutes prior to CPB
Table 36.1 Anticoagulation Management Protocol
Add 4 U of beef lung heparin per milliliter of the pump prime to the cardiopulmonary bypass circuit.
The surgeon injects 300 U of beef lung heparin per kilogram of patient body weight into the right atrium.
An uncontaminated whole-blood sample is drawn 3-5 min after heparin injection for an activated clotting time (ACT) measurement.
The ACT must be >2.5 times the baseline ACT before initiating cardiopulmonary bypass, and must be maintained at >480 seconds during cardiopulmonary bypass.
The ACT should be monitored every 20 min during normothermic cardiopulmonary bypass, every 30 min during hypothermic cardiopulmonary bypass, and more frequently if the patient shows heparin resistance.
2.5 mg/kg/h continuous infusion following initial bolus
0.1 to 0.5 mg/kg bolus to maintain desirable ACT of 500 seconds
Check ACT every 10 minutes while on bypass
Discontinue bivalirudin following termination of CPB
DO NOT use blood cardioplegia. Use crystalloid cardioplegia (Plegisol)
Flush CPB circuit with clear prime fluid into cell-saver once terminated
Process CPB circuit volume via cell-saver as soon as possible.
Cannulation
All cannulation pursestring sutures MUST be inserted before the heparin is given (Fig. 36.1 ). The full heparin dose must be given and have circulated BEFORE any cannulae are inserted. In its simplest form CPB requires a cannula in the ascending aorta and a cannula in the right side of the heart. The type of procedure to be performed will dictate where the cannula is placed in the ascending aorta and what type of cannulation is performed on the right side of the heart. If a coronary bypass procedure is being performed, the cannula in the ascending aorta will be placed close to the innominate artery or even in the arch area. This will allow a large area of the ascending aorta for the placement of proximal graft anastomoses. Remember: PURSESTRING SUTURES first, then HEPARIN, then CANNULATION!
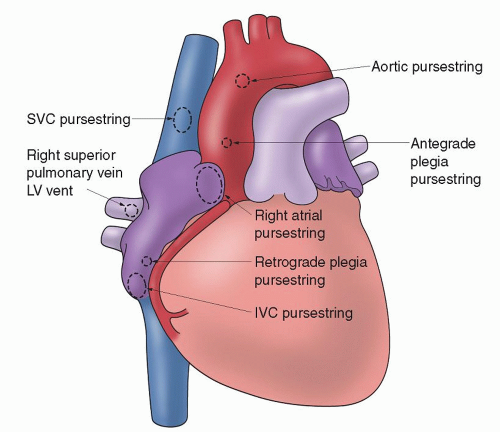 Fig. 36.1. Sites on the heart and great vessels for cannulation sutures. IVC, inferior vena cava; LV, left ventricle; SVC, superior vena cava. |
Aortic Cannulation
Trainee cardiac surgeons traditionally learn cannulation techniques from their immediate superiors or from their consultants or
professors. Before any aortic pursestrings are inserted, however, the surgeon should perform gentle digital evaluation of the entire ascending aorta, innominate artery, and aortic arch. In choosing a cannulation site he or she needs to avoid areas of calcification or atherosclerosis in the aorta. If there is any question, the aorta should be evaluated with an epiaortic probe. Of prime importance is the need for the cannula tip to lie in the lumen of the aorta (Fig. 36.2), not against or penetrating the wall of the aorta (“sheathing” the cannula, causing a type A aortic dissection). Also it should not be inserted so far that the tip of the cannula goes up the innominate artery or the left carotid artery. The jet from the cannula tip should not act like a “fire hose” directed at atherosclerotic plaque and shower emboli to the brain. Many surgeons prefer that the length of the cannula that penetrates the aortic wall should be no more than 2 to 3 cm (Fig. 36.2). Although some surgeons prefer a much longer cannula penetration into the aorta such that the tip of the cannula lies in the distal aortic arch, avoiding the innominate, the left carotid, and the left subclavian artery orifices, we feel that it is hard for trainee surgeons to be sure that the tip placement is perfect using this latter technique. The aortic pursestring is usually a 3-0 monofilament or braided suture. The diameter of the pursestring is usually 1 to 1/3 times the diameter of the aortic cannula being used. There is usually an inner pursestring and an outer pursestring and some surgeons prefer to use pledgets with these pursestrings (Figs. 36.3, 36.4, 36.5). The needle bites of the double-armed sutures should penetrate the adventitia and into the media of the aortic wall, but not into the lumen of the aorta. After completing the pursestrings, the needles are removed and both ends of the suture drawn through a tourniquet or snare. There are thus two tourniquets to secure the aortic cannula when it is inserted.
professors. Before any aortic pursestrings are inserted, however, the surgeon should perform gentle digital evaluation of the entire ascending aorta, innominate artery, and aortic arch. In choosing a cannulation site he or she needs to avoid areas of calcification or atherosclerosis in the aorta. If there is any question, the aorta should be evaluated with an epiaortic probe. Of prime importance is the need for the cannula tip to lie in the lumen of the aorta (Fig. 36.2), not against or penetrating the wall of the aorta (“sheathing” the cannula, causing a type A aortic dissection). Also it should not be inserted so far that the tip of the cannula goes up the innominate artery or the left carotid artery. The jet from the cannula tip should not act like a “fire hose” directed at atherosclerotic plaque and shower emboli to the brain. Many surgeons prefer that the length of the cannula that penetrates the aortic wall should be no more than 2 to 3 cm (Fig. 36.2). Although some surgeons prefer a much longer cannula penetration into the aorta such that the tip of the cannula lies in the distal aortic arch, avoiding the innominate, the left carotid, and the left subclavian artery orifices, we feel that it is hard for trainee surgeons to be sure that the tip placement is perfect using this latter technique. The aortic pursestring is usually a 3-0 monofilament or braided suture. The diameter of the pursestring is usually 1 to 1/3 times the diameter of the aortic cannula being used. There is usually an inner pursestring and an outer pursestring and some surgeons prefer to use pledgets with these pursestrings (Figs. 36.3, 36.4, 36.5). The needle bites of the double-armed sutures should penetrate the adventitia and into the media of the aortic wall, but not into the lumen of the aorta. After completing the pursestrings, the needles are removed and both ends of the suture drawn through a tourniquet or snare. There are thus two tourniquets to secure the aortic cannula when it is inserted.
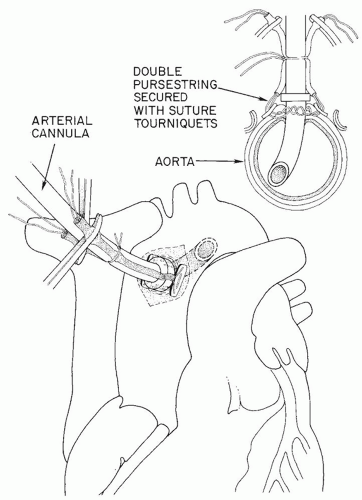 Fig. 36.2. The final position of the aortic cannula in an adult. |
There are three commonly used techniques for inserting the aortic cannula in the aorta:
Using a #11 blade, and taking care not to cut the pursestring sutures, the surgeon makes a stab incision through the aortic wall inside the pursestrings circle (Fig. 36.5). Removing the blade, the left index finger quickly tamponades the incision to prevent hemorrhage. The “bumper” on the aortic cannula has already been adjusted to limit the depth of penetration of the cannula into the aorta. As the left index finger moves from the stab incision in the aorta the right hand gently but quickly pushes the aortic cannula into the aortic lumen. The snares or tourniquets are tightened down and then tied to the cannula above the bumper to prevent the cannula from backing out of the aorta. The clamp on the aortic cannula is briefly released to remove all air from the cannula and the clamp reapplied (Fig. 36.2).
Some surgeons prefer to use a #15 blade and make a vertical incision within the pursestrings, layer by layer of the aorta, until only the intimal layer remains. Holding the preadjusted cannula in the right hand the cannula is carefully pushed through the intima into the lumen of the aorta. The aortic cannula is deaired as above and secured (Fig. 36.2).
Ambidextrous surgeons can make the incision into the aorta inside the pursestring circle with the left hand using a #15 blade, and keeping the body of the #15 blade inside the aorta, they hold the cannula in their right hand and slide the tip of the cannula off the #15 blade into the aortic lumen (a “shoe-horn” maneuver). The cannula is then secured and deaired as above.
No matter which technique is used to insert the aortic cannula into the aorta, the surgeon must meticulously remove all air and debris from the cannula as it is connected to the arterial line from the heart-lung machine, and the clamp is removed from the aortic cannula.
Alternative Cannulation Sites
Arterial cannulation of the distal ascending aorta or aortic arch may not be desirable or possible if there is extensive calcification of the entire ascending aorta and arch, or if there is an acute aortic dissection involving the ascending aorta and arch (type A), or a large aneurysm involving the arch. In such circumstances there are two alternative cannulation sites to consider: the right axillary artery or the femoral artery.
The right axillary is exposed using a small subclavicular incision. The pectoralis muscle is split or divided, exposing the axillary artery. Gentle mobilization is necessary to avoid injury to the adjacent brachial plexus, or causing spasm of the axillary artery itself. After heparinization of the patient a segment of the artery is isolated
between gentle vascular clamps, and an 8 mm longitudinal incision is made on the anterior aspect of the artery. A 10 cm length of 8 mm diameter prosthetic graft is sewn end-to-side to the 8 mm arteriotomy using a 5-0 polypropylene running suture. The arterial cannula is inserted into this graft and secured with a heavy silk suture ligature. The tip of the arterial cannula should be 2 to 3 cm from the axillary artery. After the CPB is discontinued and the patient is quite stable, the cannula is removed and the prosthetic graft is transected, leaving a 5 mm cuff which is oversewn with a running 5-0 suture.
between gentle vascular clamps, and an 8 mm longitudinal incision is made on the anterior aspect of the artery. A 10 cm length of 8 mm diameter prosthetic graft is sewn end-to-side to the 8 mm arteriotomy using a 5-0 polypropylene running suture. The arterial cannula is inserted into this graft and secured with a heavy silk suture ligature. The tip of the arterial cannula should be 2 to 3 cm from the axillary artery. After the CPB is discontinued and the patient is quite stable, the cannula is removed and the prosthetic graft is transected, leaving a 5 mm cuff which is oversewn with a running 5-0 suture.
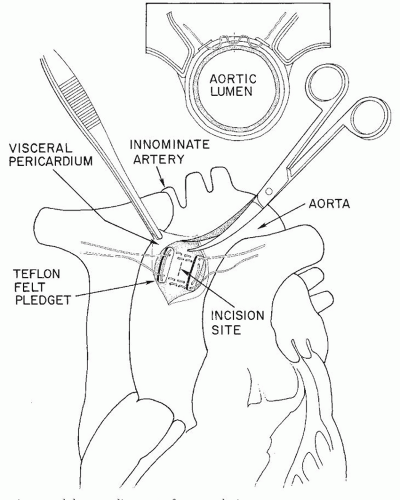 Fig. 36.3. Preparing an adult ascending aorta for cannulation. |
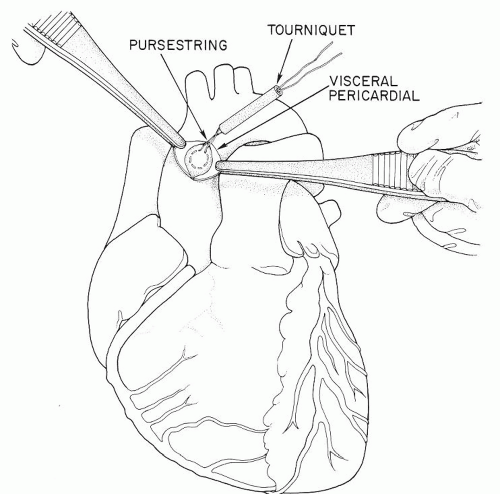 Fig. 36.4. Preparing an infant or pediatric aorta for cannulation. |
Femoral cannulation is not desirable if the patient has aortoiliac occlusive disease with severely diminished or absent femoral pulses. When used it requires a short vertical skin incision directly over the common femoral artery. Using electrocautery for hemostasis, the common, superficial, and profunda arteries are encircled for control. An umbilical tape is passed around the common, and the ends drawn through a tourniquet. With the patient fully heparinized, the distal vessels are occluded, a vascular clamp occludes the common femoral, and a transverse arteriotomy is made in a soft part of the common femoral on its anterior surface, not longer than 50% of the circumference of the artery. The arterial ( femoral) cannula is advanced proximally up the common femoral artery and the umbilical tape tourniquet is tightened just enough for hemostasis, and is then secured to the cannula with a heavy silk ligature. On completion of CPB the cannula is removed, and the arteriotomy closed with a continuous 5-0 suture.
Stay updated, free articles. Join our Telegram channel

Full access? Get Clinical Tree


