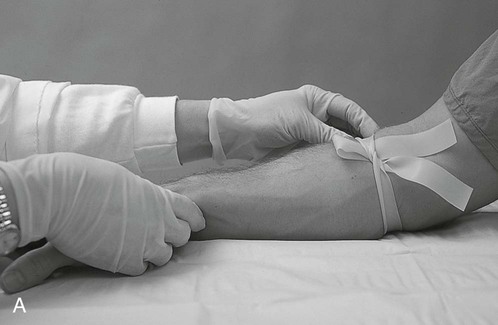
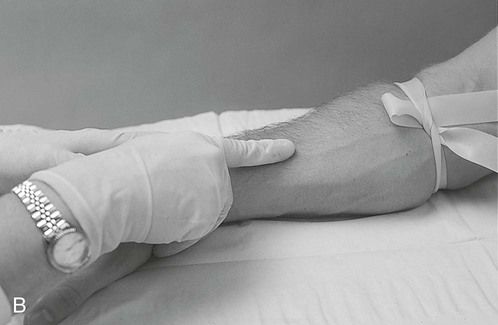
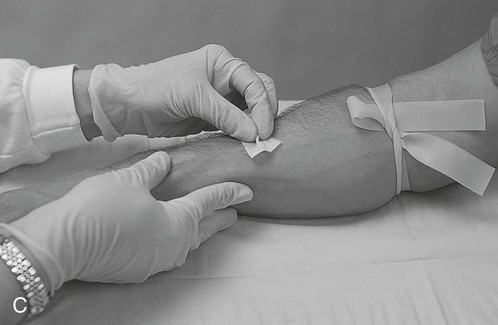
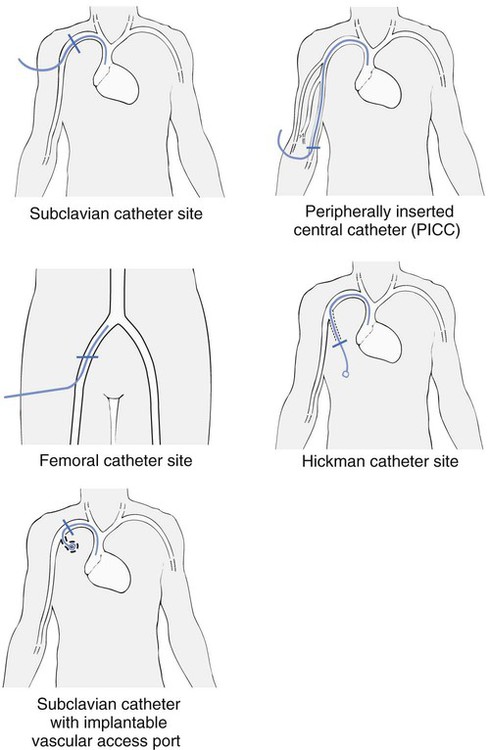
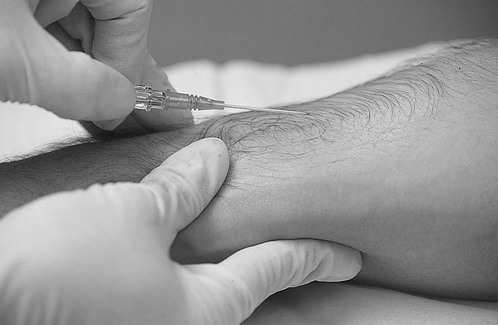
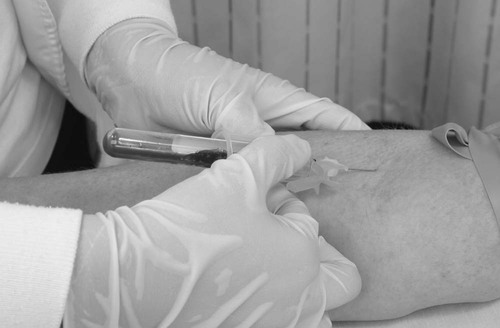
1. Identify basic complete blood cell count and basic metabolic panel values. 2. Perform venipuncture with a butterfly collection needle and Vacutainer. 3. Interpret basic laboratory values. 4. Identify complications associated with venous access. 5. Perform initiation of intravenous therapy. 6. Perform discontinuation of intravenous therapy. 7. Perform peripherally inserted central catheter line placement. The respiratory therapist (RT) is mainly a “lung specialist” whose focus and area of expertise is the pulmonary care of patients. However, in this high-tech era of medicine, the focus is on patient care teams that include multiple disciplines and specialties, hospital workforce restructuring, and therapist-driven protocols, and the responsibilities of RTs have expanded. Many responsibilities that used to belong to hospital staff specialists other than RTs are shifting to the respiratory care department. Venipuncture, venous access, and peripherally inserted central catheter (PICC) line placement are skills that can be acquired by the RT with proper procedural education and clinical practice. As a student, you should be familiar with the standards and safety procedures at your clinical facility relating to needle safety and methods to report an accidental needle stick. In addition to the skills needed to perform various types of venous access, the RT must possess a practical understanding of lab and diagnostic tests. The RT must understand values for the complete blood cell count (CBC), basic metabolic panel (BMP), and coagulation studies. A CBC provides a description of the number of circulating leukocytes (white blood cells [WBCs]), erythrocytes (red blood cells [RBCs]), and thrombocytes (platelets), whereas a BMP includes the predominant electrolytes and glucose values (see “Normal Values” in Appendix A). This chapter will cover the skills needed to perform various aspects of venous access, including blood draws, initiating venous access, and discontinuing venous access, along with basic interpretation of laboratory values. The RT is frequently called on to draw venous blood specimens that will be used for a variety of laboratory tests. Specimens are then sent to the laboratory to aid in the diagnosis of conditions such as electrolyte imbalances as well as to monitor the effects of treatments and medications. Hematology is the branch of medicine involved in the study of blood morphology, physiology, and pathology. Although obtaining blood specimens is a fairly routine procedure, precautions must be taken because it is a hazardous procedure if not carefully performed. RTs must follow universal precautions and all facility policies and procedures with regard to venipuncture. Figures 24-1 illustrates the steps for applying a tourniquet and cleansing the puncture site. Although venous access is reasonably safe for a patient, he or she may experience complications as a result of the procedure. A few that may occur are hematoma (localized collection of blood outside the blood vessels) formation, excessive bleeding, and syncope (fainting) during the procedure. Common access sites are shown in Figure 24-2. The following is the step-by-step process for venipuncture using two different methods. 1. Review the patient’s chart. 2. Verify the physician’s order or the facility’s protocol for standard of care. 3. Obtain, clean, and inspect the appropriate equipment prior to entering the patient’s room. 4. Follow personal protective equipment (PPE) requirements, and observe standard precautions for any transmission-based isolation procedure. 5. Identify the patient using two patient identifiers. 6. Introduce yourself to the patient and to the family. 7. Explain the procedure to the patient and to the family, and acknowledge the patient’s understanding. 8. Perform proper hand hygiene, and put on gloves, mask, and protective eyewear, as appropriate for the procedure. 1. Place the patient in a comfortable position. 2. Prepare the equipment needed at the bedside. 5. Choose the appropriate site for the venipuncture. 6. Apply a tourniquet above the selected site (about 3–4 inches) and gently palpate the vein with your finger (see Figure 24-1). 7. Instruct the patient to clench his or her fist. Syringe with Needle or Butterfly Method a. Prepare a syringe with the needle or butterfly securely attached. b. Cleanse the site (see Figure 24-1). c. Remove the needle or butterfly cover. d. Pull the patient’s skin taut with your thumb or forefinger about 1 inch below the site. e. Hold the syringe and needle or butterfly at a 15-degree to 30-degree angle (Figure 24-3). f. Insert the needle or butterfly slowly into the vein. g. Hold the syringe securely, and pull back on the plunger while watching for blood return. h. Obtain the desired amount of blood. i. Release the tourniquet after the specimen is obtained. j. Apply pressure with a 2 × 2 inch gauze, and withdraw the needle or butterfly from the vein. k. Dispose of the used sharps in the proper container. l. Follow all the recommended Occupational Safety and Health Administration (OSHA) practice standards. m. Fill the blood tubes, if needed, and invert them if additives are present. a. Attach a double-ended needle to the appropriate vacuum tube. b. Place the blood specimen tube in the Vacutainer without puncturing the rubber stopper. c. Prepare a syringe with the needle or butterfly securely attached. e. Remove the needle or butterfly cover. f. Pull the patient’s skin taut with your thumb or forefinger about 1 inch below the site. g. Hold the syringe and needle or butterfly at a 15-degree to 30-degree angle. h. Insert the needle or butterfly slowly into the vein. i. Hold the Vacutainer securely, and advance the specimen tube onto the needle in the Vacutainer (Figure 24-4). k. Remove the specimen tube after it is filled, and if necessary, insert additional tubes. l. Release the tourniquet after the last sample is obtained. m. Apply pressure with a 2 × 2 inch gauze, and withdraw the needle or butterfly from the vein. n. Dispose of the used sharps in the proper container. 8. Apply gauze with tape to the puncture site. 9. Check the tubes, and wipe with alcohol, if necessary. 10. Assist the patient to a comfortable position, if previously moved. 11. Label every tube with the patient’s information, date and time the specimen was collected, and the initials of the person who collected it. 12. Dispose of all the used supplies and soiled equipment. 13. Remove the unused supplies from the patient’s room, and clean the area, as needed. 14. Remove PPE, and perform proper hand hygiene prior to leaving the patient’s room. 15. Bag and transport the tube to the laboratory according to your facility’s protocols. Before you can understand laboratory data and how abnormalities or deviations in the data relate to a patient’s condition, you must know what the normal values are and how to obtain them correctly (see “Normal Values” in Appendix A, which lists the values of typical laboratory values common in respiratory care). Physicians commonly utilize a diagram, called a fishbone diagram, to list the most common parts of the CBC and BMP. This diagram is provided in Figure 24-5. This chapter will use a case study approach to help the RT student interpret basic clinical laboratory data as they relate to the pulmonary status of their patients. The following is the step-by-step process for interpreting basic laboratory values.
Venous Access
Equipment
 2 × 2 or 4 × 4 Sterile gauze pads
 Disposable gloves, face shield, goggles
 IV catheters or over-the-needle IV catheter (ONC) safety device needle
 Mannequin or artificial phlebotomy practice arm
 Tegaderms or transparent dressing
» Skill Check Lists
24-1 Venipuncture
Procedural Preparation
Implementation
24-2 Interpreting Clinical Lab Data


