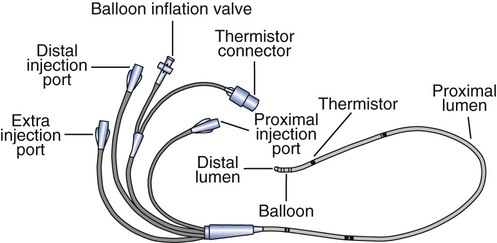
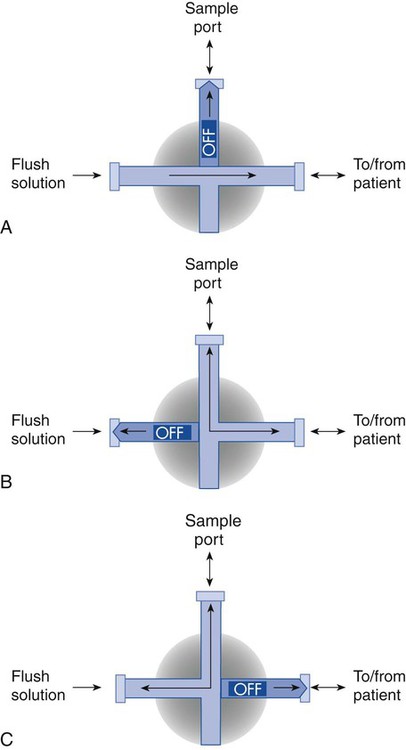
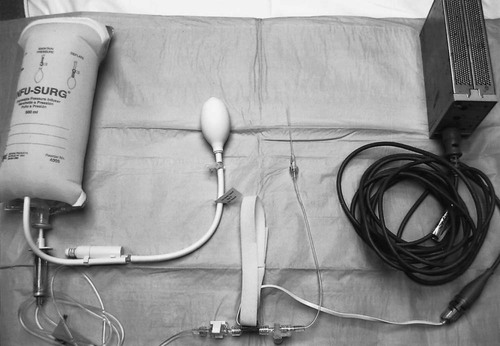
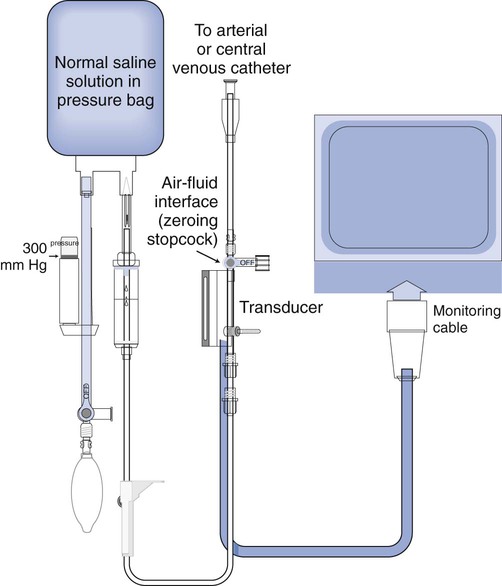
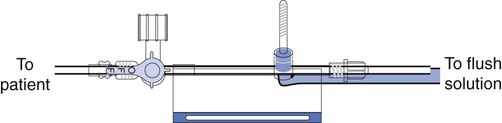
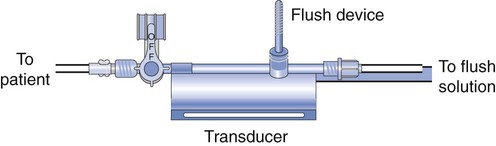
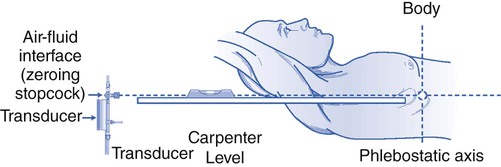
Chapter 7 1. Identify and assemble a hemodynamic monitoring set-up. 2. Describe the function of each component of a hemodynamic monitoring set-up. 3. Identify and explain the purpose of each component of a Swan-Ganz catheter. 4. List the various locations where a Swan-Ganz catheter is commonly introduced. 5. Describe the purpose of an arterial line. 6. List the various locations where an arterial line is commonly introduced. Hemodynamic monitoring refers to the observation of blood pressure, blood volume, and cardiac output (CO; or cardiac flow), as well as cardiac preload and afterload, and systemic and pulmonary vascular resistance in real time (Box 7-1). Special indwelling catheters such as the Swan-Ganz catheter are inserted into a specific artery or vein by a trained physician or RT. A Swan-Ganz catheter is a useful device for measuring dynamic pressures in the heart, the vena cava, and the pulmonary artery. The catheter is typically introduced through the internal jugular vein, the subclavian vein, or the femoral vein. The position of the catheter determines which pressure the monitor will display. Modern-day catheters have many passages called lumens. Some catheters have up to six lumens; the catheter pictured in Figure 7-1 is a quadruple lumen catheter equipped with an inflatable balloon at the tip and a monitor connector to transmit data from the thermistor to the monitor. The lumen opening that is the closest to the various ports is called the proximal lumen. Similarly, the lumen opening that is farthest from the ports is called the distal lumen. The third lumen is dedicated for medication or fluid administration by injection. This catheter, in the proper position, is capable of measuring dynamic blood pressure in the vena cava, the right atrium, the right ventricle, or the pulmonary artery. If the balloon at the tip is properly inflated, an indirect measurement of the left atrial pressure is obtained. The catheters are attached to pressure transducers, which send data to a monitor for visual observation. From this data, a pressure-time graphic is visualized, and mean pressures are calculated and displayed on the monitor. This chapter will focus on the monitoring and analysis of hemodynamic data that are relevant to the field of respiratory care. Correct set-up of equipment is the first step in the monitoring process. Figure 7-2 shows a schematic of a hemodynamic monitoring set-up. The functions of these components of the set-up are listed in Box 7-2. The following is the step-by-step process for hemodynamic monitoring set-up: Box 7-2 Function of Each Component of the Hemodynamic Monitor Set-up 500-mL Heparinized Saline with Pressure Bag 1. Review the patient’s chart. 2. Verify the physician’s order or the facility’s protocol for standard of care. 3. Obtain, clean, and inspect the appropriate equipment prior to entering the patient’s room. 4. Follow the personal protective equipment (PPE) requirements, and observe the standard precautions for any transmission-based isolation procedure. 5. Identify the patient using two patient identifiers. 6. Introduce yourself to the patient and to the family. 7. Explain the procedure to the patient and to the family, and acknowledge the patient’s understanding. 8. Perform proper hand hygiene, and put on gloves, mask, and protective eyewear, as appropriate for the procedure. 1. Place the patient in the supine position, with the head of the bed no higher than 45 degrees. 2. Open the prepackaged pressure transducer kit. 3. Tighten all the connections. 4. Attach the transducer clamp to the intravenous (IV) pole, and place the transducer inline with the patient’s phlebostatic axis. 5. Open the bag of heparinized saline, and insert it into the pressure bag. 6. Spike the bag, and hang the bag from the IV pole. 7. Turn the stopcock off to the patient, and attach the pressure tubing to the transducer stopcock (Figure 7-3). 8. Open the roller clamp, and prime the drip chamber. 9. Flush the tubing, and attach it to the pressure transducer. 10. Turn the stopcock off to the patient, and flush through the transducer. 11. Turn the stopcock on so that it is open to the transducer (Figure 7-4). 12. Inflate the pressure bag to 300 mm Hg. 13. Attach the pressure tubing to the appropriate catheter port. 14. Turn on the bedside monitor. 15. Plug the pressure cable into the appropriate monitor port. 16. Turn on the chosen parameter (pulmonary artery [PA], right atrial [RA], arterial). 17. Set the appropriate scale. 18. Level the transducer and set to zero (Figure 7-5). 19. Remove the supplies from the patient’s room, and clean area, as needed. 20. Remove the PPE, and perform proper hand hygiene prior to leaving the patient’s room.
Hemodynamic Monitoring
» Skills Check List
7-1 Hemodynamic Monitoring Set-up
Procedural Preparation
Implementation
Hemodynamic Monitoring


 Tip The word “hemodynamic” is made up of the word parts hemo-, which refers to “blood,” and -dynamic, which refers to motion or movement. The opposite of dynamic is static, which means “stationary.”


