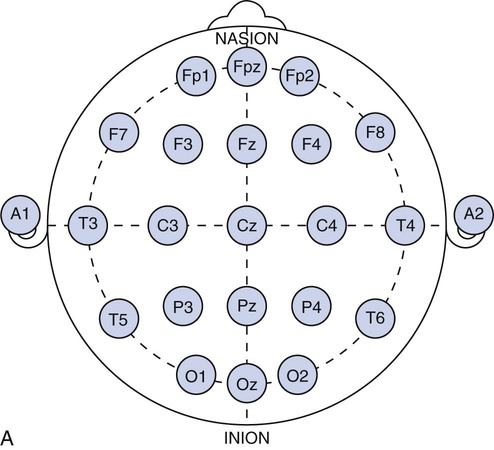
Chapter 28 Wendi M. Nugent and Susan Townsley 1. Describe the process of patient setup and data acquisition. 2. Identify the various types of polysomnographic testing protocols and their respective uses. 3. Identify polysomnographic monitoring devices. 4. Identify polysomnographic signals, including classification of sleep-related breathing disorders. 5. Describe patient preparation tips for polysomnographic testing. This chapter provides an overview of polysomnographic technology and the duties of the polysomnographic technologist. It is not intended to be an in-depth and comprehensive tool for learning about the technical responsibilities and sleep disorders that are encountered in a sleep lab. Polysomnography (poly—many, somno—sleep, graphy—tracing) (PSG) is the acquisition of various physiologic signals transmitted to a recording device for interpretation. To acquire and record the physiologic signals, sleep laboratories use computerized technology to digitalize and amplify the acquired signals. A series of electrodes and transducers are attached to the patient to record brainwaves (electroencephalography [EEG]) (Figure 28-1), cardiac wave forms (electrocardiography [ECG]), respiratory events (effort, air flow, saturation of peripheral oxygen [SpO2]), limb movements, snoring, and other parameters during sleep. The data are then available for detailed review to assist qualified physicians in the diagnosis and treatment of sleep disorders. Respiratory therapists (RTs) who have been trained in polysomnographic testing play an integral role in the diagnosis and treatment of sleep-related breathing disorders. Examples of the most common sleep disorders and some frequently performed sleep studies are listed in Boxes 28-1 and 28-2. Of the over 90 identified sleep disorders, 14 are related to sleep-disordered breathing. The most common sleep disorder diagnosed in the sleep lab is obstructive sleep apnea. The goal of the trained respiratory therapist is to help normalize disordered breathing during the overnight procedure. Normalizing breathing through the elimination of sleep apnea helps to restore neurologic sleep patterns and to provide the patient with restorative sleep, decreasing or eliminating the symptoms of snoring and excessive daytime sleepiness. This chapter will cover the indications, methodology, and interpretation of polysomnographic testing for the respiratory therapist (RT). Upon checking into the sleep lab, the patient is asked to complete a presleep questionnaire, which includes information about their activities the night before and the day of testing (Figure 28-2). This questionnaire will provide an indication of the quality of sleep the night prior to testing, napping on the testing day, medications taken prior to arriving at the lab, current state of wakefulness or sleepiness, and consumption of caffeine, alcohol, or other substances that may impact sleep. Comorbidities such as cardiac disease, hypertension, diabetes, seizures, neuromuscular abnormalities, and pulmonary disease should be identified and documented. Disorders such as seizures may alter the process for data acquisition, and interpretation of the sleep study; cardiac abnormalities may present increased risks to the apnea patient during the night; and some medications may alter the appearance of the EEG data or lead to other changes in the recording. The technologist must be cognizant of potential health risks to the patient during the night and any possible recording difficulties (i.e., cardiac abnormalities, excessive movements, required nocturnal medications, etc.) that may impact patient safety. 1. Review the patient’s chart. 2. Verify the physician’s order and the facility’s protocol for standard of care and appropriate study type (i.e., baseline PSG only, split night-baseline and titration, titration only, Multiple Sleep Latency Test (MSLT), etc.) 3. Identify the patient using two patient identifiers. 4. Follow the facility’s protocol for patient interaction, and introduce yourself to the patient and the family. 1. Obtain the patient’s history for medication and substance allergies. 2. Ask the patient to verbally describe the reason he or she has come to the sleep lab, and his or her expectations of the testing procedure and potential treatments to be accomplished during the study. 3. Determine if the patient has had issues with claustrophobia. 4. Determine if the patient has special physical needs to be addressed prior to the start of the procedure (i.e., bedside commode, supplemental oxygen, padded bedrails, etc.). 5. Instruct the patient to complete a presleep questionnaire (see Figure 28-2), which includes information about the patient’s activity the day of testing, prescribed medications already taken and medications to be taken while in the sleep lab, quality of sleep the night prior to testing, time the patient awoke, and any nap(s) taken on the day of testing. 6. Review the completed presleep questionnaire with the patient to ensure accuracy. 7. Determine any comorbidities that may be of concern during the procedure (i.e., cardiovascular abnormalities, diabetes, seizures, neuromuscular disorders, pulmonary disease, etc.). 8. Obtain written permission from the patient to monitor, record, and acquire video during the procedure and to treat breathing-related sleep disorders diagnosed in the sleep lab. 1. Clearly explain the reason for PSG testing to the patient, making sure that he or she understands. 2. Explain the process of ancillary monitoring device application. 3. Educate the patient regarding sleep-disordered breathing and PAP treatment. 4. Discuss PAP therapy, including the acclimation process, equipment orientation, and the benefits of PAP therapy (see PAP therapy). 5. Answer all the questions and concerns the patient has before proceeding with testing to ensure the patient’s comfort and compliance with the procedure. The process of fitting the PAP interface (mask) may cause anxiety in some patients (Figure 28-3). A detailed explanation of the equipment used for PAP therapy helps alleviate stress for the patient. Several interface options should be presented to the patient with an explanation of pros and cons for each device. Patient comfort is the most important factor for compliance, and sufficient time should be exercised when assisting a patient with choosing the appropriate interface. A proper fit of the interface provides an adequate seal with minimal tension of the headgear. Interface manufacturers provide a wide variety of interface sizes and styles intended to accommodate differences in facial morphology, facial hair, and style preferences. Ask the patient to choose the style of interface that appears most appropriate for him or her, keeping in mind this is a new experience for most patients and that they may have no idea about what is suitable. For example, does the patient like to read or watch TV in bed while falling asleep? Does the patient need glasses? If so, the patient may prefer a nasal pillow type interface that allows the use of glasses while the patient is wearing the interface. Is the patient a mouth breather? If so, try a full-face interface that covers the mouth. Next, the concept of how PAP works by keeping the airway open should be explained to the patient. Understanding how the PAP device will improve breathing and subsequently sleep and daytime alertness may aid in patient adoption of the PAP devices. (See Box 28-3—PAP Devices.) In the case of patients who experience claustrophobia, ask them to hold the interface in place without the headgear or PAP pressure to acclimate to the feel of the interface, as this allows for the interface to be pulled away at will. Once the patient develops some confidence and comfort with the interface, add 4 cmH20 PAP pressure, and allow the patient to experience breathing with the interface held against the face. Once the patient is able to hold the interface in place without pulling it away, assist with placing the headgear and adjusting the strap tension to keep the interface in proper position. With the interface in place and the PAP unit turned on to the lowest pressure (4 cmH2O), coach the patient to do easy, relaxed breathing through the nose. Often the patient will open the mouth to exhale when first trialing PAP, so encouragement to keep his or her mouth closed may be necessary. Extreme caution should be taken to avoid overtightening the headgear. Overtightening the straps will reduce the cushioning properties of the interface seal and create more leaks. Each interface manufacturer has a predetermined intentional leak for their interface products, and a proper fit will reflect a leak value within the manufacturers’ guidelines. PAP acclimation in the sleep lab is very time consuming but should not be skipped or shortened to save time. A patient who fully understands PAP therapy and has experienced the device and developed confidence in the therapy will experience a more successful titration process during the night. Provide encouragement to the patient by stating that sleeping with the device will quickly become natural. Experienced PAP users, using a variety of interfaces, find sleeping in any desired position comfortable, with only minor adjustments required, when moving to a new sleeping position (see Figure 28-3). 1. Review the patient’s chart. 2. Verify the physician’s order or the facility’s protocol for standard of care. 3. Obtain, clean, and inspect the appropriate equipment prior to entering the patient’s room. 4. Identify the patient using two patient identifiers. 5. Introduce yourself to the patient and to the family. 6. Explain the procedure to the patient and to the family, and acknowledge the patient’s understanding. 1. Provide a detailed explanation of the devices used for PAP therapy. 2. Present multiple options of interfaces (masks) to the patient. 3. Provide explanations of the pros and cons for each interface device. 4. Ask the patient to choose the most comfortable interface, and ensure that the appropriate size and fit has been selected for the patient. 5. Demonstrate your understanding of PAP interfaces and appropriate application for each device to the patient. 6. Instruct the patient to sit comfortably on the side of the bed. 7. Explain the concept of PAP and how the device will assist with breathing during the night. 8. Instruct the patient to breathe normally in and out through the nose. 9. Assist the patient with applying the interface and headgear. 10. Introduce PAP at 4 cmH2O pressure. 11. Reassure and support the patient, and ask him or her to relax and breathe easily through the nose throughout the process. 12. Assess for any leak(s) around the edges of the interface, and make adjustments, as needed. 13. Use the minimal amount of headgear tension to maintain an adequate interface seal. 14. Adjust the interface if measured leak is unacceptable, or change the interface if adequate seal cannot be maintained. 15. Instruct the patient to lie down in the supine position: a. The interface may need a slight adjustment when moving into the supine position to maintain a good seal. 16. Assure the patient that PAP will be initiated only if indicated by findings on the polysomnogram. 17. Determine patient tolerance of interface and PAP pressure by allowing time to acclimate to any changes with interface or position (allow the patient to move to the preferred sleeping position) and to ensure the patient is comfortable with the process: a. Establish rapport and gain patient confidence. b. Develop an appropriate plan of action based on the patient’s response to PAP. 18. Remove the supplies from patient’s room, and clean the area, as needed. 19. Remove your gloves, and perform proper hand hygiene prior to leaving the patient’s room. The International 10-20 System of electrode placement was developed by neuroscientists to provide a standard format and common terminology to describe the location of EEG scalp electrodes. By systematically naming and placing the electrodes (Figure 28-4), the EEG data can be compared serially, even when recorded at multiple locations around the world. The 10-20 System of labeling electrode locations is identical in all languages. The naming of the electrode sites correlates with the cortical structures under the electrodes, for example: The 10-20 System is so termed “10-20” because electrodes are spaced either 10% or 20% of the total distance between a given pair of predetermined landmarks such as the area at the bridge of the nose, or “nasion,” or the protrusion on the back of the head called the “inion,” and so on. The 10-20 System also provides uniform spacing of electrodes for accurate and symmetrical comparison of EEG data. Nomenclature for the International 10-20 System was developed to give each electrode site a logical alphabetical abbreviation that immediately identifies it with the lobe or area of the brain to which it refers. All of the alphabetical characters refer to the area of brain over which they are located with the exception of “z” which is used for the numerical subscript zero or the midline zero reference (Fpz, Fz, Cz, Pz). Refer to Figure 28-4A for descriptions of the regions covered in electrode placement. Table 28-1 lists the alphabetical abbreviations used. TABLE 28-1 Nomenclature for the International 10-20 Electrode Placement System
Polysomnography Technology
Equipment
 Airflow Thermistor or Thermocouple, and Nasal Pressure Transducer
 EEG gold disk electrodes with long lead wires
 Flexible cloth or paper metric measuring tape (washable or disposable)
 PAP delivery unit with heated humidifier
 Remote operation and digital readout at PSG acquisition device screen
 PAP interfaces (nasal mask, nasal pillows, full face mask, chin support strap)
 Polysomnographic acquisition device
 Pulse oximeter with probe (typically a module within the acquisition device)
 Respiratory effort sensors, thoracic and abdominal belts
 Stick-on surface electrodes (pregelled ECG electrodes)
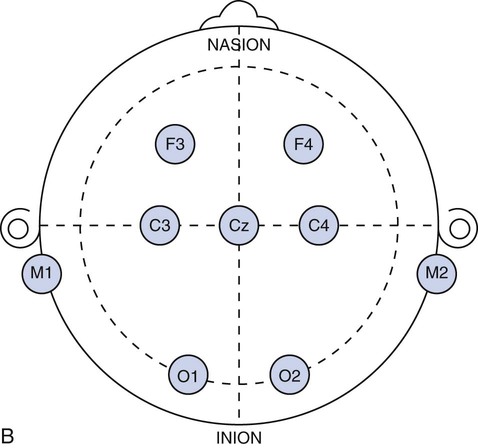
Wakefulness (Stage W) is identified by posterior alpha activity (patient relaxed with eyes closed) and anterior beta activity, active chin EMG and eye blinks. Slow rolling eye movements, theta activity and vertex sharp waves help to determine Stage N1 sleep. Stage N2 sleep is characterized by sleep spindles and K complexes. High amplitude (75µv) slow waves (delta activity) for 20% or more of the epoch are scored as Stage N3. Stage N3 is also referred to as slow wave sleep (SWS) or delta sleep. The EEG of REM sleep consists of low amplitude mixed frequency EEG- and REM-specific sawtooth waves. Eye movements (EOG) and chin EMG are used for the scoring of REM sleep. Sharp rapid eye movements of REM can resemble reading eye movements of wakefulness, however, the chin EMG will be greatly reduced from baseline levels, indicating the relative muscle paralysis of REM sleep, helping to differentiate from Stage W. (Source: Iber C, Ancolo-Israel S, Chesson A, Quan S: The AASM Manual for the Scoring of Sleep and Associated Events, Rules, and Terminology and Technical Specifications. © 2007 American Acacemy of Sleep Medicine).
» Skill Check Lists
28-1 Assessing the Polysomnography Patient
 Tip The sleep technologist should review the presleep questionnaire (see Figure 28-1) with the patient.
Procedural Preparation
Implementation
28-2 Educating the Polysomnography Patient
Implementation
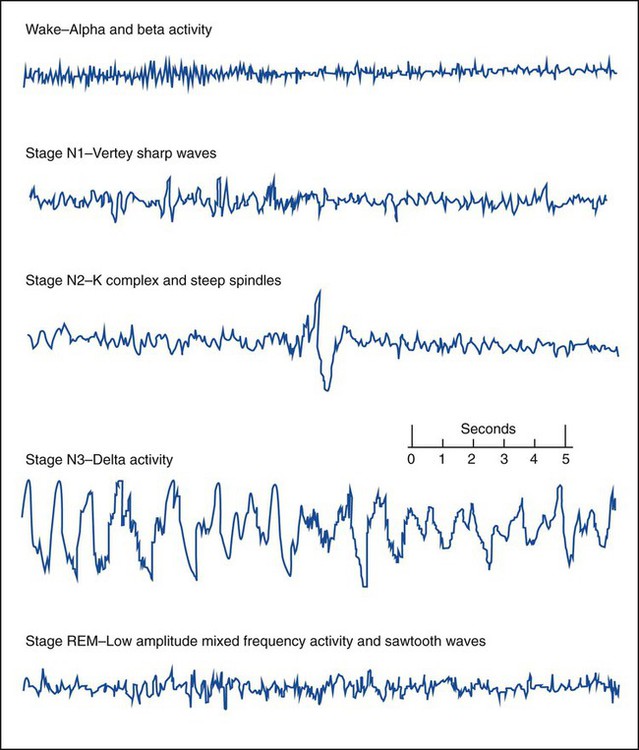
28-3 Introducing and Fitting the Positive Airway Pressure Interface
A, Nasal mask and headgear. B, A fitting gauge is used to ensure correct fitting of nasal mask. C, Nasal mini-mask and headgear. D, Nasal pillows and headgear. E, Full-face mask or oronasal mask. F, Sizing gauge used to determine proper size of full-face mask. G, Total face mask. (A and C, F, and G, Courtesy of Philips Respironics, Murrysville, PA. D, Image used with permission. Nellcor Puritan-Bennett, LLC, Boulder, CO, doing business as Covidien. E, Courtesy of ResMed, San Diego, CA.)
Procedural Preparation
Implementation
28-4 Applying Monitoring Devices for Polysomnography
C
Central
F
Frontal
Fp
Frontal polar
T
Temporal
O
Occipital
P
Parietal
A
Auricular
M
Mastoid
Z
Midline ![]()
Stay updated, free articles. Join our Telegram channel

Full access? Get Clinical Tree


Polysomnography Technology


 Reality Check Pediatric polysomnography has age-specific parameters for patient hookup and sleep stage scoring and is not included in this chapter.
 Tip The National Board for Respiratory Care (NBRC) offers an examination for the sleep technologist that is a subspecialty for current respiratory care practitioners (RCPs). The examination allows for credentialing as a Certified Respiratory Technician-Sleep Disorder Specialist (CRT-SDS) or a Registered Respiratory Therapist-Sleep Disorder Specialist (RRT-SDS). The Board of Registered Polysomnographic Technologists (BRPT) offers the Registered Polysomnographic Technologist (RPSGT) credentialing examination. The American Association of Sleep Medicine (AASM) offers the Registered Sleep Technologist (RST) examination.
 Tip All patients should have vital signs measured prior to the start of the PSG study. If the patient has complaints of chest discomfort, shortness of breath, or pain, vital signs should be obtained again; if the values are outside normal limits, contact the sleep lab medical director or the physician on call.
 Reality Check Sleep labs require a detailed medical history from the referring physician as well as a sleep questionnaire completed by the patient detailing the primary sleep complaint.
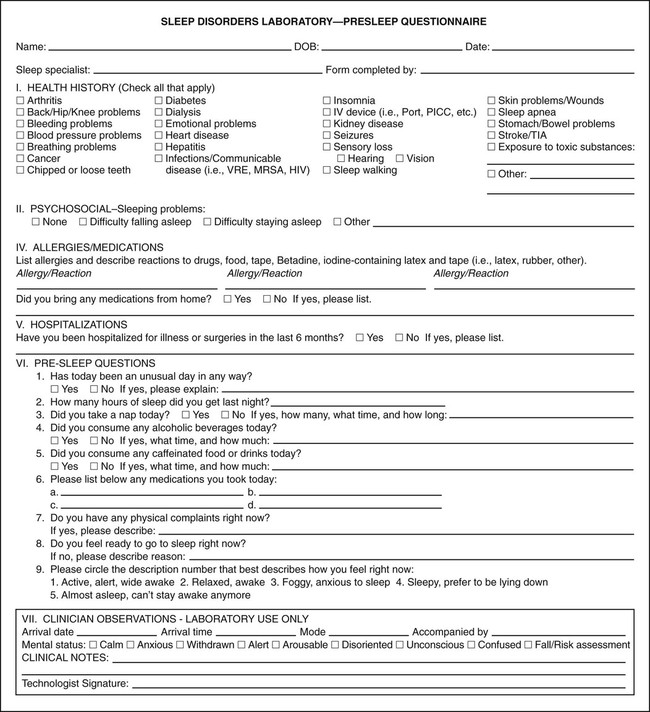
 Reality Check Video recording provides documentation of the patient during sleep and interactions with the technologist who is entering and leaving the room while the patient is sleeping.
 Tip Technologist to patient PAP discussions should include the interface and PAP pressure acclimation process, equipment orientation, and discussion of potential benefits of PAP therapy.
 Reality Check Patient anxiety can be relieved with proper explanation of testing and treatment procedures.
 Tip The interface should be comfortable for the patient while lying in the favorite sleeping position.
 Reality Check A full understanding of PAP interfaces (masks) is critical for the sleep technologist to better assist the patient with interface choice. Training and experience with multiple interfaces allows the technologist to guide the patient to the most appropriate interface based on the patient’s likes, dislikes, and needs.
 Reality Check The idea of “strapping” a device on the face may be frightening for patients with claustrophobia. Providing these patients with training and allowing them to control interface placement on the face will help the patient to better tolerate PAP therapy.