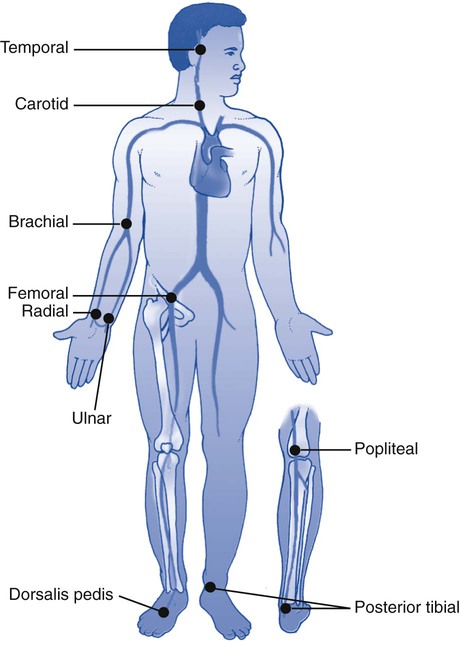
1. Perform an assessment of the patient with respiratory problems. 2. Take a patient’s medical history. 3. Measure vital signs, including: c. Examination of the thorax and lungs: Along with the physical examination and assessment of a patient, the patient’s medical history plays a fundamental role in the accurate diagnosis and appropriate treatment of the patient with respiratory disease. Thorough evaluation of the patient’s chart prior to entering the room is the initial step. Box 5-1 provides information that you should obtain during the complete health history. Negative responses to questions are called pertinent negatives, whereas positive responses are called pertinent positives. For example, if the patient complains of hemoptysis but has no recent weight loss, “hemoptysis” would be a pertinent positive and “no recent weight loss” would be a pertinent negative. These types of questions help the examiner formulate a differential diagnosis, which is the determination of which of two or more diseases with similar symptoms is the one the patient has. This is accomplished by a systematic comparing and contrasting of the clinical findings. Careful observation should be made as soon as the examiner sees the patient. How you “expect” the patient to look should be compared with how the patient “actually” looks at the time of the examination. The following is the step-by-step process for obtaining the medical history of a patient. 1. Review the patient’s chart. 2. Verify the physician’s order or the facility’s protocol for standard of care. 3. Obtain, clean, and inspect the appropriate equipment prior to entering patient’s room. 4. Follow personal protective equipment (PPE) requirements, and observe standard precautions for any transmission-based isolation procedure. 5. Identify the patient using two patient identifiers. 6. Introduce yourself to the patient and to the family. 7. Explain the procedure to the patient and to the family, and acknowledge the patient’s understanding. 8. Perform proper hand hygiene, and put on gloves, mask, and protective eyewear, as appropriate for the procedure. 1. In the social space, provide a brief introduction of yourself and your role to the patient. 2. Assess the patient’s level of consciousness (orientation to person, place, and time). 3. Identify the patient respectfully using titles (e.g., Mr., Mrs., Ms.) and his or her last name. 4. Assess for factors influencing communication (e.g., language barriers, hearing impairment, anxiety, etc.). 5. Use appropriate nonverbal behaviors and active listening skills while conducting the patient interview. 6. Ensure patient privacy during the interview (e.g., close the door, pull the curtain, ask visitors to leave during assessments, etc.) 7. Structure the interview in an orderly manner (see Box 5-1): 8. Ensure patient comfort before leaving the room. 9. Remove all supplies from patient’s room, and clean the area, as needed. 10. Remove PPE, and perform proper hand hygiene prior to leaving the patient’s room. In most patients, the rate, rhythm, and strength (quality) of the pulse are evaluated using the radial artery site. Location of this site is also important because it is the most commonly accessed point for arterial blood gas (ABG) draws. Figure 5-1 illustrates the locations of the most common pulse points. A rate of 60 to 100 is considered normal for an adult person at rest. Pulmonary problems often manifest as an alteration of a patient’s pulse rate. Tachycardia is a heart rate above 100 beats per minute (beats/min), whereas bradycardia is less that 60 beats/min. Table 5-1 lists some common pulse descriptions with potential causes. The following is the step-by-step process for assessing the pulse rate of a patient. TABLE 5-1 Pulse Descriptions with Common Causes 1. Review the patient’s chart. 2. Verify the physician’s order or the facility’s protocol for standard of care. 3. Obtain, clean, and inspect the appropriate equipment prior to entering the patient’s room. 4. Follow PPE requirements, and observe standard precautions for any transmission-based isolation procedure. 5. Identify the patient using two patient identifiers. 6. Introduce yourself to the patient and to the family. 7. Explain the procedure to the patient and to the family, and acknowledge the patient’s understanding. 8. Perform proper hand hygiene, and put on gloves, mask, and protective eyewear, as appropriate for the procedure. 9. Mute or turn off the television or radio in the patient’s room. Ensure patient privacy. 1. Position the patient comfortably, and instruct him or her to breathe normally. 2. Locate the preferred site, and palpate the pulse for the appropriate amount of time. Count the rate for 15 seconds. Multiply that number by 4, and record the pulse rate in beats per minute. If the pulse rate is slow or irregular, you may have to palpate for 30 seconds and multiple by 2 or palpate for an entire minute.
Patient Assessment
» Skill Check Lists
5-1 Taking a Medical History
Procedural Preparation
Implementation
5-2 Taking Vital Signs
Pulse Rate
Pulse Description
Common Causes
Bradycardia: rate below 60
Hypothermia, certain cardiac arrhythmias, traumatic brain injuries
Tachycardia: rate above 100
Exercise, fear, anxiety, hypotension, anemia, fever, reduced arterial blood oxygen levels, certain medications
Pulsus paradoxus: a >10 mm Hg decrease in pulse pressure with each inspiratory effort
Acute obstructive pulmonary disease, asthma exacerbation
Pulsus alternans: alternating between strong and weak heartbeats
Left-sided heart disease

Procedural Preparation
Implementation
Patient Assessment


