Five 10-mm ports
0° and 30° scope
Graspers and needle holder
Babcock clamp
L-shaped hook cautery with suction-irrigation capacity
Scissors
Laparoscopic clip applier
Electrothermal bipolar vessel sealing system
Liver retractor
Suturing device
2-0 silk sutures
Penrose drain
56-French esophageal bougie
Step 1: Placement of Trocars
A five-trocar technique is used for the operation (Fig. 8.1). Trocar 1 is placed 14 cm inferior to the xiphoid process, in the midline, or 1–2 cm to the left of the midline to be in line with the esophagus. Extreme care must be taken when positioning this trocar, since the insertion site in the supraumbilical area is just above the aorta and its bifurcation. In order to increase the distance between the abdominal wall and the aorta and therefore reduce the risk of vessel injuries, the abdomen is initially inflated by using a Veress needle to a pressure of 15 mmHg. Subsequently, under direct vision, an optical port with a 0° scope is placed. Once this port is placed, the 0° scope is replaced with a 30° scope, and the other trocars are inserted under laparoscopic vision.
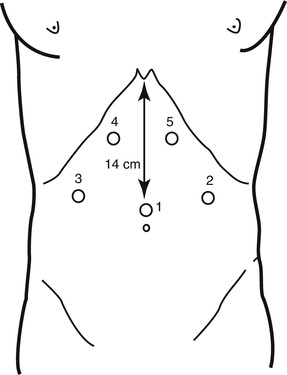
Fig. 8.1
Trocars’ placement. Trocar 1 30° camera, trocar 2 Babcock clamp, trocar 3 liver retractor, trocars 4 and 5 dissection and suturing instruments
Trocar 2 is placed in the left midclavicular line at the same level with trocar 1, and it is used for insertion of a Babcock clamp, a grasper to hold the Penrose drain placed around the esophagus, or for devices used to divide the short gastric vessels. Trocar 3 is placed in the right midclavicular line at the same level of the other two trocars, and it is used for the insertion of a retractor to lift the left lateral segment of the liver. Trocars 4 and 5 are placed under the right and left costal margins, so that their axes form an angle of about 120° with the camera. They are used for the dissecting and suturing instruments.
Step 2: Division of Gastrohepatic Ligament; Identification of Right Crus of the Diaphragm and Posterior Vagus Nerve
The gastrohepatic ligament is divided, beginning above the caudate lobe of the liver, where the ligament is usually very thin, and continuing toward the diaphragm until the right crus is identified. The crus is then separated from the right side of the esophagus by blunt dissection, identifying the posterior vagus nerve. The right crus is dissected inferiorly toward the junction with the left crus.
During the dissection of the right crus from the esophagus, the electrocautery should be used with extreme caution. Because of the lateral spread of the monopolar current, the posterior vagus nerve may be damaged, even without direct contact. A bipolar instrument represents a safer alternative.
An accessory left hepatic artery originating from the left gastric artery is frequently present in the gastrohepatic ligament. Preservation of this artery should be attempted if possible; however, if this vessel limits the exposure, it may be divided.
Step 3: Division of Peritoneum and Phrenoesophageal Membrane Above the Esophagus and Identification of the Left Crus of Diaphragm and Anterior Vagus Nerve
The peritoneum and the phrenoesophageal membrane above the esophagus are transected with the electrocautery, and the anterior vagus nerve is identified. The left crus of the diaphragm is dissected bluntly downward toward the junction with the right crus.
This dissection must be performed with extreme caution to avoid an injury to the anterior vagus nerve or the esophageal wall. Accordingly, the nerve should be left attached to the esophageal wall, and the peritoneum and the phrenoesophageal membrane should be lifted from the wall by blunt dissection before they are divided.
Step 4: Division of Short Gastric Vessels
The 5-mm laparoscopic bipolar instrument is introduced through trocar 2. A grasper is introduced through trocar 5 and held by the surgeon, while traction on the greater curvature of the stomach is applied by an assistant through trocar 4. The dissection begins at the level of the middle portion of the gastric body and continues upward until the most proximal short gastric vessel is divided [13].
Bleeding, either from the short gastric vessels or from the spleen, and damage to the gastric wall are possible complications during this step of the procedure.
Excessive traction and division of a not completely coagulated vessel are the most common causes of bleeding from the short gastric vessels, while a burn from the electrocautery during dissection between vessels and traction applied with the graspers or the Babcock clamp are the most common mechanisms of damage to the gastric wall.
Step 5: Creation of a Window Between Gastric Fundus, Esophagus, and Diaphragmatic Crura and Placement of Penrose Drain Around the Esophagus
A Babcock clamp is applied at the level of the esophagogastric junction to retract upward the esophagus. A window is opened by a blunt and sharp dissection under the esophagus, between the gastric fundus, the esophagus, and the left pillar of the crus. The window is then enlarged, and a Penrose drain is passed around the esophagus, incorporating both the anterior and the posterior vagus nerves.
The two main complications that can occur during this part of the procedure are (1) creation of a left pneumothorax and (2) perforation of the gastric fundus. A left pneumothorax is usually created when the dissection is performed above the left pillar of the crus in the mediastinum, rather than between the crus and the gastric fundus.
Perforation of the gastric fundus is usually caused by pushing a blunt instrument under the esophagus. Sometimes, monopolar electrocautery used for dissection can cause a perforation. An electrocautery burn may be not recognized intraoperatively, and it usually manifests itself clinically during the first postoperative day.
Step 6: Closure of Crura
The diaphragmatic crura are closed with interrupted 2-0 silk sutures that are tied intracorporeally. Retraction of the esophagus upward and toward the patient’s left with the Penrose drain provides proper exposure. The first stitch should be placed just above the junction of the two pillars. Additional stitches are placed 1 cm apart, and a space of about 1 cm is left between the uppermost stitch and the esophagus.
Step 7: Insertion of the Bougie into the Esophagus and Across the Esophageal Junction
After removal of the orogastric tube, a 56-French bougie is inserted down the esophagus through the esophagogastric junction [14]. The crura must be snug around the esophagus but not too tight: a closed grasper should slide easily between the esophagus and the crura.
The most serious complication during this step is an esophageal perforation. Lubrication of the bougie and slow advancement of the bougie by the anesthesiologist help prevent this complication. In addition, all instruments must be removed from the esophagogastric junction, and the Penrose drain must be opened. These measures prevent the creation of an angle between the stomach and the esophagus, which increases the risk of perforation.
Step 8: Wrapping of Gastric Fundus Around the Lower Esophagus
The surgeon gently pulls the gastric fundus under the esophagus with two graspers. The left and right sides of the fundus are wrapped above the esophagogastric junction. A Babcock clamp introduced through trocar 2 is used to hold the two flaps together during placement of the first stitch. The two edges of the wrap are secured to each other by three 2-0 silk placed at 1 cm of distance from each other. Two coronal stitches are then placed between the top of the wrap, the esophagus, and the right or left pillar of the crus. Finally, one additional suture is placed between the right side of the wrap and the closed crura (Fig. 8.2).
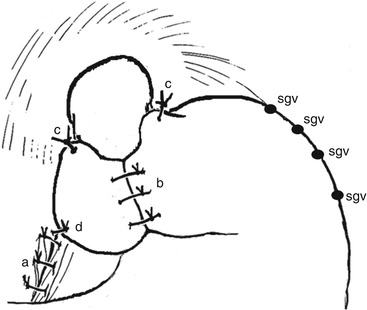
Fig. 8.2
Total fundoplication. a indicates closure of crura, b wrap, c coronal sutures, d posterior suture, and sgv divided short gastric vessels
One way to evaluate whether the wrap is going to be floppy consists of delivering the fundus under the esophagus, checking for the origins of the transected short gastric vessels. Essentially, the wrap is being done using both the anterior and the posterior wall of the fundus. If the wrap remains to the right side of the esophagus and does not retract back to the left, then it is floppy and suturing can be performed. If not, the surgeon must make sure that the upper short gastric vessels have been transected and the posterior dissection completed. To avoid redundancy of the wrap, a “shoeshine” maneuver should be performed. If tension is still present after these maneuvers, a partial wrap is preferable.
Stay updated, free articles. Join our Telegram channel

Full access? Get Clinical Tree


