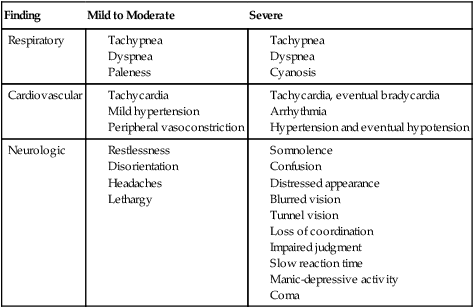
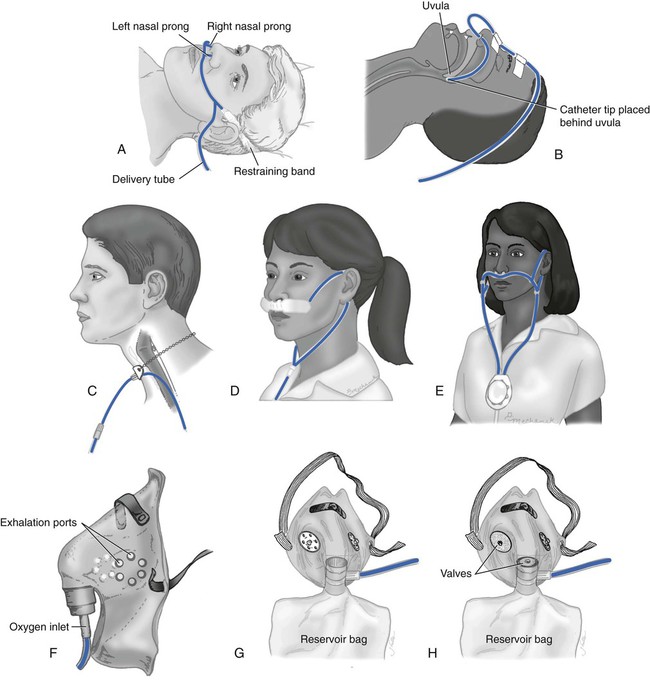
1. Describe the difference between hypoxemia and hypoxia. 2. Describe the basic goals of oxygen therapy. 3. Identify basic oxygen delivery devices. 4. Identify levels of hypoxemia. 5. Identify clinical signs of hypoxia. 6. Describe how to select an oxygen delivery system. 7. Administer oxygen therapy with a nasal cannula or mask. 8. Describe how to modify therapy to meet patient needs. 9. Administer oxygen therapy to a patient with an artificial airway. 10. Identify indications complications, and hazards of oxygen therapy. 11. Perform high-flow oxygen therapy. Treating your patient begins with a thorough assessment to assess the need for oxygen therapy. Three basic ways to determine oxygen need include (1) lab measurements (Table 15-1), (2) the patient’s clinical problem, and (3) its presentation during the bedside assessment (Table 15-2). Determination of the oxygen delivery device depends not only on the patient’s oxygen needs but also on his or her level of cooperation with the use of the device. Common oxygen delivery devices are illustrated in Figure 15-1. TABLE 15-1 Hypoxemia/Hypoxia Classifications of PaO2 and SpO2 PaO2, Partial pressure of oxygen; SpO2, saturation of peripheral oxygen. TABLE 15-2 1. Review the patient’s chart, and note patient’s most recent ABG results. 2. Verify the physician’s order or the facility’s protocol for standard of care. 3. Obtain, clean, and inspect the appropriate equipment prior to entering the patient’s room. 4. Follow personal protective equipment (PPE) requirements, and observe standard precautions for any transmission-based isolation precaution. 5. Identify the patient using two patient identifiers. 6. Introduce yourself to the patient and to the family. 7. Explain the procedure to the patient and to the family, and acknowledge the patient’s understanding. 8. Perform proper hand hygiene, and put on gloves, mask, and protective eyewear, as appropriate for the procedure. 1. Place the patient in a comfortable position. 3. Observe for signs and symptoms associated with hypoxemia. 5. Choose the appropriate oxygen delivery device based on assessment and patient need. 6. Attach the nasal cannula or mask to the oxygen tube, and attach the oxygen tube to the oxygen source. 8. Apply the oxygen delivery device properly, and adjust for the patient’s comfort. 9. Allow sufficient slack on the oxygen tube. 10. Adjust the oxygen flow rate, as needed. 11. Remove the supplies from the patient’s room, and clean the area, as needed. 12. Remove the PPE, and perform proper hand hygiene prior to leaving the patient’s room. Many patients have temporary or permanent artificial airways, and at times, they will require medical gas therapy. Besides determining how to deliver the oxygen therapy, you must also consider the aspect of heating and humidifying the gas. All patients with endotracheal tubes or tracheostomy tubes receiving mechanical ventilation require some form of heat and humidification of the medical gas. Patients with permanent tracheostomy tubes, however, require heat and humidification on a case-by-case basis. It is the RT’s responsibility to recognize the signs and symptoms of inadequate humidification and deliver the appropriate therapy, as needed. Humidity and bland aerosol therapy are frequently needed, and this topic is covered in Chapter 13. The following is the step-by-step process for administering oxygen therapy to a patient with an artificial airway. 1. Review the patient’s chart, and note patient’s most recent ABG results. 2. Verify the physician’s order or the facility’s protocol for standard of care. 3. Obtain, clean, and inspect the appropriate equipment prior to entering the patient’s room. 4. Follow PPE requirements, and observe standard precautions for any transmission-based isolation precaution. 5. Identify the patient using two patient identifiers. 6. Introduce yourself to the patient and to the family. 7. Explain the procedure to the patient and to the family, and acknowledge the patient’s understanding. 8. Perform proper hand hygiene, and put on gloves, mask, and protective eyewear, as appropriate for the procedure. 1. Place the patient in a comfortable position. 3. Observe for signs and symptoms associated with hypoxemia. 5. Set up the suction equipment at the patient’s bedside, if needed. 6. Assess for patent airway, and remove airway secretions. 7. Attach a T-tube or tracheostomy collar to the large-bore oxygen tube and to the humidified oxygen source. 8. Adjust the oxygen flow rate, and adjust the nebulizer to proper FiO2 setting. 9. Attach the T-tube or tracheostomy collar to the endotracheal or tracheostomy tube. 10. Check if the T-tube is pulling on the endotracheal or tracheostomy tube. 11. Suction the secretions in the T-tube or tracheostomy collar, if necessary. 12. Remove the supplies from the patient’s room, and clean the area, as needed. 13. Remove PPE, and perform proper hand hygiene prior to leaving the patient’s room.
Medical Gas Therapy
» Skill Check Lists
15-1 Administering Oxygen Therapy with a Nasal Cannula or Mask
Classification
PaO2
SpO2
Normal
80–100 mm Hg
Greater than 95%
Mild hypoxemia
60–80 mm Hg
90%–94%
Moderate hypoxemia
40–60 mm Hg
75%–89%
Severe hypoxemia
Less than 40 mm Hg
Less than 75%
Finding
Mild to Moderate
Severe
Respiratory
Cardiovascular
Neurologic


Procedural Preparation
Implementation
15-2 Administering Oxygen Therapy to a Patient with an Artificial Airway
Procedural Preparation
Implementation


