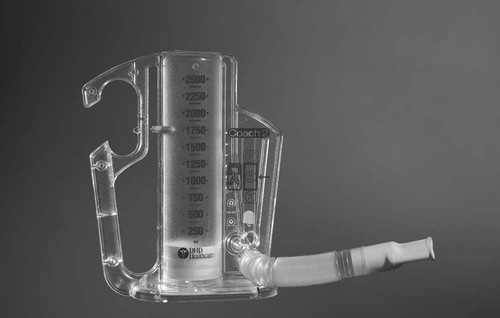
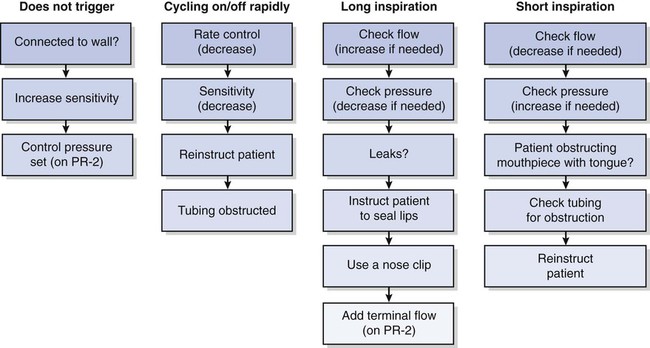
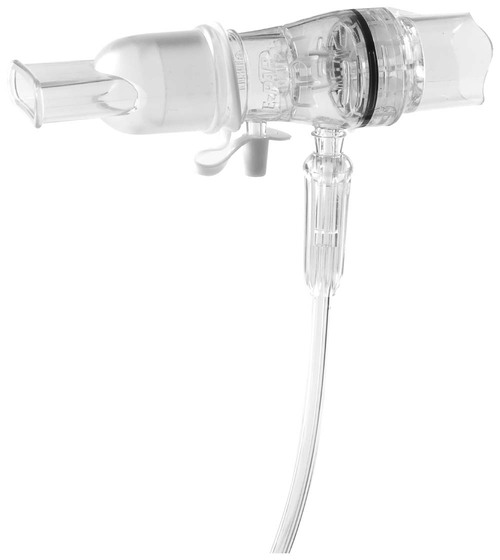
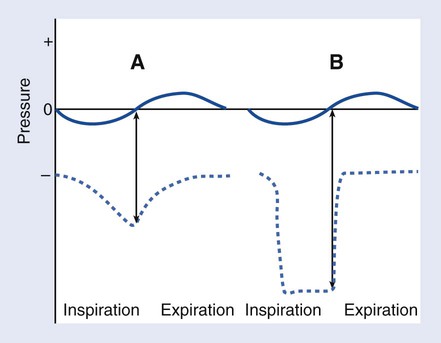
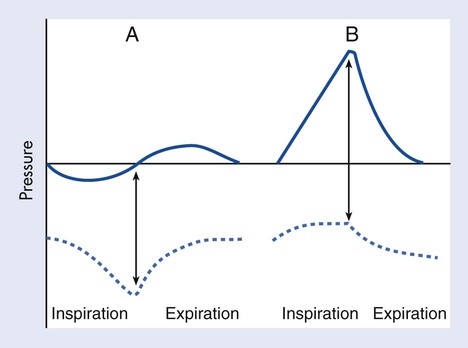
1. Identify clinical signs of atelectasis. 2. Describe chest radiographic indications of atelectasis. 3. Identify the indications, contraindications, and hazards associated with incentive spirometry. 4. Perform patient teaching on the correct techniques for incentive spirometry. 5. Identify the indications, contraindications, and hazards associated with intermittent positive pressure breathing. 6. Perform patient teaching on the correct techniques for intermittent positive pressure breathing. 7. Identify the indications and steps for administering EzPAP. 8. Identify the indications and steps for the use of the MetaNeb System. Treating and preventing atelectasis, the collapse of distal lung parenchyma, should always be a main concern of a respiratory therapist (RT), especially when dealing with postoperative and bedridden patients. Correct therapy must be implemented early before atelectasis leads to deterioration of the patient’s pulmonary status. A patient’s medical history should provide the RT with the first indication that atelectasis may be present. Clinical signs of atelectasis, when recognized, often indicate considerable pulmonary involvement. Boxes 16-1 and 16-2 list these signs and chest radiography findings, which help confirm the presence of atelectasis. If the atelectasis becomes significant, hypoxemia may manifest clinically with tachycardia. Respiratory therapists must be vigilant in their assessments of patients to ensure that even the subtlest signs are not overlooked. IS is used to treat and prevent atelectasis. Devices, illustrated in Figure 16-1, may be flow-oriented devices, which measure and visually indicate the inspiratory flow and equate it with volume, or volume-oriented devices, which measure and indicate visually the volume the patient is achieving during a sustained maximal inspiration (SMI). To attain a SMI, the patient must breathe in slowly and deeply to total lung capacity (TLC) and then hold the breath for about 5 to 10 seconds. A comparison of alveolar and pleural pressure changes during a normal, spontaneous breath and during an SMI are illustrated in Figure 16-2. Box 16-3 lists the assessment tools and monitoring parameters that help evaluate a patient’s performance with the IS device. The following is the step-by-step process for the use of incentive spirometry. 1. Review the patient’s chart. 2. Verify the physician’s order or the facility’s protocol for standard of care. 3. Obtain, clean, and inspect the appropriate equipment prior to entering the patient’s room. 4. Follow personal protective equipment (PPE) requirements, and observe standard precautions for any transmission-based isolation procedure. 5. Identify the patient using two patient identifiers. 6. Introduce yourself to the patient and to the family. 7. Explain the procedure to the patient and to the family, and acknowledge the patient’s understanding. 8. Perform proper hand hygiene, and put on gloves, mask, and protective eyewear, as appropriate for the procedure. 1. Place the patient in the semi-Fowler position, and instruct the patient to breathe normally. 3. Demonstrate how to place the mouthpiece and hold the device. 4. Instruct the patient to inhale slowly and deeply to a maximal inspiration while maintaining a constant flow through the device. 5. Instruct the patient to hold the breath for 5 to 10 seconds. 6. Instruct the patient to exhale passively through pursed lips (see PA 27-2). 7. Encourage the patient to cough. 8. Advise the patient to perform the maneuver 5 to 10 times every hour while awake. 9. Remove the supplies from the patient’s room, and clean the area, as needed. 10. Remove PPE, and perform proper hand hygiene prior to leaving the patient’s room. 1. Establish a baseline, or compare with previous measurements. 2. Assess the patient’s performance of maneuver, and coach the patient to improve proficiency with the device. 3. Identify any unexpected outcomes. 4. Correlate patient progress with chest radiographs and blood gas values, if available. IPPB is a treatment modality in which inspiratory positive pressure is applied to the airway of a spontaneously breathing patient on a short-term basis, usually lasting about 15 minutes per treatment to treat atelectasis. Figure 16-3 illustrates pressure changes during spontaneous breathing compared with IPPB. Patients selected for IPPB therapy must be carefully chosen and the indications for therapy and goals clearly understood. Troubleshooting the machine is important to ensure the best patient outcomes. The chart in Figure 16-4 illustrates some common problems and how to correct them. When determining the effectiveness of the therapy, the RT should evaluate for improved breath sounds, increased tidal volume by 25%, and an increase in the vital capacity to 15 mL/kg. The following is the step-by-step process for the use of IPPB as a lung expansion therapy. 1. Review the patient’s chart. 2. Verify the physician’s order or the facility’s protocol for standard of care. 3. Obtain, clean, and inspect the appropriate equipment prior to entering the patient’s room. 4. Follow PPE requirements, and observe standard precautions for any transmission-based isolation procedure. 5. Identify the patient using two patient identifiers. 6. Introduce yourself to the patient and to the family. 7. Explain the procedure to the patient and to the family, and acknowledge the patient’s understanding. 8. Perform proper hand hygiene, and put on gloves, mask, and protective eyewear, as appropriate for the procedure. 1. Place the patient in the semi-Fowler position, and instruct the patient to breathe normally. 3. Obtain baseline values for inspiratory capacity, expiratory tidal volume, and peak expiratory flow rate. a. Increase sensitivity control until the machine self-cycles. b. Return to the sensitivity level if it does not self-cycle. 5. Check the machine and circuit for leaks: 6. Instruct the patient on how to breathe correctly: a. Explain to the patient how to initiate a breath and how expiration occurs; expiration occurs passively and should be two to three times as long as inspiration. 7. Adjust the machine as required by the patient’s ventilatory patterns: 8. Monitor inspiratory capacity, respiratory rate, heart rate, and blood pressure midway through the procedure. 9. Encourage the patient to cough. 11. Remove the supplies from the patient’s room, and clean the area, as needed. 12. Remove PPE, and perform proper hand hygiene prior to leaving the patient’s room. Another device used for lung expansion therapy to aid in the treatment and prevention of atelectasis is EzPAP Positive Airway Pressure System (Smiths Medical, Norwell, MA) (Figure 16-5). It is often used when a patient has difficulties with incentive spirometry. It may be administered using a mouthpiece or a mask, and it allows for the addition of an in-line nebulizer during use. Positive airway pressure is produced via a flowmeter, using oxygen or air, throughout the patient’s breathing cycle. The following is the step-by-step process for the use of EzPAP. 1. Review the patient’s chart. 2. Verify the physician’s order or the facility’s protocol for standard of care. 3. Obtain, clean, and inspect the appropriate equipment prior to entering the patient’s room. 4. Follow PPE requirements, and observe standard precautions for any transmission-based isolation procedure. 5. Identify the patient using two patient identifiers. 6. Introduce yourself to the patient and to the family. 7. Explain the procedure to the patient and to the family, and acknowledge the patient’s understanding. 8. Perform proper hand hygiene, and put on gloves, mask, and protective eyewear, as appropriate for the procedure.
Lung Expansion Therapy
» Skill Check Lists
16-1 Performing Incentive Spirometry
Procedural Preparation
Implementation
Evaluation of Procedure
16-2 Performing Intermittent Positive Pressure Breathing
Procedural Preparation
Implementation
16-3 Administering EzPAP
Procedural Preparation
![]()
Stay updated, free articles. Join our Telegram channel

Full access? Get Clinical Tree


Lung Expansion Therapy


