3 Blood Gas Sampling, Analysis, Monitoring, and Interpretation
Note 1: This book is written to cover every item listed as testable on the Entry Level Examination (ELE), Written Registry Examination (WRE), and Clinical Simulation Examination (CSE).
The listed code for each item is taken from the National Board for Respiratory Care’s (NBRC) Summary Content Outline for CRT (Certified Respiratory Therapist) and Written RRT (Registered Respiratory Therapist) Examinations (http://evolve.elsevier.com/Sills/resptherapist/). For example, if an item is testable on both the ELE and the WRE, it will simply be shown as: (Code: …). If an item is only testable on the ELE, it will be shown as: (ELE code: …). If an item is only testable on the WRE, it will be shown as: (WRE code: …).
MODULE A
There are three broad, general indications for this recommendation:
Some specific indications follow.
MODULE B
1. Blood gas sampling device selection and preparation
a. Get the appropriate blood gas sampler
A capillary blood gas (CBG) sample requires the following:
d. Use the proper amount of heparin
This is a concern only when liquid heparin is added to a needle and syringe. Aspirate about 1 mL of 10 mg/mL or 1000 units/mL sodium heparin through the needle into the syringe. Pull the plunger back to coat the inside of the syringe. Push the plunger forward to squirt the excess heparin out through the needle. The values of a 2- to 4-mL sample of blood should not be affected by this concentration. Remember that inadequate heparin can cause the blood sample to clot. Excessive heparin can alter the blood gas values by reducing the pH and the carbon dioxide level and increasing the oxygen level.
2. Manipulate arterial catheters by order or protocol (WRE code: IIA20b) [Difficulty: WRE: R, Ap, An]
a. Select the appropriate catheter
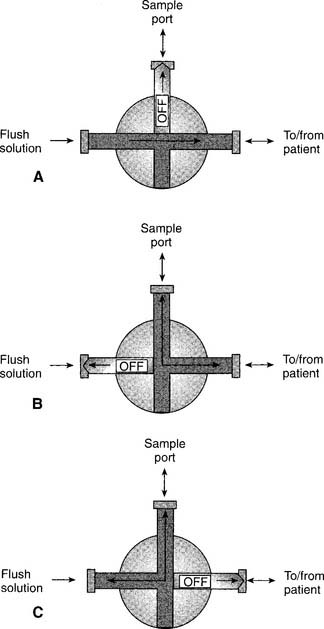
An arterial catheter (also called an arterial line) is a flexible catheter that is placed into a peripheral artery for the purposes of sampling blood or continuously monitoring the patient’s blood pressure, or both. The blood-sampling procedure is explained in the following discussion. Chapter 5 contains a discussion on blood pressure monitoring and illustrations of how the monitoring system is assembled. The radial artery is the most common site for catheter insertion. Alternate arterial sites may be used if needed.
A newborn with a severe cardiopulmonary problem should have the catheter inserted into either of the umbilical arteries. Usually, a long, flexible umbilical artery catheter (UAC) is placed into the patient and advanced into the aorta (see Figure 1-7). If indicated, this should be done as quickly as possible after birth, before arterial spasm prevents the catheter from being advanced. If the patient weighs more than 1250 g, a 6-French (6 Fr) catheter is used; a 3.5 Fr catheter is used if the neonate weighs less than 1250 g. Besides obtaining blood samples and monitoring the blood pressure, one can give the newborn glucose or a blood transfusion through the catheter. A neonatal patient also may have the umbilical vein catheterized.
b. Put the equipment together and make sure that it works properly
Arterial catheters come as single units in sterile packaging. Additional stopcocks, tubing, flush solution, and an automatic solution drip device are needed. These are discussed in Chapter 5 in some detail.
3. Get a blood sample from an arterial catheter (Code: IB9f and IIIE2b) [Difficulty: ELE: R, Ap; WRE: An]
The steps for obtaining an arterial blood sample include the following:
4. Perform an arterial puncture to obtain a blood sample for analysis (Code: IB9f and IIIE2a) [Difficulty: ELE: R, Ap; WRE: An]
1. Radial artery site
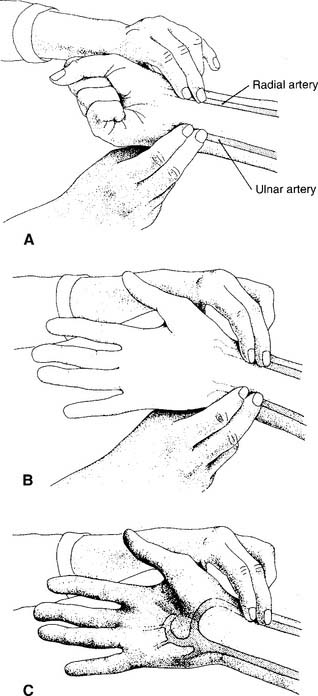
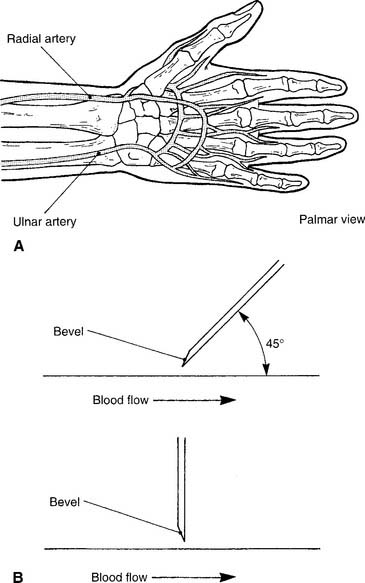
See Figure 3-2 for the basic procedure. Circulation to the hand is stopped by pressing both the radial and the ulnar arteries closed. Releasing the pressure over the ulnar artery should result in the hand flushing within 5 to 15 seconds. This is a positive test result and proves that the ulnar artery has adequate circulation to the hand. If the hand does not flush within 15 seconds of the release of the ulnar artery, the circulation is inadequate, and the radial artery of that wrist must not be punctured. Another site must be evaluated for puncture.
2. Dorsalis pedis artery site
Press down on the dorsalis pedis artery to occlude it. Press on the nail of the great toe so that it blanches. Release the pressure on the nail, and watch for a rapid return of color. This normal test finding confirms that a good blood flow exists through the posterior tibial and lateral plantar arteries. It is safe to draw a sample from the site. A slow return of blood flow indicates poor circulation; another site must be chosen.
5. Perform arterialized capillary blood gas sampling (Code: IB9g and IIIE2c) [Difficulty: ELE: R, Ap; WRE: An]
MODULE C
1. Manipulate a point-of-care blood gas analyzer by order or protocol (Code: IIA10) [Difficulty: ELE: R, Ap; WRE: An]
b. Put the equipment together and make sure that it works properly (CSE code: IIA10)
1. pH electrode
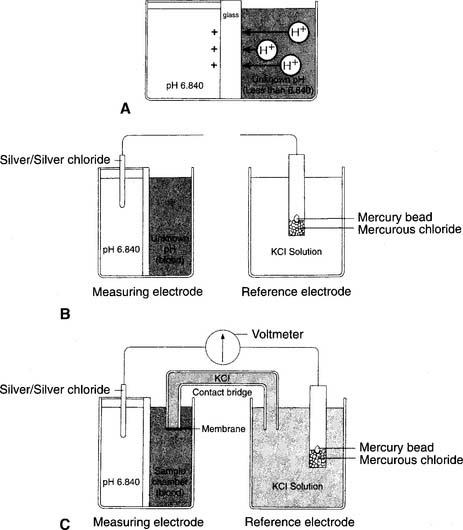
The modern pH electrode has existed since the mid-1950s and is usually referred to as the Sanz electrode after its principal inventor. The basic principle behind the pH analyzer is its ability to measure the voltage (potential for electrical flow) between two different solutions. This is based on the different hydrogen ion (H+) concentrations between the solutions that reflect their relative pH values. The reference electrode is immersed in a solution with a pH of 6.840 that fills a glass or plastic chamber. The blood sample, of unknown pH, is placed in a separate measuring chamber called a cuvette. These two chambers are separated by a special glass membrane that contains metals and sodium ions (Na+), thus making it pH sensitive. Both chambers are kept at a stable 37° C temperature. See Figure 3-5 for a graphic representation of the pH electrode. When blood or a quality control (QC) material is introduced into the cuvette, the potential exists for hydrogen ions to replace the sodium ions in the pH-sensitive glass if the two pHs are different. The replacement is proportional to the difference in the two pHs.
2. Pco2 electrode
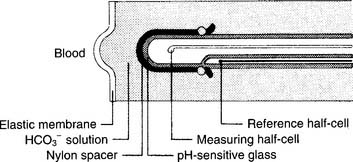
The partial pressure of carbon dioxide (Pco2) is measured in a modified pH electrode. This was first designed in the mid-1950s by Stow and further perfected by Severinghaus. Accordingly, these units are now referred to as Severinghaus electrodes, or sometimes as Stow-Severinghaus electrodes. In Figure 3-6, the electrode is depicted in cross section. It has a reference half-cell and a measuring half-cell that are enclosed within pH-sensitive glass and electrically connected by an electrolyte contact bridge. The blood sample is introduced into a cuvette heated to 37° C.
3. Po2 electrode
This unit is completely different from the others mentioned. It was developed in the late 1950s by Clark and thus is usually called a Clark electrode. It is also sometimes known as a polarographic electrode because of the basis of its operation. Figure 3-7 is a drawing of key features of the unit. A phosphate-KCl buffer solution surrounds the silver anode. A thin membrane separates the blood-filled cuvette from direct contact with the electrode but allows oxygen molecules to diffuse slowly through to contact the platinum wire cathode. The whole unit is heated to 37° C. The term polarographic comes from the addition of about 0.7 volt to the cathode to make it slightly “polarized” or negative compared with the anode. This is needed to ensure that oxygen is rapidly chemically reduced (that it gains electrons) at the cathode. This creates an electrical current directly proportional to the number of reduced oxygen molecules.
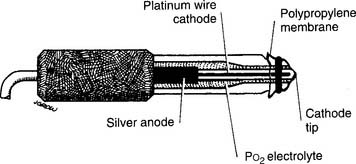
Figure 3-7 Schematic illustration of the Clark electrode for measuring PO2.
(From Harrison BA, Shapiro C: Clinical application of blood gases, ed 4, St Louis, 1989, Mosby.)
It must be understood that the partial pressure of oxygen (Po2) being measured is derived from oxygen that is dissolved in the plasma. It does not come from the hemoglobin found in the erythrocytes (red blood cells). The reported value for the saturation of oxygen in the hemoglobin (Sao2) is calculated by using a mathematical table. Under normal conditions, the calculated Sao2 value is the same as or close to the true Sao2 value. Carbon monoxide (CO) poisoning is the only commonly seen clinical situation during which a calculated saturation can be incorrectly high. If carbon monoxide poisoning is suspected or known, the patient’s blood sample should be analyzed on a CO-oximeter unit.
d. Perform quality control procedures for a blood gas analyzer (Code: IIC1) [Difficulty: ELE: R, Ap; WRE: An]
5. Levey-Jennings charts
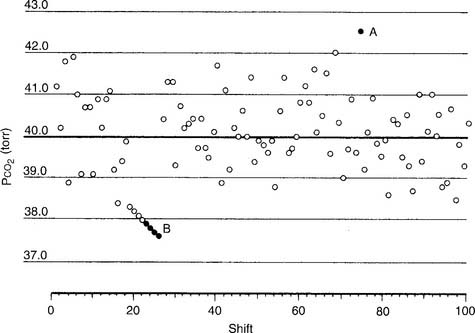
An out-of-control situation exists whenever a single calibration value or a series of calibration values is outside established limits. A random error is an unpredictable aberration in precision that occurs when the QC material is sampled. A systematic error shows an accuracy problem and is much more serious. It must be investigated, corrected, and documented. Figure 3-8 shows an example of both random error and systematic error. Rules have been established for determining whether the error is random or systematic (Table 3-1).
TABLE 3-1 Westgard’s Rules for Determining When an Aalyzer Is Not Functioning Properly
| Rule name | Levey-Jennings chart |
|---|---|
| RANDOM ERROR | |
| 1-2 SDs | The measurement is more than 2 SDs but not more than 3 SDs from the mean. |
| 1-3 SDs | The measurement is more than 3 SDs from the mean. |
| R*-4 SDs | Two consecutive measurements are 4 SDs or more apart. |
| SYSTEMATIC ERROR | |
| 2-2 SDs | Two consecutive measurements are either 2 SDs above or 2 SDs below the mean. |
| 4-1 SDs | Four consecutive measurements are either 1 SD above or 1 SD below the mean. |
| 7-trend | Seven consecutive measurements are on only one side of the mean; each measurement is progressively more out of control. |
| 10-mean | Ten consecutive measurements are on only one side of the mean. |
SDs, standard deviations.
Modified from Lane EE, Walker JF: Clinical arterial blood gas analysis, St Louis, 1987, Mosby.
6. pH electrode
a. One-point calibration
b. Two-point calibration
7. Pco2 electrode
a. One-point calibration
8. Po2 electrode
a. One-point calibration
c. Three-point calibration
10. Calibration gas cylinders
For economic reasons, the low-percentage oxygen and carbon dioxide gases are placed together in one cylinder, and the high-percentage oxygen and carbon dioxide gases are placed together in a second cylinder. Box 3-1 summarizes the normal precision of the electrodes discussed and the gases used in their calibration. A cylinder containing 100% oxygen and no carbon dioxide can be used for three-point calibration.
e. Perform quality control procedures for a point-of-care blood gas analyzer (Code: IIC3) [Difficulty: ELE: R, Ap; WRE: An]
f. Perform blood gas analysis (Code: IB9j and IIIE3c) [Difficulty: ELE: R, Ap; WRE: An]
1. CO-oximeter/hemoximeter
a. Perform quality control procedures on the CO-oximeter/hemoximeter (Code: IIC1) [Difficulty: ELE: R, Ap; WRE: An].
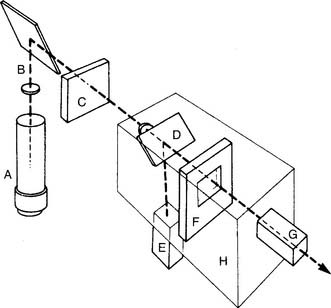
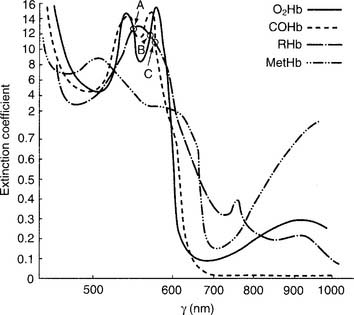
The unit is preassembled by the manufacturer. Practical experience with a unit is recommended to understand how to add a patient blood sample and perform calibration duties. (See Figure 3-9 for a schematic drawing of a CO-oximeter.) A thallium-neon hollow cathode lamp emits light in the infrared-visible range. A device called a monochromator contains four filters and rotates through the light beam. Each filter allows only one specific wavelength to pass through it. These four monochromatic wavelengths correspond to the three isosbestic points, discussed later (shown in Figure 3-10) and 626.6 nm. This last wavelength is poorly absorbed by all four hemoglobin moieties. It is used to find the maximal difference in absorption so that the relative amounts of the hemoglobin species can be determined.
Stay updated, free articles. Join our Telegram channel

Full access? Get Clinical Tree


