11 Cardiac Monitoring and Cardiopulmonary Resuscitation
Note 1: This book is written to cover every item listed as testable on all Entry Level Examination (ELE), Written Registry Examination (WRE), and Clinical Simulation Examination (CSE).
The listed code for each item is taken from the National Board for Respiratory Care’s (NBRC) Summary Content Outline for CRT (Certified Respiratory Therapist) and Written RRT (Registered Respiratory Therapist) Examinations (http://evolve.elsevier.com/Sills/resptherapist/). For example, if an item is testable on both the ELE and WRE, it will simply be shown as (Code: …). If an item is only testable on the ELE, it will be shown as (ELE code: …). If an item is only testable on the WRE, it will be shown as (WRE code: …).
MODULE A
1. Manipulate electrocardiogram monitors by order or protocol (ELE code: IIA18) [Difficulty: ELE: R, Ap]
a. Get the necessary equipment for the procedure
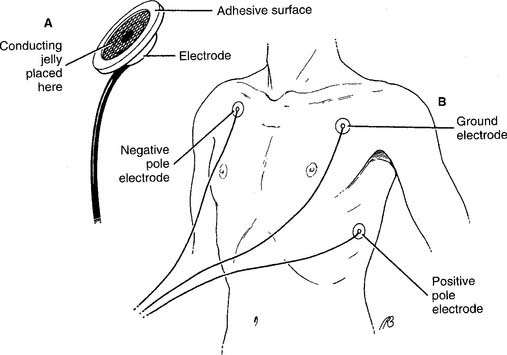
To perform electrocardiogram (ECG) monitoring, it is necessary to select the proper cardiac electrodes and the monitoring unit. Cardiac electrodes, or leads, pick up the electrical signal from a heart contraction and conduct it to the monitor. They are usually called chest leads (or chest electrodes or precordial leads) and consist of four parts: (1) a conducting wire coated with an electrically neutral plastic, (2) an adapter at one end of the wire that plugs into the electrocardiograph machine, (3) a different adapter at the opposite end of the wire that attaches to a patient electrode, and (4) the patient electrode (Figure 11-1, A). Conducting jelly is added to the surface of the electrode to reduce the skin’s resistance to the heart’s electrical signal. An adhesive ring holds the electrode tightly to the skin. The conducting wire snaps or clips onto the back of the electrode. Typically, three to five of these chest leads are used for a period of hours or days for basic rhythm monitoring or Holter monitoring. Typically, three or four chest leads are used for rhythm monitoring. Holter monitoring typically involves using five chest leads.
One of the following monitoring units must be selected, based on the patient’s situation:
1. Basic bedside rhythm monitoring
A bedside rhythm monitoring unit usually receives input from three or four chest leads (Figure 11-1, B). That collective signal is sent to an oscilloscope (video display terminal) for a real-time display of the patient’s rhythm. These ECG machines have several additional features. They continuously display the patient’s heart rate. High and low heart rate alarm settings can be set. If the high or low setting is reached, an audible and visual alarm is triggered. The patient’s heart rhythm can be recorded on ECG paper manually by pushing a record button or automatically when an alarm setting is reached. These units are often seen mounted at the patient’s bedside in the intensive care unit.
2. Cardiopulmonary resuscitation cart
Cardiopulmonary resuscitation (CPR) “crash” carts have electrocardiographs and oscilloscopes mounted on them. These are connected to the defibrillator to allow synchronous defibrillation (cardioversion) or asynchronous defibrillation. Typically, three or four chest leads are used for rhythm monitoring (Figure 11-1, B). Crash carts have other features that are similar to those seen on bedside rhythm monitoring units. Portable versions of these units are used when the patient must be transported. A portable unit operates by battery power when unplugged from the wall electrical outlet.
3. Holter monitoring
Holter monitoring involves recording a patient’s complete ECG for 1 to 3 days through the use of a portable, battery-powered monitor. In addition, the patient keeps a diary of any episodes of chest pain, dyspnea, and so forth. The whole system includes the recording device for the patient’s ECG, a set of chest leads, a carrying bag for the recording device, and a patient activity diary (Figure 11-2).
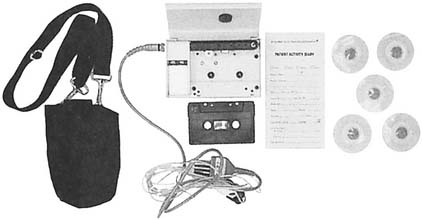
Figure 11-2 Holter monitoring system for ambulatory electrocardiography.
(From Pagana K, Pagana TJ: Mosby’s manual of diagnostic and laboratory tests, ed 3, St Louis, 2006, Mosby.)
2. Manipulate diagnostic electrocardiogram machines by order or protocol (ELE code: IIA19) [Difficulty: ELE: R, Ap]
a. Get the necessary equipment for the procedure
A 12-lead ECG test requires a machine capable of receiving electrical input from the four limb leads and six precordial leads (see Figures 11-3 and 11-4). The operator can manually select the lead combinations needed to get the 12 different combinations for a 12-lead ECG tracing. However, modern units do this automatically when the operator turns them on. The various ECG combinations are printed out on ECG paper. Modern units also store the patient’s information on a self-contained computer.


b. Put the equipment together and make sure that it works properly
The limb leads come as a group of four with one for each arm and leg (Figure 11-3). Precordial leads came in a group of six and are placed on the chest in the positions shown in Figure 11-4. A conducting and adhesive jelly is used to reduce the skin’s resistance and to hold the lead in place. The limb leads are longer, and they may need to be held in place by a rubber strap.
3. Cardiac monitoring
c. Monitor the cardiac rhythm to evaluate the patient’s response to respiratory care (Code: IIIE6) [Difficulty: ELE: R, Ap; WRE: An]
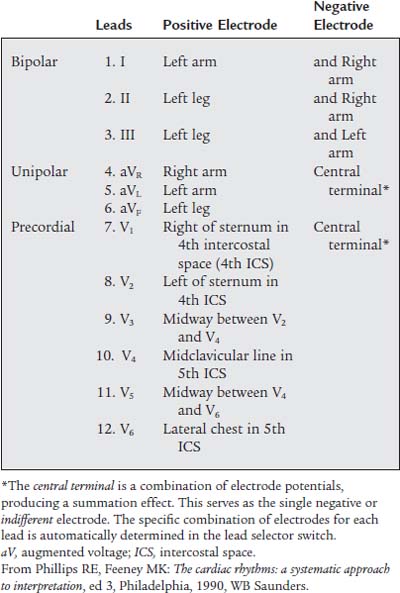
The most common chest electrode pattern used for rhythm monitoring is called lead II. The three chest electrodes are placed as shown in Figure 11-1, B. The negative (right arm, RA) electrode is on the right upper chest. The positive (left leg, LL) electrode is placed on the left lateral chest. The ground (left arm, LA) electrode is placed on the left upper chest. With this electrode configuration, known as the Einthoven triangle, the heart’s electrical signal is followed as it flows from the right atrium to the left ventricle. This results in the so-called normal ECG tracing with upright P, R, and T waves, as shown in Figures 11-5 and 11-6. Table 11-1 shows the sequential electrical events of the normal cardiac rhythm that correspond with those in Figure 11-5.
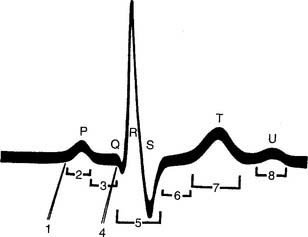
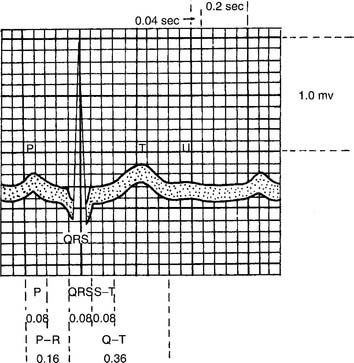
Figure 11-6 Timing of the electrical events of the cardiac cycle during normal sinus rhythm.
(From Spearman CB, Sheldon RL, Egan DF: Egan’s fundamentals of respiratory therapy, ed 4, St Louis, 1982, Mosby.)
TABLE 11-1 Electrophysiologic Events Represented by the Electrocardiogram Sequential Electrical Events Electrocardiographic of the Cardiac Cycle Representation
| 1. Impulse from the sinus node | Not visible |
| 2. Depolarization of the atria | P wave |
| 3. Depolarization of the atrio-ventricular node | Isoelectric |
| 4. Repolarization of the atria | Usually obscured by the QRS complex |
| 5. Depolarization of the ventricles | QRS complex |
| a. Intraventricular septum | a. Initial portion |
| b. Right and left ventricles | b. Central and terminal portions |
| 6. Quiescent state of the ventricles immediately after depolarization | ST segment: isoelectric |
| 7. Repolarization of the ventricles | T wave |
| 8. Afterpotentials following repolarization of the ventricles | U wave |
From Phillips RE, Feeney MK: The cardiac rhythms: systematic approach to interpretation, ed 3, Philadelphia, 1990, WB Saunders.
4. Diagnostic electrocardiogram
b. Recommend an electrocardiogram to obtain additional data (Code: IC9) [Difficulty: ELE: R, Ap; WRE: An]
A diagnostic electrocardiogram (also called a 12-lead ECG) test is indicated if the patient is suspected of having cardiac problems. Symptoms such as syncope, angina pectoris, sudden crushing chest pain, shortness of breath, or unstable heart rate and blood pressure point to a heart problem. Growing evidence indicates that men and women have different signs and symptoms during an acute myocardial infarction (AMI or MI). Men tend to have crushing central chest pain that may radiate down the left arm or the left side of the neck, diaphoresis, cold extremities, shortness of breath, and a feeling of impending doom. Women tend to experience pain in the lower back and the abdominal area. A diagnostic ECG is indicated to document the nature of the cardiac problem or rule out the heart as a source of the symptoms.
c. Perform a diagnostic electrocardiogram (Code: IB9a) [Difficulty: ELE: R, WRE: Ap, An]
The 12-lead ECG involves the use of an electrocardiograph machine with heat-sensitive ECG recording paper, four limb leads, and six precordial leads (see Figures 11-3 and 11-4). Table 11-2 describes the locations of the precordial leads and the positive and negative electrode combinations that are used to record the heart’s electrical signal through the 12 different leads. Each lead individually records the heart’s electrical activity, but it does so from a different position in relation to the heart. These 12 leads give the physician a three-dimensional impression of how the cardiac conduction system and the myocardium are functioning. Abnormal functioning can be diagnosed. Review the normal anatomy and physiology of the heart and its conduction system, if necessary.
MODULE B
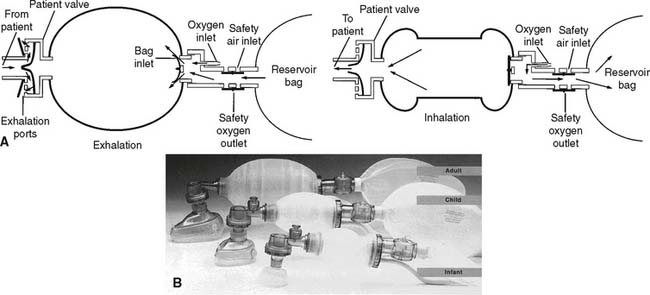
1. Manipulate a manual resuscitator (bag-valve or bag-mask by order or protocol (ELE code: IIA5) [Difficulty: ELE: R, Ap, An]
a. Get the necessary equipment for the procedure
The first consideration when deciding which manual resuscitator to select is the size of the patient. Although the volume of the reservoir bag and the tidal volume expelled from it vary among the types of bags, three basic sizes are available. An infant or newborn unit typically has a reservoir bag volume of about 250 mL. A pediatric unit usually has a reservoir bag volume of about 250 to 500 mL, and an adult unit typically has a reservoir bag volume of 1500 to 2000 mL. In addition to all of these reusable units, a number of disposable units are thrown away after one patient use. They also come in comparable infant, pediatric, and adult reservoir bag volumes.
b. Put the equipment together and make sure that it works properly
Figure 11-7 shows line drawings of a complete set of Laerdal infant, pediatric, and adult manual resuscitators. The following steps should be taken when the function of a manual resuscitator is evaluated:
c. Troubleshoot any problems with the equipment
Check for a reversed or improperly seated one-way valve (spring-loaded, duckbill, or leaf type) if the gas does not enter or exit the unit as it should. In clinical use, mucus, vomitus, and blood can foul the expiratory one-way valve system. By regulation, the valve must be clearable within 20 seconds. Do this by disconnecting the unit from the patient, aiming the adapter into a neutral area, and squeezing the bag to blow out the obstruction. Replace a unit that cannot be promptly cleared of any debris.
2. Manipulate a mouth-to-valve mask resuscitator (ELE code: IIA5) [Difficulty: ELE: R, Ap, An]
a. Get the necessary equipment for the procedure
b. Put the equipment together and make sure that it works properly
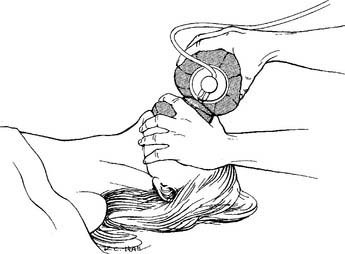
Mouth-to-valve resuscitators are relatively simple devices. Most have only two or three pieces: a face mask, a mouthpiece with a one-way valve, and possibly an oxygen T-piece (Figure 11-8). The “male” and “female” connections are designed to fit together in only one way. When they are properly assembled, no air should leak out when the breath is delivered to the victim.

MODULE C
1. Basic cardiac life support (ELE code: III I1a) [Difficulty: ELE: R, Ap, An]
The key steps of basic cardiac life support (BCLS) include the following:
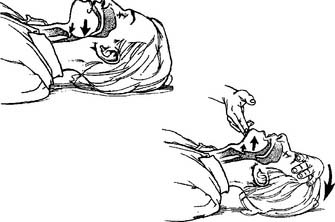
c. Open the airway
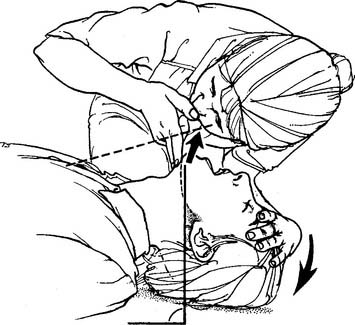
The head-tilt/chin-lift maneuver is the procedure of choice for opening the airways of all victims except those with a known or suspected cervical (neck) spine injury. The victim is gently positioned on his or her back. In an adult, the head is firmly pushed back with one hand, and the jaw is pulled upward with the fingers of the other hand (Figure 11-9). In an infant, it is not necessary to tilt the head back beyond a neutral position. Children may need to have the head pushed back slightly beyond neutral.
The jaw-thrust maneuver is the procedure of choice for opening the airway of all victims with a known or suspected cervical spine injury. The rescuer’s elbows are rested on the ground, and the hands are placed on either side of the victim’s jaw. Lifting of the jaw usually opens the airway and eliminates the need to tilt the head back. See Figure 11-10 for the adult maneuver.
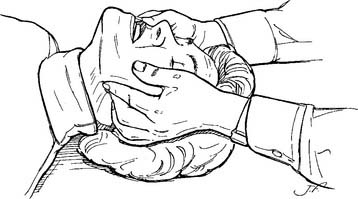
Figure 11-10 Opening the adult’s airway by the jaw-thrust method.
(From Watson MA: Cardiopulmonary resuscitation. In: Barnes TA, editor: Respiratory care practice, St Louis, 1988, Mosby.)
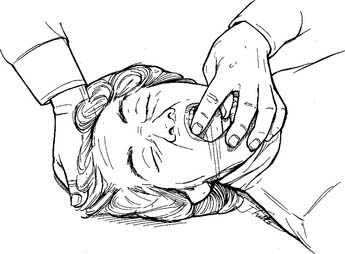
Any obstruction that can be seen in the mouth or throat should be removed. The cross-finger technique can be used to open the mouth wide enough so that a finger or suction device can be inserted to remove a blockage (Figure 11-11). An oral airway should be used only in an unconscious patient to keep the tongue from falling back and blocking the airway.
d. Determine that the patient is not breathing
The rescuer places his or her face close to the victim’s face to look for rising and falling of the chest, listen for victim’s air movement, and feel any air movement from the victim’s breathing (Figure 11-12). The entire procedure should not take longer than 10 seconds.
e. Ventilate the patient
1. Mouth-to-mouth breathing
The first rescuer should begin mouth-to-mouth breathing as soon as possible if no spontaneous breathing by the victim occurs once the airway is opened. No matter the age of the victim, an effective seal must be present between the rescuer and the victim. The adult victim’s nose must be pinched closed; often the rescuer’s cheek can block the infant’s nose. The rescuer’s mouth can cover both the nose and mouth of an infant. Alternative methods include mouth-to-nose and mouth-to-stoma ventilation (Figure 11-13).
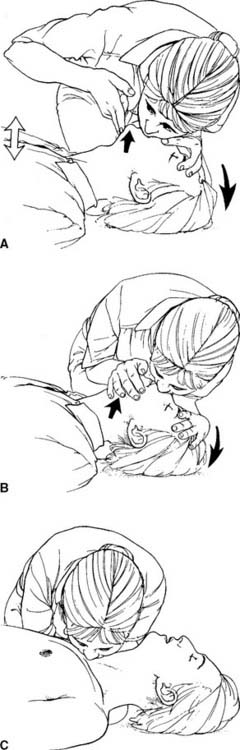
Figure 11-13 A, Adult mouth-to-mouth, mouth-to-nose (B), and mouth-to-stoma (C) ventilation.
(From Standards and guidelines for cardiopulmonary resuscitation [CPR] and emergency cardiac care [ECC], JAMA 268:2188, 1992.) Copyright © 1992, American Medical Association. All rights reserved.
A child should be given two breaths large enough to raise the victim’s chest. A child obviously needs less volume than an adult. All of the same considerations apply as for the adult. Rescue breathing should be performed at a rate of 12 to 20 per minute (every 3 to 5 seconds) in an infant and a child. A newly born infant should be ventilated at a rate of 40 to 60 per minute.
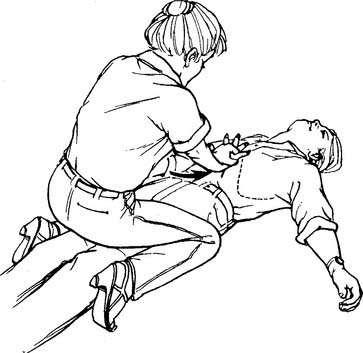
Figure 11-14 Administering the Heimlich maneuver to an unconscious adult victim of an airway obstruction.
(From Standards and guidelines for cardiopulmonary resuscitation [CPR] and emergency cardiac care [ECC], JAMA 268:2193, 1992.) Copyright © 1992, American Medical Association. All rights reserved.
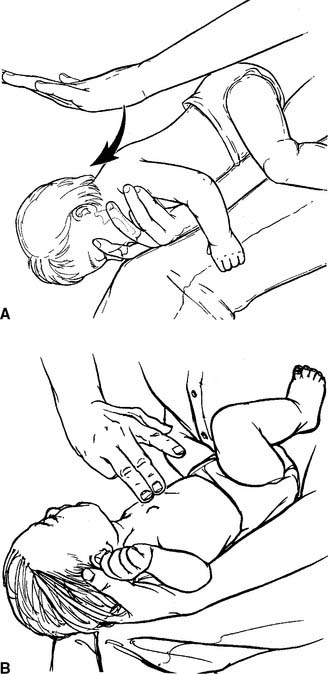
Figure 11-15 Administering (A) back blows and (B) chest thrusts to an infant victim of an obstructed airway.
(From Standards and guidelines for cardiopulmonary resuscitation [CPR] and emergency cardiac care [ECC], JAMA 268:2258, 1992.) Copyright © 1992, American Medical Association. All rights reserved.
2. Manual resuscitator (bag-valve)
A manual resuscitator should be used during hospital-based CPR as soon as one is available. The resuscitation mask must be held to the victim’s face so that no air leak occurs during the forced inspiration (Figure 11-16). An assistant can hold the mask tightly to the face so that the rescuer who is pumping the resuscitation bag can use both hands. This has been shown to produce a larger tidal volume. If the victim’s airway contains an endotracheal tube or tracheostomy tube, the expiratory valve adapter fits directly over the tube adapter. Rescue breathing continues with the previously mentioned considerations for volume and rate. After an adult victim has had an endotracheal tube placed, the tidal volume goal is 500 to 600 mL over a 1-second period to produce a visible chest rise.
3. Mouth-to-valve mask ventilation
A mouth-to-valve mask device (or pocket mask) combines a resuscitation mask with a one-way valve mouthpiece. It is used to ventilate an apneic patient rather than perform mouth-to-mouth breathing. Concerns about protecting the rescuer from patient infections such as acquired immunodeficiency syndrome (AIDS) and hepatitis have led to their widespread acceptance. As shown in Figure 11-8, the patient’s neck is hyperextended, the mask is applied over the mouth and nose to get an airtight seal, and the rescuer breathes into the mouthpiece. It is best if the rescuer is positioned at the victim’s head so that the chest can be seen to rise with each delivered breath. The one-way valve is designed so that the victim’s exhaled gas is vented out to the room air. Some units have a nipple adapter so that supplemental oxygen can be added to the delivered breath. Simply attach oxygen tubing between the nipple and oxygen flowmeter, and turn the flowmeter on to the manufacturer’s recommended flow. When this type of device is used with an adult victim, the tidal volume goal is 500 to 600 mL over a 1-second period to produce a visible chest rise. These devices should be replaced by a manual resuscitator as soon as possible.
g. Determine pulselessness
The carotid pulse is felt for in all victims except children younger than 1 year. The carotid pulse is found by gently feeling with two or three fingers in the groove between the larynx and the sternocleidomastoid muscle on either side of the neck (Figure 11-17). Check for 5 to 10 seconds to be sure that the victim is pulseless and not just bradycardic. In addition, check for other signs of circulation such as spontaneous breathing, coughing, and movement. An infant younger than 1 year should have the pulse felt in the brachial artery; the carotid artery is difficult to find in such young children because they have short, chubby necks.
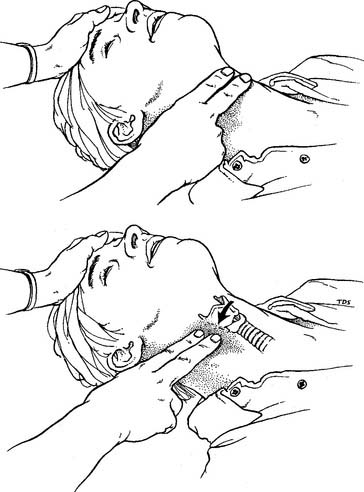
Figure 11-17 Determining pulselessness by checking the carotid pulse of an adult.
(From Standards and guidelines for cardiopulmonary resuscitation [CPR] and emergency cardiac care [ECC], JAMA 268:2189, 1992.) Copyright © 1992, American Medical Association. All rights reserved.


