Chapter 17 Arterial Access; Guidewires, Catheters, and Sheaths; and Balloon Angioplasty Catheters and Stents
Vascular Access
The Access Site
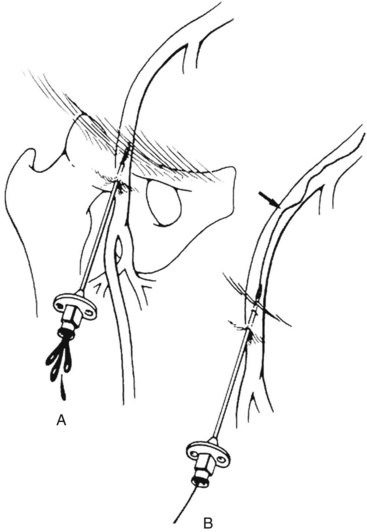
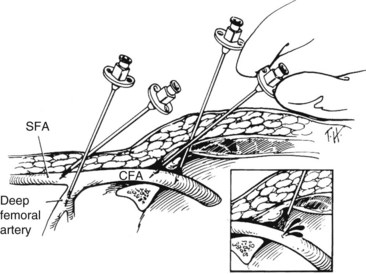
Endovascular intervention begins with vascular access. Appropriate vascular access requires the site to provide a secure, direct, and uninterrupted pathway to the vascular bed of interest or target lesion. The commonly used arterial access sites are the common femoral arteries in the groins and the brachial arteries at the antecubital fossae (Figure 17-1). The femoral approach from the right groin is usually the first choice for angiography and most interventions (Figure 17-2). Its superficial location allows for ease of access, and its relatively large caliber provides blood flow around the sheath to maintain perfusion to the distal lower extremity. In addition, the common femoral artery lies anterior to the femoral head, providing support for pressure to achieve hemostasis should the need arise. This access can be directed in a retrograde fashion toward the pelvis or antegrade toward the thigh. The retrograde femoral puncture provides access to the entire thoracoabdominal aorta and its branches. The contralateral iliofemoral arteries and lower extremity circulation can be easily catheterized from this approach. Alternatively, using an antegrade femoral puncture, distal arteries such as the infrapopliteal and inframalleolar circulation can be visualized in detail and treated most directly.
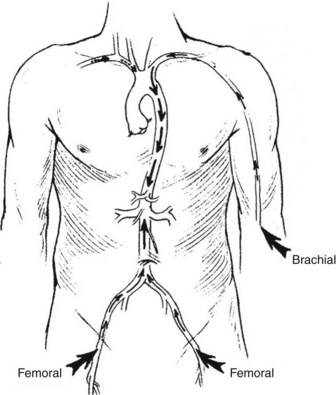
FIGURE 17-1 Sites for arterial access.
(From Moore WS, Ahn SS, editors: Endovascular surgery, ed 4, Philadelphia, 2011, Saunders, p 50.)
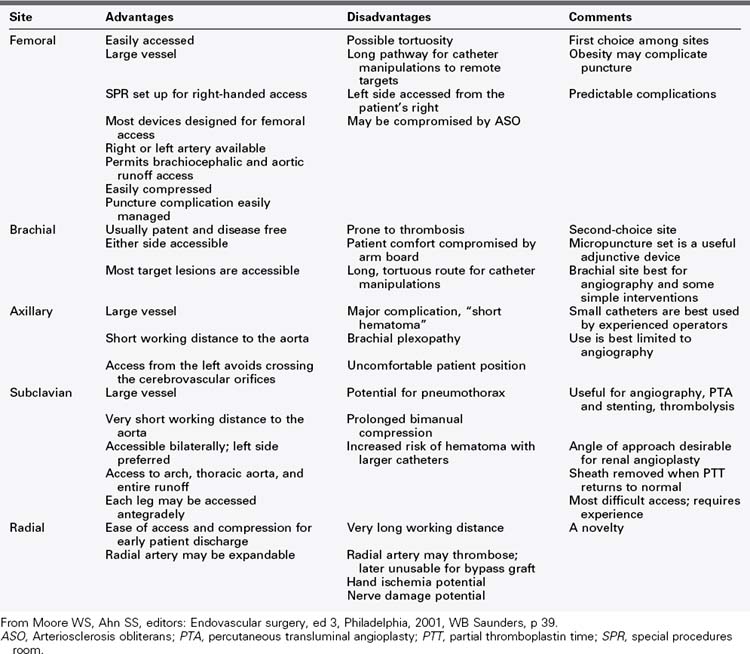
Arterial puncture in the upper extremity also provides access to thoracoabdominal aorta and its branches. The use of upper extremity access is usually limited to instances in which the common femoral arteries are not available because of occlusive disease in the aortoiliac segment or recent bypass. The left brachial artery is preferably used because the left subclavian artery is a separate branch from the left common carotid artery off the aortic arch. A sheath from the right brachial artery can also be used. It has a potential disadvantage in that it crosses the origin of the right common carotid artery (and also the left common carotid artery in bovine arch) as it enters the aortic arch. This can increase the risk of embolization to the brain from atherosclerotic plaque in the diseased innominate artery during sheath and catheter manipulations or device delivery. The axillary artery is contained in a neurovascular sheath, and even minimal bleeding in the sheath has the potential to cause nerve compression with resultant upper extremity paralysis. Therefore the axillary artery is not routinely used as an arterial access. The radial artery is frequently used for cardiac interventions; devices deliverable through a 6-French sheath can be used through specially designed radial sheaths, but access at the wrist necessitates very long catheters and devices for imaging or intervening in the infrainguinal vasculature. The advantages and disadvantages of the various access sites are listed in Table 17-1.
Vascular Cannulation
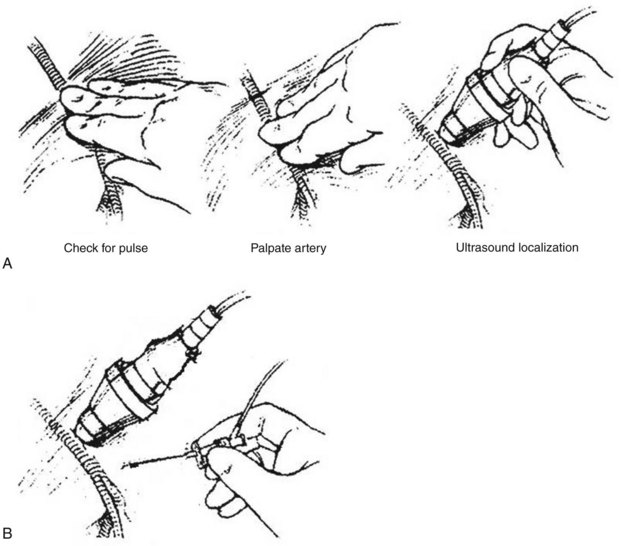
Vascular cannulation is a standardized procedure that is applied regardless of the vein or artery selected. There are two methods to obtain vascular access (Figure 17-3): the through-and-through puncture and the single-wall puncture. In the through-and-through (double-wall) method, both the anterior and posterior walls are completely crossed with the needle. The needle is then withdrawn back into the lumen. This is sometimes used for venous entry, but is not recommended routinely for arterial access. The posterior wall puncture can lead to bleeding complications such as retroperitoneal hematoma at the groin or nerve compression in the surrounding perivascular spaces. The posterior wall puncture can also lead to arteriovenous fistula. For arterial access, the single-wall puncture is preferred. A steady pressure is applied to slowly advance the needle. Pulsatile flow after puncture of only the anterior wall indicates entry into the arterial lumen.
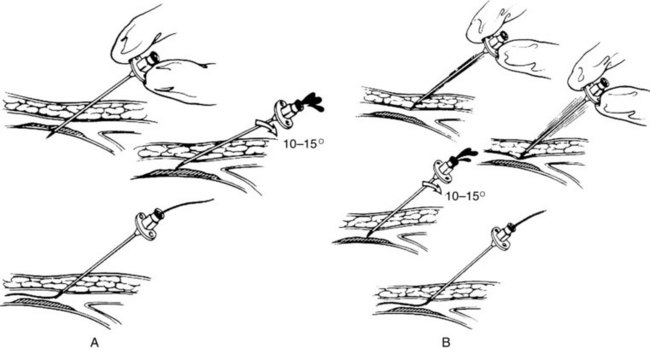
FIGURE 17-3 Vascular cannulation. A, Through-and-through (double-wall) puncture. B, Anterior (single-wall) puncture.
(From Moore WS, Ahn SS, editors: Endovascular surgery, ed 4, Philadelphia, 2011, Saunders, p 52.)
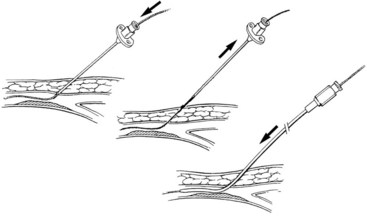
The Seldinger technique is the fundamental method of vascular access that was first described in 1953 (Figure 17-4). A wire, needle, and a sheath are required. In this technique:
1. Angulated entry into the vascular wall is obtained with the needle beveled anteriorly (see Figure 17-4A). The single-wall puncture should be used. Intraluminal position of the needle is indicated by pulsatile flow from the needle hub during arterial puncture or steady blood return into the syringe with negative pressure during venous puncture. A small injection of intravenous contrast under fluoroscopy can also be used to confirm intraluminal needle position.
2. A guide wire is then passed through the needle into the vascular lumen until the stiff portion is well inside the artery or vein (see Figure 17-4B). The wire should be inserted gently and advance easily without resistance. If there is resistance, fluoroscopy should be used for wire advancement.
3. The needle is removed and exchanged for the appropriate sheath over the guide wire (see Figure 17-4C). There may be instances when the artery is hard from calcified plaque or the surrounding tissue is fibrotic from previous access or surgery. Dilators of increasing size can be used over the guide wire for sequential dilation of the track and arteriotomy until the sheath can be inserted.
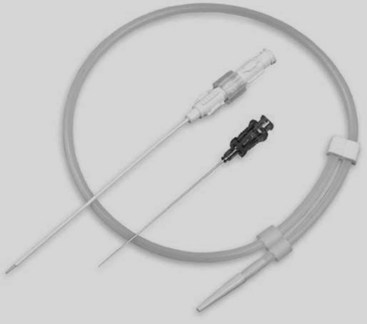
For safe vascular access, especially the small arteries such as the brachial artery at the antecubital fossa, a modified Seldinger technique using the micropuncture set is recommended (Figure 17-5). A small, 21-gauge needle is used to obtain vascular entry. A 0.018-inch guidewire is inserted to secure access, followed by exchange of the needle for a paired coaxial catheter. The small inner catheter accepts the small guidewire and functions as a dilator for the larger outer catheter. The small guidewire and catheter are both removed, and a 0.035-inch guidewire is inserted into the outer catheter. This catheter is then removed for the appropriate sheath. It is common to use ultrasound guidance for real-time vascular wall imaging, in addition to routine reliance on micropuncture technique.
Techniques for Arterial Access
In this section, anatomic landmarks and techniques used for a specific arterial site are described.
Retrograde Femoral Puncture
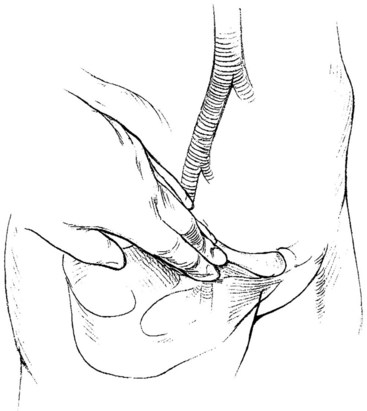
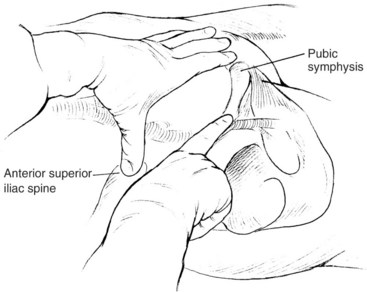
The common femoral artery can be located using the osseous anatomic landmarks at the groin (Figure 17-6). In general, there is approximately 3 to 5 cm of common femoral artery located anterior to the junction of the medial third and middle third of the femoral head. This artery begins proximally at the inguinal ligament and is two fingerbreadths lateral to the pubic symphysis on a line joining the symphysis with the anterior iliac spine. This relationship varies little with the patient’s body habitus and age; however, the location of the inguinal ligament and the common femoral artery can be misleading in obese patients. The abdominal panniculus may falsely lead the interventionalist to initiate access more distally, resulting in puncture of the superficial femoral or profunda femoris arteries. Before entry with the needle, the femoral head should first be identified with the fluoroscopy. Inadvertent access of these arteries increases the risk of postoperative hematoma, pseudoaneurysm, or arteriovenous fistula. Using ultrasound to identify the common femoral artery and the profunda femoris and superficial femoral artery origins, at the time of microneedle insertion, reduces these types of complications.
Antegrade Femoral Puncture
The antegrade femoral puncture is a useful arterial access for intervention of distal, ipsilateral arterial lesions. This is especially true for tall patients with distal tibial arterial lesions, where there may not be enough catheter length for the angioplasty balloon or stent to reach the target from a contralateral, retrograde femoral puncture. In this technique, the needle is inserted just distal to the anterior iliac spine in an antegrade fashion to access the common femoral artery (Figure 17-7). Similar to retrograde femoral puncture, the location of the inguinal ligament can be misleading in obese patients, resulting in puncture of the superficial femoral or the profunda femoris arteries. In these patients, the abdominal panniculus is retracted in a cephalad direction to allow for appropriate location and angle of needle entry at the skin. The location of the femoral head should be identified with fluoroscopy before skin puncture. Less commonly, the needle may access the external iliac artery; this results in difficulty with guidewire advancement and postoperative bleeding complications (Figure 17-8). Ultrasound guidance should be used routinely.
With antegrade femoral puncture, the guidewire is frequently advanced into the profunda femoris artery. Under fluoroscopic guidance, the needle tip may be moved either medially or laterally to redirect it into the superficial femoral artery. However, this may not be possible if the needle access is too close to the femoral bifurcation. For antegrade punctures, the needle should enter the proximal common femoral artery as close to the femoral head and the inguinal ligament as possible. As mentioned previously, the use of the micropuncture kit is recommended. If the wire is advanced into the profunda femoris artery, the needle is exchanged over wire with the outer sheath in this artery. Contrast is injected through the sheath as it is pulled back until the tip is in the common femoral artery under fluoroscopy. An angled guidewire is then advanced into the superficial femoral artery (Figure 17-9).
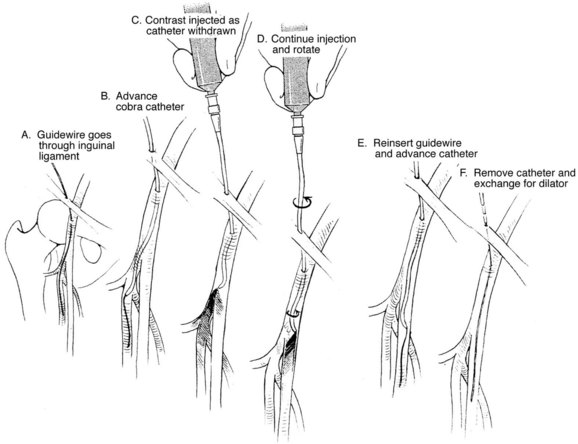
FIGURE 17-9 Redirecting the wire and catheter from the profunda femoris to the superficial femoral artery.
(From Moore WS, Ahn SS, editors: Endovascular surgery, ed 4, Philadelphia, 2011, Saunders, p 55.)
Ultrasound Guided Access
A small and portable ultrasound unit such as the Sonosite (General Electric, Bothell, Wash.) can be used to identify and characterize the artery or vein to be accessed (Figure 17-10). The common femoral artery or vein can be located at the groin, the brachial artery or vein at the antecubital fossa, and the superficial veins in the upper or lower extremities. The ultrasound is especially useful when the vascular structure cannot be palpated because of occlusive disease or patient obesity. Under ultrasound imaging, the echogenic tip of the micropuncture needle can be seen as it passes deep into the soft tissue and enters the anterior wall of the artery or vein. In addition, a soft spot in a diseased arterial wall can be identified and entered with needlepoint accuracy.
Access Site Complcations
New innovative technologies and techniques in endovascular surgery are rapidly emerging. With increasing use of catheter-based endovascular interventions, it is conceivable that there will be a rise in complications from these procedures. There are unique complications specific to endovascular therapies that are different from conventional open surgeries. It is therefore important that vascular surgeons performing these procedures are knowledgeable in the recognition and management of these complications. Studies have shown that overall complications following endovascular surgery can range from 1.5% to 9%.1–3 The most frequently encountered complications in endovascular surgery are related to access site problems. Following cardiac catheterization, the incidence of groin complications is 0.05% to 0.7%.4,5 However, the incidence is much higher following percutaneous transluminal angioplasty, at 0.7% to 9.0%.5,6 Peripheral vascular complications, in descending order of frequency, include pseudoaneurysm, groin hematoma, and arteriovenous fistula. In the following sections, complications related to vascular puncture will be presented. Complications associated with endovascular procedures will be presented later in the chapter.
Hematoma
Several factors can assist in the prevention of hematomas. During access, it has been found that needle access 1 cm lateral to the most medial cortex of the femoral head and proper maintenance of a 30- to 45-degree puncture angle can reduce the likelihood of groin hematoma formation.7 At the time of sheath removal, hypertension control and coagulation status of the patient should be known. The use of commercially available closure devices is recommended to assist in arterial closure and to reduce the time of immobility. If a device is not used, manual pressure at the access site on the artery, not the skin puncture site, is held at 15 to 30 minutes, and longer if necessary. This pressure is followed by limited mobility for 6 to 8 hours. Sandbags or other compression devices have been used; however, they can become dislodged easily and fail to apply pressure directly over the site of arterial puncture and allow for continued hemorrhage. These devices obscure the access site, impede visual inspection, and provide a false sense of security; therefore their use is not recommended.
Pseudoaneurysm
Pseudoaneurysms result from failure of the closure in the arterial puncture site, leading to contained bleeding in the soft tissue adjacent to the site of vascular entry. The wall of a pseudoaneurysm is composed of organized thrombus and adjacent soft tissue rather than the vessel wall, as in true aneurysms. Pseudoaneurysms are most commonly seen in the femoral artery (incidence is 0.05% to 0.4%), likely because it is the site most frequently used for access.8,9 However, it can be seen in any arterial entry including brachial,9,10 axillary, radial, and popliteal arteries (as high as 2.9%).11
Predisposing factors to pseudoaneurysm formation include anticoagulation, antiplatelet agents, hypertension, and the location of vascular entry.8 There is a higher rate of pseudoaneurysm formation if the arterial access is below the femoral head in either the superficial femoral or profunda femoris artery, or at the femoral bifurcation.4,10,12,13 Difficulty in compressing these arteries and the greater ratio of sheath size to artery diameter may be contributing factors.
Pseudoaneurysms typically develop within 24-48 hours after the intervention, but may not be apparent until several days later. They are associated with pain, and ecchymosis may be present. Similar to a hematoma, pressure created from the mass effect can cause irreversible nerve injury, necrosis of overlying skin, and compression of the veins.9 Rarely, pseudoaneurysms can rupture and cause life-threatening hemorrhage.
There are many treatment options, and management of pseudoaneurysms should be based on size and the presence of complications mentioned previously, such as nerve compression. Many small pseudoaneurysms thrombose spontaneously8 and may be observed without therapy. Thrombosis usually occurs within 2 to 4 weeks, but possibly later if there is concurrent anticoagulation or antiplatelet therapy. Repeated ultrasound examination for confirmation of closure is recommended.
There are less invasive approaches that are available. Ultrasound-directed compression was first described in the 1990s and uses ultrasound to identify the neck of the pseudoaneurysm. The neck is seen as a high-velocity jet, and direct compression is applied with the transducer. This is associated with significant pain, and is labor intensive. Ultrasound-guided thrombin injection has become the treatment of choice.9,10 It is preferred over direct ultrasound compression because it produces less patient discomfort and has a higher success rate. Studies have shown it to be successful in 94% of patients, despite 30% of patients being anticoagulated and receiving antiplatelet therapy.9 The procedure is performed with ultrasound guidance, with the introduction of needle into the cavity as far away from the neck as possible; 500 to 1000 units of bovine thrombin is injected, and ultrasound imaging is used to see clotting and cessation of blood flow into the pseudoaneurysm cavity. Long, narrow necks are ideal, whereas wide necks are contraindicated. Wide necks with direction communication between the pseudoaneurysm and the artery have higher risks of clot embolization and thrombin injection into the artery.
Arteriovenous Fistula
Arteriovenous fistula is a postprocedural direct communication between access artery and vein, caused by inadvertent puncture of the artery and vein. This complication can occur at any vessel access site. Because most access is obtained at the groin, arteriovenous fistulas are most commonly seen between the femoral artery and vein. A prospective study of patients undergoing coronary angioplasty using duplex ultrasound found an incidence of 2.8%.8 In contrast, an incidence of 0.3% was detected when using audible bruit as an indication for duplex study, likely an underestimation of the true incidence.14 Predisposing factors include periprocedural anticoagulation, hypertension, female gender, left femoral puncture, and popliteal artery access. The increased incidence associated with left femoral access may be due to alteration of the entry angle while standing on the right side. In popliteal artery puncture, the vein is posterior to the artery and this overlap makes the occurrence of fistula more likely.
Many arteriovenous fistulae close spontaneously and may be observed without specific treatment.15 Symptomatic fistulae should be treated. Surgical repaired is performed by dissecting the artery and exposing the defect. Arterial control is obtained either by clamping or digital pressure. Venous control is obtained by direct pressure. The arterial defect is repaired first, using horizontal mattress Prolene sutures. Usually, only one or two interrupted sutures are needed for the repair.
Less invasive approaches have been described. Successful use of ultrasound-guided compression has been attempted.4 Recently there have been several studies describing the use of endovascular repair with stent grafts.16,17 Arteriography of the groin shows rapid filling of the venous system. A short, covered stent is used to cover the arteriovenous communication.
Retroperitoneal Hematoma
Retroperitoneal hematoma is perhaps the most feared complication of groin access following femoral arterial puncture. It is rare with an incidence of 0.15%, but can be fatal.18 Following puncture, the blood tracks into the retroperitoneal cavity, and it may not be visible or palpable at the groin. An iliopsoas hematoma can form if the bleeding is contained in the iliopsoas muscle. If there is bleeding into the retroperitoneum, a large amount of blood can accumulate in this large potential space, leading to compression of the ipsilateral kidney and life-threatening complications associated with the hemodynamic derangement of significant blood loss.
Predisposing factors for significant retroperitoneal hematoma formation include periprocedural anticoagulation, double arterial wall puncture, and arterial entry above the inguinal ligament.18,19 With through-and-through arterial wall puncture, there may be bleeding into the retroperitoneal space from the arteriotomy on the posterior wall. In arterial access above the inguinal ligament, hemostasis is difficult because compression is not against the femoral head.
Symptoms of retroperitoneal hematoma commonly include lower abdominal and back pain. There is usually no ecchymosis initially, but the pain is more severe than the typical periprocedural pain. As the hematoma enlarges, compression of the lumbar plexus in the psoas muscle can cause thigh pain, numbness, or weakness in the quadriceps. The pressure created from the mass effect can also cause venus obstruction with or without thrombosis20 or result in the urge to urinate or defecate. Finally, patients with severe blood loss may have life-threatening hypotension and shock. Conversely, patients may also exhibit normal hemodynamics and few external physical findings.
Groin Infection
Soft tissue infections at the vascular access site after catheterization are rare, but can be potentially severe. They are most commonly caused by gram-positive organisms from the skin flora, especially the Staphylococcus species.21,22 Predisposing factors include hematoma at the access site, immunodeficiency, obesity, diabetes, and use of closure devices.23–25 The foreign materials used by these devices can serve as a nidus for infection and cause more access site infections compared with direct compression.26
Guidewires, Catheters, and Sheaths
Guidewires

Selection
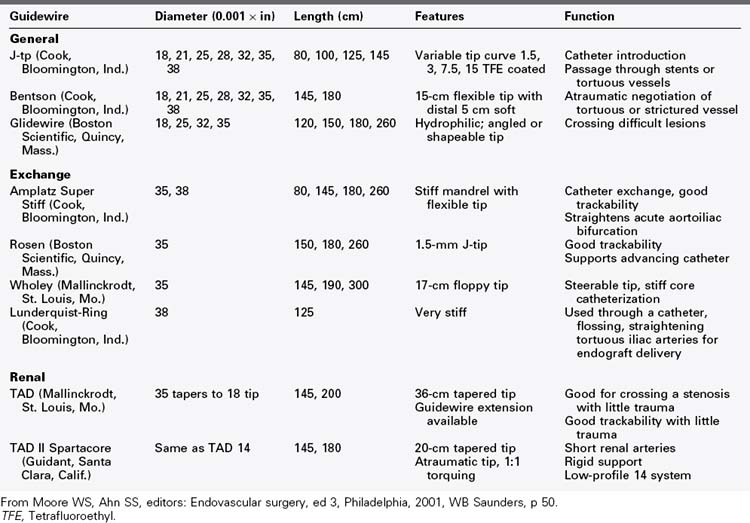
As one gains experience with catheter-based therapy, the number of guidewires and catheters needed to complete an intervention successfully may become fewer. The recommendations in this chapter should serve as a reference for the reader, but are by no means comprehensive (Table 17-2). For initial entry into the artery, a J-tip wire is recommended; it is associated with the lowest risk of dissection. J-tip wires come in a wide variety; some have a movable core that can convert the distal end of the wire from a flexible state to a rigid one. For initial introduction, a nonhydrophilic guidewire with medium rigidity should be chosen. The Bentson wire has a floppy tip, is of medium to firm rigidity and, although straight in its packaged state, forms a large, functional J-tip when being advanced through an artery or vein.
Catheters
Design
Functionally, catheters can be either selective or nonselective. Nonselective or flush catheters, which have multiple side and end holes that allow a large cloud of contrast agent to be infused over a short period, are used for large-vessel opacification and in high-flow systems (Figure 17-11). These nonselective catheters can be straight or have shaped ends (e.g., Tennis Racquet or pigtail catheters). There are numerous, interchangeable variations of the curled pigtail shape, with subtle modifications of the tightness of the curls.
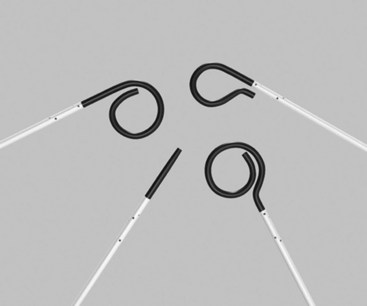
FIGURE 17-11 A variety of nonselective flush catheters.
(From Moore WS, Ahn SS, editors: Endovascular surgery, ed 4, Philadelphia, 2011, Saunders, p 65.)
Selective catheters have only a single hole at the tip and are used to intubate vascular families (branches off the aorta) before advancement of the wire (Figure 17-12). With angiography that includes selective catheterization, smaller amounts of contrast material are used at lower injection rates to obtain adequate arterial opacification. When using selective catheters, care must be taken to avoid intimal injury or dissection of the artery from either direct catheter tip advancement or the forceful injection of contrast material. In addition, a “jet effect” can occur when forceful injection of contrast material pushes the catheter out of the vessel of interest and back into the aorta. Lengthening the “rise of rate” of injection on the power injector control panel can limit these negative effects.
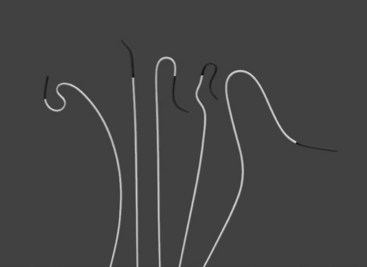
FIGURE 17-12 A variety of selective shaped catheters.
(From Moore WS, Ahn SS, editors: Endovascular surgery, ed 4, Philadelphia, 2011, Saunders, p 65.)
Stay updated, free articles. Join our Telegram channel

Full access? Get Clinical Tree


