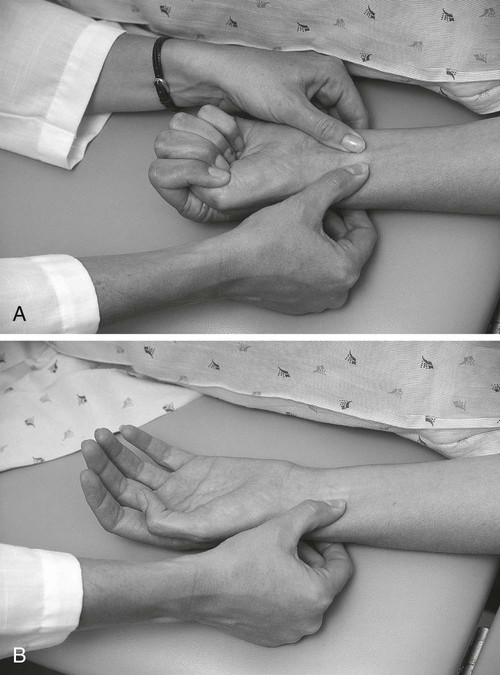
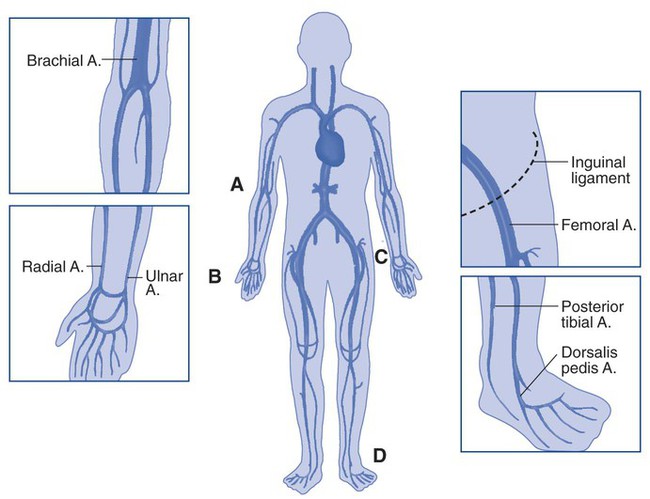
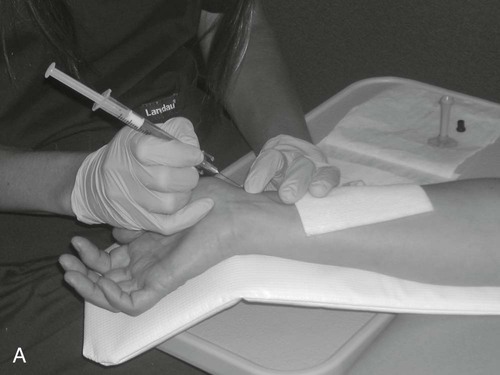
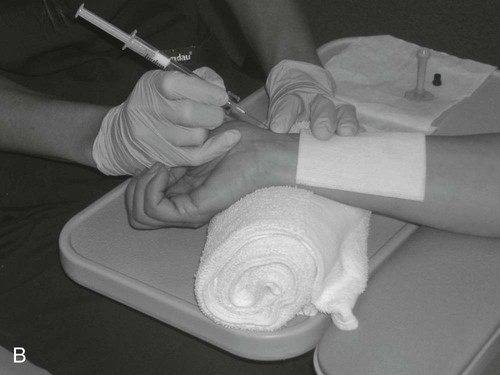
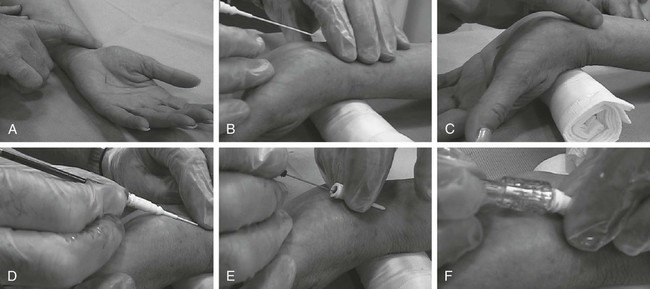
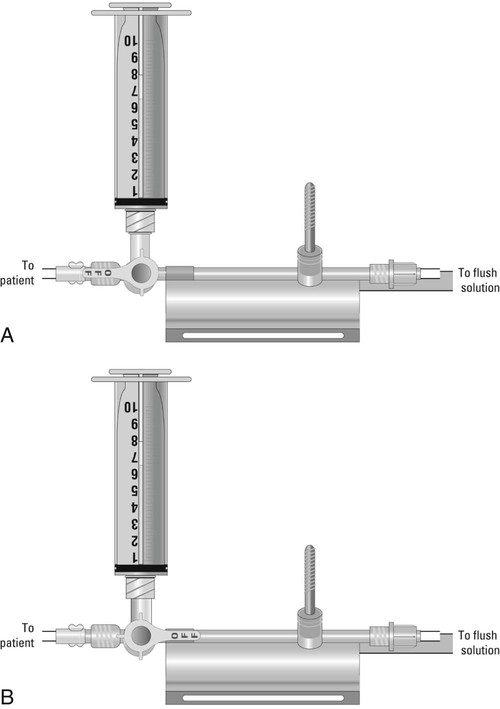
1. Perform the modified Allen’s test. 2. Perform an arterial puncture. 3. Perform an arterial line insertion. 4. Obtain a capillary blood sample. 5. Obtain an arterial blood sample from an arterial line. 6. Place and maintain a transcutaneous blood gas probe. 7. Connect an end-tidal carbon dioxide monitor. If your patient does not have adequate gas exchange, he or she is at risk of becoming hypoxemic, hypercapnic, or hypocapnic, and this may lead to acidemia or alkalemia. The focus of this chapter is to explore various procedures and techniques of clinically analyzing and monitoring gas exchange. The modified Allen’s test is performed prior to radial artery puncture to ensure that adequate collateral circulation is present through the ulnar artery to the hand in the event that the radial artery is damaged during an arterial puncture procedure (Figure 8-1). Radial artery puncture should not be performed when the modified Allen’s test results are negative. The following is the step-by-step process for performing a modified Allen’s test. 1. Review the patient’s chart. 2. Verify the physician’s order or the facility’s protocol for standard of care. 3. Obtain, clean, and inspect the appropriate equipment prior to entering the patient’s room. 4. Follow the PPE requirements, and observe the standard precautions for any transmission-based isolation procedure. 5. Identify the patient using two patient identifiers. 6. Introduce yourself to the patient and to the family. 7. Explain the procedure to the patient and to the family, and acknowledge the patient’s understanding. 8. Perform proper hand hygiene, and put on gloves, mask, and protective eyewear, as appropriate for the procedure. 1. Place the patient in a comfortable position, and instruct him or her to breathe normally. 3. Instruct the patient to form a tight fist or raise the arm above the heart level for several seconds. 4. Apply direct pressure to the radial and ulnar arteries, thus obstructing arterial blood flow to the hand while the patient opens and closes the fist rapidly several times. 5. Instruct the patient to open the hand or keep the arm above the heart level with the radial artery compressed. 6. Examine the palmar surface for an erythematous blush or pallor within 6 seconds: a. An erythematous blush indicates ulnar artery patency and is interpreted as a positive Allen’s test result. Radial arterial puncture may be performed at this site. b. Pallor indicates occlusion of the ulnar artery and is interpreted as a negative Allen’s test result. Radial arterial puncture should not be done. 7. Remove the supplies from the patient’s room, and clean the area, as needed. 8. Remove PPE, and perform proper hand hygiene prior to leaving the patient’s room. Blood may be sampled by performing an arterial puncture. The radial, brachial, and dorsalis pedis arteries are common sites for arterial puncture. The femoral artery may be used but usually requires a special order from a physician. Figure 8-2 illustrates common arteries used for puncture. As with any invasive procedure, you need to be aware of certain hazards and complications. When inserting a needle into a patient’s artery, a chance of introducing a contagion at the sampling site or of introducing a contagion to the sampler by accidental needle stick exists. Trauma, occlusion, or spasm of the artery may also occur. Other possible complications include air or clotted blood emboli, hematoma, or hemorrhage at the trauma site; vasovagal response; and pain. Images of arterial puncture of the radial artery are provided in Figure 8-3. The following is the step-by-step process for arterial puncture. 1. Review the patient’s chart. 2. Verify the physician’s order or the facility’s protocol for standard of care. 3. Obtain, clean, and inspect the appropriate equipment prior to entering the patient’s room. 4. Follow the PPE requirements, and observe the standard precautions for any transmission-based isolation procedure. 5. Identify the patient using two patient identifiers. 6. Introduce yourself to the patient and to the family. 7. Explain the procedure to the patient and to the family, and acknowledge the patient’s understanding. 8. Perform proper hand hygiene, and put on gloves, mask, and protective eyewear, as appropriate for the procedure. 1. Position the patient by extending the patient’s wrist approximately 30 degrees, and instruct him or her to breathe normally. 2. Assess vital signs, and estimate the oxygen concentration or fraction of inspired oxygen (FiO2) that the patient is receiving. 3. Perform an Allen’s test, if radial artery puncture is used (See PA 8-1). 4. Clean the site thoroughly with 70% isopropyl alcohol or an equivalent antiseptic. 5. Use a preheparinized blood gas kit syringe, or heparinize a syringe and expel the excess. 6. Palpate and secure the artery with one hand, 7. Insert the needle, bevel up, through the skin at a 45-degree angle until blood pulsates into the syringe. 8. Allow 1 mL of blood to fill the syringe. 9. Remove the needle and syringe from the artery. 10. Apply firm pressure to the puncture site with sterile gauze until the bleeding stops. 11. Apply dressing or bandage to the puncture site. 12. Expel any air bubbles from the sample, and cap or plug the syringe. 13. Mix the sample by rolling and inverting the syringe. 14. Place the sample in a transport container, or on ice, if the specimen will not be analyzed within 10 to 30 minutes. 15. Attach the correct patient identification label and lab requisition to the side of the specimen container and a patient identification label on the syringe. 16. Remove the supplies from the patient’s room, and clean the area, as needed. 17. Remove the PPE, and perform proper hand hygiene prior to leaving the patient’s room. 1. Establish a baseline, or compare with previous measurements. 2. Develop an appropriate respiratory care plan based on assessment data. 3. Note any use of oxygen therapy. 4. Check the puncture site after 20 minutes for hematoma and adequacy of distal circulation. 5. Identify any unexpected outcomes. The radial site is frequently chosen because the risk of complications is lower than with other sites because collateral blood supply to the hand occurs through the ulnar artery should the radial artery be damaged. The following is the step-by-step process for placing a radial arterial line (Figure 8-4). 1. Review the patient’s chart. 2. Verify the physician’s order or the facility’s protocol for standard of care. 3. Obtain, clean, and inspect the appropriate equipment prior to entering the patient’s room. 4. Follow the PPE requirements, and observe the standard precautions for any transmission-based isolation procedure. 5. Identify the patient using two patient identifiers. 6. Introduce yourself to the patient and to the family. 7. Explain the procedure to the patient and to the family, and acknowledge the patient’s understanding. 8. Perform proper hand hygiene, and put on gloves, mask, and protective eyewear, as appropriate for the procedure. 1. Place the patient in a comfortable position that gives adequate access to the placement site, and instruct him or her to breathe normally. 3. Perform an Allen’s test (See PA 8-1). 4. Position the patient’s wrist and hand, and dorsiflex the wrist over a towel pad or padded bedside table. 5. Put on sterile gloves and protective eyewear. 6. Prepare the entry site with betadine, chlorhexidine, or other skin cleanser. 7. Apply sterile drape at the entry site. 8. Identify the radial artery. 9. Stabilize the artery by pulling the skin taut. 10. Using sterile technique, insert the arterial needle into the skin just distal to the palpated arterial site at a 30- to 60-degree angle 11. Advance the needle into the artery until pulsatile bright red blood enters the column. 13. Advance plastic catheter over the guidewire. 14. Connect to the pressure tubing and the transducer. 15. Level and set the transducer to zero, and verify the arterial waveform. 16. Clean the area of any blood; allow the site to dry. 17. Apply Benzoin to the cleansed area, and allow the site to dry and become tacky. 18. Secure the arterial line with tape or Steri-strips, and cover with a Tegaderm dressing. 19. Secure the tubing to prevent it from being pulled. 20. Remove the supplies from the patient’s room, and clean the area, as needed. 21. Remove PPE, and perform proper hand hygiene prior to leaving the patient’s room. In the intensive care unit (ICU) setting, for patients requiring mechanical ventilation for treatment of respiratory failure or severe acid–base disturbances, frequent arterial blood sampling is typically required as part of their respiratory care plan. Rather than repeated arterial punctures, an arterial catheter is placed to facilitate the recurrent arterial blood sampling. Drawing blood from an arterial line is a convenient way to acquire an arterial blood sample and reduces the pain and discomfort a patient experiences from repetitive needle sticks. Another benefit of drawing blood from an indwelling catheter is that it reduces the possibility of pathogens being introduced through numerous puncture sites. Images of this process are provided in Figure 8-5. The following is the step-by-step process for blood sampling from an indwelling arterial catheter. 1. Review the patient’s chart. 2. Verify the physician’s order or the facility’s protocol for standard of care. 3. Obtain, clean, and inspect the appropriate equipment prior to entering the patient’s room. 4. Follow the PPE requirements, and observe the standard precautions for any transmission-based isolation procedure. 5. Identify the patient using two patient identifiers. 6. Introduce yourself to the patient and to the family. 7. Explain the procedure to the patient and to the family, and acknowledge the patient’s understanding. 8. Perform proper hand hygiene, and put on gloves, mask, and protective eyewear, as appropriate for the procedure. 1. Place the patient in a comfortable position, and instruct him or her to breathe normally. 2. Assess vital signs, and estimate the oxygen concentration or FiO2 that the patient is receiving. 3. Attach the waste syringe to the stopcock port. 4. Position the stopcock so that blood or the IV flush solution flows into the syringe. 5. Aspirate 2 mL of fluid or blood. 6. Reposition the stopcock to close off all the ports.
Analysis and Monitoring of Gas Exchange
» Skill Check Lists
8-1 Performing a Modified Allen’s Test
Procedural Preparation
Implementation
8-2 Performing an Arterial Puncture
Procedural Preparation
Implementation
Evaluation of Procedure
8-3 Placing a Radial Arterial Line
Procedural Preparation
Implementation
8-4 Blood Sampling from an Indwelling Arterial Catheter
Procedural Preparation
Implementation
![]()
Stay updated, free articles. Join our Telegram channel

Full access? Get Clinical Tree


 Reality Check Having knowledge of how well your patient is oxygenating and ventilating puts you in a position to recognize what to do, or not to do, for your patients.
 Tip Lesions and sites distal to or through a surgical shunt should also be avoided.