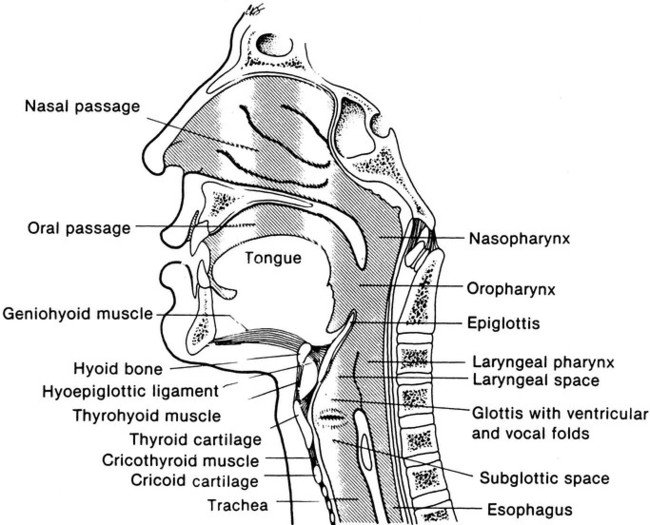
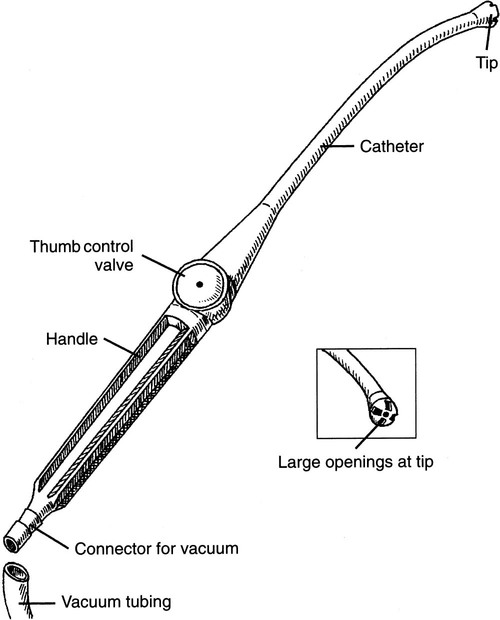
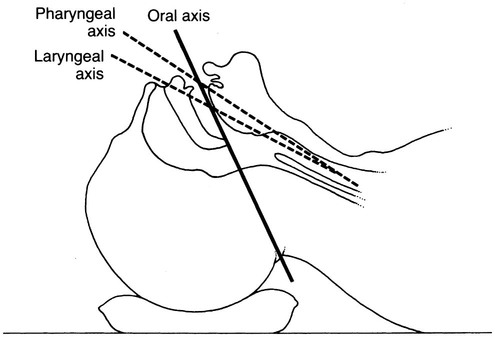
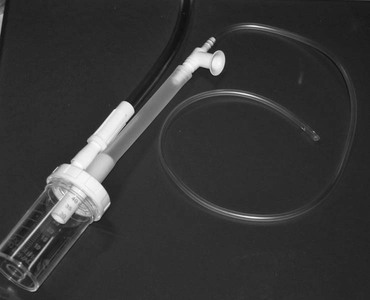
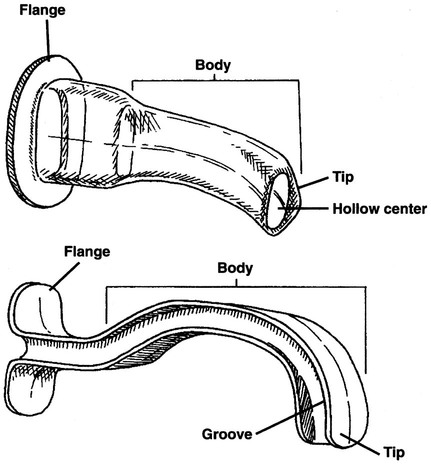
1. Identify normal airway anatomy. 2. Perform oropharyngeal suctioning. 3. Perform sterile open and in-line suctioning. 4. Collect a sputum sample by way of suctioning. 5. Perform insertion of an oropharyngeal airway. 6. Perform orotracheal and nasotracheal intubation on an adult patient. 7. Perform endotracheal tube care. 10. Perform changing a tracheostomy tube. 11. Perform extubation of orotracheal and nasotracheal tubes. 12. Describe the advantages and disadvantages of alternative airway devices. 11-1. Oropharyngeal Suctioning 11-2. Endotracheal Tube Suctioning 11-4. Collecting Sputum Samples by Suctioning 11-5. Inserting an Oropharyngeal Airway 11-6. Oral Endotracheal Intubation 11-8. Inserting Alternative Airway Devices 11-10. Monitoring Cuff Pressures 11-11. Tracheostomy and Stoma Care 11-12. Changing a Tracheostomy Tube 11-13. Orotracheal or Nasotracheal Extubation Management of a patient’s airway in various scenarios is the responsibility of the respiratory therapist (RT). These scenarios include inserting and maintaining artificial airways, bronchial hygiene, and assisting physicians in special procedures involving the airway. Any deficiencies in airway management may have grave consequences for patients. Care must be taken at every point of a patient’s airway care. Figure 11-1 shows normal airway anatomy. An RT’s expertise and knowledge relating to its structures and functions are essential for top-quality airway care. Any type of retained airway secretions may impose an increased work of breathing for a patient and cause a myriad of pulmonary complications. Upper airway suctioning is called oropharyngeal suctioning. It may be performed on all types of patients with a variety of artificial airway and includes oral care. Box 11-1 describes the key points of oral care. A type of suction device, called a Yankauer suction device, can be seen in Figure 11-2. The following is the step-by-step process for oropharyngeal suctioning of a patient’s airway. 1. Review the patient’s chart. 2. Verify the physician’s order or the facility’s protocol for standard of care. 3. Obtain, clean, and inspect the appropriate equipment prior to entering the patient’s room. 4. Follow personal protective equipment (PPE) requirements, and observe standard precautions for any transmission-based isolation procedure. 5. Identify the patient using two patient identifiers. 6. Introduce yourself to the patient and to the family. 7. Explain the procedure to the patient and to the family, and acknowledge the patient’s understanding. 8. Perform proper hand hygiene, and put on gloves, mask, and protective eyewear, as appropriate for the procedure. 1. Place the patient in a comfortable position, and instruct him or her to breathe normally. 2. Assess vital signs and symptoms of upper airway obstruction requiring oropharyngeal suctioning. 3. Connect the tubing, and turn on suction device. 4. Remove the oxygen mask, if present. 5. Insert the rigid tonsillar device, the Yankauer, or the catheter into patient’s mouth. 6. Cover, if needed, the thumb-control valve, and suction the patient’s mouth. 7. Rinse the catheter, and turn off the suction device. 8. Wipe the patient’s face, if needed. 9. If removed, replace patient’s oxygen mask. 10. Remove the supplies from the patient’s room, and clean the area, as needed. 11. Remove PPE, and perform proper hand hygiene prior to leaving the patient’s room. With a bypassed upper airway, the patient’s normal cough mechanism and secretion management abilities are compromised. It is the responsibility of the RT to ensure patency of a patient’s airway. Suctioning is part of required maintenance of an artificial airway so that adequate ventilation and gas exchange can take place. Additionally, the RT should be aware of the complications associated with suctioning. Box 11-2 lists the complications that can be seen with this procedure. Indications for the closed suctioning technique are provided in Box 11-3. The following is the step-by-step process for endotracheal tube suctioning. 1. Review the patient’s chart. 2. Verify the physician’s order or the facility’s protocol for standard of care. 3. Obtain, clean, and inspect the appropriate equipment prior to entering the patient’s room. 4. Follow PPE requirements, and observe standard precautions for any transmission-based isolation procedure. 5. Identify the patient using two patient identifiers. 6. Introduce yourself to the patient and to the family. 7. Explain the procedure to the patient and to the family, and acknowledge the patient’s understanding. 8. Perform proper hand hygiene, and put on gloves, mask, and protective eyewear, as appropriate for the procedure. 2. Assess vital signs and need for suctioning. 3. Hyperoxygenate the patient, according to institutional protocol and the patient’s condition. 4. Perform closed in-line suctioning: a. Unlock the suction control mechanism. b. Pick up the suction catheter with the dominant hand, and stabilize the endotracheal airway tube with the other hand. c. Insert the catheter without applying suction: i. For deep suctioning, insert the catheter until resistance is met. ii. For shallow suctioning, insert catheter the length of the airway plus the adapter (recommended for infants and children). d. Apply suctioning while withdrawing catheter for no more than 15 seconds (5 seconds in the neonate). e. Completely withdraw the catheter, and rinse, if needed. f. To rinse, place a saline vial in-line, squeezing it while applying suction. 5. Perform sterile suctioning. a. Open the sterile suctioning kit. b. Apply the sterile glove to the dominant hand. c. Open the sterile water container, and fill it with sterile water for suction line irrigation. d. Wrap the suction catheter with the dominant hand. e. Insert the catheter without applying suction. f. Apply suction while withdrawing the catheter. 6. Hyperoxygenate using the same method as in Step 3. 7. Perform oral suctioning, if indicated. 8. Remove the supplies from the patient’s room, and clean the area, as needed. 9. Remove PPE, and perform proper hand hygiene prior to leaving the patient’s room. 1. Review the patient’s chart. 2. Verify the physician’s order or the facility’s protocol for standard of care. 3. Obtain, clean, and inspect the appropriate equipment prior to entering the patient’s room. 4. Follow PPE requirements, and observe standard precautions for any transmission-based isolation procedure. 5. Identify the patient using two patient identifiers. 6. Introduce yourself to the patient and to the family. 7. Explain the procedure to the patient and to the family, and acknowledge the patient’s understanding. 8. Perform proper hand hygiene, and put on gloves, mask, and protective eyewear, as appropriate for the procedure. 1. Place the patient in a comfortable position, and instruct him or her to breathe normally. 2. Assess vital signs and need for suctioning. 3. Assemble and check the equipment. 4. Preoxygenate the patient, as indicated. 5. Remove the oxygen delivery device, if present. 6. Coat the distal end of the suction catheter with a water-soluble lubricant. 7. Apply a sterile glove to the dominant hand. 8. Insert the catheter gently through the nostril; direct it toward the septum and floor of the nasal cavity; twist the catheter to ease insertion. 9. Have the patient assume a “sniffing” position (Figure 11-3). 10. Advance the catheter until resistance is felt or the patient coughs. 11. Apply suction while withdrawing the catheter for no more than 15 seconds. 12. Maintain sterile technique. 13. Oxygenate according to procedure, as needed. 14. Suction the oropharynx, if needed. 15. Remove the supplies from the patient’s room, and clean the area, as needed. 16. Remove PPE, and perform proper hand hygiene prior to leaving the patient’s room. Identification of the pathogen, or pathogens, responsible for a patient’s pulmonary infection is an important part in their treatment plan. Proper identification ensures the proper antibiotics are administered. A sterile sputum sample must be obtained using a specimen trap. Figure 11-4 provides an example of one of these containers, frequently referred to as a Lukens trap. The following is the step-by-step process for collecting a sputum sample by suctioning. 1. Review the patient’s chart. 2. Verify the physician’s order or the facility’s protocol for standard of care. 3. Obtain, clean, and inspect the appropriate equipment prior to entering the patient’s room. 4. Follow PPE requirements, and observe standard precautions for any transmission-based isolation procedure. 5. Identify the patient using two patient identifiers. 6. Introduce yourself to the patient and to the family. 7. Explain the procedure to the patient and to the family, and acknowledge the patient’s understanding. 8. Perform proper hand hygiene, and put on gloves, mask, and protective eyewear, as appropriate for the procedure. 1. Place the patient in a comfortable position, and instruct him or her to breathe normally. 3. Place a new catheter just before a suction sample is taken, if a closed suction system is being used. 4. Apply a sterile glove to the dominant hand. 5. Insert the specimen trap without applying suction. 6. Suction for no more than 15 seconds. 7. Collect 2 to 10 mL of sputum, and label per your facility’s policy. 8. Detach the catheter from the sputum trap and cover while maintaining sterile technique. 9. Remove the supplies from the patient’s room, and clean the area, as needed. 10. Remove PPE, and perform proper hand hygiene prior to leaving the patient’s room. Establishing and maintaining the airway of an unconscious patient is a critical part of the respiratory care plan, especially during emergency life support. The tongue could easily impede the airway, making it difficult, even impossible, for ventilation to ensue. Oropharyngeal airways (OPAs) may be used to displace the tongue and maintain the patency of a patient’s airway. OPAs may also be used as a bite block for the orally intubated patient. These types of airways are illustrated in Figure 11-5. The following is the step-by-step process for inserting an oropharyngeal airway. 1. Review the patient’s chart. 2. Verify the physician’s order or the facility’s protocol for standard of care. 3. Obtain, clean, and inspect the appropriate equipment prior to entering the patient’s room. 4. Follow PPE requirements, and observe standard precautions for any transmission-based isolation procedure.
Airway Management
Procedural Assessments
Equipment
 Airway management mannequin and silicone spray
 Bronchoscopy equipment-optional
 Calibrated, adjustable regulator
 Cuff pressure monitoring device
 Human patient simulator (optional)
 Laryngoscope handle with different blades
 Lukens trap or sterile sputum trap
 Oxygen source with connections
 Sterile water or normal saline and cup
» Skill Check Lists
11-1 Oropharyngeal Suctioning
Procedural Preparation
Implementation
11-2 Endotracheal Tube Suctioning
Procedural Preparation
Implementation
11-3 Nasotracheal Suctioning
Procedural Preparation
Implementation
11-4 Collecting Sputum Samples by Suctioning
Procedural Preparation
Implementation
11-5 Inserting an Oropharyngeal Airway
Procedural Preparation
![]()
Stay updated, free articles. Join our Telegram channel

Full access? Get Clinical Tree


