Figure 3.1
(a) Surgical technique. Surgery is carried out under sterile conditions in the operating theater. The patient is placed in the supine position with the cervical spine maximally reclined, except in cases of traumatic cervical spine conditions preventing hyperextension in a fixed position. An incision 4–5 cm long is made horizontally, approximately a two-finger width above the jugulum. After cutting through the subcutaneous tissue and platysma, the neck muscles are exposed and divided midline. The two halves of straight neck muscles are pulled aside laterally with retractors. The thyroid isthmus is visible, at least partially. Fundamentally, there are three ways to fit a plastic tracheotomy device (upper, middle and lower tracheotomy). The upper tracheotomy is carried out between the first and second or between the second and third tracheal rings, after the thyroid isthmus is exposed and held aside caudally (A). Here, damage to the cricoid cartilage may lead to severe tracheal stenosis. The middle tracheotomy is carried out mostly between the third and fourth tracheal rings; the thyroid isthmus must be resected (B). The lower tracheotomy (between the fourth and fifth tracheal rings) requires exposure of the lower thyroid isthmus, often with ligature of the lowest thyroid veins. The thyroid isthmus then is held aside cranially with a retractor or is resected (C). In adults, the middle tracheotomy (between the third and fourth cartilage rings), as shown here, is recommended. The upper tracheotomy carries the risk of damage to the cricoid cartilage, possibly leading to severe tracheal stenosis. The lower tracheotomy bears the highest rate of complications because of its proximity to the arterial truncus brachiocephalicus, which might lead to erosive hemorrhage. (b) Dividing the thyroid isthmus. The thyroid isthmus is resected midline between the retractors. If a goitre is present, further resectioning must be considered to avoid symptoms of compression and damage to vessels of the lower thyroid (Calhoun et al. 1994; Demmy et al. 2005)

Figure 3.2
(a, b) View of the exposed trachea, incision line, and flap. Shown is the anterior tracheal wall. Dissection at the lateral tracheal wall is not necessary and may lead to complications such as compromising perfusion of the wall and recurrent nerve palsies. The trachea is incised horizontally between the third and fourth tracheal rings. At this point, care must be taken not to damage the underlying inflated cuff of the endotracheal tube. An inverted U-shaped (Björk) flap is excised from the third cartilage ring. The anterior tracheal wall can be accessed in various ways, and many opinions exist as to which is the best. Possibilities include partial removal of the tracheal cartilage by cutting out a hole, creation of U-shaped flaps cranial and caudally, and star-shaped incisions. We prefer the reversed U-shaped incision by Björk (1960), as shown here
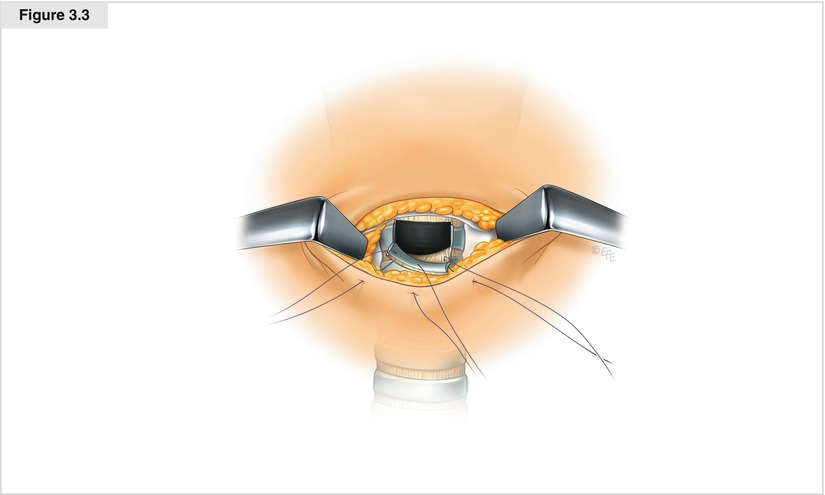
Figure 3.3
Suturing the flap. After the subcutaneous tissue has been mobilized cranial and caudal to the incision edge, the caudally directed flap is knotted together with the edge of the inferior skin incision at the midline. Absorbable sutures (e.g., polydioxaneone 4.0) should be applied using a simple interrupted button technique, taking care to turn the incision edges inward to create an indentation for best medical care of the tracheotomy
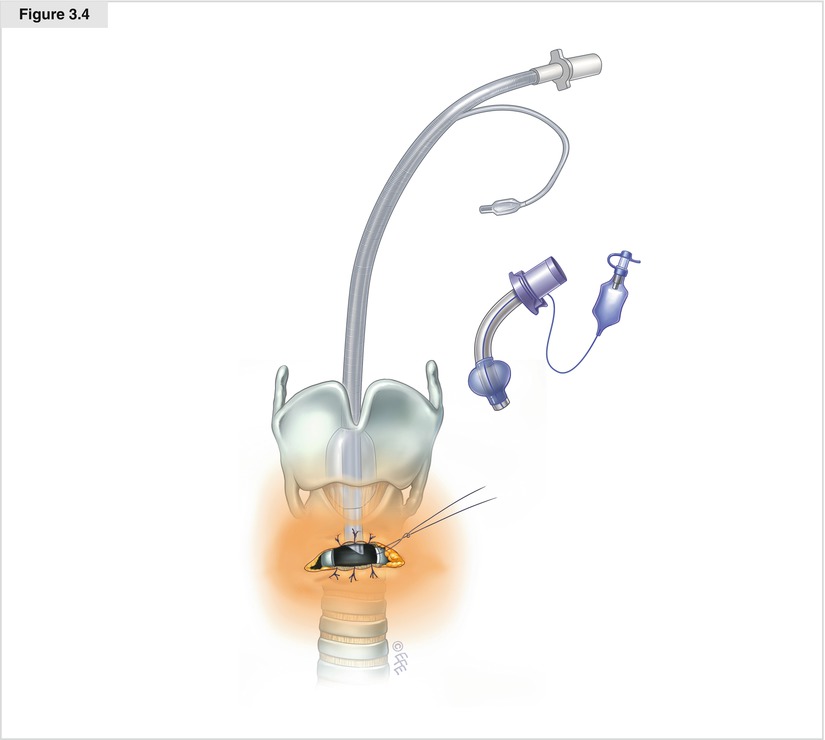
Figure 3.4
Tracheotomy accomplished. In agreement with the anesthesiologist, the endotracheal tube is slowly retracted, the appropriate tracheal cannula is fixed, and the operability of ventilation is checked
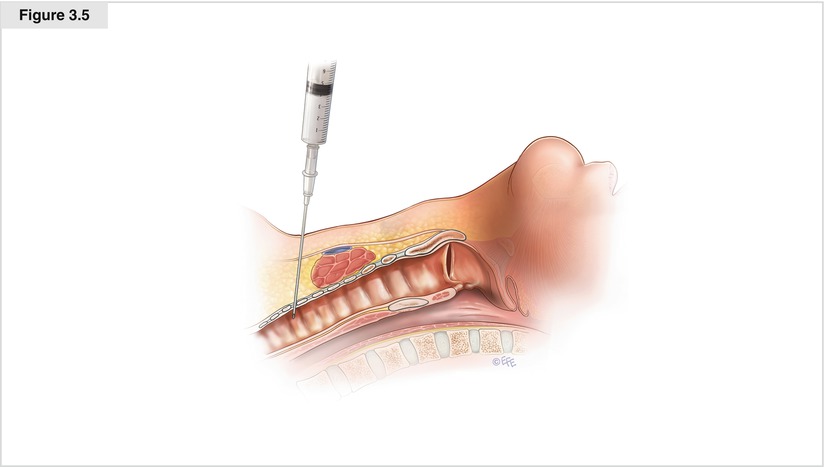
Figure 3.5
Tracheal penetration with a 17-gauge needle. After the patient is appropriately sedated, monitored, and positioned, and the landmarks are identified and marked, the neck is disinfected and draped in a sterile fashion, and the skin is infiltrated with a local anesthetic containing a vasoconstrictor. The incision typically is located halfway between the cricoid cartilage and sternal notch. As a rule, a vertical 2- to 2.5-cm incision or the smallest incision large enough to smoothly accommodate the operator’s index fingertip is necessary. The subcutaneous fat and pretracheal muscles are bluntly dissected with a mosquito clamp, with any small bleeding controlled by compression. The dissection is kept in the avascular midline plane to minimize bleeding. A bronchoscope is inserted through the endotracheal tube, and the tip of the tube is withdrawn under bronchoscopic control to a point superior to the intended level of the tracheostomy (typically between the second and third tracheal rings). The trachea is then palpated, and a 17-gauge sheathed introducer needle is inserted into it. Correct placement is confirmed by aspirating bubbles of air into a fluid-filled syringe attached to the needle and by bronchoscopic visualization of the needle entering the trachea (Bardell 2005)
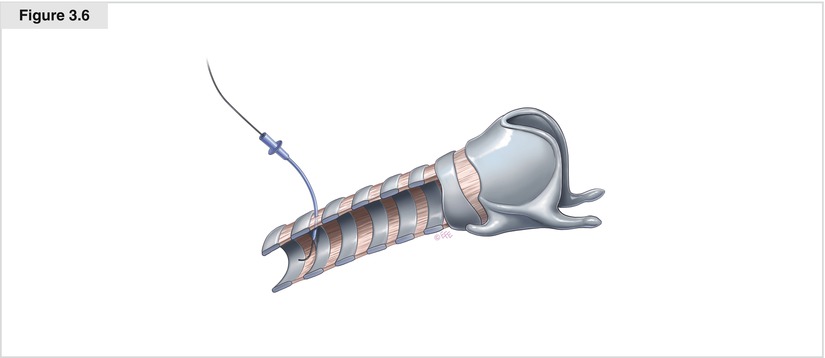
Figure 3.6
Placement of a J guidewire through the sheath. The needle and syringe are withdrawn, leaving the sheath in place. The J guidewire is introduced through the sheath (Seldinger technique), and placement into the trachea is confirmed by bronchoscopy. The sheath is removed and the guidewire left in place
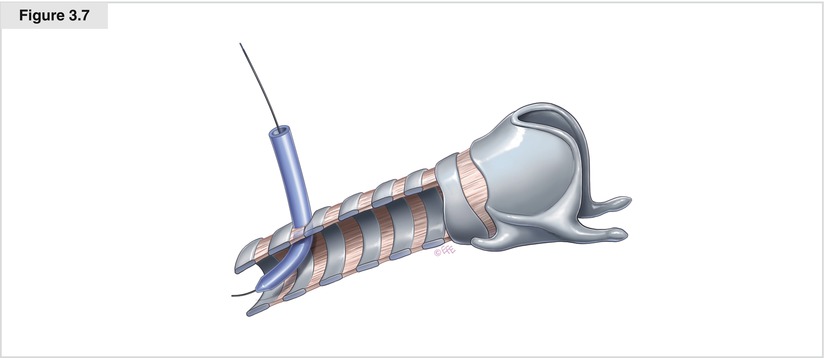
Figure 3.7
Tracheal dilation accomplished with Blue Rhino dilator. Next, a short 14 F dilator is introduced over the guidewire to create a pathway and then withdrawn. The Blue Rhino dilator is moisturized with saline, fed over a guiding catheter, and subsequently advanced over the guidewire into the trachea. Correct placement is confirmed bronchoscopically (Byhahn et al. 2000)
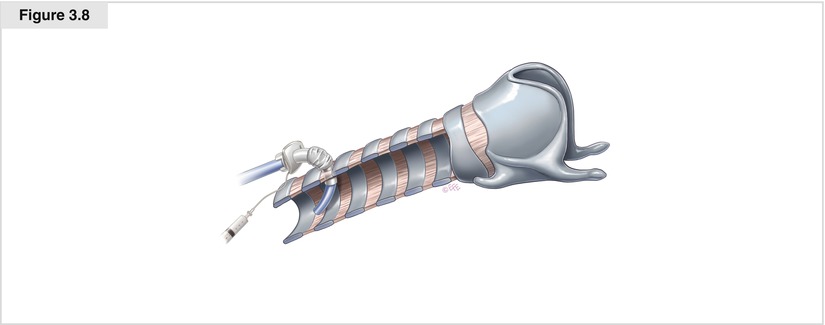
Figure 3.8


Placement of the tracheostomy tube (preloaded on a dilator) into the trachea. The dilator is removed, and the guiding catheter and guidewire are left in place. Next, the tracheostomy tube, preloaded on a dilator, is advanced as a unit into the trachea over the guiding catheter and guidewire under bronchoscopic guidance. Finally, the guiding catheter, guidewire, and guiding dilator are withdrawn, leaving the tracheostomy tube in place. Without removing the endotracheal tube, the ventilator circuit is connected to the tracheostomy tube and the respiration measurements (tidal volume, end-tidal carbon dioxide, oxygen saturation) are confirmed. The bronchoscope is then inserted through the tracheostomy tube to confirm good positioning by visualizing the carina and to rule out bleeding. The endotracheal tube is then removed. After suction of the trachea and bronchi, the bronchoscope is removed and the tracheostomy tube secured to the skin with sutures and tracheostomy tape around the neck
Stay updated, free articles. Join our Telegram channel

Full access? Get Clinical Tree


