Figure 15.1
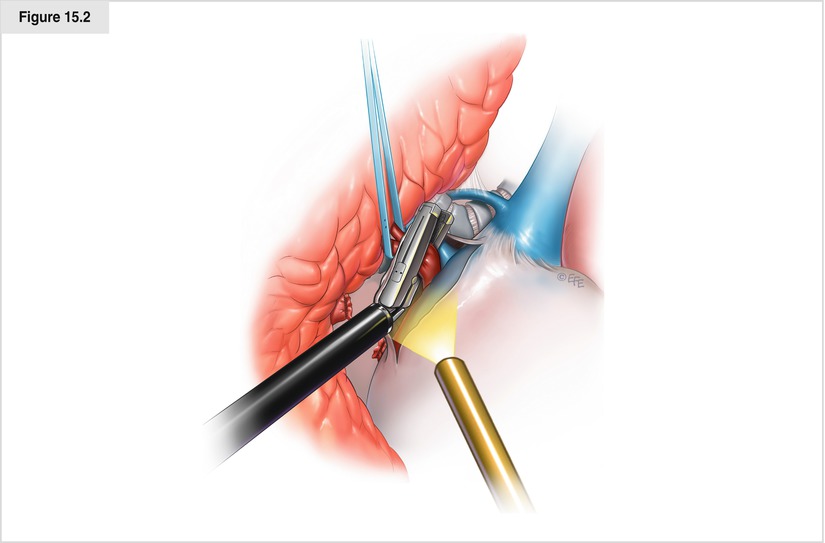
The first 1-cm incision is placed in the eighth intercostal space in the midaxillary line. The camera is inserted and the pleural cavity inspected. The second 1-cm incision is placed in the sixth to eighth intercostal space anteriorly under thoracoscopic vision to avoid injury to the diaphragm or proximity to the pericardium, which may lead to annoying pulsation of the instruments or the camera when positioned through this port. Orienting this second port as anteriorly as possible facilitates horizontal positioning of endostaplers for division of hilar structures and avoids burying the stapler tip into the hilum along with stapler articulation. A 4- to 6-cm access incision is placed over the anterior hilum. Depending on the size and dimensions of the patient’s chest cavity, direct palpation of the hilar structures may be possible to assess resectability, but indirect palpation with the use of instruments may be necessary. Similar to open pneumonectomy, the inferior pulmonary ligament is divided and visible lymph nodes are dissected. The inferior pulmonary vein is dissected circumferentially. The mediastinal pleura lateral to the phrenic nerve is dissected to divide the tissue between the inferior and superior pulmonary veins and to expose the superior pulmonary vein. This dissection is viewed better by moving the camera from the mid axillary port to the anterior port while retracting the lung with one or more low profile lung retractors introduced through the former camera port. If during dissection of the pulmonary veins there is any question regarding resectability, this must be explored before any vascular structure is divided, even if this requires enlarging the access incision to allow direct palpation of the hilar structures. The inferior pulmonary vein is ligated and divided with an endovascular stapler passed via the anterior port while the lung is retracted via the access incision directly upward to open the space on the underside of the vein for passage of the anvil of the stapler. This requires a “retraction swap” from retractors in the anterior port to the access incision. We prefer a 30- or 45-mm long 2.5-mm vascular load for the pulmonary veins, but a 2-mm thickness load may be used if the vein is particularly thin

Figure 15.2
The superior pulmonary vein is then dissected circumferentially. Dissection is continued on the superior hilum to expose the pulmonary artery. On the left side, dissection is continued until the descending portion of the aorta is visualized and the boundary between the inferior edge of the pulmonary artery and the bronchus is exposed. On the right side, dissection is continued until the arch of the azygos vein and the posterior hilum are exposed. Shifting of retractor position and a slight twisting of the lung may be necessary to allow optimal visualization for dissection. Axial rotation (“twisting”) is accomplished by two or more low-profile lung retractors through the same incision. If the plane around the vein is fused or difficult to delineate, intrapericardial dissection often reveals a free plane around the vein. The pericardium is opened with a long knife, easily exposing the superior pulmonary vein for division. Depending on the tumor anatomy and tediousness of the venous dissection, it sometimes is wise to divide the veins in the opposite order to facilitate exposure. Also, it may be wise to dissect both veins and then divide them in rapid succession to reduce any lung edema that may result from a prolonged venous occlusion

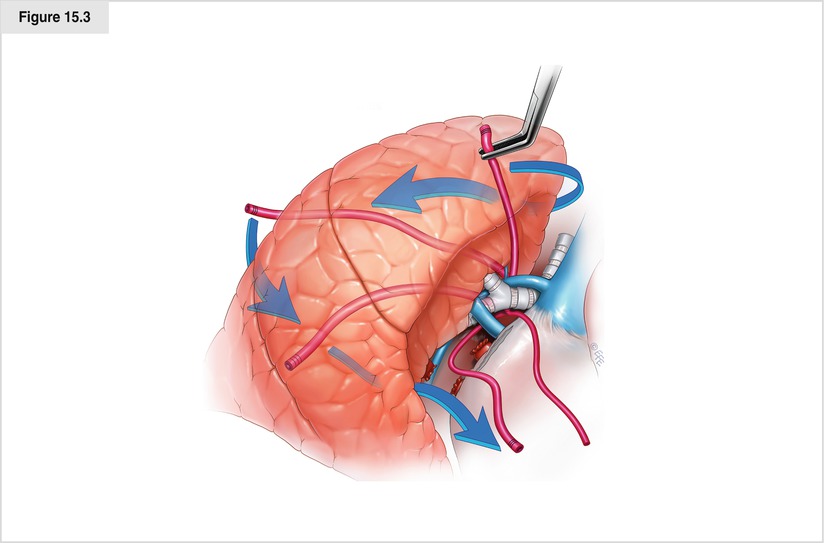
Figure 15.3


The bronchus is now better palpated with instruments. At this juncture, the pulmonary artery or the bronchus may be dissected. We prefer to dissect the bronchus with planned transposition around the artery by the exclusion maneuver, to be described later. Although this figure shows a right pneumonectomy, the transposition maneuver is much more important on the left because the airway often obscures the vascular anatomy. Careful circumferential dissection of the bronchus with strict adherence to the wall of the bronchus is performed. Dissection may be performed from both the anterior and posterior surfaces of the bronchial edges until a large blunt-tip curved clamp can be passed around the bronchus. If the dissection plane is adherent or inflamed, great care must be taken to avoid a laceration in the underside of the pulmonary artery. The clamp is used to grasp the tip of a red rubber catheter and pass it around the bronchus. The lung is then gently retracted and flipped posteriorly while the ends of the red rubber catheter are brought anterior. This exclusion maneuver transposes the red rubber catheter circumferentially around the pulmonary artery since it is the only hilar structure remaining. The artery is inspected to ensure that all extraneous tissue that might hinder passage of an endostapler is cleared. Gentle retraction of both ends of the catheter through the axis incision provides added exposure for safe dissection by better defining the relationship of the pericardium to the pulmonary artery. This is especially useful for the approach after neoadjuvant therapy, in which an intrapericardial dissection is needed. The cut end of the red rubber catheter may then be used as a lead to guide the anvil of the endostapler, which is brought into the chest via the anterior port around the artery. If a curved-tip stapler is used, the red rubber catheter may be used with either end toward the stapler. If a non–curved tip stapler is used and the open end of the red rubber catheter is facing craniad in the chest when initially passed, its tip may be sutured end to end with the tip of another catheter and carefully pulled through the tract so the open end of the new red rubber catheter faces caudad to aid in passing the stapler. A 45-mm stapler generally is of adequate length. There must be no resistance when the stapler is passed around the pulmonary artery, and both the anvil and cartridge tip of the stapler must be visualized on the craniad side of the hilum before the stapler is closed. This is especially important for stapler brands that apply significant occlusion pressure before the stapler is fired. Because fragile pulmonary artery tissues may be damaged by this force, “test clamping” probably should be done with an instrument different from this type of stapler. An observation period of approximately 1 min is recommended to ensure stability of the pulse, blood pressure, and oxygenation status. If all remain stable, the stapler is fired gently and supported to prevent torque as the mechanism fires and releases. It is prudent to have a sponge on a stick ready to create global pressure on the pulmonary artery stump in case the stapler misfires
Stay updated, free articles. Join our Telegram channel

Full access? Get Clinical Tree


