Radial Artery Approach
Mauricio G. Cohen
Sunil V. Rao
INTRODUCTION
In 1989, Lucien Campeau published his successful series of 100 coronary angiographies performed via the left radial artery with minimal occurrence of complications.1 Subsequently in 1993, Kiemeneij performed percutaneous coronary interventions (PCI) using 6F guiding catheters in a time when most interventional procedures were performed with larger 8F catheters.2 Since then, transradial access (TRA) has continued to gain popularity in some regions of Europe, Canada, South America, Japan, and other sites outside of the United States where TRA is used in more than 60% of the cases.3 The most compelling reason for adopting TRA is the increased patient safety that results from the virtual elimination of access site bleeding and vascular complications. In addition, TRA is associated with early sheath removal, improved patient comfort, faster recovery, and lower costs in comparison with transfemoral access.4, 5, 6 However, a relatively steep learning curve, increased radiation exposure, incompatibility of the radial artery with sheaths larger than 6F required for large rotablator burrs and complex bifurcation stenting, and higher access failure rates have been cited as reasons for not systematically adopting TRA.7, 8, 9, 10, 11 An early analysis of the American College of Cardiology National Cardiovascular Data Registry (ACC/NCDR) of procedures performed between 2004 and 2007 demonstrated a minimal use of TRA in the United States, with almost 90% of centers performing less than 2% of cases using the radial artery approach.12 However, interventional cardiologists have been more open to change and TRA has gained renewed momentum in the United States with the recognition of access site bleeding as a predictor of adverse outcomes post-PCI,13 wider access to training opportunities, and the inception of dedicated micropuncture needles, hydrophilic-coated sheaths, and radial hemostasis devices. A more recent analysis including 1,776,625 patients treated at more than 1,200 U.S. hospitals demonstrated a significant uptake in TRA use from 1.3% in 2007 to 12.7% in 2011.14 The ACC/AHA/SCAI guidelines now include TRA as a class IIA recommendation with a level of evidence A to decrease access site complications.15 A class IIA recommendation for TRA is also included in the most recent European guidelines for the management of acute ST segment elevation myocardial infarction in the setting of primary PCI, if performed by an experienced radial operator.16
ANATOMICAL CONSIDERATIONS
The radial artery arises together with the ulnar artery from the bifurcation of the brachial artery just below the bend of the elbow. The radial artery passes along the lateral side of the forearm from the neck of the radius to the forepart of the styloid process in the wrist and is smaller in caliber than the ulnar artery. It then winds backward, around the lateral side of the carpus. The distal portion of the artery in the forearm is superficial, being covered by the integument and the superficial and deep fascia, lying between the tendons of the brachioradialis and flexor carpi radialis over the prominence of the radius. With an average diameter of 2.8 mm in females and 3.1 mm in males, the radial artery is compatible with 6F sheaths. The artery is accompanied by a pair of venae comitantes throughout its whole course, which can be used to perform right heart catheterization (RHC).17, 18, 19
Several anatomic characteristics explain the marked safety advantage of the radial artery over the femoral artery approach. The flat, bony prominence of the radius provides ease of compression and hemostasis after sheath removal; the vast collateralization of the radial artery through the palmar arch prevents ischemia of the hand; because the puncture site is not overlying a joint, motion of the hand or the wrist does not increase the risk of bleeding; and because of the absence of major adjacent nerve structures, there is no risk of neurologic sequelae.20 In contrast, the ulnar artery is deep lying, mobile, adjacent to the ulnar nerve, and consequently not
ideal for first-line vascular access. Despite this, ulnar access has been used successfully for coronary procedures, without evidence of an increased rate of complications when compared with TRA.21 The ulnar artery should not be used after a failed ipsilateral radial attempt because of a possible small risk of complete obstruction of circulation to the hand.
ideal for first-line vascular access. Despite this, ulnar access has been used successfully for coronary procedures, without evidence of an increased rate of complications when compared with TRA.21 The ulnar artery should not be used after a failed ipsilateral radial attempt because of a possible small risk of complete obstruction of circulation to the hand.
The interventional cardiologist should be aware of relatively uncommon anatomic anomalies that may impede the advancement of catheters to the aorta or increase the risk of failure or complications. Variations include tortuous radial configurations, stenoses, hypoplasia, radioulnar loops, aberrant right subclavian artery (arteria lusoria), and abnormal origin of the radial artery.22,23 In a series of 1,540 transradial procedures, anatomic anomalies were found in about 15% of cases. A high radial artery origin at the level of the mid or upper humerus was found in 7% of cases and was associated with a failure rate of 4.6%, a loop in the proximal radial artery was found in 2.3% of cases and associated with a high failure rate of 37.1%, severe tortuosity was found in 2 %, and other miscellaneous anomalies in 2.5% of cases. These anomalies are usually unilateral, therefore vascular access crossover to the left radial artery may be indicated in cases of extreme tortuosity or angulated radial loops.23 Significant subclavian or brachiocephalic tortuosity is present in about 10% of cases and is usually associated with advanced age, short stature, and long-standing history of hypertension. However, subclavian tortuosity is rarely a cause of procedural failure because it can be easily negotiated by the use of deep inspiration or supportive guidewires.11 In rare cases (<1%), the right subclavian artery arises directly from the distal segment of the posterior aspect of the aortic arch and has a retroesophageal course toward the right upper extremity. This anomaly is known as arteria lusoria and represents a formidable challenge for advancing a catheter from the subclavian artery to the ascending aorta. This anomaly is mostly asymptomatic but can be associated with dysphagia.22
TECHNICAL ASPECTS
Preprocedure Assessment—Testing for Dual Circulation to the Hand
All patients undergoing TRA procedures in the catheterization laboratory should be assessed and undergo preparation according to a standardized protocol. Depending on the operator’s preference, the groins can be prepped along with the wrists. Placement of intravenous lines in the vicinity of the wrist should be avoided. Sedation is strongly recommended to decrease catecholamine release that can potentially contribute to radial spasm.
There is significant variability in the vascular anatomy of the hand. The superficial palmar arch that connects the ulnar and radial arteries is complete in approximately 80% of cases and the predominant blood supply to the hand is thought to be from the ulnar artery in the majority of cases.24 In 1929, Edgar Van Nuys Allen introduced a “compression test” to diagnose arterial occlusion resulting from thromboangiitis obliterans or Buerger disease. The test consists of simultaneously compressing the ulnar and the radial arteries at the level of the wrist for approximately 1 or 2 minutes, the patient closes the hand tightly to squeeze as much blood out as possible, then quickly opens the hand and extends the fingers; then the operator releases compression of the ulnar artery and waits for the hand to regain color. In individuals with integrity of the hand circulation and a patent palmar arch, the pallor of the hand is quickly replaced by blushing of higher intensity than normal in about 5 to 9 seconds. Because the Allen’s test is largely subjective and yields more than 30% of falsely abnormal results, Barbeau and coworkers modified the test by attaching a pulse oximeter to the thumb to record oxygen saturation and plethysmography. In a study including 1,010 patients, Barbeau and colleagues described four reading patterns: no damping of the pulse waveform immediately after 2 minutes of radial compression, positive oximetry (Type A, frequency 15%); damping of the pulse waveform and positive oximetry, followed by complete recovery within 2 minutes of compression, (Type B, frequency 75%); loss of pulse waveform, negative oximetry, with partial progressive recovery of the pulse waveform and oximetry within 2 minutes of compression (Type C, frequency 5%); loss of pulse waveform, negative oximetry, without recovery of either pulse waveform or oximetry after 2 minutes of compression (Type D, frequency 5%) (Figure 7.1). After analyzing these patterns in the right and left wrists of the study participants, only 1.5% showed a bilateral Type D pattern and these patients did not undergo TRA procedures. In summary, this study suggests that almost all patients are eligible for TRA procedures without risk of ischemic complications to the hand.25 Some operators have challenged the utility of testing the collateral circulation of the radial artery, stating that the presence of a rich collateral system and the presence of interosseous branches that supply circulation to the hand could possibly allow to tolerate concomitant radial and ulnar artery occlusion.26 In addition, there is no evidence indicating that the modified Allen’s test predicts hand ischemia after TRA procedures. However, as part of the catheterization laboratory routine in most sites, a modified Allen’s test using pulse oximetry and plethysmography is usually performed and the results documented.
Patient Positioning—Right versus Left Radial Access
TRA can be performed through the left or the right radial artery. Due to ergonomic considerations, most operators prefer using right TRA. Regardless of the side of choice, a comfortable position for the patient and the operator is crucial for successfully performing TRA procedures. The patient is
positioned supine on the angiographic table. With right-sided TRA, an arm board extension is attached to the right hand side of the table. Importantly, there should be a platform that extends from the distal portion of the patient’s hand to the table controls so that equipment can be placed in this area. Arm boards are commercially available in different shapes and designs. Many laboratories have opted for trapezoidshaped acrylic glass board, with the narrow end tucked under the mattress at the shoulder level and the broad area at the wrist level (Figure 7.2). The patient’s right arm is placed on the board and abducted at a 30° angle. The right wrist is placed in a hyperextended position using commercially available splints or a rolled towel behind the wrist with the fingers taped to the arm board. A pulse oximeter probe can be placed in the right thumb for continuous monitoring of the circulation to the hand throughout the procedure (Figure 7.3). Both groins may be prepped as well, depending on the anticipated need for femoral access.
positioned supine on the angiographic table. With right-sided TRA, an arm board extension is attached to the right hand side of the table. Importantly, there should be a platform that extends from the distal portion of the patient’s hand to the table controls so that equipment can be placed in this area. Arm boards are commercially available in different shapes and designs. Many laboratories have opted for trapezoidshaped acrylic glass board, with the narrow end tucked under the mattress at the shoulder level and the broad area at the wrist level (Figure 7.2). The patient’s right arm is placed on the board and abducted at a 30° angle. The right wrist is placed in a hyperextended position using commercially available splints or a rolled towel behind the wrist with the fingers taped to the arm board. A pulse oximeter probe can be placed in the right thumb for continuous monitoring of the circulation to the hand throughout the procedure (Figure 7.3). Both groins may be prepped as well, depending on the anticipated need for femoral access.
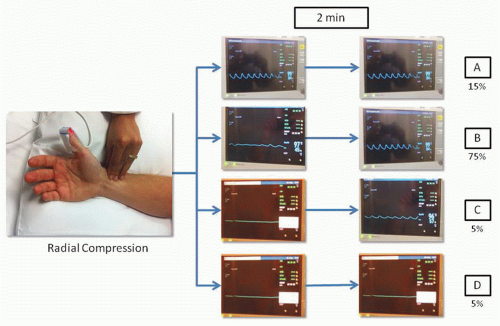 Figure 7.1 Testing for dual circulation to the hand. The Barbeau Grading System for assessment of collateral circulation of the palmar arch. The presence of an arterial waveform on plethysmography (even if delayed or with reduced amplitude) and an oxygen saturation above 90% (Grades A, B, and C) confirm the presence of dual circulation to the hand. |
For left TRA, the setup is completely different and varies widely across catheterization laboratories. As with right TRA, the operator stands on the right side of the patient for left TRA to avoid disruption of the traditional laboratory setup. The patient is positioned supine on the table and a custom arm rest, made of foam or pillow material, is attached to the left side of the table to elevate and pronate the left arm and guide the forearm toward the midsection of the patient’s body and place the wrist over the leg where it can strapped to a splint (Figure 7.2).
It has been shown that the prevalence of subclavian tortuosity and radial loops is three times higher in the right upper extremity.27 With right TRA the catheter has to pass through the right subclavian artery and the brachiocephalic trunk before reaching the aortic root. These two areas of bifurcation can increase technical difficulty, especially when these vessels are atherosclerotic, tortuous, and calcified. Since the left subclavian artery arises directly from the aorta, the path followed by the catheter in the left radial route into the ascending aorta is more straightforward, often resulting in less complex catheter manipulation. In addition, left TRA should be strongly considered in patients who have undergone coronary artery bypass grafting (CABG), because it provides direct access to the left internal mammary artery (LIMA). Certainly, the LIMA can also be cannulated from the right radial route, but this
is significantly more challenging from a technical standpoint with a potential risk of embolic stroke due to catheter manipulation and exchanges in the aortic arch. Randomized data comparing right versus left radial access suggested that using left TRA during the learning curve may be advantageous as it allows novice operators to acquire the skills and confidence required for transradial procedures more quickly than the right radial route. In the TALENT trial (Transradial Approach [Left versus. Right] and Procedural Times during Percutaneous Coronary Procedures) 1,500 patients were randomized to right or left TRA. The study found that among trainees, left TRA was associated with a significantly shorter learning curve, with progressive reductions in cannulation and fluoroscopy times as the operator volume increased, compared to right TRA.28,29
is significantly more challenging from a technical standpoint with a potential risk of embolic stroke due to catheter manipulation and exchanges in the aortic arch. Randomized data comparing right versus left radial access suggested that using left TRA during the learning curve may be advantageous as it allows novice operators to acquire the skills and confidence required for transradial procedures more quickly than the right radial route. In the TALENT trial (Transradial Approach [Left versus. Right] and Procedural Times during Percutaneous Coronary Procedures) 1,500 patients were randomized to right or left TRA. The study found that among trainees, left TRA was associated with a significantly shorter learning curve, with progressive reductions in cannulation and fluoroscopy times as the operator volume increased, compared to right TRA.28,29
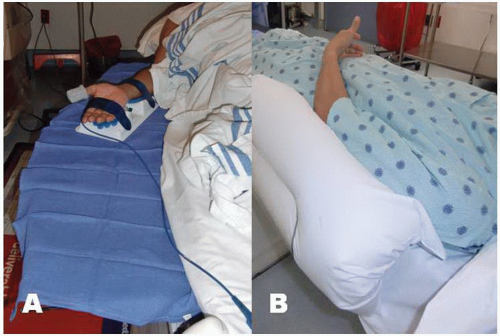 Figure 7.2 Positioning of the arm for right or left radial access. A. The right arm is placed on the board abducted at a 30° angle. B. The left arm rest on a large pillow placed on a regular arm board that guides the forearm towards the midsection of the patient’s body, placing the left wrist on top of the left groin. |
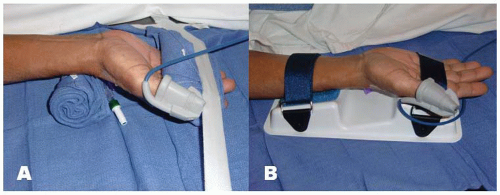 Figure 7.3 Positioning of the hand for transradial access. A. The hand is hyperextended with use of a rolled towel behind the wrist and tape holding the fingers, B. or with use of a dedicated positioning splint. |
Radial Puncture
There are a number of TRA kits available in the market. In general, these kits include a micropuncture needle, a short 0.018 to 0.021 inch wire, and an arterial sheath with or without hydrophilic coating of shorter (10 to 13 cm) or longer (23 cm) length. Some operators advocate the use of longer sheaths to avoid difficulties with catheter manipulation should spasm occur, but a randomized trial comparing sheath lengths on arterial spasm showed no effect of longer sheaths on reducing spasm.30 On the other hand, hydrophilic coating allows easier sheath removal and is clearly associated with less spasm and patient discomfort.31 However, in the past decade, Kozak and colleagues reported sterile abscesses in the wrist after the use of a particular transradial sheath brand. These abscesses were
later found to be a foreign-body reaction to the hydrophilic coating of the sheaths.32 Conservative management ruling out the presence of infection, local wound care with drainage in case of abscess formation, and reassurance are recommended for the management of this complication. Sterile abscesses are rarely found in contemporary practice as the hydrophilic coating causing the problem has been modified, although a recent isolated case of sterile abscess has been reported with new sheaths.33 A recent study randomized 790 patients undergoing TRA PCI in a 2×2 factorial design to shorter (13 cm) or longer (23 cm) sheaths with or without hydrophilic coating. Hydrophilic-coated sheaths were associated with a significant reduction in radial spasm (19.0% versus 39.9%, P < 0.001) and patient discomfort (15.1% versus 28.5%, OR 2.27, P < 0.001), whereas sheath length did not have any effect in the occurrence of spasm or patient discomfort.30 In addition, the operator may consider using smaller diameter sheaths as 5F sheaths are associated with lower incidence of radial artery occlusion (RAO) than 6F sheaths.34 Therefore, in current practice, shorter 5F hydrophilic-coated sheaths are preferred.
later found to be a foreign-body reaction to the hydrophilic coating of the sheaths.32 Conservative management ruling out the presence of infection, local wound care with drainage in case of abscess formation, and reassurance are recommended for the management of this complication. Sterile abscesses are rarely found in contemporary practice as the hydrophilic coating causing the problem has been modified, although a recent isolated case of sterile abscess has been reported with new sheaths.33 A recent study randomized 790 patients undergoing TRA PCI in a 2×2 factorial design to shorter (13 cm) or longer (23 cm) sheaths with or without hydrophilic coating. Hydrophilic-coated sheaths were associated with a significant reduction in radial spasm (19.0% versus 39.9%, P < 0.001) and patient discomfort (15.1% versus 28.5%, OR 2.27, P < 0.001), whereas sheath length did not have any effect in the occurrence of spasm or patient discomfort.30 In addition, the operator may consider using smaller diameter sheaths as 5F sheaths are associated with lower incidence of radial artery occlusion (RAO) than 6F sheaths.34 Therefore, in current practice, shorter 5F hydrophilic-coated sheaths are preferred.
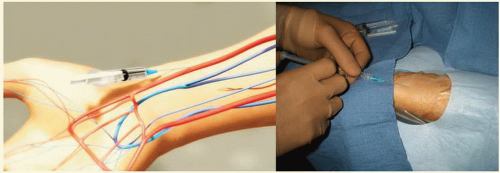 Figure 7.4 Transradial access technique (Step 1). After sterile preparation and draping, the wrist area is locally anesthetized with lidocaine using a 25G needle and a small 3 cc syringe. |
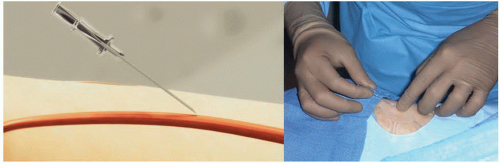 Figure 7.5 Transradial access technique-front wall technique (Step 2). With the front wall technique, a short 2.5 cm 21G stainless-still needle is used to puncture the radial artery. |
It is important to administer sedation to avoid the release of catecholamines associated with the emotional stress and fear that patients usually experience before the procedure, which can contribute to radial artery spasm. The site of access is approximately 2 cm proximal to the radial styloid process, not at the wrist. The radial artery is most superficial in this area. Once the patient is prepped in sterile fashion, this area is anesthetized with approximately 2 to 3 cc of 1% lidocaine injected with a small syringe and a 25G needle (Figure 7.4). Usually, the arterial puncture is performed with either a short 2.5 cm, stainless steel, 21G needle or a micropuncture IV catheter that consists of a fine metal needle and a 22G Teflon catheter that allow the passage of a 0.018 to 0.021 inch guidewire. While feeling the pulse with one hand, the operator advances the needle into the radial artery at a 30° angle with the other hand (Figure 7.5). Most operators prefer one of two different
access techniques (single-wall versus double-wall or back-wall technique). With the single-wall technique, a stainless steel needle is advanced through the front wall of the artery into the lumen; once blood is noticed in the needle hub the wire can be advanced (Figure 7.6). Using this technique, the blood return is rarely brisk or pulsatile and sometimes the wire does not advance freely because the bevel may be directing the wire toward the vessel wall. If this happens, the operator should never force the wire because of the risk of arterial dissection. The needle should be carefully rotated clockwise or counterclockwise until the wire can be easily advanced without resistance (Figure 7.7). With the dual-wall or back-wall technique, a micropuncture catheter is advanced through the front wall into the lumen of the artery until blood is noticed in the hub and then intentionally pushed through the back wall of the artery (Figure 7.8). The fine needle is removed and the small Teflon microcatheter is slowly withdrawn until the appearance of brisk pulsatile flow (Figures 7.9 and 7.10). Then, the wire can be freely advanced and the microcatheter exchanged for the arterial sheath (Figure 7.11). The orifice in the back wall of the radial artery is sealed once the sheath is in place (Figure 7.12). This technique has not been reported to be associated with a higher incidence of wrist hematomas. Proponents of the backwall technique argue that this method is simpler, more reproducible, easier to teach, allows easier advancement of the wire, and that the arterial pulsatile blood return is easier to recognize.
access techniques (single-wall versus double-wall or back-wall technique). With the single-wall technique, a stainless steel needle is advanced through the front wall of the artery into the lumen; once blood is noticed in the needle hub the wire can be advanced (Figure 7.6). Using this technique, the blood return is rarely brisk or pulsatile and sometimes the wire does not advance freely because the bevel may be directing the wire toward the vessel wall. If this happens, the operator should never force the wire because of the risk of arterial dissection. The needle should be carefully rotated clockwise or counterclockwise until the wire can be easily advanced without resistance (Figure 7.7). With the dual-wall or back-wall technique, a micropuncture catheter is advanced through the front wall into the lumen of the artery until blood is noticed in the hub and then intentionally pushed through the back wall of the artery (Figure 7.8). The fine needle is removed and the small Teflon microcatheter is slowly withdrawn until the appearance of brisk pulsatile flow (Figures 7.9 and 7.10). Then, the wire can be freely advanced and the microcatheter exchanged for the arterial sheath (Figure 7.11). The orifice in the back wall of the radial artery is sealed once the sheath is in place (Figure 7.12). This technique has not been reported to be associated with a higher incidence of wrist hematomas. Proponents of the backwall technique argue that this method is simpler, more reproducible, easier to teach, allows easier advancement of the wire, and that the arterial pulsatile blood return is easier to recognize.
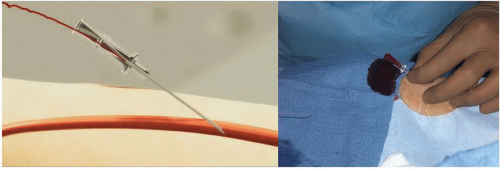 Figure 7.6 Transradial access technique-front wall technique (Step 3). The needle is advanced into the radia l artery. The blood return indicates the intraluminal needle position. The blood return is rarely pulsatile or brisk. |
 Figure 7.7 Transradial access technique-front wall technique (Step 4). A 0.018 inch short guidewire is advanced without resistance through the needle into the proximal radial artery. Then the needle is exchanged for a hydrophilic-coated sheath. |
After several unsuccessful puncture attempts, there are instances in which the radial pulse disappears due to spasm. In this situation, the operator should reassess the sedation status of the patient, consider administering 200 to 400 mcg
of subcutaneous nitroglycerin at the site of the lost radial pulse, and wait patiently for 5 to 10 minutes until the pulse reappears before attempting a new puncture.35
of subcutaneous nitroglycerin at the site of the lost radial pulse, and wait patiently for 5 to 10 minutes until the pulse reappears before attempting a new puncture.35
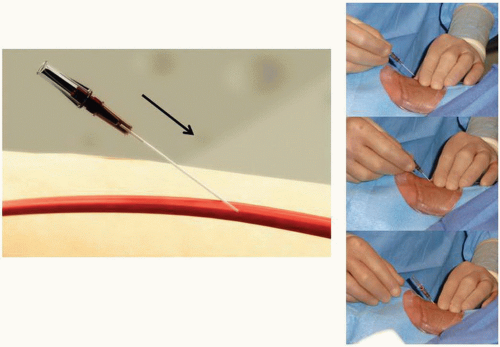 Figure 7.8 Transradial access technique-back-wall technique (Step 2). The microcatheter and needle are advanced in a 30° angle through the skin into the radial artery. The presence of blood in the hub of the needle indicates that the artery has been punctured. The needle is advanced forward through the back wall of the radial artery. |
Even though TRA procedures can be successfully completed in more than 95% of cases, inability to puncture the radial artery has been one of the most frequent mechanisms associated with TRA failure.11 Therefore a consistent and meticulous radial artery puncture technique could not be emphasized more. A steep learning curve for TRA procedures has been well described. Spaulding et al., documented an initial access failure rate greater than 10% that decreased dramatically to about 2% after the first 80 cases. In addition, the time required for access and sheath insertion decreased from 10.2 ± 7.6 to 2.8 ± 2.5 minutes and the procedure time also decreased from 25.7 ± 12.9 to 17.4 ± 4.7 minutes after the first 80 cases.7 More recently, in a group of 28 operators, Ball and colleagues documented a stepwise reduction of TRAPCI failure rates from 7% to 2% (P = 0.01), contrast volume use from 180 ± 79 to 168 ± 79 mL (P = 0.05), and fluoroscopy times from 15 ± 10 to 12 ± 9 minutes (P = 0.02) with increasing procedural volumes. The odds of TRA procedural failure showed a steep decline up to 50 cases, and after 100 cases the learning curve flattened. Figure 7.13 shows that reasons for failure are different according to operator volume. It is clear that with experience, the operator can overcome most hurdles and the major reasons for failure remain radial artery spasm and extreme vascular tortuosity.9
Prevention of Radial Artery Spasm
The radial artery has a high propensity to develop spasm due to its smaller caliber, large muscular media, and higher receptor-mediated vasomotion in comparison with similar arteries.36 Radial artery spasm is perhaps the most common TRA complication and a frequent reason for failure and crossover to transfemoral access.9,11 In the catheterization laboratory, spasm should be routinely prevented using a hydrophilic-coated sheath with the injection of a single vasodilator or a cocktail of vasodilators through the sidearm of the sheath immediately after obtaining access (Figure 7.14). Most
commonly used vasodilators in order of frequency include the combination of verapamil and nitroglycerin, verapamil or nitroglycerin alone, nicardipine, lidocaine, and papaverine.37,38 Radial spasm manifests with severe forearm pain and unusually difficult manipulation of the catheters and the sheath. Independent predictors of radial spasm include the presence of radial artery anomalies, multiple catheter exchanges, pain during radial cannulation, larger catheter diameter, and small radial artery caliber.39 In extreme cases, eversion radial endarterectomy has been reported after forceful removal of the radial sheath.40 When spasm occurs, additional doses of intraarterial vasodilators, sedation, and use of smaller 4F to 5F catheters to complete the procedure are usually recommended. If after these measures the patient still complains of substantial pain and the catheters are difficult to manipulate, a limited upper extremity angiography is recommended to rule out vascular anomalies such as a high radial origin in the proximal brachial artery or a radial loop. In case of catheter or sheath entrapment due to spasm, warm wet compresses can be applied over the skin of the upper extremity and the sheath or catheter slowly removed, or, in extremely severe cases, regional nerve block may be required.
commonly used vasodilators in order of frequency include the combination of verapamil and nitroglycerin, verapamil or nitroglycerin alone, nicardipine, lidocaine, and papaverine.37,38 Radial spasm manifests with severe forearm pain and unusually difficult manipulation of the catheters and the sheath. Independent predictors of radial spasm include the presence of radial artery anomalies, multiple catheter exchanges, pain during radial cannulation, larger catheter diameter, and small radial artery caliber.39 In extreme cases, eversion radial endarterectomy has been reported after forceful removal of the radial sheath.40 When spasm occurs, additional doses of intraarterial vasodilators, sedation, and use of smaller 4F to 5F catheters to complete the procedure are usually recommended. If after these measures the patient still complains of substantial pain and the catheters are difficult to manipulate, a limited upper extremity angiography is recommended to rule out vascular anomalies such as a high radial origin in the proximal brachial artery or a radial loop. In case of catheter or sheath entrapment due to spasm, warm wet compresses can be applied over the skin of the upper extremity and the sheath or catheter slowly removed, or, in extremely severe cases, regional nerve block may be required.
Stay updated, free articles. Join our Telegram channel

Full access? Get Clinical Tree


