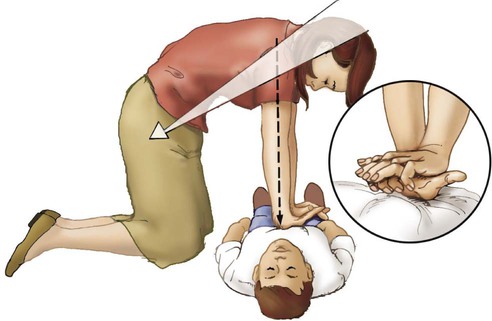
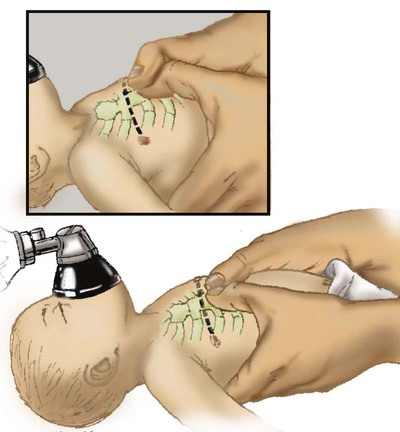
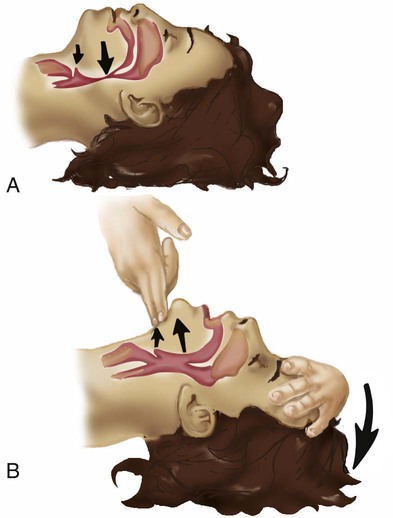
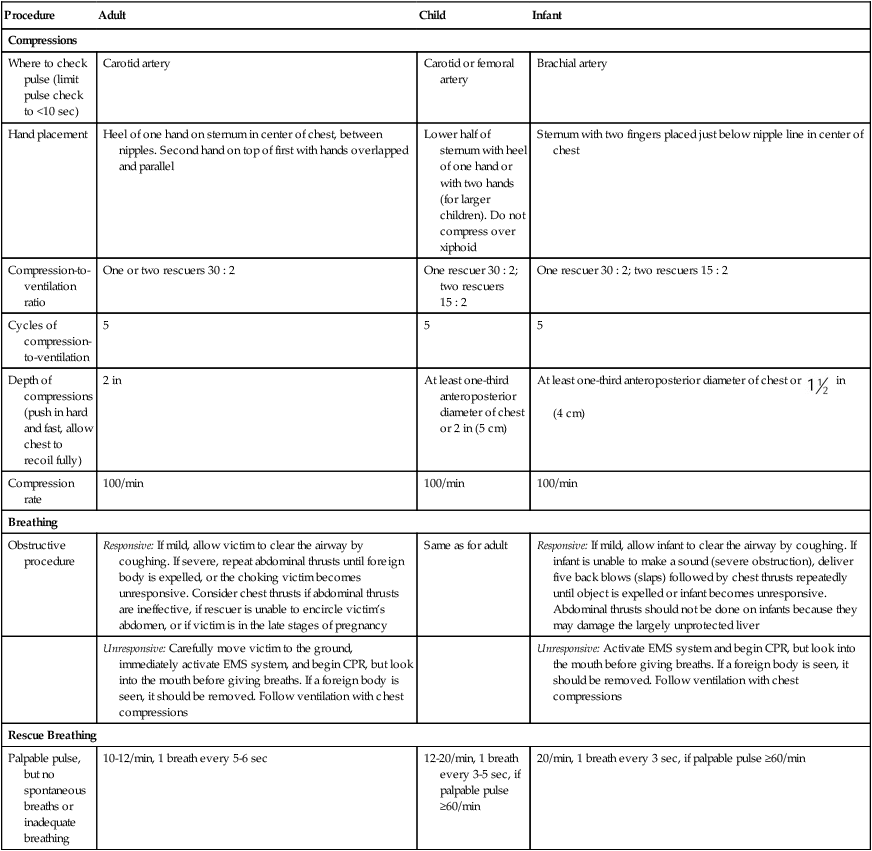
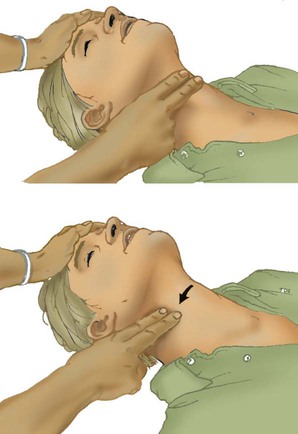
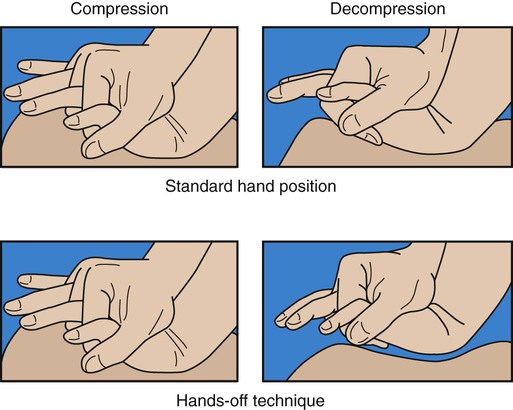
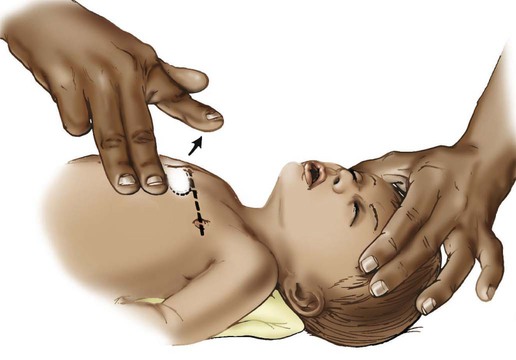
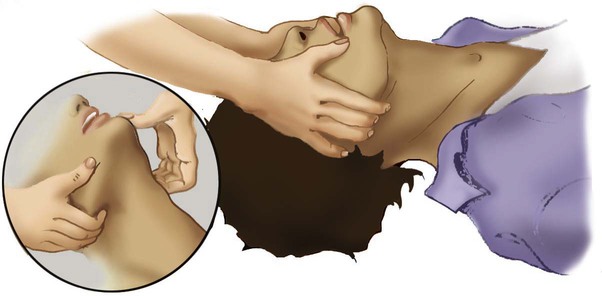
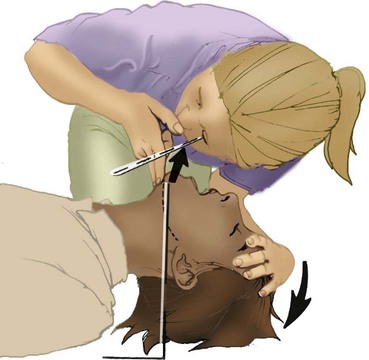
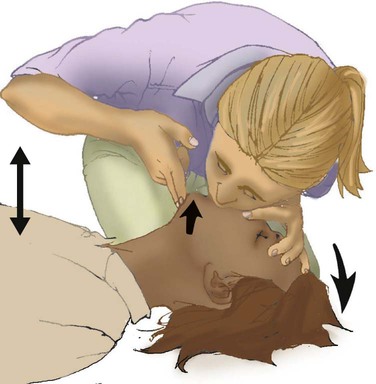
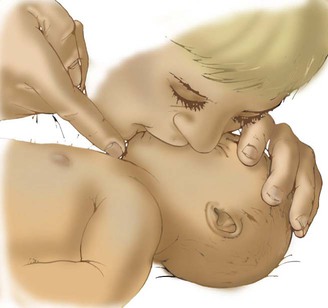
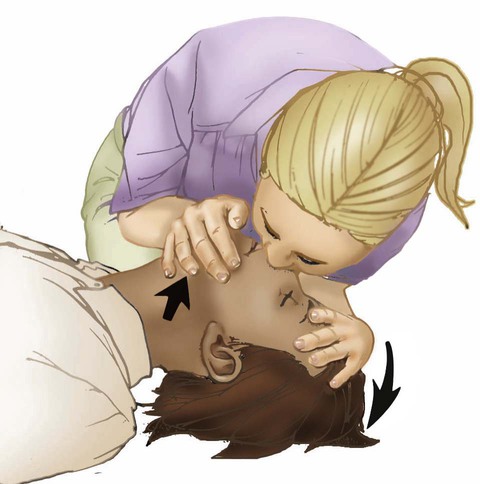
After reading this chapter you will be able to: Sudden cardiac arrest (SCA) is a leading cause of death in many parts of the world.1 In the United States and Canada, approximately 350,000 people per year experience SCA and receive an attempted resuscitation.2 The incidence of out-of-hospital SCA is 50 to 55 per 100,000 persons per year.2 The incidence of in-hospital cardiac arrest is 3 to 6 per 1000 admissions. Pulseless ventricular rhythms are the first manifestation of cardiac arrest in 25% of cases.2,3 Successful resuscitation depends on immediate CPR and delivery of a shock before pulseless ventricular rhythms deteriorate into asystole. In cases of SCA related to asphyxia secondary to trauma, drug overdose, or upper airway obstruction, CPR with chest compressions and ventilation before the shock is critical. 1. Check for lack of movement or response and no normal breathing or only gasping. 2. If no response and no breathing or only gasping, check pulse within 10 seconds (health care providers only). 3. Activate emergency response system (get automated external defibrillator [AED] if close to your location). 4. If no AED is available, start chest compressions and rescue breathing for adult cardiac arrest (use cycles of 30 compressions to two ventilations). 5. Open airway and check breathing. 6. If not breathing, give two breaths that produce chest rise and immediately resume chest compressions (push hard and deep). Steps 4 through 7 are referred to as the CABDs of resuscitation—circulation, airway, breathing, and defibrillation. Table 34-1 summarizes the CABDs of CPR for adults, children (1 year old to puberty), and infants (<1 year old). TABLE 34-1 Steps for Cardiopulmonary Resuscitation (CPR) in Adults, Children, and Infants Assessment of the pulse of an unresponsive patient by health care providers should be limited to 5 to 10 seconds to avoid delaying chest compressions. Pulse checks are difficult to accomplish with any fidelity. Pulse and rhythm checks should not be done after a shock until five cycles of CPR have been completed. Pulse checks should not be done by lay rescuers.4 Pulselessness is evaluated by palpating a major artery. In adults and children older than 1 year, the carotid artery in the neck or femoral artery should be palpated. To locate the carotid artery, the rescuer should maintain the head-tilt with one hand while sliding the fingers of the other hand into the groove created by the trachea and the large neck muscles (Figure 34-1). The carotid artery area must be palpated gently to avoid compressing the artery or pushing on the carotid sinus. Because the pulse may be slow, weak, or irregular, the artery may need to be assessed for approximately 10 seconds for the presence or absence of a pulse to be confirmed. If the patient has a pulse but is not breathing, ventilation must be started immediately, at the appropriate rate of 8 to 10 breaths/min (every 6 to 8 seconds). If no pulse is palpable, external chest compressions must be interposed with ventilatory support (see Table 34-1). Adequate circulation can be restored in a pulseless victim using external chest compressions. The rescuer manually compresses the lower half of the sternum (for an adult patient) at a rate of 100 compressions/min. The duty cycle for downstroke and upstroke (release) is 600 msec with a 1 : 1 downstroke-to-upstroke ratio. It is very important to have a complete upstroke so as not to increase intrathoracic pressure during the diastolic phase. The best way to ensure that the upstroke is complete is for the rescuer to take his or her hand slightly off the chest between compressions.5 Cardiac output produced by external chest compressions is approximately one-fourth of normal cardiac output, with arterial systolic blood pressures between 60 mm Hg and 80 mm Hg. Blood flow during chest compression probably results from changes in the intrathoracic pressure. The procedure for providing chest compressions to adults is as follows (Figures 34-2 and 34-3): 1. Place the victim in a supine position on a firm surface, such as the ground or the floor, because chest compressions are more effective when the victim is on a firm surface. When victims are in bed or on a stretcher, place a board or tray under them. A cardiac arrest board is ideal, but a removable bed piece or food tray may have to be used. 2. Expose the patient’s chest to identify landmarks for correct hand position. If the victim is fully clothed, quickly remove or cut off any clothing or underwear. 3. Choose a position close to the patient’s upper chest so that the weight of your upper body can be used for compression. If the patient is on a bed or stretcher, stand next to it with the patient close to that side. If the bed is high or you are short, you may need to lower the bed, stand on a stool or chair, or kneel on the bed next to the victim. If the patient is on the ground, kneel at his or her side. 4. Identify the lower half of the victim’s sternum, in the center of the chest between the nipples, and place the heel of your hand on the sternum with your other hand on top, and lock your elbows.6 5. Perform compression with the weight of your body exerting force on your outstretched arms, elbows held straight. Your shoulders should be positioned above the patient so that the thrust of each compression goes straight down onto the sternum, using your upper body weight and the hip joints as a fulcrum (see Figure 34-2). It is acceptable to let your hands leave the victim’s chest ever so slightly to ensure a complete upstroke (see Figure 34-3). 6. Compress the sternum 2 in (5 cm) at a rate of 100 compressions/min. The compression phase of the cycle should be equal in duration to the upstroke phase. 7. If CPR must be interrupted for transportation or advanced life support measures, resume chest compressions as quickly as possible. Compressions should not cease for more than 5 seconds (30 seconds if the victim is being intubated). 1. Place the victim in the supine position on a firm surface. Small children may require additional support under the upper body; this is particularly true when chest compressions are given with mouth-to-mouth ventilation because extension of the neck raises the shoulders. The head should be no higher than the body. 2. As with an adult, identify the lower half of the sternum. Because the liver and spleen of younger children lie higher in the abdominal cavity, take special care to ensure proper positioning as described previously. However, use only one hand to compress. Use the other hand to maintain head position and maintain an airway. 3. Compress the chest approximately 2 in (5 cm) at a rate of 100 compressions/min. Generally, the heel of one hand is sufficient to achieve compression. As with adults, compression and relaxation times should be equal in length and delivered smoothly. The procedure for infants (≤1 year of age) is as follows (Figure 34-4): 1. Use the lower half of the sternum for compression in an infant. Proper placement is determined by imagining a line across the chest connecting the nipples. Place your index finger along this line on the sternum. Then place your middle and ring fingers next to the index finger. Raise your index finger and perform compressions with the middle and ring fingers. Use the other hand to maintain the infant’s head position and airway. 2. Compress the sternum approximately 1.5 in (4 cm) at a rate of at least 100 compressions/min. Compression and upstroke phases should be equal in length and delivered smoothly. Your fingers should remain on the chest at all times. Chest compressions are indicated if the neonate’s heart rate decreases to less than 60 beats/min despite adequate ventilation with 100% oxygen (O2) for 30 seconds. Before starting chest compressions, the rescuer should ensure that the neonate is being ventilated optimally.7 Neonatal chest compressions are delivered on the lower third of the sternum to a depth of approximately one-third of the anteroposterior diameter of the chest to achieve an approximate rate of 100 compressions/min.7–10 Two methods have been described. The first method uses a “wraparound” technique (Figure 34-5). To use this method, the rescuer encircles the neonate’s chest with both hands and compresses the sternum with two thumbs, using the other fingers of both hands to support the neonate’s back. The rescuer should position the thumbs just below the victim’s intermammary line, taking care not to compress the xiphoid process. Compression should be performed smoothly, with downstroke and upstroke times approximately equal. Delivering a slightly shorter compression than relaxation phase may allow for more blood flow in a very young infant.11 In all infants, the chest should be allowed to expand fully after a compression. After every third compression, the neonate should receive a breath of 100% O2, coordinated with compressions to avoid simultaneous delivery. The second method, the two-finger technique (see Figure 34-4), may have advantages when access to the umbilicus is required. The most common cause of airway obstruction is loss of muscle tone, which causes the tongue to fall back into the pharynx, blocking airflow. Movement of the lower jaw and extension of the neck pulls the tongue from the posterior pharyngeal wall and opens the airway. One of two procedures can be used: (1) The head-tilt/chin-lift method is the primary procedure recommended for a layperson when spinal trauma is not suspected (Figures 34-6 and 34-7). (2) The jaw thrust is used mainly by trained clinicians when spinal neck injuries are suspected and is no longer recommended by the AHA for lay rescuers (see Figure 34-7). Health care providers should use a head-tilt/chin-lift procedure if the jaw thrust maneuver does not open the airway.4 One of these maneuvers usually can open the airway and may be the only lifesaving measure required. Research supports using manual in-line spinal immobilization rather than motion restriction devices that may complicate airway management during CPR.8 Cervical collars can cause increased intracranial pressure in a patient with a head injury.9 After the airway is cleared and opened, the rescuer must immediately assess the victim’s ventilation. Before attempting to provide artificial ventilation, the rescuer should assess for the presence of breathing. To determine breathlessness, the rescuer places his or her ear over the victim’s mouth and nose while simultaneously observing for spontaneous chest movement (Figure 34-8). Breathlessness exists if no chest movement or breath sounds are present or only gasping is present. This evaluation should take no longer than 3 to 5 seconds to complete. The procedure for adults is as follows (Figure 34-9): 1. Place the victim on his or her back on a hard, flat surface. 2. Kneel at the patient’s side, and open and clear the airway as previously described. Pinch the victim’s nose with your thumb and index finger close to the nares to prevent air from escaping during ventilation. 3. Take a slightly deeper than normal breath and deliver 500 ml over 1 second, while making a seal over the victim’s mouth. A good seal over the patient’s mouth is essential. If a good seal cannot be obtained using this method, attempt mouth-to-nose ventilation. 4. Remove your mouth from the patient’s mouth, and allow the victim to exhale passively. Provide a second breath after exhalation is complete. 5. After successfully delivering two breaths, immediately assess the circulatory status. 6. Should the initial attempt to ventilate fail, reposition the victim’s head and repeat the effort. If a second attempt at ventilation fails, the victim may have foreign body airway obstruction (FBAO), and the procedures for handling such situations described elsewhere in this chapter should be followed. 7. Assuming mouth-to-mouth ventilation is successful and the patient remains apneic, continue the effort at a rate of one breath every 6 to 7 seconds to maintain the minimal adult rate of 8 to 10 breaths/min. Airway opening maneuvers for children and infants are similar to maneuvers for adults, with several key differences. Anatomic differences in the infant’s airway make it especially susceptible to occlusion by the tongue. The infant’s head should be extended only slightly, or it should be tilted back gently into a neutral position when the head-tilt/chin-lift maneuver is used. The procedure for children and infants is as follows (Figure 34-10): 1. If the patient is an infant (<1 year old), create an airtight seal by placing your mouth over the infant’s nose and mouth (see Figure 34-10). 2. If the patient is a child between 1 year old and puberty, ventilate the victim’s lungs using the same technique as would be used for an adult (see Figure 34-9). 3. Provide an initial breath (over 1 second) sufficient to cause a visible rise in the chest. In infants, small puffs of air from the rescuer’s cheeks are usually sufficient to achieve adequate ventilation. 4. Remove your mouth, and allow the victim to exhale passively. Provide a second breath after this deflation pause. 5. After successfully delivering two breaths, immediately assess the pulse (<10 seconds). 6. If the initial attempt to ventilate fails, reposition the victim’s head and repeat the effort. A child’s head may need to be moved through a wide range of positions to secure an open airway. Hyperextension of a child’s neck can cause obstruction and should be avoided. If a second attempt at ventilation fails, the victim may have FBAO, and the appropriate procedures outlined elsewhere in this chapter should be followed. 7. Assuming mouth-to-mouth ventilation is successful and the child remains apneic, continue to provide one breath every 3 to 5 seconds to maintain a rate of 12 to 20 breaths/min. Mouth-to-mouth ventilation cannot be performed in some situations; these include trismus (involuntary contraction of the jaw muscles, also known as lockjaw) and traumatic jaw or mouth injury. Also, sometimes it is difficult to maintain a tight seal with the lips using the mouth-to-mouth method. In these situations, mouth-to-nose ventilation should be used. The procedure is as follows (Figure 34-11): 1. Place the victim on his or her back. 2. Use the head-tilt/chin-lift maneuver to establish the airway, taking care to close the mouth completely. 3. Inhale slightly deeper than normal and exhale into the patient’s nose. Greater force may need to be applied than would be used with mouth-to-mouth ventilation because the nasal passageways are smaller. 4. Remove your mouth from the victim’s nose to allow the patient to exhale passively. If the patient does not exhale through the nose (because of nasopharyngeal obstruction from the soft palate), open the victim’s mouth or separate his or her lips to facilitate exhalation. 5. After successfully delivering two slow breaths, immediately assess the circulatory status. 6. If the victim remains apneic, maintain ventilation at the rate appropriate for his or her age. 1. Place the victim on his or her back with the neck in vertical alignment. Usually, the neck does not need to be extended and the nose or mouth does not need to be sealed because oropharyngeal structures are bypassed by the stoma. 2. Ensure that the stoma is clear of any obstructing matter and breathe directly into the stoma (or tube). If the victim has a cuffed tracheostomy tube in place, inflate the cuff to prevent air from escaping around the tube. If the tube is uncuffed, the mouth and nose may need to be sealed off with your hand or a tight-fitting face mask, using a pediatric face mask to create an adequate peristomal seal for bag-mask ventilation. 3. After delivering two breaths, immediately assess the circulatory status. 4. If the victim remains apneic, maintain ventilation at the rate appropriate for his or her age. Lay rescuers should be taught to do 100 compressions/min until the AED arrives for all age groups because it is easier to remember.4 Emphasis should be placed on teaching lay rescuers to “push hard and fast” on the sternum. Health care providers should use a 30 : 2 compression-to-ventilation ratio on adults and children. A 3 : 1 compression-to-ventilation ratio for infants (≤1 year of age) should be used when there are two rescuers.4,10,11 The person doing chest compressions should be changed every 2 minutes. Doing chest compressions is tiring, and fatigue occurs within a few minutes leading to a compression rate less than 100 compressions/min, shallow chest compressions, and incomplete chest recoil.4 1. The most common initial rhythm in witnessed sudden cardiac arrest is VF. 2. The treatment for VF is electrical defibrillation. 3. The probability of successful defibrillation diminishes rapidly over time. Studies have shown that survival rates are highest when immediate bystander CPR is provided and defibrillation occurs within 5 minutes after SCA.12 The AHA recommendation is that automated external defibrillators (AEDs) be made available to individuals expected to respond to emergencies, such as police, security personnel, ski patrol personnel, flight attendants, and first-aid volunteers (Figure 34-12). Early defibrillation has already proven to be effective in saving lives of people who otherwise may have not been successfully resuscitated.12 After appropriate training and implementation of the CABs, this step is inserted as the letter D, for defibrillation. This step should be initiated within 2 minutes of when CPR is begun. EMS providers arriving at the scene of a cardiac arrest should give a period of CPR (five cycles, or about 2 minutes) before checking a rhythm and attempting defibrillation. If the EMS provider witnesses the collapse or for in-hospital situations, the rescuer should use the defibrillator as soon as it is available. In an adult drowning victim or a victim of FBAO who becomes unconscious, a health care provider working alone may give about five cycles (approximately 2 minutes) of CPR before activating the emergency response system.4
Emergency Cardiovascular Life Support
 List the causes of sudden cardiac arrest (SCA).
 List the signs of SCA, heart attack, stroke, and foreign body airway obstruction.
 Describe how to perform cardiopulmonary resuscitation (CPR) on adults, children, and infants.
 State how to administer synchronized cardioversion.
 Describe how to evaluate quality and effectiveness of CPR.
 List the complications that can occur as a result of resuscitation of SCA.
 State when not to initiate CPR.
 Describe how to apply key adjunct equipment during advanced cardiovascular life support (ACLS).
 State common drugs and drug routes used during ACLS.
 Describe how to monitor patients before cardiac arrest, during CPR, and after cardiac arrest.
Causes And Prevention Of Sudden Death
Basic Life Support
Procedure
Adult
Child
Infant
Compressions
Where to check pulse (limit pulse check to <10 sec)
Carotid artery
Carotid or femoral artery
Brachial artery
Hand placement
Heel of one hand on sternum in center of chest, between nipples. Second hand on top of first with hands overlapped and parallel
Lower half of sternum with heel of one hand or with two hands (for larger children). Do not compress over xiphoid
Sternum with two fingers placed just below nipple line in center of chest
Compression-to-ventilation ratio
One or two rescuers 30 : 2
One rescuer 30 : 2; two rescuers 15 : 2
One rescuer 30 : 2; two rescuers 15 : 2
Cycles of compression-to-ventilation
5
5
5
Depth of compressions (push in hard and fast, allow chest to recoil fully)
2 in
At least one-third anteroposterior diameter of chest or 2 in (5 cm)
At least one-third anteroposterior diameter of chest or  in (4 cm)
Compression rate
100/min
100/min
100/min
Breathing
Obstructive procedure
Responsive: If mild, allow victim to clear the airway by coughing. If severe, repeat abdominal thrusts until foreign body is expelled, or the choking victim becomes unresponsive. Consider chest thrusts if abdominal thrusts are ineffective, if rescuer is unable to encircle victim’s abdomen, or if victim is in the late stages of pregnancy
Same as for adult
Responsive: If mild, allow infant to clear the airway by coughing. If infant is unable to make a sound (severe obstruction), deliver five back blows (slaps) followed by chest thrusts repeatedly until object is expelled or infant becomes unresponsive. Abdominal thrusts should not be done on infants because they may damage the largely unprotected liver
Unresponsive: Carefully move victim to the ground, immediately activate EMS system, and begin CPR, but look into the mouth before giving breaths. If a foreign body is seen, it should be removed. Follow ventilation with chest compressions
Unresponsive: Activate EMS system and begin CPR, but look into the mouth before giving breaths. If a foreign body is seen, it should be removed. Follow ventilation with chest compressions
Rescue Breathing
Palpable pulse, but no spontaneous breaths or inadequate breathing
10-12/min, 1 breath every 5-6 sec
12-20/min, 1 breath every 3-5 sec, if palpable pulse ≥60/min
20/min, 1 breath every 3 sec, if palpable pulse ≥60/min
Restoring Circulation
Determining Pulselessness
 Rule Of Thumb
Providing Chest Compressions
Adults
Children
Infants
Neonates
Restoring the Airway
Restoring Ventilation
Providing Artificial Ventilation
Mouth-to-Mouth Ventilation
Adults
Infants and Children
Mouth-to-Nose Ventilation
Mouth-to-Stoma Ventilation
One-Rescuer versus Two-Rescuer Adult Cardiopulmonary Resuscitation
 Rule Of Thumb
 Rule Of Thumb
 Rule Of Thumb
Automated External Defibrillation
Early Defibrillation
![]()
Stay updated, free articles. Join our Telegram channel

Full access? Get Clinical Tree


Emergency Cardiovascular Life Support