Cutdown Approach: Brachial, Femoral, Axillary, Aortic, and Transapical
Ronald P. Caputoa
G. Randall Green
William Grossman
a The contributions of Alessandro Giambartolomei and Paolo Esente to this chapter in prior editions are gratefully acknowledged.
Although once the dominant technical approach to cardiac catheterization and angiography, the brachial cutdown (or Sones) approach has decreased progressively in popularity over the past 40 years as the percutaneous femoral and, more recently, radial approaches described in Chapters 6 and 7 have risen to dominance. The brachial cutdown approach is now used in only a few (<1%) cardiac catheterization procedures, and the skills required for brachial arterial and venous cutdown and vascular repair are rapidly vanishing among the invasive cardiology community. Because this approach may still be of value in occasional patients, this chapter summarizes the technique as a guide for those learning to perform it, or as a refresher for those previously trained in the brachial approach who need to use this technique in a particular patient. The brachial cutdown approach, however, should not be used by an inexperienced operator unless backed up by a vascular surgeon or a cardiologist with expertise in this technique.
INDICATIONS
The brachial approach may be indicated for patients with (1) severe peripheral vascular disease, making upper extremity vascular access preferable; (2) urgent or emergent cardiac catheterization with an increased risk for bleeding (owing to chronic oral anticoagulation or recent thrombolytic therapy); (3) a need for early ambulation or mobility (outpatient procedures, severe back pain, and so on). Many of these situations can also be addressed by percutaneous radial artery catheterization (see Chapter 7), but the brachial cutdown approach can provide the following additional advantages: (1) the ability to obtain upper extremity arterial access in patients without a patent radial artery or with a contraindication to radial artery access; (2) reliable venous access to perform concomitant right heart catheterization in patients with suspected or known valvular heart disease, congestive heart failure, intracardiac shunts, and so on; (3) assured arterial access for 7F or greater catheter sizes; and (4) access to large veins to allow for foreign body retrieval (from the superior and inferior vena cava, right ventricle, or pulmonary artery).
Relative contraindications to brachial artery cutdown are few. They include absence of a brachial pulse, presence of an arteriovenous fistula, overlying soft tissue infection, severe ipsilateral axillary or subclavian vascular disease, and inability to extend the arm at the elbow or supinate the hand.
PREPROCEDURE EVALUATION
Proper preprocedure patient evaluation is critical for a successful brachial catheterization. Inspection and identification of the antecubital folds, biceps tendon, and medial and lateral epicondyles of the humerus takes only a few seconds but is essential. This inspection should be performed with the patient’s arm extended and the hand supinated to assess for the ability to position the arm properly for the procedure. The general location for arterial cutdown will be approximated 2 to 3 cm above the antecubital skin folds, slightly superior to the level of the humeral epicondyles, and medial to the
biceps tendon. A cutdown below this level is not recommended because the artery subsequently courses under the biceps tendons and bifurcates. A cutdown performed above this level is feasible, but may be awkward owing to the medial course of the artery.
biceps tendon. A cutdown below this level is not recommended because the artery subsequently courses under the biceps tendons and bifurcates. A cutdown performed above this level is feasible, but may be awkward owing to the medial course of the artery.
The brachial pulses should be carefully palpated bilaterally. A weak unilateral pulse usually indicates proximal vascular occlusive disease. Auscultation should be performed over the brachial, axillary, and subclavian areas to assess for bruits. A diminished pulse and/or bruits should lead the operator to anticipate proximal vascular occlusive disease and plan accordingly with consideration for a contralateral procedure, femoral access, or the use of soft and steerable guidewires. If a prior cutdown has been performed, the brachial pulse should be assessed 1 to 2 cm from the scar (to avoid the need to dissect through scar tissue with potential adhesions to the previous arteriotomy site), with the new cutdown preferably performed proximally to the previous one.
INCISION, ISOLATION OF VESSELS, AND CATHETER INSERTION
With the direct brachial approach, a single cutdown is made in the right antecubital fossa, through which both the brachial artery and vein can be isolated and used to perform left and right heart catheterization, respectively. With the arm fully extended flat on the armboard and the hand supinated, the brachial artery (Figure 8.1) is identified by palpation and local anesthesia is induced in the overlying soft tissues using 1% to 2% lidocaine. This is first injected intradermally through a short 25 or 27 gauge needle to raise a bleb and then deeper using a long (1.5 inch) 22gauge needle to infiltrate the subcutaneous, deep fascial, and periosteal tissues. Liberal amounts of 2% lidocaine are injected, 5 to 15 mL initially. During the course of the procedure, an additional four 4 mL aliquots of lidocaine may be applied topically within the incision. If anesthesia is achieved properly, the catheter insertion site ought to be virtually painless throughout the procedure.
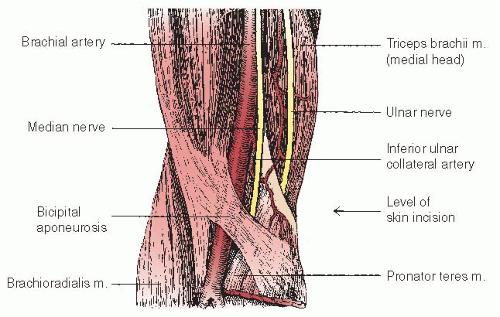 Figure 8.1 Anatomy of antecubital fossa illustrating course of the brachial artery. The artery is best sought at or slightly above the antecubital skin crease, medial to the bicipital aponeurosis. Care must be taken not to disturb the median nerve, which usually lies medial to the brachial artery. (From Clemente, C. Gray’s Anatomy of the Human Body, 30th American ed. Philadelphia, PA: Lea & Febiger; 1985.) |
Prior to starting the procedure, the proper instruments should be on hand, including the following: a no. 15 blade with handle, a no. 11 blade without a handle (or with a short handle) for improved control during arteriotomy, two or three curved hemostats, two straight hemostats, one self-retaining retractor, two soft tissue retractors, one small scissors, one needle holder, one toothless forceps, one small forceps, two segments of umbilical tape or vascular loops, 6.0 Prolene suture on a 3/8 inch needle, 3-0 absorbable suture with a curved needle, silk or chromic ties, and a vein lifter. These items are sufficient for almost all cases (Figure 8.2).
A transverse incision is made with a no. 15 surgical blade just proximal to (i.e., approximately 2 cm above) the flexor crease. If right and left heart catheterization is contemplated, the incision is wide and made over the palpable brachial artery; if a right heart study alone is planned, the incision is narrow and made directly over a previously identified medial vein. Even large veins of the lateral antecubital fossae usually drain into the cephalic system, through which it may be difficult to navigate the catheter into the right atrium, whereas the medial veins drain into either the basilic or brachial venous systems (which join the axillary vein by direct continuation and thus provide the easiest routes to the superior vena cava (SVC) and right atrium (Figure 8.3).
The operator performs blunt dissection through the subcutaneous fat with a curved hemostat, simultaneously
performing lateral retraction, while the assistant retracts medially. As the handheld retractors are applied to the lateral ends of the incision, the self-retaining retractor is applied superoinferiorly. This provides optimal exposure, particularly when substantial amounts of adipose tissue are present. After the fascia overlying the brachial artery is exposed, the artery is palpated again and blunt dissection through the fascia is then performed immediately overlying or lateral to the artery. This further decreases the chance for median nerve injury. When the artery is partially exposed, dissection is continued to separate the artery from adjacent veins and other structures.
performing lateral retraction, while the assistant retracts medially. As the handheld retractors are applied to the lateral ends of the incision, the self-retaining retractor is applied superoinferiorly. This provides optimal exposure, particularly when substantial amounts of adipose tissue are present. After the fascia overlying the brachial artery is exposed, the artery is palpated again and blunt dissection through the fascia is then performed immediately overlying or lateral to the artery. This further decreases the chance for median nerve injury. When the artery is partially exposed, dissection is continued to separate the artery from adjacent veins and other structures.
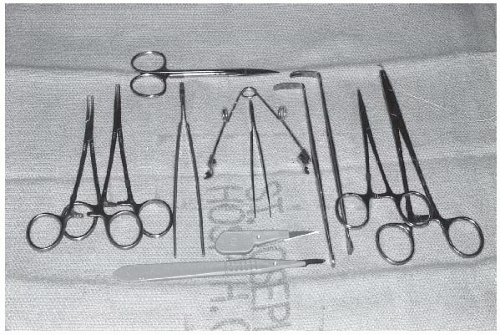 Figure 8.2 Instruments used for brachial cutdown: two Halstead curved 5 inch mosquito hemostats, one Halstead straight mosquito 5 inch hemostat, one thumb dressing 6 inch forceps without teeth, one straight iris forceps without teeth, one short-handled scalpel (no. 11 blade), one long-handled scalpel (no. 15 blade), one Grieshaber wire self-retaining retractor, two Davis double-end soft tissue retractors, one straight 4 inch iris scissors, and one Halsey 5 inch needle holder. All except scalpels are from Pilling Instruments, Washington, PA. |
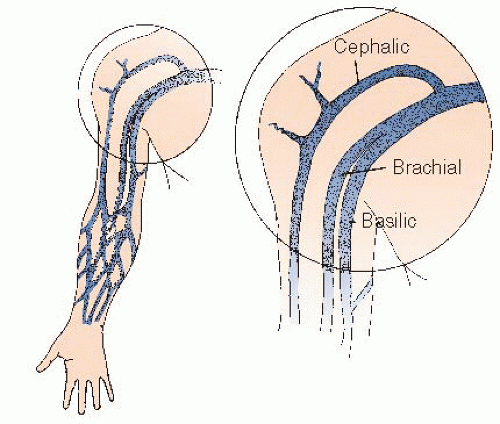 Figure 8.3 Venous anatomy of the arm. Brachial and basilic veins are medial to the cephalic vein within the antecubital fossa. Note that the brachial and basilic veins continue directly into the axillary and subclavian system, whereas the cephalic system frequently joins the subclavian vein at a right angle. Passage of a catheter from the cephalic system to the right atrium may thus be quite difficult; the medial veins provide the straightest pathway. |
At this point, the artery is easily recognized by its pulsation and characteristic silvery white color. Veins, in contrast, are nonpulsatile, much darker in color, and usually of smaller caliber. The median nerve is yellowish with a slightly corrugated surface, and should not be further manipulated. A few patients have an accessory brachial artery, which is smaller and usually not suitable for catheterization. This vessel has a more superficial course and generally is not surrounded by veins, but deeper palpation will often reveal the location of the true brachial artery. The tissues are separated by blunt dissection with a curved Kelly forceps, and an appropriate vein is brought to the surface, separated from adjacent nerves and fascia, and tagged proximally and distally with a loop of 3-0 or 4-0 silk suture material. The brachial artery is similarly brought to the surface with a curved Kelly forceps, isolated from adjacent nerves, veins, and fascia, and tagged proximally and distally with moistened umbilical tape or silicone-elastomer surgical tape (Retract-o-tape, Med-Pro Division, Quest Medical, Dallas, TX; Figure 8.4).
After isolating the brachial artery and basilic or brachial vein, an appropriate right heart catheter is selected and flushed. A 1 to 2 mm longitudinal incision is made in the vein with a no. 11 blade, and the catheter is introduced with the aid of either curved tissue forceps or a small plastic catheter introducer. Alternatively, the vein may be placed over a bridge formed by straight forceps to enable better control and to diminish oozing during passage of the catheter. Once the catheter has been introduced and passed a short distance, blood is aspirated, and the catheter is again flushed with heparinized solution. The catheter may then be connected either directly or by means of flexible plastic tubing to the side port of a manifold with an appropriate pressure transducer (see Chapter 10).
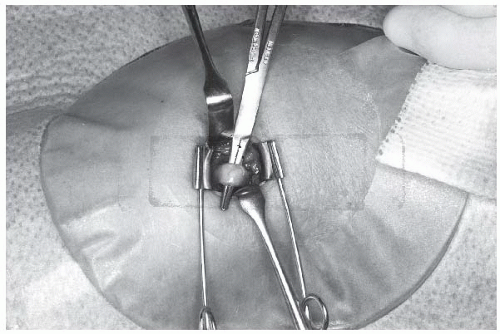 Figure 8.4 Isolation of the brachial artery. The incision is held open superoinferiorly by the self-retractor and laterally by the manual retractors while a curved hemostat is manipulated underneath the artery. |
After passage of the right heart catheter (discussed below), the brachial artery is cleaned and positioned by applying gentle pressure on the hemostats or umbilical tapes using thumb and index finger to stretch the artery longitudinally (Figure 8.5). This maneuver is critical because it allows for arterial positioning, stabilization, and (with adequate tension) excellent hemostatic control. Most operators incise it transversely by making a small (2 mm) nick in its anterior surface with a no. 11 surgical blade. Others favor a longitudinal arteriotomy with the no. 11 surgical blade held at a 30° angle to the artery and the sharp edge facing upward (toward the ceiling) to minimize risk of injury to the posterior wall. The longitudinal direction requires a more cautious repair to avoid narrowing the lumen.
An appropriately selected left heart catheter (see the following section) is flushed. Tapered tip catheters, such as the Sones or multipurpose ones, can be inserted without a sheath (Figure 8.6), but a sheath may be preferable when multiple catheter exchanges are planned or when catheters with a nontapered tip, such as guiding catheters for percutaneous coronary interventions, are used. To minimize the risk for arterial dissection during insertion of a relatively rigid arterial sheath, it should be introduced over a wire and carefully aspirated and flushed after insertion.
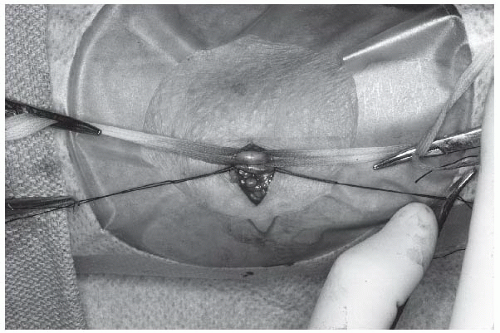 Figure 8.5 Isolating and securing the brachial artery and adjacent vein. The brachial artery is secured superiorly and inferiorly with moistened umbilical tapes fixed with curved hemostats. The isolated segment of vein is secured in similar fashion with 4-0 suture. |
Many laboratories administer heparin solution (e.g., 50 units/kg) to help prevent thromboembolic events to the hand. This can be given into the distal brachial artery, central aorta, or intravenously.
CATHETER SELECTION
Right Heart Catheters
When right heart catheterization is being performed only for measurement of right atrial, right ventricular, pulmonary artery, and pulmonary capillary wedge pressures, any
of the end-hole catheters is adequate. Classic woven Dacron right heart catheters (e.g., Goodale-Lubin and Cournand, Figure 8.7) have now been replaced by flow-directed balloon flotation catheters. Passage of the right heart catheter may occasionally produce transient right bundle branch block. Should this occur in a patient with preexisting left bundle branch block, bilateral or complete heart block will develop and may require emergency ventricular pacing. If right-sided angiography is planned, a closed-end catheter with multiple side-holes can be used (see Chapter 17).
of the end-hole catheters is adequate. Classic woven Dacron right heart catheters (e.g., Goodale-Lubin and Cournand, Figure 8.7) have now been replaced by flow-directed balloon flotation catheters. Passage of the right heart catheter may occasionally produce transient right bundle branch block. Should this occur in a patient with preexisting left bundle branch block, bilateral or complete heart block will develop and may require emergency ventricular pacing. If right-sided angiography is planned, a closed-end catheter with multiple side-holes can be used (see Chapter 17).
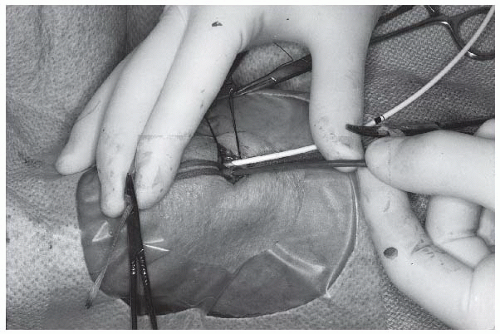 Figure 8.6 Insertion of an 8F Sones I catheter (Cordis Corp., Miami, FL) into the brachial artery during gentle retraction exerted by the thumb and index finger on umbilical tapes to control bleeding. A 7F balloon-tipped Swan-Ganz catheter has already been placed into the adjacent vein. |
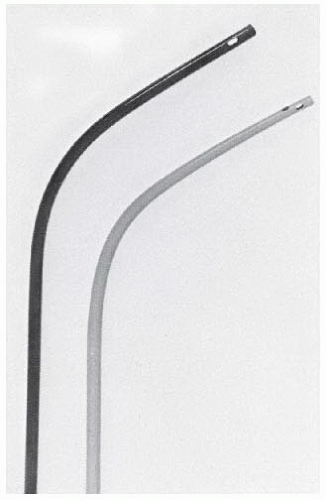 Figure 8.7 Useful traditional catheters for right and left heart catheterization. (Left) The Goodale-Lubin catheter has an end-hole and two side-holes and is ideal for right heart catheterization, including measurement of pulmonary capillary wedge pressure. (Right) The polyurethane Sones catheter tapers to a 5F tip with an end-hole and four side-holes; it is useful for coronary angiography and for left ventriculography (at low flow rates). |
Left Heart Catheters
When the direct brachial approach is used, potential catheters include both open-end and closed-end multiple side-hole designs (used for left ventricular pressure measurement and angiography). The classic Sones B or a multipurpose catheter can also be used for most coronary and left ventriculographic purposes, although they tend to recoil at injection rates greater than 8 mL/second and have to be positioned carefully within the left ventricle to avoid myocardial staining. Thus, from a safety perspective, it is preferable to use pigtail catheters for left ventriculography. In addition, pigtail catheters (6F or 7F) should be used whenever contrast flows greater than 10 mL/second are needed.
Coronary angiography can usually be completed with the Sones catheter. Alternatively, Castillo or Amplatz 1, 2, or 3 type curves are available (Cordis Corp, Miami, FL) and are very useful for angiography of coronary artery bypass grafts, coronary engagement in patients with large aortic roots, and in situations where more forceful torque must be applied (see below). The Sones A type curve is also useful for patients with a high takeoff of the left coronary artery. Multipurpose type I and type II catheters have applications generally similar to the Sones. From the right brachial approach, the femoral mammary catheter is adequate for angiography of the right internal mammary artery, whereas the brachial mammary catheter or a multistep approach (1) gaining access to the left subclavian artery with a Castillo or Amplatz catheter; 2) advancing an exchange wire into the axillary artery; and 3) exchanging for the femoral mammary catheter) is required for angiography of the left internal mammary (see below).
ADADVANCING THE RIGHT HEART CATHETER
Both right and left heart catheters should be advanced as soon as possible after introduction into the vascular system, because letting them sit in the bloodstream at body temperature may result in loss of catheter stiffness and also diminishes catheter control. The right heart catheter is advanced under fluoroscopic control to the SVC. If a balloon-tip catheter is used, advancement is generally straightforward. However, if the cephalic vein is entered rather than the brachial vein there may be resistance due to the angle of entry at the level of the subclavian vein. If there is difficulty entering the subclavian vein/SVC, it is sometimes helpful to try the following maneuvers: have the patient take a deep breath; raise the right arm and shoulder toward the head (ask the patient to shrug his or her right shoulder); turn the patient’s head to the extreme left; remove the patient’s pillow. On occasion, a guidewire may be helpful in passing from the subclavian vein into the SVC. Arterial or venous spasm may develop and inhibit catheter movement. It may resolve if the catheter is with-drawn by a distance of 10 to 20 cm, and the same cocktail of intravenous nitroglycerine and verapamil or other calcium channel blockers may be administered as used in radial artery catheterization. Intravenous papaverine (30 to 60 mg) may also be efficacious (note, it should never be given intraarterially because of intense local pain). Persisting in attempts to advance or manipulate the catheter in the presence of spasm produces pain, vagal reactions, and hypotension, and may convert a minor problem into a large one including dissection of the artery.
When the catheter tip has been advanced to the SVC, the operator should draw a blood sample for oximetry. If the SVC blood oxygen saturation is substantially lower than the pulmonary artery oxygen saturation, a full oximetry run should be done (Chapter 12). If a nonballoon catheter is used, a J loop technique should be initially tried to pass from the right atrium to right ventricle and pulmonary artery. The catheter is advanced so that its tip catches on the lateral right atrial wall and the catheter looks like the letter J on fluoroscopy (Figure 8.8). Next, the catheter is rotated counterclockwise so that the tip of the J sweeps the anterior right atrial wall (thus avoiding the coronary sinus, whose ostium lies posterior to the tricuspid valve) and jumps across the tricuspid valve into the right ventricle. Because the catheter usually still retains its J curve, its tip will now be pointing toward the right ventricular outflow tract and can easily be advanced into the pulmonary artery. Right ventricular pressure may be recorded during the transit or subsequently during the catheter pullback. It should never, however, be advanced against resistance, since perforation of the right ventricular outflow tract can occur.
The catheter is then advanced to the “wedge” position by having the patient take a deep breath and hold it while the catheter is advanced until its tip will go no farther and ceases to pulsate with the heart. Having the patient cough at this time will frequently advance the catheter tip into a true wedge position. The pressure waveform is examined, and if it has the appearance of a true wedge pressure, it is recorded. If there is any doubt that a true wedge position has been achieved, blood is sampled from the catheter. The pressure is confirmed as a true wedge pressure only if blood that is completely (≥95) saturated with oxygen can be aspirated gently from the catheter.1 In patients who are hypoxemic, a wedge blood oxygen saturation of 90% or more may be accepted, especially if the oxygen saturation of pulmonary artery blood is much lower (e.g., ≤70). When mitral stenosis is not expected to be present, the wedge pressure may be confirmed simply by observing its typical waveform and its match against the simultaneously recorded left ventricular diastolic pressure. After measuring (and possibly confirming) the wedge pressure, the right heart catheter is withdrawn into the pulmonary artery. There has been substantial debate on the usefulness of pulmonary capillary wedge pressure as a measure of pulmonary venous and left atrial pressure (2, 3, 4, 5, 6, 7, 8, 9, 10). In general, most studies have reported excellent agreement between left atrial and mean pulmonary capillary wedge pressure (2, 3, 4, 5, 6, 7, 10).
Stay updated, free articles. Join our Telegram channel

Full access? Get Clinical Tree


