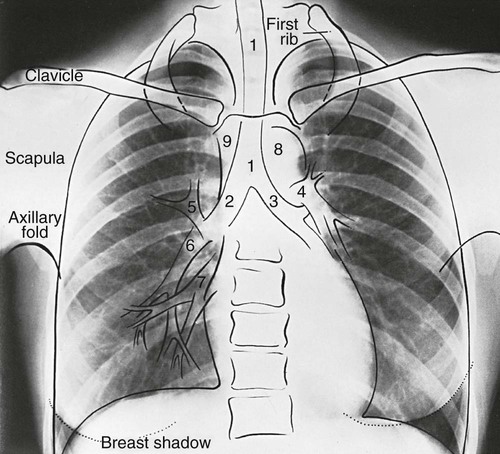
1. Demonstrate a systematic review of a chest radiograph. 2. Evaluate the normal anatomic structures seen on a chest radiograph. 3. Describe common radiographic abnormalities. As a respiratory therapy student, you develop and improve assessment skills by examining every patient you come in contact with. This same rigor should be applied to becoming proficient in interpreting a chest radiograph. Students are not expected to be experts in interpreting a chest radiograph. But, normal chest radiographic findings along with common abnormalities associated with pulmonary pathologies should be recognizable. Figure 10-1 illustrates normal chest radiographic findings. Although no single perfect way to interpret a radiograph exists, you must find your own technique and stick to it. Consistency with your approach to the interpretation of radiographs will help to ensure that you will not be tempted to focus on just the obvious and fail to notice a subtle detail that will be essential to a patient’s diagnosis and treatment. Although it is the physician who orders a radiograph, the respiratory therapist (RT) is frequently the health care team member who conducts patient assessment on the mechanically ventilated patient and notices a need for a radiograph. Indications for obtaining a chest radiograph are given in Box 10-1. This chapter summarizes a basic technique for interpreting chest radiographs. 1. Confirm the patient’s name and the date the chest radiograph was taken. 2. Identify the type of radiograph: 3. Look for markers, and note the position of the patient: 4. Evaluate the quality of the radiograph: a. Ensure that the trachea is visible and in midline. b. Ensure that the trachea gets pushed away from abnormality such as a pleural effusion or tension pneumothorax. c. Ensure that the trachea gets pulled towards abnormality such as atelectasis. d. Ensure that the trachea normally narrows at the vocal cords. 6. Evaluate the cardiac silhouette: a. Look at size of the heart, and estimate the cardiothoracic ratio (width of heart to the thoracic is normally less than 1 : 2). b. Check whether the silhouette is appropriate or blunted. c. If a thin rim of air is present around the heart, think of pneumomediastinum. 8. Evaluate the hemidiaphragms and lung edges: d. Costophrenic angle (Note: Effusions cause blunting.) e. Right hemidiaphragm (Note: Should be higher than the left.) f. If much higher, think of effusion, lobar collapse, and diaphragmatic paralysis. g. If you cannot see parts of the diaphragm, consider infiltrate or effusion.
Chest Radiography Interpretation

» Skill Check List
10-1 Interpreting Chest Radiographs
Implementation


