7 Arterial and Venous Access
 Considerations for Choosing the Correct Access
Prior to the cardiac catheterization the operator should determine the sites of arterial and venous access. This is preceded by inspection and palpation of alternative puncture sites as well as the planned puncture site and the palpation of all peripheral arteries. Reports from prior catheterizations are important so as to avoid possible difficulties a previous operator may have encountered.
A frequently used access site for cardiac catheterization is the common femoral artery and, if required, the common femoral vein. This access route allows a fast, and usually unproblematic, engagement and visualization of the coronary arteries and the left ventricle; in addition, all diagnostic steps during a right heart catheterization including transseptal puncture can be conveniently achieved via this site. Access via the radial artery is a very elegant alternative when only coronary angiography or coronary intervention is planned. It has the advantage of needing no postprocedure immobilization.
For interventions, a femoral, radial, or brachial access can be used. A significant factor in choosing the vascular access is the size of the guiding catheter required for the intervention.
If possible, patients with peripheral arterial disease, especially if the pedal pulses cannot be palpated and femoral pulses are absent or only weak, should be examined via the radial artery or the brachial artery. Even if cardiac catheterization from the femoral artery should be feasible, the procedure could worsen the arterial perfusion of the legs, for example, due to intimal injuries or due to embolic complications. Ideally, patients with known abdominal aortic aneurysm should also be examined from the arm. The same is true for patients with a femoral graft even though in most cases puncture of the prosthesis is successful and without adverse sequelae.
Occasionally a marked kinking of the iliac arteries or aorta can impede the control of the catheter and correct placement of the catheter. The operator can then use the radial artery as an alternative. This problem usually cannot be predicted and is only recognized during the first catheterization via the femoral artery.
Further reasons to choose the brachial or radial artery for access are inflammatory skin conditions or marked scarring in the groin.
As noted, an essential advantage of the nonfemoral access is that the patient does not need to be immobilized after catheterization. This technique can therefore be used in patients in whom confinement in bed, even though limited, should be avoided. Radial access is especially favored when the cardiac catheterization is done on an outpatient basis.
 Instruments
Puncture needles. These are beveled metal cannulas with or without a Teflon sleeve. They are used for the initial vessel puncture and the introduction of the appropriate guidewires (Seldinger technique). There are specific puncture needles for the radial artery.
Guidewires. Guidewires have the following functions in cardiology:
 Guiding the sheath through the subcutaneous tissue
 Intravascular catheter guidance
 Support in catheter positioning
 Providing a placeholder during catheter exchange
The diameter of guidewires is specified in inches (1 inch = 1 in. = 2.54 cm). Standard wires in adult cardiology have a diameter of 0.035 in. (0.89 mm) to 0.038 in. (0.97 mm). The guidewire should be at least 20 cm longer than the catheter; the standard length in adults is 145 cm. If the guidewire is used as a placeholder during catheter exchange, the portion of the guidewire outside the patient has to be longer than the catheter to be exchanged (length up to 300 cm). However, there are also short (45 cm) wires that are used only to introduce the sheath.
In general, every guidewire for intravascular use has a soft and flexible end and a stiff end. The stiff end must not be introduced into the vascular system.
The flexible end may have a J-shaped or a straight tip configuration. The J-configuration is preferred, because a straight tip increases the risk of dissection and perforation, especially in highly tortuous atherosclerotic arteries.
Most wires are Teflon coated to reduce friction; others (e.g., Terumo glidewire) have a special coating of hydrophilic polymers and therefore exhibit very low friction resistances.
Introducer sheaths. Introducer sheaths aid in the introduction of catheters into the vascular system. They have a plastic membrane that serves as a valve in the hub, which prevents the extravasation of blood during catheter exchange. The sheath is flushed via a side connection to prevent thrombus formation. Introducer sheaths are available in different sizes (4F–18F) and different lengths. Standard length is 12 cm. Long sheaths are preferred especially when marked vessel kinking is present, and they should be available in every catheterization laboratory.
Arterial Access
Techniques and General Approach
Local anesthesia. After palpation of the artery, local anesthesia is provided with lidocaine 1 %. First a superficial infiltration of the skin is made with 2 to 3 mL of the local anesthetic, after which the subcutaneous tissue down to the artery is infiltrated slowly with repeated aspirations. The amount of local anesthetic needed to achieve sufficient anesthesia depends on the access site: For puncture of the radial artery, 2 mL via a 26-gauge needle is frequently sufficient; for femoral access usually 15 to 20 mL is administered via a 20-gauge needle. For radial artery access, local anesthesia can also be achieved using an occlusive dressing with a local anesthetic; for example, EMLA cream (emulsion with lidocaine 2.5 % and prilocaine 2.5 %). This will avoid the local bleb and simplify the puncture.
 Do not inject the local anesthetic into the artery. Injection into the adjacent nerve should also be avoided due to the risk of long-lasting local paresthesias.
The local anesthetic requires ~2 to 3 minutes to take effect. This is an important consideration as the arterial puncture is the only painful part of cardiac catheterization and will remain in the patient’s memory. A painful puncture and introduction of the sheath can cause both a vasospasm and a marked vasovagal reaction. Both prolong the duration of the examination and can potentially cause other avoidable complications.
Arterial puncture. The application of the local anesthetic is followed by cutaneous stab incision with a pointed scalpel. The original technique with puncture of the anterior and posterior wall according to Seldinger is no longer used. Less traumatic is the single wall puncture technique, in which the needle penetrates only the anterior wall of the artery (Fig. 7.1). The puncture needle (size 1.4 × 70 mm) is advanced into the artery until pulsating blood appears. Subsequently, the guidewire is advanced through the cannula into the artery. Puncture of the posterior vessel wall must also be avoided when using a vascular closure device (see below).
Weak backflow of blood through the cannula can have the following causes:
 Cannula only partially in the vessel lumen
 Occlusion or severe stenosis of the artery
 Vasospasm
 Accidental puncture of the adjacent vein
 Hypotension due to vasovagal reaction
 Polycythemia vera
 Puncture of a perivascular hematoma or a pseudoaneurysm
During the puncture a decrease in the initially brisk blood flow is occasionally observed. In most cases the reason is that the cannula has been advanced too far, so that it partially penetrates the posterior wall of the artery. Retracting the cannula ~1 to 2 mm usually solves this problem.
With the radial technique, puncture of the posterior vessel wall often cannot be avoided. However, this is usually not a problem because of the very small puncture needle used.
Advancing the guidewire. Once the puncture needle is reliably in the vessel lumen, the guidewire is advanced carefully into the artery. Guidewires with flexible J-shaped tips (diameter 0.038 in. [0.97 mm]) are the least traumatic. Often preformable sheath sets with short (45 cm) guidewires are used, but it is also possible to use the longer guidewire (145 cm) intended for the cardiac catheters from the start. Advancement of the guidewire must occur without any resistance, and it should be painless. If advancement is problematic, proper location of the puncture needle should first be ascertained—if it is touching the posterior wall, slight retraction of the cannula usually allows for successful advancement of the guidewire.
If, despite correct intraluminal positioning, it is not possible to advance the guidewire, the local vascular status (stenosis, occlusion, dissection?) can be visualized by administration of contrast media via the cannula and fluoroscopy. It can then be determined whether it makes sense to continue the procedure via this access site.
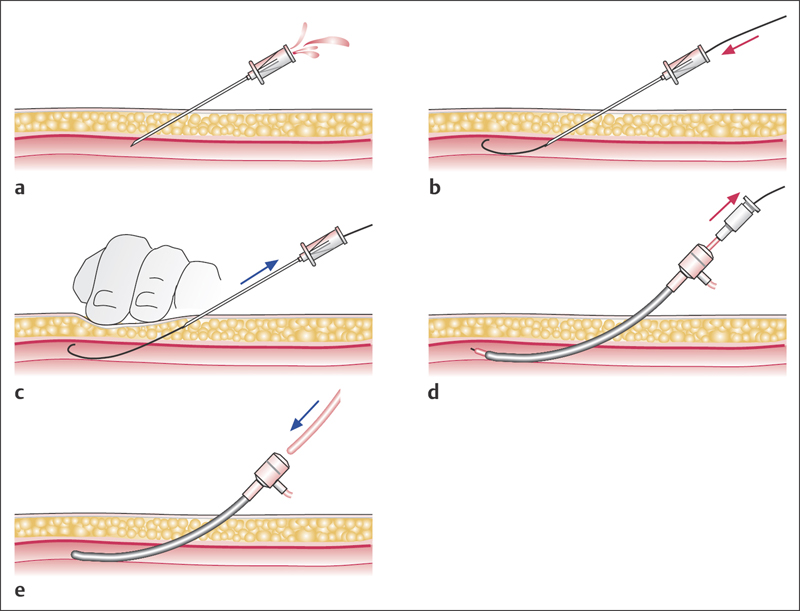
Fig. 7.1 a–e Single wall puncture technique with sheath introduction.
a The puncture cannula is advanced into the artery until pulsating blood exits.
b The guidewire is then advanced into the artery via the cannula.
c The cannula is removed under compression of the puncture site.
d The sheath is advanced with the dilator inserted.
e After removal of the dilator, a catheter can be inserted into the artery.
If initially the guidewire can be advanced easily into the artery for a few centimeters and then resistance is noted that precludes advancing the wire further, a possible cause other than local stenosis or vessel occlusion is dissection of the vessel wall with intramural location of the guidewire. In the case of dissection, it is not possible to turn the J-tip any further and the tip straightens when the guidewire is retracted. Occasionally, retracting the guidewire under fluoroscopy will help to identify the entry into the dissection, which then can be circumnavigated by careful manipulation. If this is not successful, an alternative access route has to be chosen. If the dissection starts at the puncture site, then the site has to be sufficiently compressed after removal of the guidewire and cannula before the next puncture.
Extensive atherosclerotic wall changes can also inhibit advancement of the guidewire without a stenosis or a dissection being present. In such cases the use of guidewires with polymer coating is recommended. These have extremely low friction values and can therefore facilitate the negotiation of highly atherosclerotic segments.
After placement of the guidewire, the catheter sheath with inserted dilator is advanced (Fig. 7.1d). Sheath size depends on the anticipated catheter size and vessel size. Most of the time a slight resistance has to be overcome. Occasionally slight rotation can facilitate insertion. After introduction of the sheath, the dilator is removed, 2 to 3 mL of blood is aspirated via the side arm, and subsequently the sheath is flushed with 5 to 10 mL of heparinized saline solution. If the location is uncertain, contrast medium can be administered via the hub of the sheath. In addition, 2,500 to 5,000 IU of heparin are administered.
Puncture of the Femoral Artery
 Indication
The femoral artery is a standard access for left heart catheterization, for coronary angiography, for coronary intervention, and for the remainder of the arterial system.
 Positioning
The patient is supine with a slight external rotation of the leg.
 Puncture Site
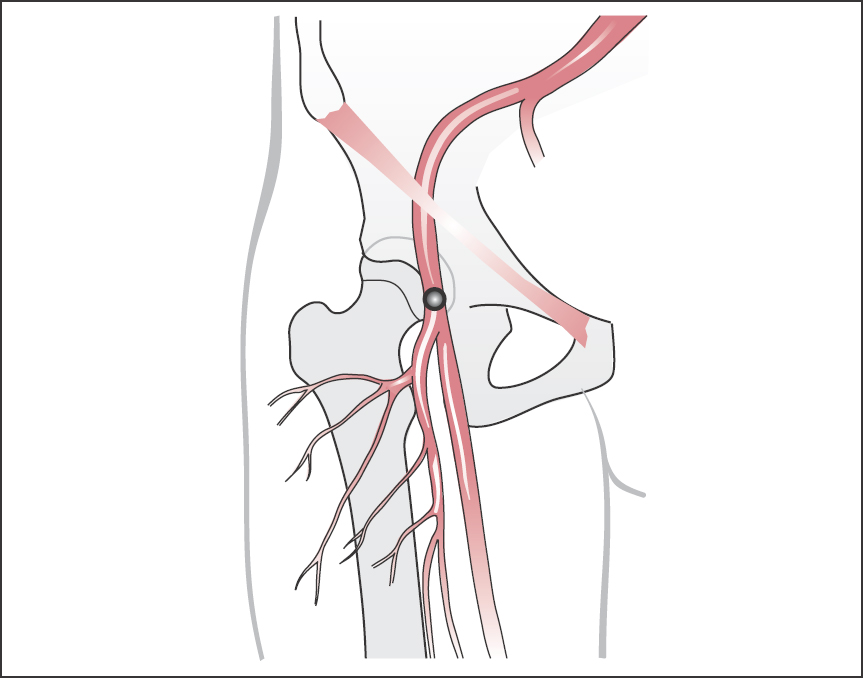
In the subinguinal region the femoral artery lies 2 to 5 cm below the skin (Fig. 7.2). The artery has a diameter of ~1 cm. Medial to the artery is the femoral vein; lateral to it is the femoral nerve. Puncture of the artery is done 1 to 2 cm below the inguinal ligament (connecting line between anterior superior iliac spine and pubic bone) so that one is safely in the common femoral artery. Skin incision should be 1 to 2 cm more distal. The femur head can serve as a bony anatomical landmark, and also serves as a buttress for the compression of the artery after completion of the catheterization.
 Puncture Technique
The puncture needle is advanced at an angle of ~30 to 45° to the skin and in the direction of the course of the artery proximally.
 Too steep a puncture (> 45°) can complicate advancement of the guidewire and also lead to kinking of the arterial sheath or the catheters. Importantly, the artery should be punctured medially as puncture of the lateral wall makes introduction of the guidewire as well as subsequent hemostasis more difficult.
 Too proximal a puncture (at the level of or proximal to the inguinal ligament) increases the risk of retroperitoneal hematoma.
 Too distal a puncture increases the risk of arteriovenous fistula formation (crossing of femoral artery and deep femoral vein). In addition, accidental puncture of the superficial femoral artery or profunda femoris artery may occur.
 Troubleshooting
Repeated catheterizations. It is not at all uncommon that patients with coronary artery disease have to undergo repeated cardiac catheterizations, which requires repeated punctures of the femoral artery. Subcutaneous scar tissue can complicate both the puncture and especially the sheath introduction. If necessary the puncture site can be enlarged with a special dilator. When sheath introduction is difficult, it is important to keep the guidewire straight and under tension to avoid kinking the wire at the tip of the sheath.
Puncture after vascular surgery.
Stay updated, free articles. Join our Telegram channel

Full access? Get Clinical Tree


