2 Arterial and Venous Access
The Radial Versus Femoral Vascular Access Debate
In several large studies, femoral access had higher procedural success rates (in Brueck et al, 97% transradial, 99.8% transfemoral, p < .0001) and shorter procedure times (40 vs. 37 minutes, p = .046), and slightly more radiation exposure (42 vs. 38 Gycm2). However, vascular complications were higher despite the use of femoral vascular access closure devices with six times the vascular access site complications (3.7% vs. 0.6%, p = .0008). Thus the greatest advantage of the radial approach is reduced bleeding and vascular access complications (for radial approach, the worst of being loss of radial artery pulse ranging from 3% to 9%), which have been associated with a mortality benefit. Despite this advantage, radial access is still only slowly being adopted in the United States with reports of its use range from less than 2% to 7%. Occasional radial operators using the technique only when pressed have a lower procedural success and higher rates of arterial spasm necessitating the conversion to the femoral approach or prolonged trials of antispasm regimens and tincture of time.
Femoral advocates argue that (1) fellows-in-training need to learn the femoral access approach first; (2) patients with prior bypass surgery and left internal mammary artery (LIMA) require either a femoral or a left-sided approach; (3) femoral access is faster; (4) femoral bleeding is reduced with vascular closure devices (VCDs) (and low in their individual laboratories); (5) there are more options for percutaneous coronary intervention (PCI) guide catheter sizes and support devices, like intra-aortic balloon pump (IABP); (6) the postprocedure radial artery may not be suitable for coronary artery bypass graft (CABG) surgery; and (7) the radial approach is not great for a highly tortuous subclavian system, a small and vasospastic radial artery, or forearm anatomic variants (e.g., an ulnar loop) and if not done carefully has the potential for a cerebrovascular event. Although seemingly reasonable arguments, most technical radial problems can be overcome with experience and persistence much like that required conquering the occasional difficulties encountered in the femoral approach. Superior operators and laboratories should be very good at both approaches. For the best outcomes, femoralists should become better radialists and vice versa. Radial operators would argue that fellows trained on both femoral and radial access are superior in their catheter manipulation skills. The invasive cardiologist, like other procedure specialists, should be performing the best procedure for the appropriate patient, which in turn has the best outcomes, lowest complications, lowest cost, and most patient comfort (Table 2-1). For this reason we recommend, “radial first then femoral” access whenever possible (Fig. 2-1). The new generation of catheterization laboratory operators should be able to do procedures from both approaches with the same facility and safety.
Table 2-1 Comparison of Femoral and Radial Access for Cardiac Catheterization
| Feature | Femoral | Radial |
|---|---|---|
| Access site bleeding | 3%-4% Pseudoaneurysm, retroperitoneal bleed, AV fistula, painful hematoma | 0-0.6% |
| Artery complications | Rare local irritation, pulse loss 3%-9% | |
| Patient comfort | Acceptable | Great |
| Ambulation | 2-4 hr | Immediate |
| Extra costs | Closure device | Band |
| Procedure time* | Perceived shorter | Perceived longer |
| Estimated radiation exposure* | Perceived shorter | Perceived longer |
| Access to LIMA | Easy | Hard from RRA |
| Use of artery for CABG | n/a | Unknown |
| Learning curve | Short | Longer |
| >8 F guide catheters | No problem | Maximum 7 F (in men) |
| PVD, obese | Problematic | No problem |
AV, Arteriovenous; CABG, coronary artery bypass graft surgery; LIMA, left internal mammary artery; PVD, peripheral vascular disease; n/a, not applicable; RRA, right radial artery.
Modified from Kern MJ, editor: Editor’s corner: radial artery catheterization: the way to go, Cath Lab Digest pages 4-5, July 2009.

Radial Artery Catheterization
Compared with the femoral artery, the radial artery is easily accessible in most patients and is not located near significant veins or nerves. The superficial location of the radial artery enables easy access and control of bleeding. No significant clinical sequelae after radial artery occlusion occur in patients with a normal Allen’s test because of the dual blood supply to the hand through the ulnar artery. Lastly, patient comfort is enhanced by the ability to sit up and walk immediately after the procedure.
Use of the Allen’s Test
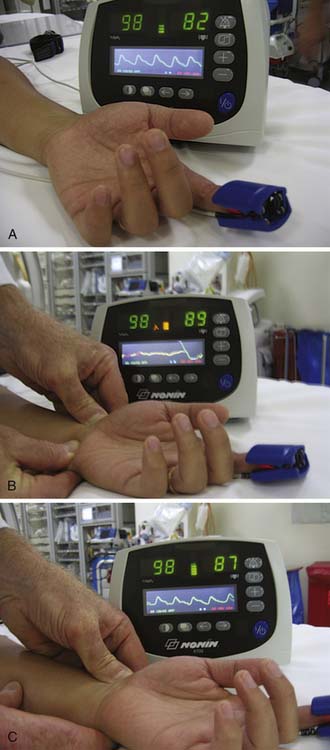
A recommendation for the radial procedure is the performance of the Allen’s test. The Allen’s test assesses ulnar flow and is performed as follows: The patient makes a fist. The radial and ulnar arteries are occluded simultaneously. When the hand is opened, it appears blanched. Release of the ulnar artery should result in return of pink hand color within 8 to 10 seconds. Satisfactory ulnar flow can also be documented by pulse oximetry. Using the pulse oximeter, the pulse wave is displayed with both arteries open. The radial artery is then compressed and the pulse wave of ulnar flow observed. A reverse Allen test can also be performed by occluding the ulnar artery and is recommended for patients with a history of previously accessed radial arteries either for catheterization or for arterial blood gases. The results of the oximetric Allen test are divided into three grades of wave forms during radial artery occlusion: type A, no change in pulse wave; type B, a damped but distinct pulse wave; and type C, loss of phasic pulse waveform. Radial artery cannulation can proceed with either type A or B and is not recommended for type C (Fig. 2-2).
Patient Preparation
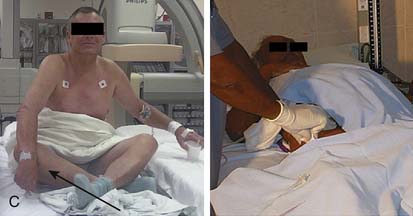
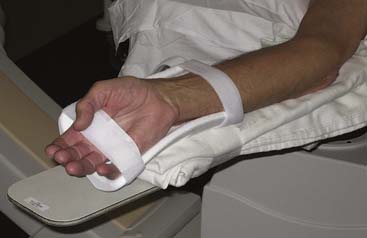
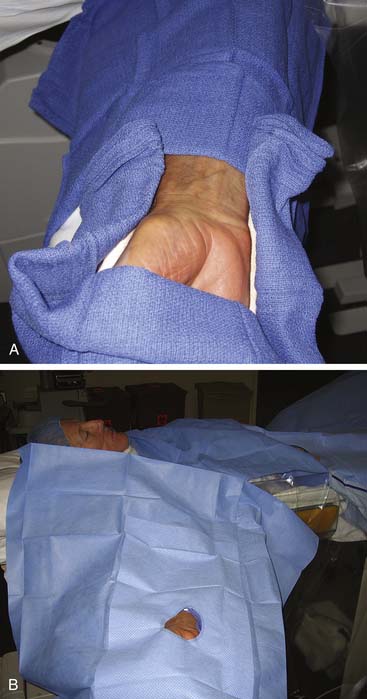
The patient should be well sedated and comfortably positioned. Several positioning techniques have been suggested. Arm abduction at a 70-degree angle on an arm board or placement immediately next to the femoral access site has been used for sheath insertion. A movable arm board allows the arm to be positioned at the patient’s hip next to the femoral artery during the procedure, while the placement next to the leg allows decreased operator radiation exposure and removes the need for specialized drapes. A roll of sterile towels is used to support and flex the wrist in a hyperextended position (Figs. 2-3 and 2-4). A topical anesthetic cream placed over the planned puncture site early in the patient preparation area helps to decrease the amount of local lidocaine infiltration over the radial pulse, and small amounts of nitroglycerin added to lidocaine for topical infiltration may also reduce spasm. Large amounts of lidocaine may obscure the pulse and make cannulation more difficult.
Equipment Selection
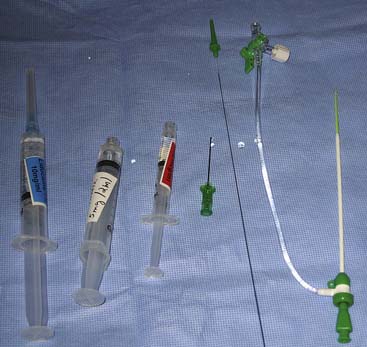
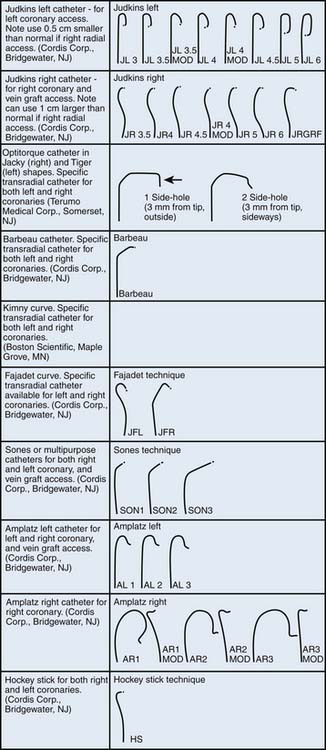
Arterial puncture is best achieved with a micropuncture needle and a 0.018-inch guidewire. Several radial artery sheath systems (10 to 36 cm) with a graduated dilator system are available (Fig. 2-5). Some operators advocate a long sheath technique for patient comfort and better catheter manipulation, although in patients with smaller stature the sheath may reside in the brachial artery. Careful catheter selection for the radial approach is important. Fig 2-6 lists the most commonly used catheters. The standard preformed diagnostic Judkins or Amplatz catheter shapes may be used but require more manipulation for selective engagement of the coronary ostia. For selective engagement of the left coronary ostium, a Judkins left 3.5 catheter is typically used. Several catheters that can be used to approach both the left and right coronary arteries have been developed (Fig. 2-6). A decrease in catheter exchanges has been shown to decrease the incidence of spasm. Use of the left radial artery approach provides easier manipulation of the standard preformed Judkins shapes with minimal effort. The left arm should be brought over the abdomen so that the operator can work from his or her usual position on the right of the patient.
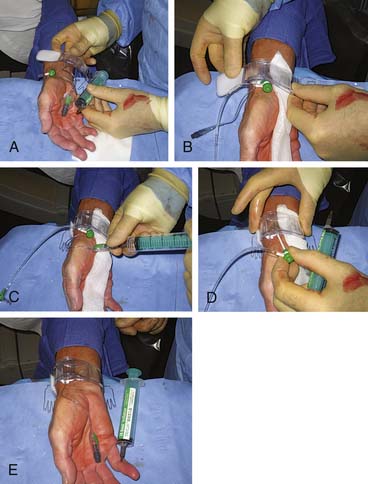
Radial Artery Access and Sheath Introduction (Fig. 2-7, A to I)
Once draped, the radial pulse is palpated. The point of puncture should be 1 to 2 cm cranial to the bony prominence of the distal radius. One should administer a small amount of lidocaine into the skin. The micropuncture needle is used at a 30- to 45-degree angulation and slowly advanced until blood pulsates out of needle. It will not be a strong pulsation because of the small bore of the needle. One should fix the needle position and carefully introduce the 0.018-inch guidewire with a twirling motion. There should be little or no resistance to the wire introduction. The needle is removed. One should make a small skin incision over the wire in preparation to introduce the sheath. The sheath is advanced over the wire into the artery. If the sheath moves in easily, one should advance it to the hub. If resistance is felt with the sheath halfway in the artery, one should remove the wire and administer a vasodilator cocktail. The operator should reinsert the wire and continue to advance the sheath. After the sheath is positioned and flushed, one should secure the sheath with clear plastic dressing or suture. The arm can now be moved to the patient’s side for catheter introduction.
Medications for Radial Artery Catheterization
After the arterial sheath has been inserted, a radial “cocktail” for arterial spasm prevention is infused through the side arm. Numerous cocktails are used: 5000 U of heparin, 2 ml of 1% lidocaine, and 200 mg of nitroglycerin; 2.5 mg of verapamil and 5000 U of heparin; or nitroglycerin 200 mg and 5000 U of heparin (Table 2-2). One should consider giving heparin intravenously (IV) to reduce local irritation and pain. Lidocaine can improve patient comfort during catheter manipulation. Vasodilators, such as diltiazem, verapamil, papaverine, or adenosine, may be helpful to minimize spasm of the radial artery. Verapamil in doses of 5 mg have been given without unwanted side effects, such as hypotension or bradycardia. Heparin is always used to prevent thrombosis and can be given either intra-arterially or IV.
Table 2-2 Medical Regimen for Radial Catheterization*
* Other vasodilator cocktails can be used per laboratory routines.
Sheath Removal and Postprocedure Care
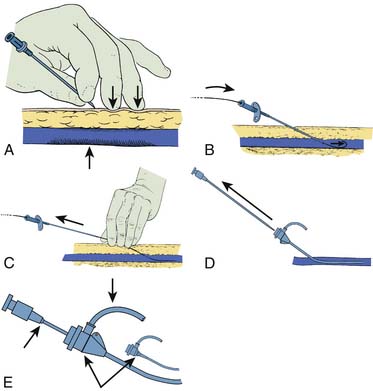
The band should be positioned loosely around the wrist before sheath removal; the compression portion of the device should be positioned to cover both the skin nick and arteriotomy site. The sheath should be removed slowly and smoothly while slowly tightening the band. One common mistake is tightening the band too aggressively before the sheath is removed, completely leading to patient discomfort. The removal of the sheath and the tightening of the band should be simultaneous, for both patient comfort and adequate hemostasis. The bracelet should be tight enough to ensure hemostasis but not occlude the flow to either the radial or ulnar arteries. A modified oximetric Allen’s test should be used to ensure flow to both the radial and ulnar arteries with the band in place. Flow through the radial artery appears to increase the likelihood of postprocedure radial artery patency. Figure 2-8 shows one method for radial sheath removal and hemostasis.
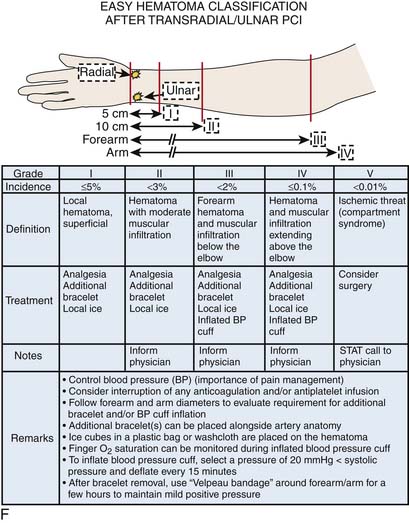
The patient is checked 1 hour later, and the bracelet is loosened every 15 minutes until it is removed at 2 hours. The patient is given instructions about puncture site compression with the fingers if late bleeding occurs (rare).
Complications—Radial Artery Spasm
Some spasm during sheath withdrawal is common. One should tell patients that removal of the sheath will be associated with discomfort. The sheath is taken out fast (but gently); usually the duration of discomfort (if any) is short. Despite all precautions, if radial artery spasm occurs or persists, the operator should consider the next suggestions. One does not allow the patient to experience significant pain. Analgesics and sedation should be administered. If spasm is severe and the sheath is stuck, the following actions can be undertaken:
Complications—Arm Bleeding
Although vascular complications are rare, early recognition of a problem is vital. In the early stages of a transradial program, an unrecognized hematoma can develop even under the watchful eyes of a provider. These can be more subtle than those seen from the transfemoral approach and no overt bleeding is seen. Patients complaining of pain or paresthesias (numbness) warrant a close evaluation. Developing hematomas can be averted with a careful arm wrapping technique. While maintaining the wrist band in place, one should wrap the arm loosely with gauze and secondarily wrap from the elbow to the wrist with elastic tape or an Ace bandage providing compression to the forearm. While this is in place the hemostasis device is rechecked and repositioned if needed. After a few minutes, the tape is removed and the forearm is rechecked; it should be softer. If not, the operator should rewrap with slightly higher tension and recheck the hemostasis device.
There are times, albeit rare, when manual compression of the puncture site is necessary if the band cannot be adequately placed. If this does occur, the operator should hold only to provide hemostasis and no tighter. Usually a 10- to 15-minute hold manually is all that is required. Theoretically, an unnoticed and untreated hematoma produces a forearm compartment syndrome. Figure 2-8F diagrams a schema for easy recognition and treatment of arm bleeding after radial artery catheterization and PCI.
Catheterization From the Percutaneous Femoral Artery Approach
Percutaneous femoral arterial catheterization is still the most widely used technique in the United States. In patients with a significant history of claudication, signs of chronic arterial insufficiency, diminished or absent pulses, or bruits over the iliofemoral area, the physician should use an alternate entry site to avoid the risk of further impairment of the arterial circulation in the legs (Table 2-3) The presence of arterial conduit grafts or previous balloon angioplasty of the iliofemoral system is not an absolute contraindication to the percutaneous femoral technique. Prosthetic graft puncture has been shown to be safe if small-diameter sheaths are used. Nonetheless, an alternative route should be strongly considered.
Table 2-3 Indications for Alternative Routes to Femoral Arterial Catheterization
| Claudication |
| Absent dorsalis pedis and posterior tibialis pulses |
| Absent popliteal pulses |
| Femoral bruits |
| Absent femoral pulses |
| Prior femoral artery graft surgery |
| Extensive inguinal scarring from radiation therapy, surgery, or prior catheterization |
| Excessively tortuous or diseased iliac arteries |
| Severe back pain, inability to lie flat |
| Patient request |
| Morbid obesity |
Artery Location
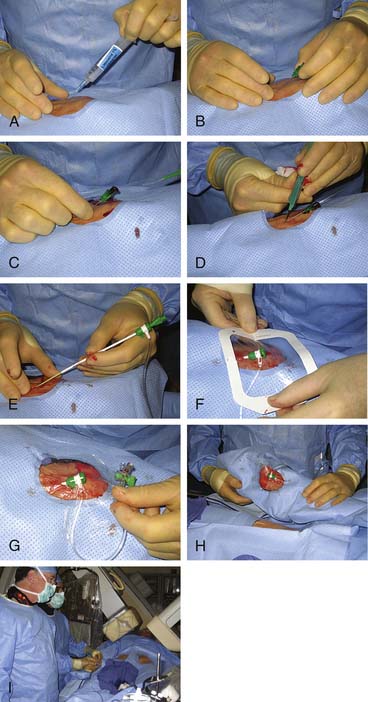
The femoral arterial entry is usually begun using the patient’s right femoral artery with the operator standing at the right side of the patient. The inguinal (groin) skin crease is located. The inguinal ligament, which usually lies directly beneath the inguinal skin crease parallel with but slightly below a line from the iliac crest to the pubis, is palpated. In obese patients the inguinal skin crease may be lower than the inguinal ligament, and there may be several skin folds below and above the inguinal ligament, making it important to locate the inguinal ligament. A metal clamp can be laid over the proposed entry site. The correct arterial entry (not skin entry) should have the tip of the clamp near the medial edge of the middle of the head of the femur (Figs. 2-9 and 2-10). The common femoral artery is the target entry point and defined as that portion of the femoral artery below the lowest margin of the inferior epigastric artery and above the bifurcation of the superficial and profunda branches of the femoral artery.
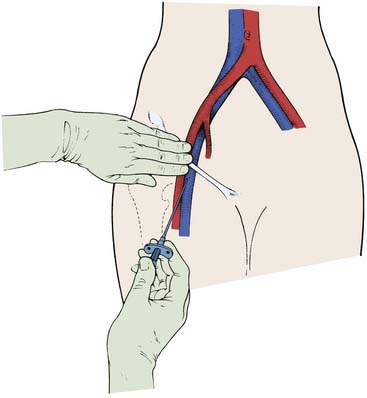
The femoral artery generally crosses the inguinal ligament at an imaginary point that divides the ligament into one-third medial and two-thirds lateral portions. To physically chart the artery course, the practitioner should think of the femoral artery as a tube approximately 1 cm in diameter running across the inguinal ligament. As in any tube the center line is the highest point with the edges of the tube lower on each side. The femoral artery pulse is located with the middle and index fingers placed parallel to the long axis of the femoral artery. The index finger palpates the artery 1 to 2 cm below the inguinal ligament, the site of actual arterial entry with the needle (see Fig. 2-9).
Local Anesthesia
With a 25-gauge needle the skin is infiltrated superficially with 2 to 3 ml of 1% lidocaine 1 to 2 cm below (caudal to) where the index finger is placed as described previously. This point is the skin entry site. In obese patients with thick subcutaneous tissue the entry site should be slightly lower to ensure a needle entry angle of 45 degrees or less. Because large amounts of lidocaine may obscure the pulse, small amounts should be injected repeatedly instead of a large bolus. Next, with a 21-gauge needle, 10 ml of 1% lidocaine is introduced into deep tissue planes on each side of the artery. During lidocaine infiltration, the operator should palpate the arterial pulse with the left middle and index fingers to avoid accidental puncture of the artery and to ensure infiltration of tissue above and around the artery.
Gentle aspiration before the injection of lidocaine is essential to ensure that the needle tip is not in a blood vessel. Inserting the needle first to the deepest level desired, and then continuing infiltration at several more shallow layers may decrease the patient’s discomfort. Local anesthesia should cover the whole depth of the expected skin-to-artery path. Sufficient lidocaine (about 15 to 20 ml of a 1% solution) should be given 2 to 3 minutes for the full anesthetic effect to take place. Hint: Lidocaine should be given early, and while the anesthetic is taking effect, other preparations, such as connecting tubing and flushing catheters, can be completed. During access, the operator should listen to the heart rate monitor or watch the electrocardiogram (ECG) for slowing of the rate as an early warning of a vagal reaction. Alternatives to lidocaine are shown in Table 2-4.
Table 2-4 Anesthetic Alternatives to Lidocaine
From Tilkian AG, Daily EK: Cardiovascular procedures: diagnostic techniques and therapeutic procedures, St Louis, 1986, Mosby.
Arterial Puncture
The single anterior arterial wall entry is the preferred technique (Fig. 2-11). This is especially important in patients being treated with anticoagulants (e.g., heparin), antiplatelet agents, or thrombolytic agents. The original Seldinger double-wall puncture technique is not explained here. The single-wall technique begins with the operator’s left-hand fingers positioned over the femoral artery as described previously. The arterial needle (without an obturator) is held between the index and middle fingers of the right hand (as if holding a pencil) with the tip bevel directed upward. The needle is introduced through the skin and advanced slowly toward the artery at a 30- to 45-degree angle to the horizontal plane. An entry into the artery that is too vertical creates problems in advancing the guidewire and promotes sheath and catheter kinking. Pulsation may be felt when the needle contacts the arterial wall. A slight resistance to the needle can be felt as it passes through the arterial wall. At this point a jet of blood from the needle hub confirms arterial puncture. The immediate, strong spurt of pulsatile arterial blood should be maintained by holding the needle hub stable with the left-hand fingers. Resting the left wrist on the patient’s thigh is helpful. The J-tipped guidewire is straightened and introduced into the needle with the right hand. The wire should be introduced only when good pulsatile blood flow is present.
Guidewire Insertion
The guidewire is advanced gently into the artery. A soft J-tipped guidewire is the safest. Although straight-tipped guidewires have been used, the potential for subintimal dissection or tearing of the blood vessel wall is high. The wire should move without resistance. If resistance is encountered, the wire is pulled out and pulsatile blood return is confirmed. Fluoroscopy should be used often to check wire movement. Repositioning of the needle may be necessary if the wire cannot be advanced freely. Sometimes the needle tip partially penetrates the posterior wall. In this case there is good blood return, but the wire cannot be advanced because it is directed into the posterior wall of the artery rather than the arterial lumen. Withdrawing the needle 1 to 2 mm usually solves this problem. The needle hub is moved a few millimeters laterally or medially, after which the guidewire is slowly readvanced. It is important not to move the needle hub excessively in either direction, which could slice the arterial lumen. In the case of a too-vertical (>45-degree angle) entry into the artery, as is sometimes encountered in obese patients, lowering the needle hub several millimeters may improve the artery and needle tip alignment and permit easier guidewire passage. The operator should attempt to puncture the artery close to the midline of the anterior vessel wall. Puncturing the lateral arterial wall may create a problem in advancing the guidewire or, worse, in controlling bleeding after the procedure.
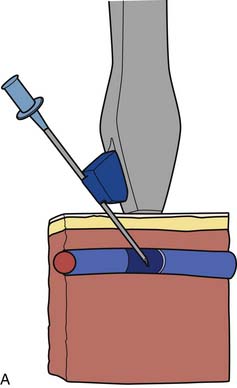
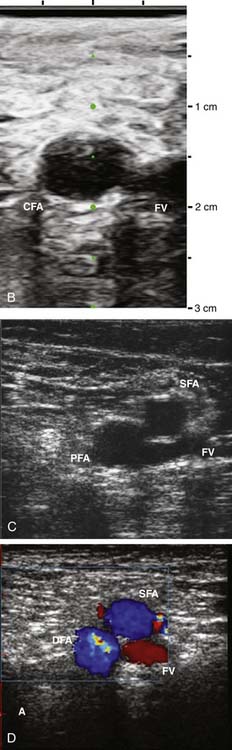
Ultrasound-Facilitated Arterial and Venous Access
Standard access may be difficult to obtain in patients who have altered anatomy, obesity, or scarring caused by prior surgical procedures (e.g., peripheral vascular surgery, multiple prior catheterizations, or prior intraaortic balloon pumps or support cannulae). Arterial and venous access may be achieved with an ultrasonic direct visualization transducer (SiteRite) or with a Doppler needle (Smart Needle), which differentiates the high-pitched (arterial) or low-pitched (venous) flow velocity sounds (Fig. 2-12).
Use of a Sheath Assembly
The sheath-dilator assembly used in nearly all laboratories (Fig. 2-11) has a valved end with a side arm. Unvalved sheaths should never be used because of uncontrolled potential for bleeding. For satisfactory side arm pressure recording, a catheter, one French size smaller than the sheath size, is necessary. The advantages of a sheath include a single arterial entry with increased patient comfort and the limitation of arterial damage produced by multiple catheter exchanges through the artery. The sheath also maintains constant arterial access, so that an accidental removal of the guidewire or catheter does not result in loss of arterial access.
Hemostasis after Catheter and Sheath Removal
After the catheterization has been completed, the patient’s blood pressure is monitored and the catheter is removed. The sheath is aspirated and flushed to clear any thrombi. The patient is transferred to the holding area on a stretcher. If heparin has been given during the procedure, an activated clotting time is obtained, and if it is greater than 200 seconds, protamine sulfate (about 30 to 50 mg of protamine reverses 10,000 U of heparin) may be given before sheath removal. Protamine should be administered slowly (at least 5 minutes). Caution should be used in giving protamine to patients receiving neutral protamine Hagedorn (NPH) insulin, who may be at higher risk for a protamine reaction (see Chapter 1). A protamine reaction may include any or all of the following:


