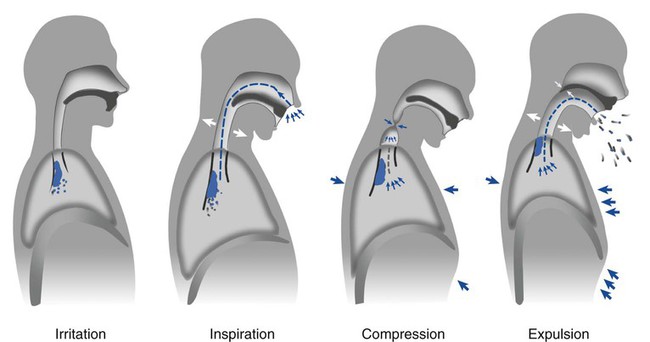
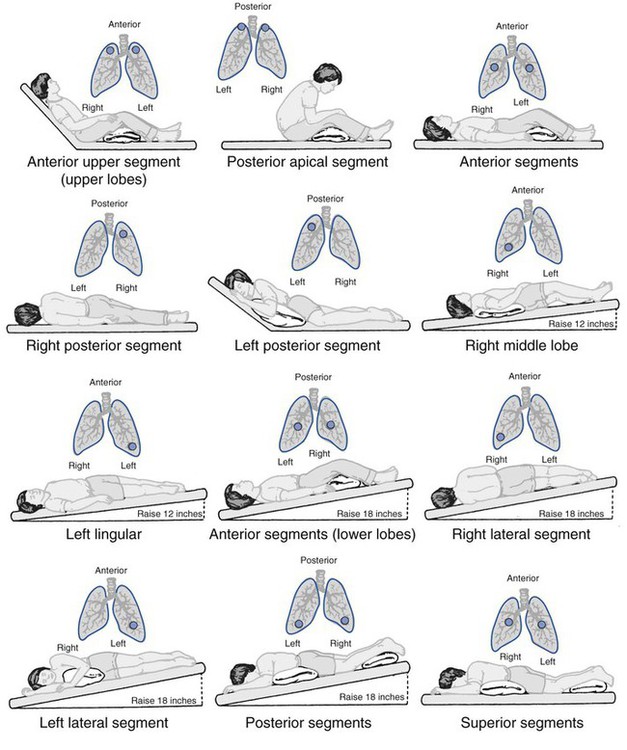
1. Describe normal airway clearance mechanisms and factors that may impair their function. 3. Identify pulmonary pathologies associated with abnormal section clearance. 4. Perform and properly instruct the patient regarding the following airway clearance activities: c. Forced expiratory technique d. Mechanical insufflation–exsufflation e. Positive airway pressure adjuncts A patient’s pulmonary status may deteriorate quickly if airway secretions are not removed. Thickening of secretions from inadequate humidification, also termed inspissation of secretions, may result from the use of oxygen therapy during illness (Box 17-1). For normal mucus clearance to occur, a patient must have a patent airway, a functional mucociliary escalator, and, perhaps most important, an effective cough. The four phases of the cough reflex are illustrated in Figure 17-1. These phases together contribute to mucus progression along the airways, and a problem in one or more of these phases may result in a patient’s inability to remove the secretions (Box 17-2). During a session of CPT, the patient may be placed in any of 10 to 12 different positions (Figure 17-2). Secretions are mobilized through postural drainage, percussion, and vibration (PDPV). Clearance is augmented with deep breathing and coughing. Complete therapy includes all the five elements listed above. However, breathing techniques will be covered in detail in Chapter 27. Knowledge of a patient’s medical history, anatomy of the lungs, and all the indications, contraindications, and hazards of CPT is central when determining the need for and performing CPT. Figure 17-2 illustrates the postural drainage positions incorporated in percussion and vibrations. 1. Review the patient’s chart, and identify the appropriate lobe(s) and segment(s) for drainage. 2. Verify the physician’s order or the facility’s protocol for standard of care. 3. Obtain, clean, and inspect the appropriate equipment prior to entering the patient’s room. 4. Follow personal protective equipment (PPE) requirements, and observe standard precautions for any transmission-based isolation procedure. 5. Identify the patient using two patient identifiers. 6. Introduce yourself to the patient and to the family. 7. Explain the procedure to the patient and to the family, and acknowledge the patient’s understanding. 8. Perform proper hand hygiene, and put on gloves, mask, and protective eyewear, as appropriate for the procedure. 2. Place the patient in the proper position for drainage. 3. Confirm patient comfort in the drainage position. 4. Percuss the patient over the proper segment for 3 to 5 minutes. 5. Instruct the patient to exhale through pursed lips during vibrations (see PA 27-2). 6. Instruct the patient to cough. 7. Reassess vital signs, and continuously observe the patient for any adverse effects or complications during the procedure. 8. Restore the patient to the pretreatment position of comfort. 9. Ensure the patient’s stability and comfort. 10. Remove the supplies from the patient’s room, and clean the area, as needed. It may seem strange to have to “teach” a patient how to cough, but coaching a patient to deliberately cough may aid in effective removal of his or her secretions and prevent further pulmonary compromise. Indications for directed cough therapy are listed in Box 17-3. The following is the step-by-step process for instruction on directed cough. 1. Review the patient’s chart. 2. Verify the physician’s order or the facility’s protocol for standard of care. 3. Obtain, clean, and inspect the appropriate equipment prior to entering the patient’s room. 4. Follow PPE requirements, and observe standard precautions for any transmission-based isolation procedure. 5. Identify the patient using two patient identifiers. 6. Introduce yourself to the patient and to the family. 7. Explain the procedure to the patient and to the family, and acknowledge the patient’s understanding. 8. Perform proper hand hygiene, and put on gloves, mask, and protective eyewear, as appropriate for the procedure. 2. Instruct the patient to assume the sitting position with one shoulder rotated inward and the head and spine slightly flexed; elevate the head of the bed, if necessary. 3. Instruct the patient to use diaphragmatic breathing techniques (see PA 27-3). 4. Confirm that the patient can take a deep breath. 5. Instruct the patient to bear down against the glottis, followed by a slight breath-hold, and then to cough. 6. Supply tissue for sputum removal. 7. Remove the supplies from the patient’s room, and clean the area, as needed. 8. Remove the PPE, and perform proper hand hygiene prior to leaving the patient’s room.
Airway Clearance Therapy

» Skill Check Lists
17-1 Administering Chest Physical Therapy

Procedural Preparation
Implementation
17-2 Teaching Directed Cough
Procedural Preparation
Implementation


 abnormalities caused by unilateral lung disease

