Contraindications
The main contraindication to a diagnostic thoracentesis is a hemorrhagic diathesis. One should hesitate to perform a thoracentesis in a patient who is receiving anticoagulants, particularly thrombolytic agents. Depending on the urgency of the situation, however, diagnostic thoracentesis using a small (22-gauge) needle can be performed on almost any patient if one is careful. McVay et al. (
3) demonstrated that there was no increased risk of bleeding if the prothrombin time or the partial thromboplastin time was not more than two times the normal value. Likewise, there was no increased risk of bleeding with low platelet counts (<25,000/mm
3). A more recent study reported similar results (
4). Accordingly, these authors recommend that prophylactic blood product transfusions are not needed before thoracentesis in patients with mild coagulopathy and no clinical evidence of bleeding (
3). These authors did note an increased risk of bleeding if the creatinine level was elevated above 6 mg/dL (
3), presumably because of decreased platelet function in the setting of uremia.
It appears that thoracentesis can be safely performed on patients who are undergoing mechanical ventilation. In one study from Beth Israel Hospital in New York, 232 thoracenteses were performed in 211 patients receiving mechanical ventilation under ultrasound guidance (
5). In this series, 95.6% of the patients were on positive end expiratory pressure (PEEP), 63% were receiving vasopressors, and 61% underwent therapeutic thoracenteses (
5). Thoracentesis yielded fluid in 98.7% of the procedures and the incidence of pneumothorax was only 1.3% (
5). It should be noted that the ultrasound in this series was performed by pulmonologists (
5). When thoracentesis has been performed without ultrasound on patients receiving mechanical ventilation, the incidence of pneumothorax has been much higher. McCartney et al. (
6) reported a series of 31 patients who underwent thoracentesis while they were receiving mechanical ventilation; 25 patients were receiving PEEP between 5 and 20 cm H
2O. All thoracenteses were performed with patients in the lateral decubitus position. Three of the patients (10%) developed a pneumothorax, and all were managed with a chest tube (
6). In a second series, 2 of 32 patients (6%) developed a pneumothorax after undergoing a thoracentesis while on mechanical ventilation (
7). A thoracentesis should not be attempted through an area affected by a local cutaneous condition such as pyoderma or herpes zoster infection.
Positioning of Patient
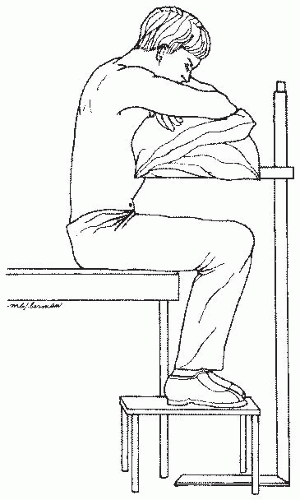
For a diagnostic thoracentesis, and particularly for a therapeutic thoracentesis, the patient and the operator must be comfortable. I find that the patient is most comfortable when he or she sits on the side of the bed with arms and head resting on one or more pillows on a bedside table (
Fig. 28.1). A footstool is placed on the floor for the patient to have someplace to rest the feet. The bed is elevated so that the operator does not have to stoop over. The patient sits near the foot of the bed, with the side containing the fluid toward the foot of the bed. With the patient in this position, the operator does not have to reach across the entire bed, yet the foot of the bed can be covered with sterile drapes to provide a sterile area from which to work. The patient should be positioned with his back vertical so that the lowest part of his hemithorax is posterior. If the patient leans forward too far, the lowest part of the hemithorax may move anteriorly, and no fluid will remain posteriorly.
Some patients are too debilitated to assume a sitting position. The thoracentesis may then be performed with the patient lying on the side of the pleural effusion in the lateral decubitus position with his back near the edge of the operating table or bed. Alternately, the patient may sit in bed with the head of the bed maximally elevated. With the patient in this position, the thoracentesis is performed in the midaxillary line.
Selection of Site
The site for the attempted thoracentesis should be selected with care. Most thoracenteses that fail to yield fluid are performed too low (
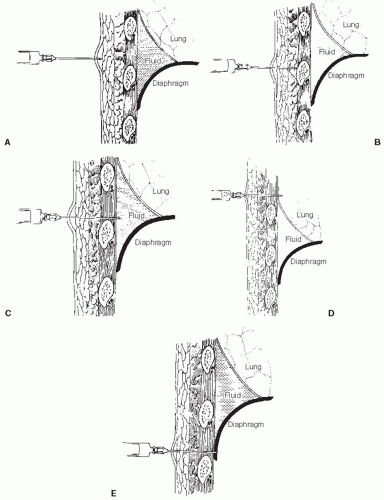
8). A review of the chest radiographs indicates an approximate location. The physical examination of the patient’s chest is most important in determining the site, however. When fluid is present between the lung and the chest wall, tactile fremitus is lost, and the light percussion note becomes dull. Accordingly, thoracentesis should be attempted one interspace below the spot where tactile fremitus is lost and the percussion note becomes dull. Thoracentesis should usually be performed posteriorly several inches from the spine, where the ribs are easily palpated. The exact location for the thoracentesis attempt should be just superior to a rib. The rationale for this location is that the arteries, veins, and nerves run just inferior to the ribs (
Fig. 28.2), so that if the needle is just superior to a rib, the danger of damage to these structures is minimized.
Ultrasound has been proposed as being superior to chest roentgenography in identifying pleural fluid and choosing the optimal site for thoracentesis (
9). The usefulness of ultrasound in identifying the site was demonstrated in one study from South Africa (
10). In this study, attempts were made by pulmonologists to identify the site for thoracentesis 255 times in 67 patients on the basis of physical examination and chest radiographs. A site was proposed in 172 cases (67%). Ultrasound demonstrated that 25 of the identified sites (15%) were inaccurate and in 17 (10%) a solid structure would have been punctured (
10). Experienced operators did not perform better than physicians-in-training (
9). An earlier study (
11), however, was unable to demonstrate that it is cost effective to obtain ultrasound routinely before thoracentesis. Kohan et al. (
11) randomly allocated 205 patients to undergo or not undergo chest ultrasonography before thoracentesis. They reported that the incidence of dry attempts was significantly higher without ultrasound (33%) than with ultrasound (10%) in patients with small effusions, but there was no difference with large effusions. Moreover, the use of ultrasound did not lead to a lower rate of complications in patients with either small or large effusions (
11). In a smaller study (
12), the incidence of pneumothorax was much less (0/19) if the thoracentesis was done with ultrasound guidance than if it was done without ultrasound guidance (10/33) (
12). In a recent study of 941 thoracenteses performed with ultrasound guidance, the incidence of pneumothorax was only 2.5% (
13). On the basis of the preceding studies, it is recommended that thoracentesis be initially attempted with ultrasound unless the amount of pleural fluid is large. In patients with larger effusions, ultrasound should be utilized if no fluid is obtained after one or two attempts. The British Thoracic Society (
14) has recommended that thoracic ultrasound be used for all thoracenteses.
Thoracentesis Kits
The materials required to perform diagnostic thoracentesis are listed in
Table 28.1, and these materials should be assembled before the procedure is initiated. What is done more commonly, however, is to use a thoracentesis kit in which the materials have been preassembled. There are several thoracentesis kits available commercially including the Arrow-Clark™ Pleura-Seal
® Thoracentesis Kit distributed by Arrow, and the Argyle™ Turkel™ Safety Thoracentesis System distributed by Kendall. When a thoracentesis kit is selected, it is important to select one with a needle-catheter system, particularly if a therapeutic thoracentesis is going to be performed. If one performs a therapeutic thoracentesis with a sharp needle, the needle is likely to lacerate the lung as it reexpands with the removal of pleural fluid and cause a pneumothorax.
One excellent thoracentesis kit is the Arrow-Clark™ Pleura-Seal® Thoracentesis Kit manufactured by Arrow International, Reading, Pennsylvania (www. arrowintl.com, 800-523-8446). The basic thoracentesis apparatus in this kit is an 8-F gauge catheter over an 18-gauge needle with a three-way stopcock and self-sealing valve. With this apparatus, one constantly aspirates as the catheter is advanced through the chest wall. Then, when a free flow of fluid is encountered, the catheter is advanced approximately 1 cm and the needle is withdrawn completely. One nice feature of this set is that there is a self-sealing valve so that air does not leak into the pleural space when the needle is withdrawn; however, the needle cannot be reinserted through the catheter. With this system, small amounts of fluid can be withdrawn by aspirating directly through the side port on the catheter. Another nice feature of this set is that one may easily withdraw large amounts of fluid either with a syringe or through vacuum bottles. If a syringe is used, aspiration is performed through a Y connector that has one-way valves so that no stopcocks need be turned with each aspiration. If vacuum bottles are used, vacuum bottle tubing is included, which attaches directly to the sideport of the catheter. There is also a roller clamp to control the flow of fluid into the vacuum bottles. The cost of this thoracentesis kit is approximately US$31.
Another excellent set is the Argyle™ Turkel™ Safety Thoracentesis System set manufactured by Kendall Company (St. Louis, MO, USA, www.kendallhq. com, 800-962-9888). This system incorporates a blunt, multiside fenestrated, spring-loaded inner cannula coaxially housed within a 16-gauge conventional sharp-beveled hollow needle. The advantage of this system is that as the needle and blunt cannula penetrate the chest wall, the blunt cannula is forced into the shaft of the needle. Then when the tip of the needle encounters low resistance, such as an area of pleural effusion within the pleural space, the spring-loaded cannula automatically extends beyond
the bevel, thereby helping to protect the underlying tissue from further, inadvertent penetration. Another advantage of this system is an indicator in the needle housing that identifies the position of the blunt cannula; if resistance is being met such that the sharp end of the needle is exposed, then the indicator is red. In contrast, if no resistance is being met, then the indicator is green. Therefore, when the pleural space is entered, the indicator turns green. If a diagnostic thoracentesis is being performed, the pleural fluid can be withdrawn through the needle. If a therapeutic thoracentesis is being performed, the catheter assembly is advanced and then the needle assembly is withdrawn completely. There is a one-way valve such that there is no possibility of air leaking into the pleural space when the needle is withdrawn. There is a side port for fluid removal. The cost of these kits is approximately US$24.
When comparing the two kits described earlier, the Argyle Turkel kit has the advantage of the spring-loaded inner cannula, which should decrease the incidence of lung laceration. The advantage of the Arrow-Clark system is the ease with which a therapeutic thoracentesis can be performed either with a syringe or with vacuum bottles.
Technique
The procedure should be carefully explained to the patient, and a signed consent form should be obtained. Routine administration of atropine to prevent vasovagal reactions is not recommended as such reactions are very uncommon during thoracentesis (
13). Atropine should be available, however, and 1.0 mg should be administered subcutaneously or intramuscularly at the first sign of such a reaction. Similarly, I do not administer an analgesic, a sedative, or a tranquilizer routinely before the procedure unless the patient shows excessive anxiety. If there is excessive anxiety, I administer intravenous midazolam (Versed) just before the procedure.
Once the site for thoracentesis is identified, it is marked by exerting pressure using the end of a ballpoint pen with the tip retracted. This leaves a small indentation that will not be removed by subsequent cleansing of the area. Then the skin surrounding the site is cleansed thoroughly with an antiseptic solution over an area extending at least 4 in. in all directions from the proposed thoracentesis site. The sterile drape with the center hole is then taped to the patient’s back, and another sterile drape is placed on the bed.
The next step is to obtain local anesthesia. It is necessary to anesthetize the skin, the periosteum of the rib, and the parietal pleura. The skin is anesthetized using a short 25-gauge needle by injecting enough lidocaine, approximately 0.5 mL, to raise a small wheal (
Fig. 28.2A). The small needle is then replaced by a 1.5-in.-long 22-gauge needle. This needle is inserted to the periosteum of the underlying rib and is moved up and over the rib with frequent injection of small amounts (0.1 to 0.2 mL) of lidocaine (
Fig. 28.2B). Once this needle is superior to the rib, it is slowly advanced toward the pleural space with aspiration, followed by the injection of 0.1 to 0.2 mL of lidocaine every 1 to 2 mm (
Fig. 28.2C). This frequent aspiration and the injection of lidocaine guarantee anesthesia of the parietal pleura. As soon as pleural fluid is aspirated through this needle into the syringe containing lidocaine, the needle should be withdrawn from the pleural space and reattached to a 50- to 60-mL syringe containing 1 mL of heparin. Heparin is added into the syringe to prevent clotting of the pleural fluid as it is difficult to obtain differential white blood cell counts or pH determinations if the pleural fluid is clotted. The same needle is reintroduced along the same tract slowly with constant aspiration until pleural fluid is obtained. Aspiration is then continued until the syringe is filled. The needle is then withdrawn, and the procedure is finished. The commercially available kits can be used to perform a diagnostic thoracentesis. The special needles that come with these kits, however, have few advantages over a syringe and a needle for a diagnostic thoracentesis. They do have significant advantages for therapeutic thoracentesis, and they should be used in this situation.
At times, no pleural fluid is obtained when the1.5-in. No. 22 needle is inserted all the way to its hub. In such a situation, the needle should be slowly withdrawn with constant aspiration. The rim of the pleural fluid is sometimes thin and may be missed as the needle is inserted. If no pleural fluid is obtained either as the needle is inserted or withdrawn, one of four possibilities exists: (a) the needle was too short; (b) placement of the needle was too far superior; (c) placement of the needle was too far inferior; or (d) no pleural fluid is present. If the patient is markedly muscular or obese and if no air is obtained on the initial attempt, the 1.5-in. needle should be replaced with a longer needle such as a spinal needle, which is used for performing lumbar puncture, and the attempt should be repeated. If no fluid is aspirated, but air bubbles are obtained on the initial attempt with
the local anesthetic, the lung parenchyma has been penetrated and the needle was inserted too far superiorly (
Fig. 28.2D). Therefore, the procedure should be repeated one interspace inferiorly. Penetration of the lung with a small needle is not a catastrophe, and only occasionally does a pneumothorax result. If no fluid or air bubbles are obtained on the initial attempt, the needle was inserted too far inferiorly (
Fig. 28.2E), and the procedure should be repeated one interspace superiorly. Pleural fluid is almost never too viscous to be aspirated through a No. 20 or a No. 22 needle. If no fluid is obtained after two or three attempts, ultrasound guidance for the thoracentesis is recommended.
Processing of Pleural Fluid
The main purpose of a diagnostic thoracentesis is to examine the pleural fluid. The recommended distribution of the pleural fluid to various laboratories is outlined in
Table 28.2. For the cell count and differential, the fluid should be placed in ethylenediaminetetraacetic acid (EDTA)-treated tubes (purple top tubes) if the syringe was not initially heparinized. If the syringe was not initially heparinized and if fluid is placed in the tubes without anticoagulants that come with the thoracentesis trays, the cells are likely to clump or the fluid is likely to clot, giving inaccurate cell counts and differentials (
15). For the determination of pleural fluid pH, the sample should be maintained anaerobically and the determination should be made with a blood gas machine (
16,
17), although it is not necessary to pack it in ice as long as the pH determination is performed within an hour (
17,
18). For the bacterial cultures, it is best to innoculate the pleural fluid directly into blood culture bottles at the bedside (
19). Interpretation of the results of the various tests obtained in
Table 28.2 is discussed in
Chapters 7 and
8. If there is a good chance that the patient has a transudative pleural effusion, the most cost-effective approach is to measure only the lactate dehydrogenase (LDH) and protein in the pleural fluid. If these measurements demonstrate that the patient does not have a transudative pleural effusion (
20), the remaining studies should be performed.