Chapter 3
Techniques of Venous Catheter Placement
A detailed description of the techniques involved in the placement of central venous catheters is not possible because the techniques vary widely, depending on personal preference. No two radiologists or surgeons place catheters in the same manner, step for step; however, some basic steps are invariable, including the following:
1. Preparation of the procedure room
2. Preparation of the physician
3. Preparation of the patient
4. Venous puncture and placement of the peel-away sheath
5. Creation of the subcutaneous tunnel/pocket
6. Placement of the catheter
7. Securing the catheter and closing the wound(s)
Each basic step is discussed in detail. The techniques presented are not the only “correct” techniques, but they have been successful over many years. They may stimulate discussion with the hope that the reader may develop new methods or improve the current methods that he or she employs. Techniques are constantly evolving as new information is obtained. The goal in this chapter is to present as much information about the techniques as possible so that readers can decide which methods work best for them.
PREPARING THE PROCEDURE ROOM
Procedure Room Environment
Patients are typically anxious about these procedures; therefore, the procedure room should have a warm and comfortable feel to it. Patterns on the walls will help to minimize the sterile feel of white walls. Music should be soothing to help the patient relax; however, if the patient has a strong preference for music that cannot be classified as “soothing,” playing the music of the patient’s choice may divert the patient’s attention from the procedure and allow him or her to relax. The ceiling needs to be high enough to accommodate overhead lighting. The floor should be hard and seamless to facilitate cleaning.
The doors to the procedure room should be closed throughout the procedure. A sign should be placed on each door warning “Sterile procedure is under way: Do not enter,” or something to that effect, to prevent mistaken entry into the room. Unnecessary traffic into and out of the room should be avoided. Procedure rooms typically are equipped with a high-efficiency particulate air (HEPA) filtered-air circulatory system under positive pressure with 17 to 20 air changes per hour. The air in the procedure room has a positive pressure with respect to the air in the hallways so that unfiltered air does not enter the procedure room. Air-handling systems with filtration can reduce the number of airborne microbes by reducing the number of particles to which microbes may be attached. Appropriate design of cabinetry and placement of storage space can reduce the number of times the door to the procedure room is opened during a procedure. The number of door openings, and therefore the bioparticle count, can be reduced significantly by appropriate design of the storage space.
To control the microbiology of the environment, it is important to check that surfaces are smooth, dry, and intact before use and to ensure that spillage of human secretions and excretions are cleaned promptly because these are likely to be contaminated with human pathogens. Used solutions and wet equipment are likely to encourage the growth of gram-negative bacilli and should be removed from the rooms as soon as possible. The apparent level of cleanliness is important to patient confidence. Some patients make negative comments about hospitals they consider dirty and associate this with poor care. Items not in use must be stored.
Rituals
Rituals abound in the operating room and in interventional radiology procedure rooms because the high-intensity, life-threatening situations in these areas requires control and discipline. Rigid adherence to rules that are translated into “policies and procedures” sets limits on behavior and assists in labeling actions as “correct” or “wrong.”1,2 Condon and Quebbeman3 state that although the efficacy of many rituals has not been established, the procedures protect the patient from environmental sources of infection and are worth following for reasons of improved and disciplined behavior of the procedure room personnel.
The following procedure room rituals as listed by Gruendemann2 may create order, consistency, cleanliness, and sterility:
• Personnel must remain in the sterile area throughout the procedure.
• Personnel who are not scrubbed must remain on the periphery of the procedure room, a distance away from sterile areas.
• A margin of safety is useful as a guide to movement and adherence to aseptic principles.
• Sterile fluids, equipment, or supplies are opened and delivered to the sterile surface without contacting the edges of the wrapper or container; only sterile articles may touch sterile surfaces.
• Tables are sterile only at and above the tabletop level.
• When a staff member is not sterile he or she must not lean or reach over a sterile field.
• Sterile drapes, towels, and covers are folded in such a way that a generous cuff is provided for handling by personnel in sterile areas.
• Once in position, sterile drapes are never moved or shifted.
• Once gowned and gloved, team members may not lower their forearms below waist level. When passing each other, personnel pass front to front or back to back.
• A sterile person first covers the near side of any unsterile surface with sterile drapes and then covers the far side.
• Movement and air currents around the sterile area are kept to a minimum.
• If there is any doubt about the sterility of an item, it is considered contaminated.
Preparing the Procedure Table
Most hospital personnel have worked in the operating room and should recall the consequences of touching or coming too close to the sterile field or to the sterile table. If one comes within 2 feet of the table, the wrath of the scrub nurse will ensue. This same mentality must prevail in the angiography suite. The table should be meticulously set up such that it is not contaminated, and once it is prepared for the procedure, only the sterile physician and assistants should touch the table. The table should stand in the center of the room and not rest against the wall or equipment.
Two-Person Technique
Preparing the procedure table should be a team effort. The procedure assistant should scrub and wear a sterile gown and sterile gloves as well as a face mask, hat, shoe covers, and glasses or mask. An assistant, also wearing hat and face mask, opens the individual packages, starting with the sterile table cover, and hands the items to the scrubbed assistant in a sterile manner. The scrubbed assistant then proceeds with organizing the tray.
One-Person Technique
On occasion, the assistant will need to prepare the room and instrument table unassisted. A sterile table cover is placed initially. The assistant (preferably wearing a sterile gown in the event that he or she rubs against the table), without sterile gloves, opens the individual packages of equipment and “dumps” on the table in an organized fashion. The assistant then should scrub, gown, and put on sterile gloves and organize the table.
Instruments
Of the many surgical instruments in use today, there are both reusable and disposable sterilizable instruments. Neither type should be the source of infection. In general, reusable, sterilizable equipment is sturdier and easier to use, although disposable instruments are adequate under most circumstances. We find that disposable instruments are more than adequate when placing most tunneled catheters; however, when performing more delicate techniques such as a running subcuticular closure of a port wound, we prefer the better-quality reusable instruments.
Needle Holder Needle holders (or needle drivers) are used to grasp and securely maintain the suture needle and to facilitate suture tying. Needle holders with flat, smooth jaws, such as the Webster and the Halsey, are less traumatic to suture material and to suture needles than are the grooves or teeth on the platforms of other needle holders, such as the Baumgartner, the Mayo-Hegar, the Derf, and the Collier needle holders. Personal preference and availability should be the deciding factor in the purchase. Comfort and control are essential, especially when doing fine work.
Forceps (Pickups) Forceps are used for handling tissue and are available with either toothed or smooth tips. Forceps with teeth are less traumatic than are smooth forceps, which tend to crush soft tissues. Commonly used forceps are the Adson forceps with teeth; they have broad handles that taper to a long narrow tip. One to three teeth are present that insert between the teeth on the opposing side of the forceps. The Brown-Adson forceps contain seven or eight interlocking teeth distributed over the length of the tip. The finer Adson forceps with teeth or the Castroviejo forceps with platforms behind their teeth are useful for manipulation of the delicate needles found with fine suture material.
Scissors Scissors depend mainly on personal preference. Commonly used scissors include the Metzenbaum and the Iris.
Scalpel Blade The scalpel blades most commonly used for placement of central venous catheters are the nos. 10,15, and 11. The no. 11 blade is used in most central venous catheter procedures for stab incisions, such as for making a dermatotomy or short incisions at the skin exit site of a subcutaneous tunnel. The no. 11 blade is tapered with a sharp point. Longer incisions, such as for creation of a subcutaneous pocket, should be made with a no. 10 or no. 15 blade, which is wide with a convexly curved cutting edge. The incision should be made with the curved portion, not the tip of the blade.
PHYSICIAN PREPARATION
Attire
Scrubs
In the past, a radiologist would enter the room in street clothes, put on gloves and a sterile gown, and proceed. This is no longer the case. During catheter placement procedures, patients may be immunosuppressed, and introduction of an infection could be deadly. Everything possible should be done to avoid introduction of infection. Hospital scrubs should be clean and free of dust particles from the environment, which may harbor infectious agents. To ensure cleanliness, the scrubs should be put on in the hospital after arrival. No one in the procedure room should wear scrubs to or from work. Technologists, nurses, or physicians who wear personalized scrubs from home to work defeat the purpose of wearing them.
Scrubs protect the wearer from blood products. They are made of a polyester and cotton mixture and should be repellent to fluids. Blood-soaked scrubs should be changed immediately after the procedure. Scrubs should never be worn home because of the risks to personnel and family.
Shoe Covers
Shoe covers prevent contamination of the surrounding environment with blood products. The covers should be placed immediately before the procedure, and every member of the team should wear them. Anyone in the procedure room can step in a puddle of blood and track it throughout the hospital for the remainder of the day unless shoe covers are worn. The shoe cover must be removed immediately after the procedure. A bloody shoe cover tracks blood as well as a bloody shoe.
Shoe covers protect the shoes from becoming saturated with blood, which is especially important when handling the shoes. The shoestrings are especially absorbent and are handled when tying the shoes.
Surgical Mask
Since the demonstration of bacteria in droplets in the nose and mouth by Flugge in 18974 the face mask has been considered a necessity for reducing surgical wound infections. A 1926 study by Meleny and Stevens5 seemed to confirm this assumption by showing a reduced infection rate when attendant personnel wear masks. Meleny6 repudiated this finding in a subsequent 9-year prospective study, however; this study showed the infection rates to be similar with and without surgical masks. Numerous subsequent studies7–11 also have brought into question whether masks prevent wound infections, and several of these studies suggest that face masks increase postoperative wound infection rates.7,9 It has been suggested that the friction of the face mask against the skin of the face releases skin scales that carry bacteria, usually staphylococci.12 The use of masks should therefore be reconsidered.
It could be argued, however, that masks do protect the operator from splashed blood products touching the mucosal surfaces of the eyes, mouth, and nose and are therefore worth wearing. Consider, however, the splash shield, which not only protects the operator from splashed blood but also eliminates friction to the skin of the face, which may release scales with pathogenic colony-forming units (CFUs). In rooms with air circulatory systems under positive pressure, which carry airborne contamination away from the center of the room toward the periphery, the splash shield should deflect a jet of air from personnel, behind his or her head, which would be carried away from the table.13–14
The use of surgical masks was adopted a century ago, and the practice was passed along because it seemed reasonable. The ritual of wearing a face mask continues without questioning the effectiveness of the face mask in preventing wound infections. Actual scientific studies suggest that face masks could be replaced by splash shields15–16 without compromising the quality of care to the patient, providing savings to the medical care system (face masks cost in the range of 25¢ to 50¢ apiece) and greater comfort to personnel. The question is whether the medical community and our patients are willing to accept changes in this age-old practice.
Surgical Hat
Fallen hair from team members carry potentially pathogenic CFUs and should be excluded from the sterile field. The team members, whether sterilely scrubbed or assisting within the room, should wear hats covering all the hair on the head. Several surgical hats are available, including the large bouffant surgical cap, which should cover the hair of most personnel, although in rare instances personnel with “large hair” may require two such hats. Personnel with beards and mustaches definitely should wear face masks that cover all facial hair to prevent microbe-containing hair follicles from falling onto the sterile field.
Surgical Scrub
Sink
The sink basin preferably should be 18 to 24 inches deep, and the faucet should extend well above the basin (at least 1 foot) so that when rinsing the scrubbed, sterile hands and forearms, one does not accidentally touch the side of the basin. For the same reason, cabinets and other equipment should not be kept immediately adjacent to the sink. Foot pedals or an electric eye are very convenient for hand washing, although not absolutely necessary.
Why Scrub?
After all, surgical rubber gloves are worn, and they act as sterile barriers that provide protection against wound contamination on the hands of team members. The fact is that a large number of sterile rubber gloves become punctured during a procedure. Studies have shown gloves with holes following procedures range from 12 to 86%.17–22 These defective gloves are a prime source of wound contamination during procedures. Double gloving can reduce perforations and reduce the risk of wound contamination. One study showed that perforations occurred in both the inner and outer gloves in only 9% of surgical cases.22 Although the risk of a glove being perforated and the operator carrying a virulent strain of bacteria and transferring it into the wound may be small, it is not insignificant, and the operator should scrub the hands and forearms with an antiseptic before every sterile procedure. An antiseptic is a chemical agent that reduces the microbial population on the skin.
The Skin
Human skin harbors microorganisms, providing a complex environment. The stratum corneum is the outermost surface of the skin, which comprises many layers of interposed sheaths of flat, scale-like cells composed of keratin. The cells in this layer of the epidermis are rough and contain a multitude of crevices where bacteria reside. Bacteria are most numerous near the surface of the epidermis and are less numerous in the crevices of the deeper layers of the stratum corneum. Transient bacteria, including Staphylococcus aureus, Streptococcus species, Escherichia coli, Klebsiella species, Enterobacter species, Proteus species, Pseudomonas species, and others, are present on the surface of the epidermis.23 These bacteria can be exchanged easily between individuals and are removed easily with hand washing. In fact, humans continually shed the bacterialaden cells of the stratum corneum into the environment. The bacteria in the deeper layers of the stratum corneum are called residents and can be removed only with a focused effort and then never completely because of the complex structure of the stratum corneum, which limits complete access of any chemical into the deeper niches. Resident flora includes gram-positive aerobes, such as Staphylococcus epidermis and gram-positive anaerobes. Fungi such as Candida species, S. aureus, Klebsiella species, and Enterobacter species may also be found as resident flora23 in some individuals. Although resident florea are ubiquitous, they are more concentrated in the axilla, groin, and scalp areas. Because they seem to be anchored firmly to the epidermal elements, they are more difficult to remove with antiseptics than are transient flora. Similarly, up to 20% live in hair follicles or in other nooks and crannies on the skin surface and therefore are not accessible to surface scrubbing. The epidermis below the stratum corneum is virtually sterile.
Cleansing Agents
Numerous antiseptic agents can greatly reduce the bacterial colony counts from the skin immediately after scrubbing. Especially in the moist environment of a sweaty hand in a plastic glove, however, the bacteria counts from the hand increase with time. The counts increase at a faster rate with agents that have only bactericidal activity compared with agents that have both bactericidal and bacteriostatic action.24,25 These agents, however, do not create a totally sterile skin because, as noted earlier, the resident flora on the skin is not 100% accessible to these preparations. The ideal solution would be inexpensive, have a broad spectrum of bactericidal activity, and be nonirritating and nonallergenic.
Chlorhexidine gluconate (Hibiclens) is the most frequently used surgical scrub today, and it has bacteriostatic and bactericidal properties. Chlorhexidine creates a chemical bond with proteins in the stratum corneum of the skin, which is why its antibacterial action is persistent (i.e., it is also bacteriostatic).24,26,27 This bacteriostatic action results in less rapid multiplication of bacteria on the gloved hand which, in turn, should decrease the risk of postoperative wound infection if glove puncture does occur. It has a wide range of activity against bacteria (being especially active against gram-positive bacteria and somewhat less active against gram-negative bacteria), yeasts, and viruses. The chemical binds to the negatively charged groups on the bacterial cell wall, producing irreversible damage and death. It may cause irritation in the eyes and middle-ear damage.
Iodine solutions (Betadine) are excellent antiseptics for skin preparation because they are broad spectrum and fast acting. The formulation most commonly used for surgical scrub is iodophor, which contains 1 to 3% elemental iodine. Iodophors are a water-soluble complex of iodine conjugated with organic compounds. They have a good spectrum of activity against both grampositive and gram-negative organisms and possess some activity against spores and fungi. The povidine-iodine preparations are similar in bactericidal effect to Chlorhexidine gluconate initially; however, they lack residual activity28 (i.e., they are bactericidal but not bacteriostatic). For short procedures (less than 1 hour), either Chlorhexidine or iodophor solutions are effective and can be used.29 For longer procedures, Chlorhexidine is clearly superior and should be considered the agent of choice.24
Other antiseptic agents available for surgical scrub are hexachlorophene and alcohol. Hexachlorophene has a narrow spectrum of activity. It does not kill gramnegative organisms that have emerged as significant nosocomial pathogens. Alcohol has a rapid onset but no sustained action. The spectrum of activity of alcohols includes most gram-positive and gram-negative bacteria, tubercle bacillus, many fungi and viruses, including human immunodeficiency virus (HIV). Isopropyl alcohol is an excellent antiseptic and is preferred in many hospitals, although it tends to dry the skin. It is not commonly used as a hand antiseptic because it is not a detergent; therefore, it should be used on skin that is grossly clean (following hand washing with soap and water).
Length of Scrub
The concept of a good surgical scrub has undergone much refinement over the years. With the use of more effective detergents, there is an increasing tendency to shorten the scrub time. Several studies have shown no advantage of a 10-minute scrub over a 5-minute scrub30–32 in terms of the number of bacteria remaining on the hands. The advantages of a shorter scrub time include a reduction in skin trauma and dermatitis, a saving in water consumption (it is estimated that 50 gallons of water are used in a single 10-minute scrub, and a saving in procedure time.32 O’Shaughnessy et al.33 recommend a 4-minute scrub for the first surgery of the day, followed by a 2-minute scrub for subsequent surgery. Interventional radiologists do not perform one sterile procedure after another, however, with nonsterile cases usually interposed. Therefore, we recommend a 4-or 5-minute scrub before each sterile procedure.30,34
Hand-Scrubbing Techniques
The purpose of a surgical scrub is the removal of dirt and grease as well as transient and resident flora. This is best achieved by use of a sponge brush soaked with a detergent preparation. All physicians have performed the 5-minute scrub in medical school; however, medical school may have been a few years in the past. Therefore, we will review the surgical scrub in detail. Masks, hats, glasses, thyroid shields, and lead aprons should already be in place when hand washing commences.
1. Open the scrub brush packet and saturate the sponge with water.
2. Bring to a full lather both hands and arms, up to the elbows.
3. Using the brush side of the brush/sponge, begin scrubbing every inch of skin from fingertip to elbow. Every inch of skin should be scrubbed several times.
4. Grab and squeeze the sponge in such a way that the already scrubbed hand never touches the unscrubbed hand or arm (Fig. 3–1). That is, the brush should be held in such a way that one hand never touches the other.
5. The only way to ensure that all areas of skin have been scrubbed several times is to go about the scrubbing in a systemic manner: Begin with the fingers on the first hand, dividing each finger into four planes (Fig. 3–1). Scrub each plane of each finger five to ten times before moving onto the next plane of the finger. Pay special attention to the fingertips and under the nails. If visible dirt is under the nails, use the nail scraper.
6. The palm and dorsum of the hand must now be scrubbed.
7. Finally, the wrist and forearm are scrubbed. Again, divide the wrist and forearm into multiple planes, assuring that each plane is thoroughly scrubbed several times.
8. The process is repeated for the other hand, wrist, and forearm making sure that the first hand does not become contaminated. The systematic regimen is necessary to ensure that all areas of skin are scrubbed every time.
9. A second sponge is not used because obtaining a new sponge is highly likely to contaminate the hands.
10. Thoroughly rinse one hand, wrist, and forearm, keeping the hand elevated so that water runs down the forearm toward the elbow, not in the other direction.
11. Repeat the rinse with the other hand and arm. The two hands should not touch until they are gloved.
12. Stand at the sink momentarily to allow excess water to drip into the sink, off of the elbows.
13. Enter the procedure room with hands up, such that any residual excess water will drip off the elbow. If the hands are placed down, lower than the elbow, contaminated water from above the elbow could roll down, contaminating the forearm and hand. Obviously, do not touch anything that is nonsterile after scrubbing. If there is any question whatsoever that a nonsterile object was touched (e.g., the faucet head of the sink), rescrub.
14. A sterile towel should be obtained from the table and laid across the palm of one hand such that only one end of the towel is employed initially.
15. The other arm and hand are dried from finger to elbow so that contaminants are not brought from the elbow to the hand.
16. The other end of the towel is then laid across the already dried palm, and this end of the towel is used to dry the second hand and arm from finger to elbow. It is important not to use the same end of the towel because of the risk of the towel becoming contaminated from drying the forearm near the elbow of the first arm.
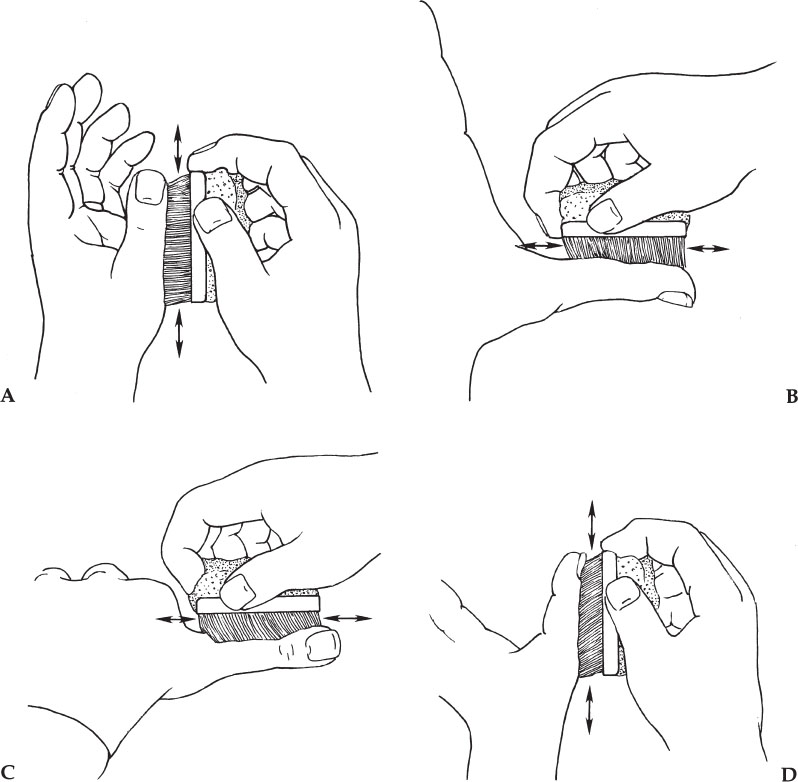
Figure 3–1 The hand holding the brush should not touch the hand being scrubbed. Divide each finger into four planes and scrub each plane of each finger five to ten times. Scrub the palm, the dorsum of the hand, the entire circumference of the wrist, and finally the forearm. Divide each part into sections and scrub each section five to ten times to ensure that every inch of skin is scrubbed multiple times.
Putting on the Sterile Gloves and Gowns Surgical gowns must be made of waterproofed, impermeable materials. At least the sleeves and front of the gown should be reinforced with such materials.35
The following is a safe way to put on sterile gloves without assistance:
1. After drying the hands and arms, grab the gown from the table, making sure not to touch the table. The gown is folded in such a way that you are grabbing the portion of the gown that will be the nonsterile inside portion.
2. Place both arms into the sleeves, allowing the gown to unfold and drop down. Work your arms into the gown by stretching your arms out, but be careful not to touch anything when stretching. Do not use one hand to pull the other sleeve up. Do not bring your hands out of the ends of the sleeves (Fig. 3–2A). The hands should be covered by the sterile sleeves.
3. Use the dominant hand to grasp the folded portion of the nondominant glove (Fig. 3–2B) (i.e., the left glove is grasped through the sleeve using the right hand in a pinching manner).
4. Now place the nondominant hand, still covered with the distal portion of the sleeve, into the glove (Fig. 3–2C). Once the fingers are covered with the glove, the sleeve can be pulled back along with the glove uncovering the fingers within the glove.
5. The gloved hand is used to pick up the glove for the dominant hand and place it on the hand in a similar manner (Fig. 3–2D). The important point is that the sleeve not uncover the hand until it is within the glove.
6. An assistant then secures the back ties or snaps of the gown. The wraparound tie of the gown is often neglected, but should always be employed. This covers the backside of the scrubbed person and decreases the likelihood of accidentally contaminating the field by rubbing up against the sterile table or patient with one’s “exposed” backside.
7. If a gown must be removed for any reason (e.g., the sleeve tears), one must rescrub. There is no way to remove a gown without contaminating the hands.
8. If the first hand does not properly slide into the glove and the fingers are not all seated in the designated glove fingers, do not waste time trying to align the glove at this time. Instead, proceed to putting on the second glove. When the other hand is properly gloved, it is easy to use this hand to adjust the first glove.
PREPARATION OF THE PATIENT
Sedation
Sedation is an important aspect of any invasive procedure. The use of conscious sedation by nonanesthesiologists has helped to allow the increase in the number of minor procedures (e.g., tunneled catheters) performed out of the operating room. Appropriate conscious sedation increases patient comfort and may increase the safety and speed of a procedure by decreasing patient movement. Many patients will require several catheter-related procedures over the course of their treatment, thus making comfort an important aspect of their care.
It is important to establish a formal program for conscious sedation at every institution in which it is used. The program should be set up and run in collaboration with the anesthesia department at the institution. The Joint Commission of Accredited Healthcare Organizations (JCAHO) expects patients to receive the same quality of anesthesia throughout the hospital regardless of where it is administered and by whom. Patients can check with that institution to determine whether a program exists.
Basic elements of a conscious sedation policy should include the following:
• A basic health evaluation should be performed on all patients who might need sedation. This includes the patient’s medications, allergies, cardiac and respiratory history, and any pertinent medical or surgical history. The time of the patient’s last food intake should be determined.
• The patient should not eat before sedation; this will reduce the risk of aspiration. Exact guidelines should be established, but a common practice is nothing by mouth except medications with sips of water for 6 to 8 hours before conscious sedation.
• The patient should be monitored at all times by an appropriately trained person, usually a nurse, who administers the sedation and monitors the patient. This person should be available to the patient at all times and should not be involved in other tasks (i.e., not helping perform the procedure).
• Monitoring should include oxygen saturation, blood pressure, heart and respiratory rate, level of consciousness, head position, and skin color. Respiratory compromise is a primary concern; therefore, the patient should be monitored with a pulse oximeter at all times while sedated. Supplemental oxygen should be available and used for even the slightest decrease in oxygen saturation. The patient’s other vital signs should be checked and recorded periodically. The doses and times of administration of all drugs also should be recorded.
• The physicians using conscious sedation should be trained in using the administered drugs and in airway management. Drug training should include dosages, contraindications, and reversal or treatment of overdose. Airway management should include the correct use of airway positioning, ventilation bag and mask, and airway devices. The patient should be monitored until fully recovered from sedation. Discharge criteria should be established as part of the conscious sedation protocol.
• Emergency protocols should be established in case of respiratory compromise. A clearly established way to call for additional assistance (e.g., anesthesia, respiratory therapy) should be arranged and known to all involved in administering sedation.
• Emergency equipment should be available at all times. An emergency cart containing equipment for airway management and drugs for resuscitation should be readily available. The location of oxygen (source, tubing, nasal cannula, and face masks) and suction should be known to all practitioners. The equipment should be checked and restocked routinely.

Figure 3–2 Putting on sterile gloves unassisted. (A) Do not bring hands out of the sleeves. (B) Grasp the glove (using a pinching motion through the gown sleeve) by the folded portion of the glove. (C) The hand, still covered by the sleeve, is slid into the glove. The hand should not emerge from the sleeve until it is inside of the glove. (D) The gloved hand is used to place the glove on the other hand. Again, the hand does not emerge from the sleeve until it is inside the glove.
A common regimen for conscious sedation involves using a benzodiazepine (BDZ) and an opiate. Specific BDZs include midazolam (the most commonly used), diazepam, and lorazepam. Midazolam has several characteristics that make it a preferred drug for conscious sedation. It is metabolized rapidly, with mental function returning to normal in about 4 hours. It frequently causes amnesia. When used with a narcotic, midazolam reduces the sympathetic response to adverse stimuli, reducing cardiac stress. Midazolam may be given as 0.5-to 1.0-mg increments administered intravenously (IV).
Narcotics provide excellent analgesia but also cause respiratory depression. Common drugs include fentanyl, morphine, and meperidine. Fentanyl has very rapid onset, with short duration of action (about 30 minutes). Repeated doses prolong its effect. Fentanyl may be given in 25- to 50-microgram increments IV.
Naloxone (Narcan) is an opiate antagonist. If oversedation leads to respiratory depression, naloxone may be given as a reversal agent. Naloxone also reverses the analgesic effects of opiates. This may result in hypertension and tachycardia if the patient is still experiencing pain. Nalaxone is given in 0.1-mg increments IV.
Flumazenil (Romazicon) is a BDZ antagonist. It may require as much as 30 minutes to take effect. If both an opiate and a BDZ have been given, treat with naloxone first. Opiates have a greater effect on respiratory drive, and naloxone takes effect more quickly than flumazenil. Flumazenil also has a shorter half-life than many BDZs. If it is used for reversal, the patient should be closely monitored because he or she may become more sedated as the effects of the flumazenil wear off. It is given in 0.1- to 0.2-mg increments IV up to 3 to 5 mg or in 0.5-mg increments if the patient is apneic.
Skin Preparation
In procedures in which indigenous contamination is not expected (such as venous catheter placement), extrinsic bacteria that contaminate the open wound cause most postoperative wound infections. Possible sources of extrinsic contamination include the skin overlying the operative site,36,37 members of the procedure team, surgical equipment, and other items in the environment. Methods to prevent contamination from other sources, such as surgical hand scrub, wearing sterile gowns and hats, and disinfecting and sterilizing equipment have been discussed. We now discuss the preparation of the patient’s skin to prevent this source of extrinsic bacteria.
Removing Hair
Multiple studies have demonstrated that shaving the skin prior to surgery increases the risk of postoperative wound infection.38–40 The old routine of shaving the surgical site the night before surgery has been shown to be risky. Hamilton et al.41 found the reason for the increased risk of infection. Using electron microscopy, they showed that razors cut not only hair but also the skin, leaving superficial wounds in which bacteria may multiply. If the field is shaved 24 hours in advance, the resulting exudate from abrasions becomes a breeding ground for bacteria, increasing the risk of postoperative infection. If shaving is necessary (e.g., dense hair growth makes suturing or attaching a dressing difficult), it should be performed immediately before the procedure.
Better options than shaving are the use of clippers, which do not cause trauma to the skin, and depilatory creams. Depilatory cream does not increase the risk of infection, 39 but its use has not become widespread because of skin sensitivity to creams. The best action concerning hair removal is not to do it unless it absolutely must be done. If hair must be removed, the use of clippers is the best option.
Antiseptic Solutions
The skin is colonized by resident skin flora. These commensal organisms form part of the body’s defense system and, when confined, are harmless. They are capable of multiplying, gaining nourishment from skin lubricants, burrowing into hair follicles and sweat glands, and becoming inaccessible to usual skin-cleaning methods. Some organisms, including S. aureus, Micrococcus species, Corybacterium species, and some gram-negative bacteria also can take residence on the skin.23 These can cause infection when transposed to deeper tissue planes as a result of an invasive procedure. They can assume a pathogenic role and are of particular concern when foreign bodies such as catheters and ports are present. The aim of the antiseptic skin preparation is to remove transient and pathogenic organisms on the skin surface and to reduce the resident flora to a low level.24,42,43 About 20% of the resident flora are beyond the reach of surgical scrubs and antiseptics, and therefore the skin cannot be “sterilized”44 Bacteria harbored in the hair follicles invariably rise to the surface and contaminate the previously prepared area.
As previously discussed, several antiseptic topical agents are now available for preparation of skin. Without definitive comparative scientific studies, the consensus favors the use of an iodophor or Chlorhexidine as an antibacterial agent.
Iodophors As previously discussed, iodophors are rapidly acting and have a wide range of activity against bacteria, yeasts, and viruses. These compounds, which contain 1 to 3% elemental iodine, release iodine slowly and therefore should never be wiped off immediately after application; rather, they should be allowed to remain on the skin for several minutes to obtain full effect.
Chlorhexidine Chlorhexidine has a wide range of activity against bacteria, yeasts, and viruses and, by virtue of its binding to epidermal protein, has a persistent (bacteriostatic as well as bactericidal) effect.24 This antibacterial action increases as the number of applications increases.
Application of Antiseptic Solutions
With the patient in the proper position, preparing the field begins. The operative field must be free from contamination from hair or clothing falling onto the field. The patient should wear a surgical cap so that hair does not fall onto the field. Oxygen tubing for nasal cannula should be wrapped around the head, instead of looped around the ears, and taped to the face. The patient’s gown should be pulled far away from the operative field.
To apply antiseptic solutions, 4 × 4 gauzes on a long clamp or disposable “lollipop” sponges can be used. The gloved hand must not be used to hold the gauzes alone because the hand most certainly will become contaminated. With the first antiseptic-soaked sponge or 4 × 4 gauzes, the antiseptic is rubbed onto the skin, starting at the center of the operative field, which would be the site of venous puncture and the skin exit site (or subcutaneous pocket site). From this central point, the antiseptic solution should be applied in a circular or outwardly spiraling manner (Fig. 3–3).
The edges of the field are painted last so that the contaminants from the edges are not carried to the center of the field, where the incisions will be made. This process should be repeated using two or three more sponges, starting in the center with each 4 × 4 or sponge and spiraling outward. It is critical that a wide area of skin be cleansed with the antiseptic solution. This wide field of preparation is necessary to prevent contamination of the central field from the edges of the operative field. For instance, surgical drapes should not be moved once they are put in place, but occasionally the drapes unavoidably shift because of patient or other motion. If a wide field of skin has been prepared, the drape that has shifted onto the central field is more likely to have migrated from an area of skin that was also cleansed with an antiseptic and will be less likely to contaminate the field. Additionally, despite well-laid plans, procedures do not always go exactly as planned. For example, a subcutaneous tunnel may need to be relocated, and it is good if the new site of the tunnel is already prepared.
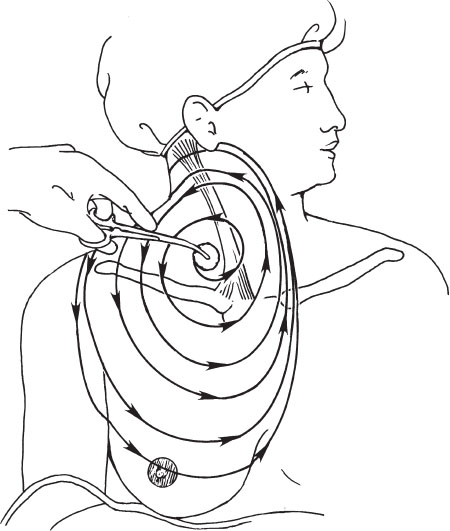
Figure 3–3 Paint the skin with antiseptic solution starting at the site of planned venous access and spiral outward from this point. Do not proceed to the center of the field if the sponge already has been used on the edge of the field. The field should be large.
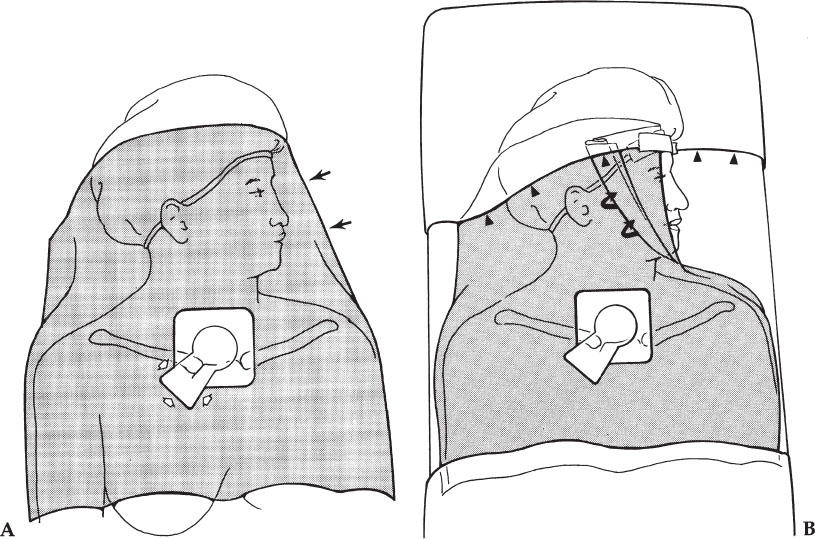
Figure 3–4 Applying the drapes. (A) The drape is placed with the opening over the site planned to be used for venous access. Initially, the face is covered by the drape (arrows). The opening can be extended by cutting away a piece of the drape with scissors (open arrows). The “keyhole” shape opening is seen here. (B) The drape has been folded off of the face (curved arrows). Also, a plastic sterile drape with an adhesive edge (arrowheads) can be taped across the forehead to hold the folded drape in place and to extend the sterile field above the head.
HELPFUL HINT
A typical operative field for a jugular puncture, for example, should extend from the mastoid process to the nipple and from the axilla to the contralateral edge of the sternum (Fig. 3–3).
Applying the Drapes
Contamination of the catheter by skin organisms at the time of insertion is one of the causes of development of subsequent catheter-related infection. Antiseptic solutions and other methods that decrease bacteria burden at the insertion site prevent catheter colonization and infection. Protective isolation using sterile barriers reduces nosocomial infection during catheter placement.45–47
Drapes come in a wide variety of shapes and sizes, with central openings that also vary in shape and size. The choice of drapes is based on personal preference and costs. For internal jugular vein punctures and subclavian vein punctures, we prefer brachial drapes, which are large enough to cover a large area, but small enough to be removed easily from the patient’s face. The drape may be cut away from over the patient’s face by an assistant. Another technique to remove the drape from the patient’s face is to have an assistant fold the drape, exposing the face on the side contralateral from the procedure (Fig. 3–4A), with the drape still tented over the face on the side of the procedure.
HELPFUL HINT
A sterile plastic barrier with adhesive along one border can be used to drape across the forehead, taping the brachial drape into position so that it does not move or fall across the patient’s face (Fig. 3–4B). This is especially useful when performing a jugular puncture while standing at the head of the table. Without the plastic barrier in place, the nonsterile top of the head and the face are too close to the sterile puncture site. In this circumstance, it would be easy for the end of the catheter or suture material to accidentally drag across the forehead or for a sterile glove accidentally to touch the top of the patient’s head, thus contaminating the hand. The sterile plastic barrier also allows the physician to brush against the table without contaminating the front of the gown, which then could easily contaminate the gloves.
It is important to keep the patient’s face uncovered by using one of the preceding techniques or by creating a tent under the drape. Most patients are claustrophobic to some degree, and having their face covered raises their level of anxiety. With the face uncovered, the patient is able to see the nurse nearby, who can provide moral support and comfort to the patient.
Larger drapes, such as pediatric drapes and femoral drapes (placing one of the openings at the venous access site), also can be used but may be difficult, because of the large size of these drapes, to fold away from the patient’s face. Alternatively, these larger drapes can be used, and a portion of the drape cut away from the face or a tent can be created over the patient’s face such that the patient can see daylight.
A large sterile barrier or femoral drape should be placed over the lower half of the body from approximately the level of the nipples to the feet. This drape allows a large working area from which to rest the end of guidewires and instruments. This drape also covers the table controls, allowing for sterile use.
After cleansing the skin, applying the drape, and obtaining venous access, gently lift the adhesive portion of the drape in the direction that you wish to create the subcutaneous tunnel (and pocket if needed). Cut a section of drape large and long enough to create the tunnel/pocket. This skin underlying the drape is still clean because the overlying drape is sterile. Ensure that the drape does not move such that a contaminated portion of the drape moves over a sterile area of the skin. Therefore, when originally placing the drape, the opening must be placed precisely at the puncture site and the drape adhesive adhered to the skin immediately. The drape should not be moved from this point onward. Care must be taken when pulling up on the adhesive to cut the drape, not to allow the drape to slide. The drape should be cut with scissors to avoid cutting the patient with a scalpel blade. We cut the drape in the shape of a keyhole (Fig. 3–4A), with the upper round portion of the keyhole being the round opening of the drape where the venous puncture was performed and the lower flared end at the skin exit site or the site where the pocket for a port will be placed. The alternative to cutting away a portion of the drape is to use a drape with a larger opening; however, it may be difficult to center the opening over the sterile area without including a nonsterile portion of the body within the drape opening. Some interventionalists place an iodophor-impregnated occlusive covering (3M) over the operative site. Incisions can be made through the covering.
When draping for translumbar and femoral venous punctures, a standard femoral drape is ideal. Place the opening over the puncture site and fix the drape adhesive to the surrounding skin. After obtaining venous access, again gently lift the adhesive portion of the drape in the direction that you wish to create the subcutaneous tunnel and cut away a keyhole portion of the drape.
Local Anesthesia
After preparing the skin and draping the patient, the skin overlying the vein to be punctured should be anesthetized. First, identify the skin site that will be punctured by palpating landmarks, by performing a preliminary localizing ultrasound, or with a venogram. Inject the lidocaine and allow the anesthetic to diffuse in the tissues for at least 30 seconds before performing the venous puncture, at which time there should be onset of anesthesia.48 A burning pain is commonly experienced on injection of lidocaine and can make injection of a large amount of local anesthetic unpleasant to the patient. The burning pain is attributed to several factors, including an intradermal instead of subcutaneous injection, injection of anesthetic at room temperature rather than at body temperature,49–51 pressure effect from rapid injection, the use of large needles, and the acidity of the solution.52–54 Several precautions can be taken to make injection of lidocaine less painful: (1) always use a 25- or 27-gauge needle; (2) inject slowly to allow the anesthetic time to diffuse in the tissues and decrease the pressure effect; (3) keep lidocaine in a warmer; (4) do not start by making a large “wheal,” which is very painful to the patient, instead push the needle quickly through the dermis and inject into the subcutaneous tissue; (5) buffer the lidocaine solution (see later discussion). Other helpful steps include the following:
• Make the puncture with the 25- or 27-gauge local anesthetic needle exactly as you anticipate making the definitive puncture (i.e., go for the vein). If blood is aspirated, then you have localized the vein. Remember the exact angle and tract of the seeker needle. If blood is not aspirated, then inject lidocaine throughout this tract. The needle should be close to the vein so that you know you have anesthetized the entire tract. Never inject lidocaine if blood is aspirated.
• Always aspirate prior to the injection of lidocaine to ensure that the needle is not intravascular. Lidocaine and epinephrine have systemic toxicities and should not be inadvertently injected intravascularly. Another consideration is that there is always an artery next to the vein. We are not always careful about removing small air bubbles from the lidocaine syringe, and if the carotid artery is inadvertently punctured and an air bubble is injected, the results could be disastrous. Therefore, make sure that the needle is not in a blood vessel before injecting the local anesthetic.
• When performing a jugular puncture, do not inject a large amount of local anesthetic prior to the venous puncture. Too much local anesthetic can distort the anatomy, make it difficult to palpate the carotid artery, and may compress the jugular vein, making the venous puncture more difficult. Injection of 4 or 5 mL of lidocaine (1%) into the tract for a jugular puncture should be sufficient to numb the tract. The area can be anesthetized further after gaining access to the vein.
Buffering Lidocaine As discussed, the burning pain associated with injecting local anesthetic can be attributed to several factors, but the most important of these is the acidity of the solution being injected. Lidocaine has a pH of 5.0 to 7.0, which makes it more soluble and stable and extends its shelf life to 3 or 4 years. At the labeled pH, however, there are more charged particles, which are believed to produce the burning pain associated with injecting the solution.55–57 Buffering the lidocaine to a pH of 7.1 to 7.4 has been demonstrated in many studies to reduce the pain of injection.55–62 The studies have encompassed various fields of medicine, including interventional radiology,59 foot surgery, 61 obstetrics and gynecology (Norplant System implantation)60 and plastic surgery (liposuction).62 The optimal concentration of buffered lidocaine as calculated by Stewart63 can be obtained by injecting 3 mL of 8.4% sodium bicarbonate into a 30 mL vial of 1% lidocaine. That is, the mixture should be approximately 10 parts 1% lidocaine and 1 part 8.4% sodium bicarbonate. With alkalization, the shelf half-life of lidocaine is shortened, and for this reason, the mixture is prepared immediately prior to use. The rapidity of onset of anesthesia has been shown to be slightly faster with the buffered solution48 and the duration of action is the same as the acidic solution, at least 1.5 hours.52,58
Lidocaine with Epinephrine Vasoconstrictors This is added to local anesthetics to decrease the amount of bleeding during an invasive procedure.64–71 Other possible benefits of epinephrine in lidocaine are prolonged duration of anesthesia72–75 and reduction of systemic toxicity of the anesthetic by reducing systemic absorption.
Epinephrine, however, is systemically absorbed after local injection and produces dose-dependent cardiovascular effects due to stimulation of alpha- and beta-adrenergic receptors. Stimulation of the beta-receptors occurs at lower levels of systemic epinephrine, causing increased heart rate, cardiac output, and myocardial oxygen consumption, which ultimately can lead to cardiac arrhythmias. At higher levels, alpha-receptor stimulation causes increased vascular resistance and can lead to systemic hypertension. Local toxicities also can occur with subcutaneous injection of epinephrine, including delayed healing of the wound76 and skin necrosis.77,78 These complications are dose related; therefore, use of the minimal concentration and minimal dose of epinephrine sufficient to provide adequate vasoconstriction to decrease bleeding should reduce the risk of toxicity. Dilute solutions of 1 to 100,000, 1 to 200,000, and 1 to 400,000 provide vasoconstriction with little difference in blood flow reduction between these concentrations.64,66,67,72
VENOUS PUNCTURES
General Principles
The use of small needles and wires with coaxial dilators (micropuncture sets) that allow conversion to standard guidewires is preferred for jugular and subclavian vein punctures. Using venographic or ultrasonographic guidance, traversing the pleura is unlikely, but is possible. Data comparing the rate of pneumothorax using large needles (16 to 18 gauge) and using fine needles (20 to 22 gauge) shows lower rates for the latter79,80 during percutaneous lung biopsies. These data can be extrapolated for venous access. Also, the risk of pneumothorax increases with the number of times the pleura is transgressed. Therefore, good image guidance is very important. Smaller needles also decrease the risk of bleeding or injury to adjacent arteries if inadvertently punctured.
Also, a dermatotomy need not be made prior to skin puncture. An improperly placed dermatotomy can limit the approach and result in distortion of the skin at completion of the procedure. Therefore, it is better to make the skin puncture at the exact desired position rather than using a dermatotomy, which already has been made. Multiple dermatotomies can lead to wound and possible tunnel infections.
Making the Venous Puncture
For making the puncture, the syringe should be held with one hand only, holding the syringe within the palm of the hand and applying back pressure on the plunger of the syringe (Fig. 3–5). The other hand is used to palpate the carotid artery or hold an ultrasound probe, depending on the method employed for access. A small syringe (5 or 10 mL) with the attached needle fits nicely into the palm of the hand, and the plunger can be pulled back with the fingers at the same time.
Regardless of the technique used, always double check to ensure that the puncture is not being made through the sternocleidomastoid muscle because dilatation of a tract through the muscle can be difficult as well as painful, and a tunneled catheter through the muscle can result in kinking of the catheter and be constant source of pain and “a stiff neck.” When advancing the needle tip through the skin, resistance to puncture is felt, and care must be taken not to insert the needle too far after the “give” of the needle going through this skin. Likewise, it is common to reflexively pull back when the resistance of the skin gives way, often resulting in pulling the needle back out of the skin. This can result in unnecessary skin punctures.
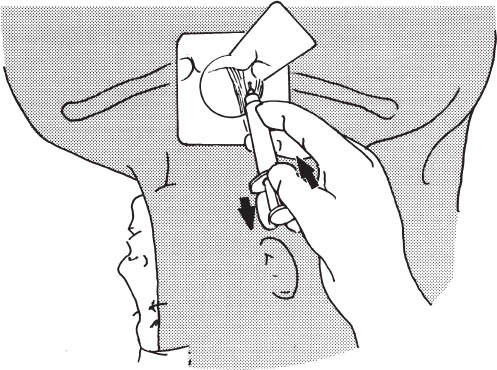
Figure 3–5 Puncturing and aspirating with one hand. The needle and syringe should be advanced and constant back pressure applied using one hand. Techniques vary, but in this example the thumb applies forward pressure on the syringe while the ring finger and small finger apply constant back pressure on the plunger. The index and middle fingers stabilize the syringe in the palm.


