Fig. 17.1
Intravascular imaging (IVUS) in left main stem coronary intervention. Mid-shaft LMS stenosis with IVUS imaging (arrows) to assess composition of plaque and to aid in vessel sizing (a, left panel). Following PCI, IVUS demonstrates excellent stent dilation with good strut apposition to vessel wall (a, right panel). When there is diagnostic uncertainty with regards to the presence of disease after multiple angiographic angles, (b, left panels), IVUS can be used to confirm final diagnosis (b right panels)
Optical Coherence Tomography
Optical coherence tomography has many advantages with regards to characterisation of intravascular disease by virtue of its high resolution [21]. However, it has poor depth penetration and requires adequate clearance of blood by contrast in the vessel of interest to obtain optimal imaging [21]. In the LMS assessment, while the use of OCT has been shown to be comparable to IVUS findings [22], the vessel diameters are often too large to be adequately imaged by OCT and often does not allow for adequate interrogation of ostial disease. For these reasons, OCT has limited value in the pre-intervention assessment of LMS stem prior to intervention.
Fractional Flow Reserve
The utilisation of fractional flow reserve (FFR) in determining the functional significance of a lesion in the LMS and has been shown to be useful in managing revascularisation strategies [23]. While LMS disease was an exclusion criteria within the DEFER (deferral versus performance of PCI of non-ischaemia-stenoses [24] and FAME (FFR versus angiography for multivessel evaluation)) [25] trials, FFR has been used successfully to determine the physiological significance of intermediate lesions. Only a minority of patients demonstrate isolated LMS disease (9 %) [26] and it is therefore important to appreciate the effect that this will have on the FFR [27] when interrogating a LMS stenosis. In the presence of concomitant disease in the left anterior descending artery or circumflex artery, it is important to appreciate that this may artificially raise the FFR reading obtained at the LMS. However, if the pressure wire is placed in a non-stenosed downstream vessel and the other vessel does not have a critical proximal stenosis [28] then the results can be interpretable (Fig. 17.2). There are however currently no large randomised studies investigating the role of FFR in the management of LMS disease and the long-term safety and effect of outcomes of FFR-guided revascularisation of the LMS.
Fig. 17.2
Fractional flow reserve (FFR) in left main stem coronary lesion evaluation. Diagnostic angiography demonstrated stenosis of circumflex artery (arrows, a) and distal left main stem (arrows, d). Fractional flow measurements carried out with ACIST-Navvus catheter (Bracco, MN, USA) in both circumflex (arrow, b) and left main stem (arrow, e). Both FFR of circumflex (c) and left main stem (f) were negative and so this patient was managed with aggressive medical therapy without the need for revascularisation
Equipment Selection
Guiding Catheter
The correct choice of guiding catheter is important both to maximise support but also with regards to stenting strategies in particular when 2-stent bifurcation techniques are being considered for distal LMS disease. For ostial lesions, a 6 French (Fr) catheter is usually sufficient for the majority of cases. When planning intervention of distal bifurcation lesions, it is helpful to determine strategy if possible following lesion assessment. If two stents are being considered, it is possible to perform two stent strategies using a 6 Fr. guiding catheter with the majority of current techniques such as culotte, T and two-step crush stenting. However, at least a 7 Fr. catheter is required if V stenting and standard crush-mini crush strategies are required. Additionally, the use of a larger guide catheter also provides better support, visualisation and accommodation of all sizes of burr if rotablation is required.
Hemodynamic Support
Hemodynamic support is not mandatory, but should be considered in patients deemed at high risk for developing instability peri-procedurally with an estimated 8 % risk of this occurrence [29]. High-risk features include impaired left ventricular (LV) function, complex bifurcation strategy or patients with persistent angina or ischaemia on maximal medical therapy and elective intra-aortic balloon pump (IABP) placement in this setting may be beneficial [29]. Other options for hemodynamic support include Impella (Abiomed, Danvers, MA, USA) or Tandem Heart (CardiacAssist Inc. Pittsburgh, PA, USA).
Lesion Preparation
As with all percutaneous coronary interventions, appropriate lesion preparation is essential to ensuring a good outcome and is even more important in the setting of ULMS intervention where the sequelae of any complication (e.g. acute stent thrombosis) are likely to be fatal. Information obtained from IVUS with regards to characterisation of disease can be invaluable. In the setting of extensive calcific disease, rotational atherectomy can be performed, whereas extensive fibrosis or diffuse calcification may demand more aggressive pre-dilatation with non-compliant balloons. On the other hand, identification of uncomplicated, soft plaque may permit direct stenting.
Stent Choice
DES are generally preferred in ULMS PCI, and in comparison to bare metal stents (BMS), are associated with lower rates of mortality, myocardial infarction and revascularisation [30, 31]. There are currently no data to support the use of bioresorbable vascular scaffolds (BVS) in ULMS PCI. The main limitation of the current devices is their maximal diameter that presently cannot exceed 4 mm.
There does not appear to be a difference between various designs or type of drug/polymer DES. The ISAR-LEFT MAIN (Intracoronary Stenting and Angiographic Results: Drug-Eluting Stents for Unprotected Coronary Left Main Lesions) study that randomised patients to either a paclitaxel-eluting stent (PES) or a sirolimus-eluting stent (SES) did not demonstrate a difference with regards to death, myocardial infarction or target lesion revascularisation at 1 year [31]. Similarly the more recent ISAR-LEFT MAIN 2 that examined the use of second-generation DES and randomised patients to zotarolimus-eluting stent (ZES) or everolimus-eluting stent (EES) again did not demonstrate any differences at 1 year, which has also been supported by findings from other registries [32–36]. A practical consideration is when a 2-stent strategy is opted for in the presence of large branches (>3.5 mm), stents with an open cell design may be preferable to facilitate re-crossing and maintain patency of branches.
Anatomical Considerations
The location of LMS disease determines the interventional strategy and while the overall rate of restenosis is low after stenting for LMS, the distal LMS is the usual site of restenosis and the ostium of the circumflex is particularly vulnerable to recurrence [37]. The distal LMS is involved in the majority of cases, and the results of PCI for these patients are worse than for those patients with lesions located at the ostium or mid-shaft likely representing the more complex nature of this disease [38, 39]. This is reflected in the current guidelines which by using the SYNTAX score to determine anatomical complexity, recommend PCI as an equivalent alternative to CABG for patients with a low score (SYNTAX score ≤22) and as an option in patients with an intermediate score (SYNTAX 22-32). In patients with complex anatomy (SYNTAX >32) CABG is the recommended revascularisation option.
Ostial LMS Disease
Disease isolated to the LMS ostium occurs in a minority of patients [40]. It is important to accurately assess the size of the reference vessel (often exceeds 4 mm). The extent of disease should be checked in a number of different projections (left anterior oblique caudal projection is useful for the assessment of distal extent of disease from the bifurcation) and to aid in the choice of stent length (Fig. 17.1). The stent should be allowed to protrude 1–2 mm into the aorta (the right anterior oblique cranial view is helpful in determining protrusion of the proximal stent into the aorta) while distally it should not involve the distal bifurcation. If the stent is too short there is a risk of dislodgement especially during post-dilatation and on-going catheter manipulation. When selecting a stent to be implanted in this location, devices with minimal longitudinal deformation should be selected.
Mid-Shaft LMS Disease
Treating mid-shaft disease is very similar to that of ostial lesions, with particular attention made to not involve the distal bifurcation. If this is not possible due to distal extension of disease close to the bifurcation with risk of plaque shift following stent deployment, a reasonable strategy, that should be used liberally, is to extent the stent into the LAD with protection of the SB with a second wire (see section “Provisional stenting strategy” below).
Distal Bifurcation LMS Disease
Distal bifurcation disease can be treated either by a 1-stent (provisional strategy) or a 2-stent technique. From observational non-randomized studies the provisional strategy, when possible, appears to be superior to a 2-stent technique with regards to the rate of target lesion revascularisation in 2-stent procedures [38, 39, 41] although, the use of 2 stents may simply reflect more complex disease and therefore be associated with worse outcomes. However, a provisional strategy is not always appropriate – for example in the setting of severe and diffuse disease in the ostium of the side branch. In these cases, a 2-stent strategy should be employed. There are a number of different techniques and these are outlined below.
Provisional Stenting Strategy
The provisional strategy is a single-stent strategy and allows for the placement of a second stent if required. This strategy is most appropriate if plaque is limited to the LMS and main vessel (MV) alone. The MV (almost always the left anterior descending artery (LAD)) is wired and a second wire is placed in the side branch (SB). A stent is then placed from the LMS into the LAD and post-dilated as required with the wire ‘jailed’ in the SB. Depending on the appearances, the SB may be left untouched, or treated with a ‘kissing’ balloon inflation. In the case of a suboptimal result such as SB dissection or significant residual stenosis (>50 %), a second stent may be deployed into the side branch with a ‘kissing’ inflation to complete the procedure. If a second stent needs to be implanted on the SB, the preferred technique is the T and protrusion (TAP).
Two-Stent Strategies
In instances where disease extends into both the MV and diffusely and significantly in the ostium of the SB then elective double stenting should be considered. The most important determining factor with regards to which strategy to use is the internal angle between the MV and the SB. Y-shaped bifurcations demonstrate an angle of <70° whilst T-shaped bifurcations have an angle of >70°. The majority of distal bifurcation lesions are T-shaped. This is important because a large angle may not allow for easy wire access to the SB or the passing of an additional wire, balloon or stent after MV stenting and is a predictor for SB occlusion. Finally, in the presence of a wide angle between the LMS-left circumflex artery (LCx) or a narrow angle between the LAD-LCx, the SB ostium area is by definition greater and this might be best treated with stents with large cells. The double-stent strategies are outlined below and illustrated in Fig. 17.3. Which technique is superior in LM bifurcations is currently unclear with outcome success most likely determined by anatomical considerations and operator experience [43].
Fig. 17.3
Schematic of bifurcation techniques. Schematic diagrams of bifurcation techniques that can be considered when attempting PCI to distal LMS bifurcation (Adapted and reprinted from Ielasi and Chieffo [42] Copyright 2011, with permission from Europa Edition)
V-Stenting
The V stent technique (or ‘kissing’ stent technique) involves the simultaneous deployment of stents in both the MV and the SB. This technique is particularly applicable for Medina 0.1.1 lesions that can be treated with a minimal and very short neo-carina and in case of hemodynamic instability of the patient.
T-Stenting
This technique is most useful when the angle between the MV and the SB is close to 90°. Both the MV and SB are wired and the SB is stented first with the careful deployment of the stent to ensure that the ostium of the SB is covered with only minimal protrusion into the MV. The LMS-LAD is then stented followed by final ‘kissing balloon’ inflation.
The T and Protrusion (TAP) Technique
This technique is applicable to the majority of LMS bifurcation lesions and it is the preferred technique to switch from a 1 to a 2-stent strategy. After both the MV and SB are wired, the LMS-LAD is stented first. A stent is then placed into the SB with a balloon left inside the MV (LAD). After careful positioning of the second stent ensuring that the proximal edge of the stent protrudes 1–2 mm into the MV the side branch stent is deployed at high pressure while keeping the deflated balloon in the MV. Final ‘kissing’ balloon inflation is then performed to complete the procedure to reshape the carina.
Culotte-Stenting
This technique is useful if the angle between the MV and SB is shallow (<60°) and the two vessels are of similar diameter. After wiring both vessels, the SB is stented. The MB is then re-wired and a second stent is placed through the stent struts, leaving an overlap of both stents in the LMS. Following deployment of the second stent, the SB is then re-wired and final ‘kissing’ balloon inflation is performed to reshape the carina [44] (Fig. 17.4a). The operator can also choose to perform a reverse Culotte with stenting first the MB.
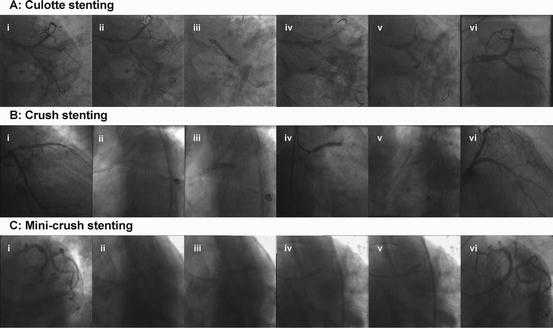
Fig. 17.4
Examples of bifurcation 2-stent strategies. (a) Culotte stenting. Suitable when both branches of a bifurcation are of similar diameter with a shallow angle (i). Both branches are wired (ii). The side branch is stented first (iii). The main branch is re-wired and then stented (iv), followed by a kissing balloon post-dilation (v) resulting in excellent final angiographic result (vi). (b) Crush stenting. Suitable when there is a size mismatch between the main branch and the side branch (i). After wiring of both branches, both stents are advanced (ii); the side branch is stented first (iii). The wire and balloon are removed and the main branch is stented (iv). There is a final kissing balloon post-dilation after the SB is re-wired through the crushed stent (v) resulting in an excellent angiographic result (vi). (c) Mini-crush stenting. Suitable when there is a size mismatch between the two branches (i). Both branches are wired and both stents are advanced (ii). The side branch stent is deployed with minimal protrusion of the proximal stent struts into the main branch (iii). After post-dilation of the side branch stent, the main vessel is stented crushing the first stent (iv). The side branch is re-wired and final kissing balloon inflation is performed (v) resulting in an excellent angiographic result (vi)
Crush Stenting Techniques
This strategy can be used when there is a size mismatch between the MV (usually larger) and the SB (usually smaller) and the angle between the branches is <60° (to facilitate re-wiring of the SB). In the crush stenting technique, after wiring of both branches and pre-dilatation if required, two stents are advanced into both the MV and the SB. The SB is first stented and then after removal of the wire and balloon the MV is then stented. The SB is then re-wired through the crushed stent and final ‘kissing’ balloon inflation is performed [45] (Fig. 17.4b). An evolution of this technique is the mini-crush technique where the overlap of the 2 stents in the MB is minimal and 2-step final kissing balloon inflation is performed: first the post-dilatation with a non compliant balloon of the SB and then a final kissing balloon inflation on MB and SB [46]. A variation of this technique is the DK-crush (double-kiss crush) where two ‘kissing’ balloon inflations are carried out both after stenting of the SB before MV stenting and at the end of the procedure [47].
< div class='tao-gold-member'>
Only gold members can continue reading. Log In or Register to continue
Stay updated, free articles. Join our Telegram channel

Full access? Get Clinical Tree


