Transperitoneal (supine patient)
Retroperitoneal
Easy access to upper extremities for line placement
Centripetal obesity and fatty abdominal viscera displaced
Bilateral groin access
Easy access to thoracic aorta and suprarenal aorta
Extension to median sternotomy
Abdominal viscera not in field
Access to abdominal viscera
Decreased post-op ileus
Ability to prep and drape prior to induction
Diminished risk of aortoenteric fistula secondary to decreased exposure of the suture lines
Transperitoneal Abdominal Aortic Exposure
The abdomen is incised in the midline as for a standard laparotomy approach (Fig. 2.1). Adherence to the linea alba makes abdominal closure easier. To minimize the likelihood of bowel injury secondary to abdominal wall adhesions, select a site in the upper abdomen or away from any prior incision sites to enter the peritoneum sharply. Digital exploration ensures that no bowel is adherent to the abdominal wall prior to extending the laparotomy incision along the length of the abdomen from xiphoid to pubis. The falciform ligament should be divided between ties. Exposure of the infrarenal aorta begins with mobilization of the small bowel to the right of the midline (Fig. 2.2). When taking down the attachments at the ligament of Treitz and opening the retroperitoneum, care should be taken to incise slightly to the left of the midline. This technique leaves an adequate margin of tissue for suture closure of the retroperitoneum at the end of the case without risking inadvertent bowel injury.
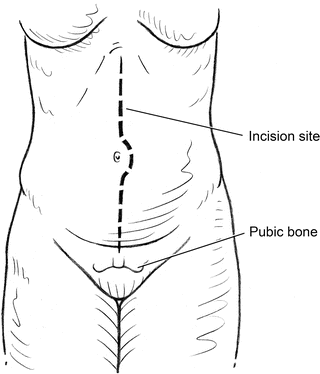
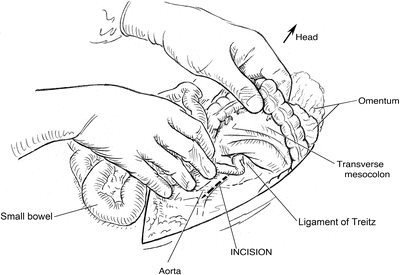

Fig. 2.1
Midline incision extending from the xiphoid to symphysis for transperitoneal approach to abdominal aortic exposure

Fig. 2.2
The transverse colon and omentum are lifted cephalad and the small bowel retracted to the right to expose the retroperitoneum. Incision in the retroperitoneum is made slightly to left of the midline to allow closure of the retroperitoneum over the aorta after repair
Once the retroperitoneum has been opened, clamp sites for proximal and distal vascular control should be exposed as soon as possible. Distal control can be obtained at the level of the common iliac arteries or by isolating each external and internal iliac artery separately, if common iliac aneurysmal or occlusive disease is present. Circumferential control of the iliac arteries is not necessary and should be avoided to minimize the risk of iliac vein injury. Surgical dissection at the aortic bifurcation should also be avoided to prevent injury to the sympathetic nerve plexus at that location.
Proximal dissection in the retroperitoneum begins by exposing the left renal vein as it crosses anterior to the aorta. Failure to find the left renal vein indicates the presence of a retroaortic left renal vein which passes posterior to the abdominal aorta. This relatively common anomaly highlights the importance of avoiding unnecessary circumferential dissection of the abdominal aorta (Fig. 2.3). A slight cephalad retraction of the crossing renal vein usually exposes the bilateral renal arteries.
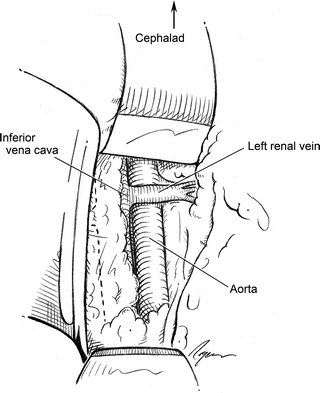

Fig. 2.3
The aorta with the crossing left renal vein. The crossing vein marks the approximate location of the renal arteries as well
If suprarenal aortic clamping is required, exposure between the SMA and renal arteries is sometimes adequate. Exposure between the SMA and celiac artery is rarely needed, and a clamp in this location leads to ongoing blood loss secondary to SMA backbleeding via collateral pathways fed by the celiac trunk. To avoid this problem, the next level of exposure obtained via a transperitoneal approach is the supraceliac aorta. Exposure in this location is facilitated by having a nasogastric or orogastric tube in place. In emergent situations, pulling the cardia of the stomach downward allows for manual palpation of the gastric tube. The aorta is then located where it crosses the diaphragmatic hiatus. The left anterior crus of the diaphragm should be sharply divided, and planes on each side of the aorta can be digitally developed enough to place a clamp in this location. Being able to palpate the spine on each side usually indicates that the aorta has been adequately cleared for clamping. Attempts to clamp the aorta before incising the periaortic tissues down to the spine will fail as the clamp slips off anteriorly. The most common error in this location is inadvertent clamping of the esophagus, typically caused by forgetting that the aorta is the more posterior structure and the vertebral bodies are directly deep to it. Palpation of the gastric tube in the esophagus provides a constant reminder of its location and helps avoid esophageal injury and inadvertent clamping.
When exposure of the visceral segment of the aorta is needed, for example, in the setting of type IV thoracoabdominal aneurysm repair, we recommend a retroperitoneal approach to avoid obscuration by the overlying viscera.
Retroperitoneal Aortic Exposure
Retroperitoneal aortic exposure has the advantages discussed previously (Table 2.1). The key steps in positioning prior to this exposure are as follows:
1.
Patient on a “sandbag” or “beanbag.”
2.
Ensuring that the flexion point or adjustable “kidney rest” of the operating table is at the level of the space between the iliac crest and the costal margin.
3.
The patient is turned into a lateral decubitus position with the right side down. An axillary roll minimizes the possibility of right brachial plexus injury.
4.
The left arm is extended upward and across the body and supported on either a Mayo stand or arm sling that can be secured to the operating table.
5.
The lower extremities are carefully padded.
6.
The “reflex” position of the bed obtained by raising the kidney rest opens the space between the costal margin and iliac crest and increases the intercostal spaces as well.
7.
In patients with abdominal obesity, the pannus is allowed to fall forward while being supported with the beanbag. This position ensures that the benefits of retroperitoneal exposure are maximized (Fig. 2.4).
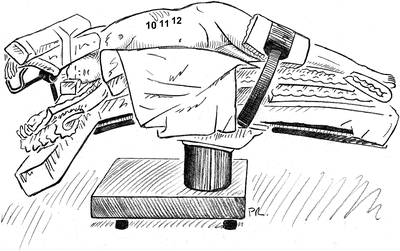

Fig. 2.4
Positioning patient in left lateral decubitus position for retroperitoneal aortic exposure
A curvilinear incision begins lateral to the rectus sheath, approximately 2 in. anterior to the anterior superior iliac spine (ASIS) and extends superiorly to the appropriate rib space as determined by the proximal extent of the aneurysm. For most abdominal aortic pathology, the incision is carried through the 10th interspace (the highest unattached rib) (Fig. 2.5).
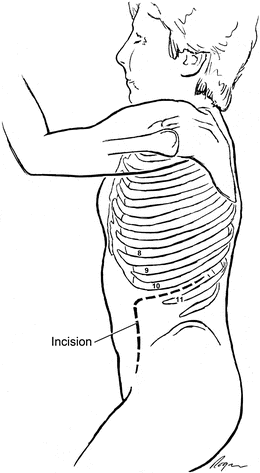

Fig. 2.5
Typical incision for juxtarenal aortic exposure is through the 10th interspace and then extends parallel to the rectus
Careful attention to the layers of the abdominal wall in this location can help avoid inadvertent entrance into the peritoneum (Fig. 2.6). The first layer encountered is the external oblique aponeurosis. Incising this layer with electrocautery exposes the fibers of the internal oblique. Using a blunt-tipped instrument in this location allows for spreading and exposure of the transverse abdominal muscular fibers, behind which lays the fatty tissue of the retroperitoneum. Digital exploration confirms access into the retroperitoneum not the peritoneum and allows for manual separation of the peritoneum from the abdominal wall layers to allow the remainder of the incision to be opened. Beginning this manual dissection laterally and extending it superiorly to the diaphragm helps maximize exposure.
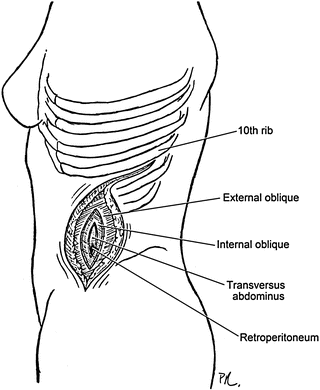

Fig. 2.6
Retroperitoneal aortic exposure demonstrates the muscle layers divided to expose the retroperitoneal space and avoid entry into the peritoneum
Once the retroperitoneal space has been developed, manual displacement of the left kidney anteriorly allows for identification of the left renal artery and exposes the left diaphragmatic crus if needed. A self-retaining retractor assists with the exposure and can also be positioned to keep the left ureter out of the operative field. Exposure of the left renal artery and dissection proximally to its origin from the aorta takes the surgeon across an accessory lumbar vein that drains into the left renal vein. This vein should be preemptively divided to avoid avulsing it (Fig. 2.7). The aortic bifurcation can be located by palpation, and the bilateral common iliac arteries are usually bluntly exposed to minimize iliac vein injury while creating isolated clamp locations. If additional proximal exposure above the renal arteries is required, the right renal artery is usually lower than the left, and exposing above the left renal artery with a combination of blunt and sharp dissection allows the SMA pulsation to be appreciated. If space to clamp in this location is not adequate, the left crus can be divided which quickly exposes the supraceliac aorta. In emergent situations, the initial incision through the 10th intercostal space allows manual palpation of and clamp placement on the thoracic aorta until further exposure can be obtained. Thoracic aortic clamping is a temporary, salvage maneuver, and the clamp should be moved distally as soon as possible.
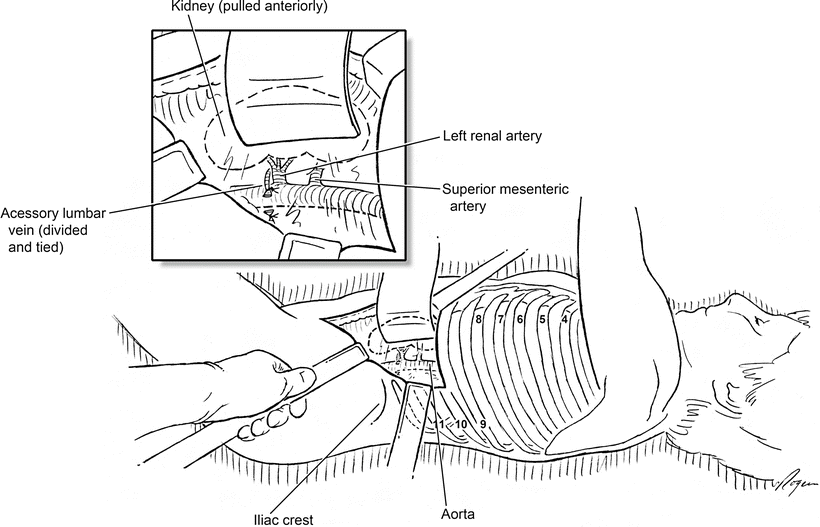

Fig. 2.7
Retroperitoneal aortic exposure with the left kidney reflected anteriorly. The left renal artery is traced back to its origin at the aorta, and the superior mesenteric artery can be felt slightly above. Inset: The accessory lumbar vein draining to the left renal vein is divided before the aorta is opened
When planned intervention requires a supraceliac aortic clamp, the incision is often through the 9th interspace which requires division of the costochondral cartilage. If planned intervention is on the descending thoracic aorta primarily, or in addition to abdominal aorta, incision through the 6th rib space, with or without division of the diaphragmatic fibers, allows for proximal thoracic aortic clamping (Fig. 2.8). These procedures are typically performed with sequential clamp techniques and left heart bypass if the situation demands.
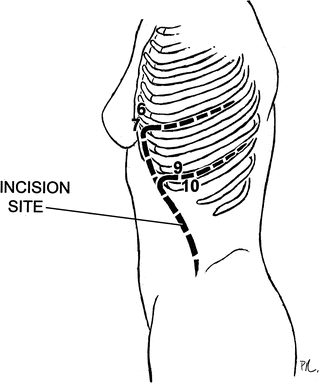

Fig. 2.8
Alternative incisions from retroperitoneal approach through the 9th interspace allows for improved exposure to the supraceliac aorta and through the 6th interspace allows for descending thoracic aortic exposure
Descriptions of exposures to gain access to the aortic arch and the origin of the great vessels can be found in any cardiac or thoracic surgical atlas. Exposure of the ascending aorta, aortic arch, innominate artery, and left common carotid artery origin is obtained by way of a median sternotomy. To expose the origin of the left subclavian artery, a left anterior thoracotomy is performed through the fourth intercostal space.
Carotid, Subclavian, and Axillary Artery Exposures
Carotid Artery
The most common means of exposing the carotid artery, for both traumatic exploration and elective intervention, requires neck extension with the patient’s head turned to the contralateral side whenever possible (Fig. 2.9a, b). The incision is placed along the anterior border of the sternocleidomastoid muscle. Care is taken to angle the incision posteriorly as it approaches to within 1–2 in. of the angle of the mandible as this minimizes the risk of injury to the marginal mandibular nerve. Injury to this nerve can manifest as unilateral downward drooping of the mouth and numbness.
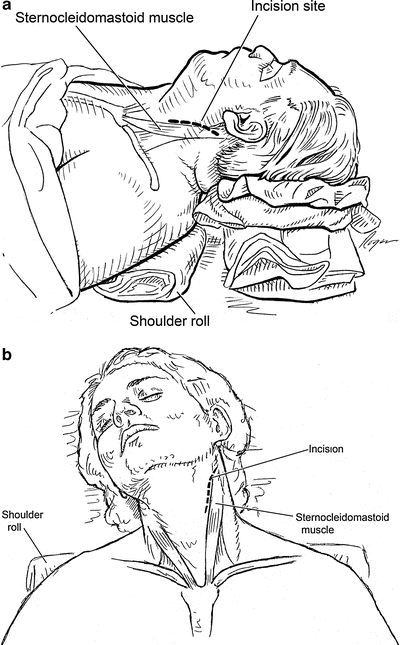

Fig. 2.9
(a, b) The lateral and anterior view of positioning for carotid exposure: the patient is positioned with the neck extended using a shoulder roll. Incision paralleling the anterior border of the sternocleidomastoid muscle and directing posteriorly before reaching the angle of the mandible
After incising the skin, the platysma is divided in the same direction as the skin incision using the electrocautery. The external jugular vein is sometimes encountered and can be ligated and divided between ties. The anterior border of the sternocleidomastoid muscle should then be delineated and the muscle belly grasped and retracted posteriorly and laterally to allow for exposure of the internal jugular vein (Fig. 2.10a). Once the internal jugular vein is identified, mobilizing its anterior border leads to exposure of the facial vein. This crossing vein typically functions as a landmark for the level of the carotid bifurcation. The facial vein should be ligated and divided with care to avoid injury of the underlying hypoglossal nerve. The carotid artery is encased within its own sheath and lies deep and medial to the jugular vein. Before opening the carotid sheath, careful inspection sometimes reveals an anterior vagus nerve that should be protected. The vagus nerve is easily differentiated from the crossing branches of the ansa cervicalis by its larger size and its course which parallels the carotid artery. The inferior border of the dissection is typically the omohyoid muscle, while superiorly the dissection usually ends at the posterior belly of the digastric muscle (Fig. 2.10b).
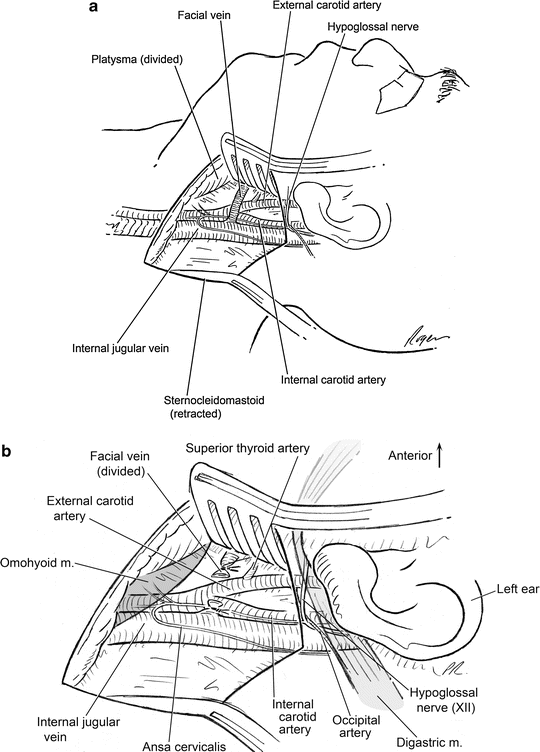

Fig. 2.10
(a) Carotid exposure: after division of the platysma and posterior retraction of the sternocleidomastoid muscle, the facial vein is noted to be crossing at the approximate level of the carotid bifurcation. (b) Once the facial vein is divided, the carotid bifurcation and superior thyroid artery can be exposed for further dissection and control. Note the omohyoid muscle at the inferior edge of the dissection and the posterior belly of the digastric muscle at the superior edge of the dissection. Can be either partially or completely divided for additional exposure if needed. Note the location of CN XII crossing the internal carotid artery
Division of either the omohyoid or digastric muscle belly allows for some additional exposure with minimal disability. Superior exposure of the internal carotid artery usually exposes the hypoglossal nerve which is held in place by an arterial branch to the sternocleidomastoid muscle. The division of this artery allows the hypoglossal nerve to be swung cephalad and protected from harm. Multiple small veins in this location also must be carefully dissected and preemptively divided to avoid unnecessary bleeding and blind placement of clips or cauterizing that can lead to nerve damage.
In the case of a planned carotid-subclavian bypass or transposition procedure, exposure of both the carotid and subclavian arteries can be obtained via a transverse supraclavicular incision centered over the medial third of the clavicle.
Supraclavicular Subclavian Artery Exposure
Supraclavicular exposure allows access to the subclavian artery as well as the origin of the vertebral artery if needed. The surgeon must remember that left-sided supraclavicular dissection risks injury to the thoracic duct, which arises deep and inferior in the wound to enter the posterior aspect of the internal jugular and subclavian vein confluence.
The patient is positioned with both arms tucked at the sides, the neck turned toward the contralateral side. A shoulder roll can be used when additional extension is needed to widen the space between the shoulder and neck. The incision is made approximately 1.5 cm above the clavicle and typically extends across the lateral head of the sternocleidomastoid (SCM) and 2 cm to either side (Fig. 2.11). The platysma muscle and the lateral head of the SCM are both divided. The authors recommend the scalene fat pad be mobilized inferomedially and then retracted superolaterally. Care is taken to not injure the phrenic nerve, which courses lateral to medial on the anterior surface of the anterior scalene muscle. Exposure of the subclavian artery typically requires the anterior scalene muscle to be divided. This is most safely done near its insertion onto the 1st rib. The muscle fibers can be elevated from the deeper brachial plexus using a right angle or straight dissector. Again, awareness of the trajectory and course of the phrenic nerve cannot be overstated.
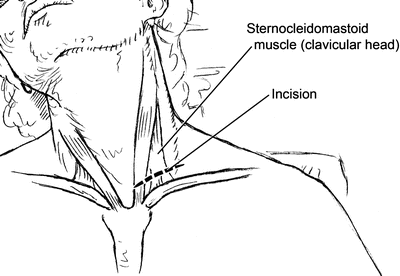

Fig. 2.11
Incision for supraclavicular exposure of the subclavian artery
Once the anterior scalene muscle is divided and reflected upward, the fascia overlying the subclavian artery can be sharply incised to mobilize the artery. The subclavian artery branches including the internal mammary, thyrocervical trunk, and vertebral artery can be individually encircled with vessel loops for control. Once mobilized, the subclavian artery easily elevates into the wound.
Infraclavicular Exposure of the Axillary Artery
Exposure of the axillary artery is most often used for axillofemoral bypass. The patient can be positioned supine with the arm tucked at the side or the arm abducted 90° on an arm board. The use of a shoulder roll to slightly elevate the side being exposed can also be helpful. Sterile skin preparation should include the neck and chest from the midline across to the shoulder. An incision is made 2–4 cm below the clavicle extending from the deltopectoral groove to the lateral aspect of the clavicular head (Fig. 2.12). The fibers of the pectoralis major are then separated in the direction of their axis to expose the clavipectoral fascia beneath. The pectoralis minor lies laterally in the exposed space and should be divided in addition to the clavipectoral fascia to optimally expose the fibrofatty tissue surrounding the axillary artery and vein. The vein lies slightly anterior and inferior to the artery in this location, and care should be taken to avoid injury during circumferential dissection and control. In this location the thoracoacromial trunk should be divided to allow the artery to be pulled up into the wound, which is best done using atraumatic silastic vessel loops.
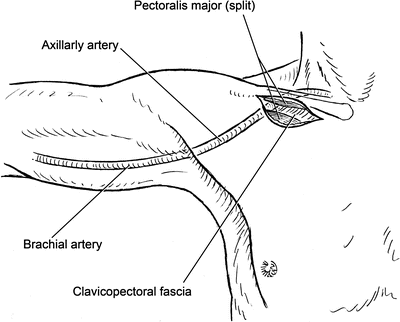

Fig. 2.12
Incision location and exposure of the infraclavicular axillary artery
Exposure of the Lower Extremity Arteries
Femoral Artery
Understanding femoral vascular anatomy is critical to open, endovascular, and percutaneous procedures in vascular surgery. The inguinal ligament should be first delineated by the bony landmarks of the anterior superior iliac spine and the pubic tubercle. The femoral artery bisects the inguinal ligament with a slight medial to lateral trajectory.
Stay updated, free articles. Join our Telegram channel

Full access? Get Clinical Tree


