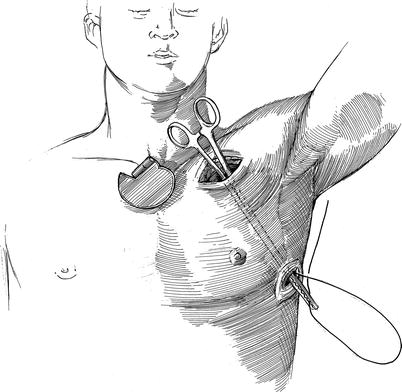
Fig. 28.1
Robot-assisted Bi-ventricular lead placement—positioned patient with port-sites: the patient is placed in the left lateral decubitus position so that the back is aligned with the left side of the operating table. Either a sand or beanbag is used to secure the patient in this position. The camera port is placed in line with the tip of the scapula at approximately the 7th intercostal space (ICS). The right robotic instrument arm port is placed in line with the scapular tip and two finger-breadths (5th ICS) below it. The left instrument arm port is placed in line with the camera port in the 8th ICS. A posterior working port is placed behind (dorsal) the camera port and an anterior working port is positioned in the mid-axillary line
Next, Medtronic™ 5571 (Medtronic, Inc, St Paul, MN) “screw in” leads are then inserted through this working port and the electrodes are positioned near the lateral pericardium for robotic insertion. The left and right robotic instrument arms are then inserted in the 8th and 5th ICS, respectively, along a straight line with the tip of the scapula. An 8–10-mm soft working port is inserted posterior to the camera port and is used by the assistant for lung retraction, suture introduction, and retrieval of suture tails and needles. The pericardium is then opened posterior to the phrenic nerve, and the obtuse marginal vessels are identified. When there has been prior cardiac surgery, entry into the posterior pericardium enables easier dissection of the ventricular wall. The pericardium is then retracted posteriorly and anteriorly with sutures that are retrieved through the working ports. The target zone is identified, and a suitable area of bare viable myocardium is located. Care is taken to define prior coronary artery bypass grafts and intra-myocardial tributaries.
Robotic instruments are then used to attach two Medtronic™ 5571 screw-in LV leads to the myocardium. Each of these is secured with 2.5–3 clockwise turns of the lead patch (Fig. 28.2). This maneuver should entrap the wire helix electrode deep in the myocardium. It is helpful to use the right hand to screw the lead into the myocardium and then to stabilize the lead with the left instrument tip, while the surgeon’s right hand “re-cocks” to add more rotational torque. Either round tooth (Endowrist™ Resano forceps) or long tipped graspers (Endowrist ™ Prograsp™ forceps) provide the most secure grip for this maneuver. Care must be taken to grasp either the silastic header or the fabric cuff of the button and not the lead, as these instruments can perforate the insulation. In order to maximize working space, ventilation can be held during lead implantation.
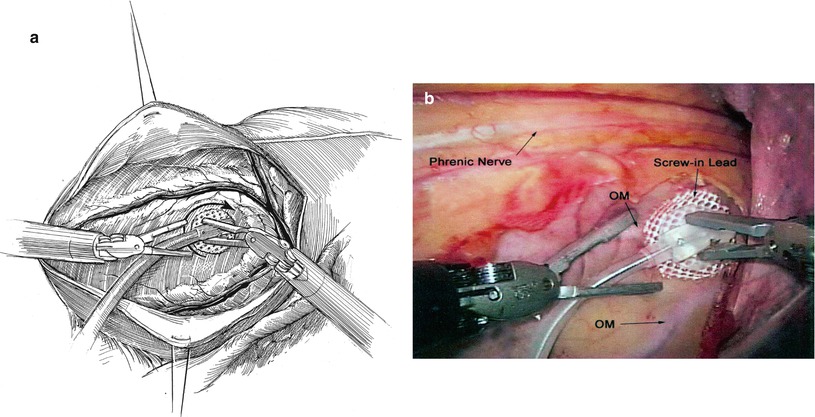
Fig. 28.2
Robotic lead insertion: (a) the pericardial incision is made posterior to the phrenic nerve. It is extended inferiorly (caudally) and superiorly (cephalically) to visualize both the first (OM1) and second obtuse marginal (OM2) coronary arteries. Pericardial stay sutures are placed through the anterior and posterior pericardial edges. Thereafter, they are passed through respective working ports and placed under tension with clamps. This maneuver provides maximum exposure to the lead target site. Through the posterior working port, a blunt tissue dissector (Kitner) is used to reflect the left lung posteriorly and away from the working field. The epicardial leads are passed into the thorax through the anterior working port. Thereafter, the first lead is grasped with the robot right arm forceps (Endowrist™ Prograsp™ Forceps). Then, with assistance of the left robot instrument, it is screwed into the myocardium in a clockwise rotation, just below the native circumflex coronary artery and between the OM1 and OM2 arteries. The second lead then is grasped with the right instrument and similarly screwed into the myocardium approximately 2.5-cm distal to the first lead and between OM1 and OM2. (b) This photograph shows the first lead being inserted just below the main circumflex coronary artery and between the OM1 and OM2 branches
Grounding one lead and energizing the other with pacing above the patient’s intrinsic heart rate is the best way to test threshold levels. Sensitivity thresholds below 2.5 V are typically satisfactory and should improve steadily with lung re-expansion and ventilation. The pericardium is then closed over the leads with 3-0 silk sutures (Fig. 28.3). The knots can be tied with the robotic instruments or by the table surgeon using a knot tier. Pericardial closure aids by enhancing permanent distal fixation and improving lead thresholds because of firmer surface contact.
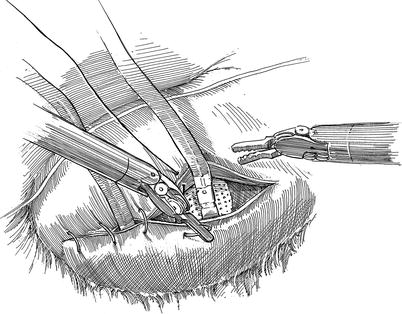
Fig. 28.3
Robotic pericardial closure: prior to pericardial closure both pacemaker leads are oriented toward the anterior working port (new pocket). The pericardium then is closed with several interrupted 2-0 silk sutures. Next, the instrument arms are removed from the thorax and the robot is moved away from the operating table. Both leads are tucked loosely into the pre-made pocket within the anterior port site. At this time, all port sites are suture closed, and the patient is then repositioned as shown in Fig. 28.4
Thereafter, the robotic instruments are removed and the instrument cart undocked. Then the hand-held endoscopic camera is inserted through the anterior working port. A 24 Fr channeled (Blake) drain is then inserted through the left arm port and is positioned under direct vision. Intercostal nerve blocks are performed by injecting marcaine (0.25 %) along the chest wall from ICSs three through nine. Using the endoscope, a sub-pleural anesthetic “wheal” should be observed at each ICS. After being sure that all port sites are hemostatic, the camera is removed, and the leads are capped. A subcutaneous pocket is made in the anterior working port, and the leads are placed here for retrieval following patient re-positioning. Thereafter, port sites are suture closed, and the patient is repositioned in the supine position, prepared sterilely, and re-draped.
If a pacemaker of defibrillator has been implanted previously, the pocket is opened and the device removed. The anterior working port pocket is reopened, and the LV leads are delivered into the surgical field. The leads are then pulled through a subcutaneous tunnel into the device pocket and tested again (Fig. 28.4). A “Y” adaptor is used to connect the LV leads in a bipolar arrangement to the correct port of the device. This configuration permits selection of either lead as the active one and retains multiple possibilities for an electrical ground (the other LV lead, the can of the device, etc.). To maintain effective left ventricular pacing when the threshold of one lead increases, either a different grounding arrangement can be selected or the other lead can be used. If a right ventricular pacing or defibrillating lead is required, it is inserted percutaneously at this time under fluoroscopy.