Fig. 21.1
Patient position: the patient is placed on the operating table with the right side shifted to the edge. The right arm is placed below the operating table and is suspended using a “sheet sling”. A towel roll is placed behind the right shoulder for slight elevation. The robot instrument cart is placed on the left side of the patient with the instrument arms and camera “reaching over” to enter the right side of the thorax
Instrument Port Placement
Robotic instrument ports are placed after a long acting local anesthetic is administered (Fig. 21.2). First, the endoscopic camera port is placed lateral to the patient’s nipple in the right fourth intercostal space. In women this port incision is placed just above the infra-mammary crease with the breast distracted superiorly so that the port enters either the fourth or fifth intercostal space. Carbon dioxide is insufflated continuously via the camera port into the thorax at 6 L/min and 8 Torr of pressure. After the camera is introduced, the inter-thoracic environment is examined to determine the presence of adhesions and to be sure that is suitably positioned.
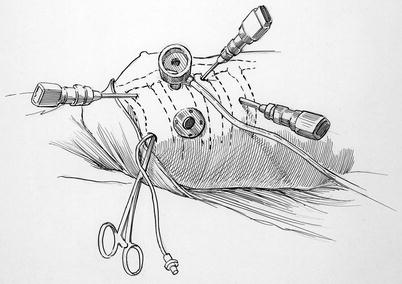
Fig. 21.2
Instrument port placement: this illustration shows placement of the left and right robot instrument port trocars (third and fifth to sixth ICS). The trans-thoracic clamp is shown in the third intercostal space (ICS) at the posterior axillary line. A small sump sucker is passing into the left atrium via the clamp incision. The working port is shown in the fourth ICS. The camera port (fourth ICS) has the CO2 insufflation line attached. The trocar that is most medial is for the retractor arm
A 2.5-cm incision is made along the anterior axillary line and carried posteriorly in the fourth intercostal space. This incision accommodates a 15-mm soft rubber thoracoport (Ethicon Endo-Surgery Inc, Cincinnati, OH) that functions as a “working port” for the surgical assistant to access the operative site. To retrieve pericardial traction sutures safely, we place a finger through the “working port” incision and pass an angiocatheter one interspace lower in the mid axillary line. Thereafter, trans-thoracic pericardial retraction sutures are pulled through the angiocatheter and anchored. Guided by a finger in the “working port”, a Chitwood trans-thoracic aortic crossclamp (Scanlan International Inc, St. Paul, MN) is introduced in the same interspace as the camera and working ports via a small mid-axillary line incision. We then introduce a suction catheter beside the clamp for left atrial pulmonary venous drainage. This is very important to maintain continuous blood-free visualization. Thereafter, the left robotic instrument trocar is placed in the third interspace, equidistant between the camera port and the shoulder, under “working port” finger guidance. The atrial retractor trocar is placed in either the fifth or sixth interspace as medially as possible. Next, the right instrument cannula is placed, under endoscopic visual guidance, along the anterior axillary line (‘working port’ level) and just cephalad to the diaphragmatic chest wall attachment. This position usually is three to four intercostal spaces caudal to the working port. By placing this port inferiorly, greater separation of the two right instrument arms decreases potential external instrument arm conflicts. The right instrument cannula retracts diaphragm inferiorly, facilitating unobstructed instrument exchanges and obviating the need for a diaphragm retraction suture.
Cardiopulmonary Bypass
The right femoral artery and vein are exposed for cannulation via a small transverse incision placed just cephalad to the groin crease (Fig. 21.3). Using the Seldinger guide-wire technique and under trans-esophageal direction, a femoral venous cannula (either 25-Fr Quickdraw™ Venous Cannula, Edwards Lifesciences, Irvine, CA or BioMedicus™ Multi-stage Femoral Venous Cannula, Medtronic, Minneapolis, MN) is inserted via an anterior surface purse-string suture and passed the length of the inferior vena cave (IVC). Then it is passed through the right atrium so that the distal end resides several centimeters in the superior vena cava (SVC) (Fig. 21.4). If this cannula is positioned appropriately excellent venous drainage ensues, obviating the need for separate SVC cannulation. For operations requiring an open right atrium, a separate internal jugular cannula is passed into the SVC. The femoral artery is cannulated via a transverse arteriotomy, which is later repaired by direct suture closure. Cardiac drainage may be aided by a pulmonary artery vent that has been placed percutaneously. When needed, retrograde cardioplegia can be infused via an EndoPlege™ retrograde coronary sinus catheter.
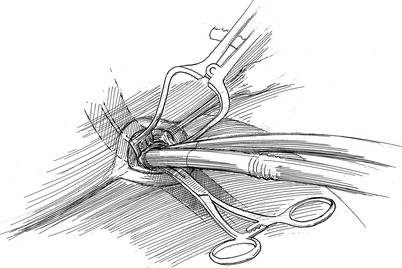
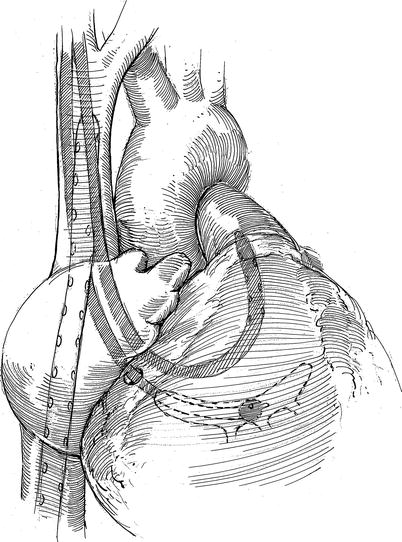
Fig. 21.3
Femoral artery and vein cannulation: this illustration shows arterial and venous cannulas that are used for cardiopulmonary perfusion. The venous cannula passes through the right femoral vein (distant cannula), into and through the superior vena cava and into the superior vena cava. The arterial cannula is shown in the foreground. All cannula insertions are done using the Seldinger guide-wire method under echocardiographic direction
Fig. 21.4
Position of intra-cardiac cannulas: the femoral venous cannula is shown after it has passed through the right atrium and into the SVC. The balloon tipped retrograde coronary sinus catheter has been inserted via the right internal jugular vein and directed into the mid-sinus for cardioplegia administration via SVC. A pulmonary artery vent has been passed via the right internal jugular vein
Thereafter, the daVinci™ surgical cart is docked to instrument and camera trocars, followed by introduction of surgical instruments. If there is significant pericardial fat, it is removed at this time using a robotic electrocautery instrument. To maintain sufficient intra-thoracic CO2 pressure, which helps to provide an adequate “working space”, the assistant can hand cover thoracoports. After cardiac decompression and suspension of respiratory motion with the initiation of cardiopulmonary bypass, mediastinal displacement provides much more working space. Vacuum-assisted venous drainage is used to optimize pump return and cardiac decompression.
Cardiac Exposure, Aortic Occlusion, and Myocardial Protection
To extract pericardial retraction sutures over the aorta, an angiocatheter is passed through the anterior chest wall, avoiding the internal thoracic vessels. Following femoral cannulation for cardiopulmonary perfusion, the daVinci™ instrument cart is “docked” at the operating table, followed by camera and instruments insertion. After cardiopulmonary bypass is established with systemic cooling to 30 °C, the pericardium is opened 3–4 cm anterior to the phrenic nerve with Endowrist™ curved scissors or electrocautery (Intuitive Surgical, Mountain View, CA), and the pericardiotomy is extended to the aortic reflection (Fig. 21.5). Two traction sutures are placed along the posterior pericardium, and using a “crochet hook”, distracted laterally via a trans-thoracic angiocatheter and through the chest wall. To improve aortic exposure for cross-clamp positioning, a third pericardial traction suture is carried through the anterior chest wall. Here, care must be taken to avoid injury to the internal thoracic vessels. To prepare for the left atriotomy, the oblique sinus is opened behind the IVC, and the inter-atrial grove is dissected slightly using the robotic electrocautery (Fig. 21.6).
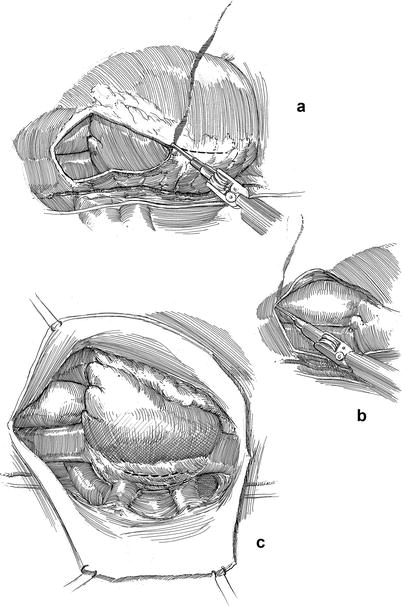
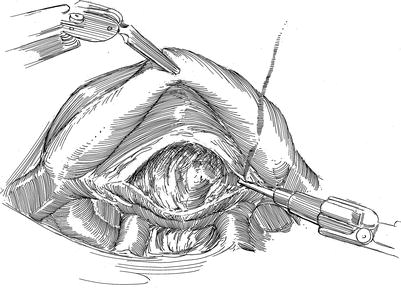
Fig. 21.5
Pericardiotomy and retraction sutures. (a) After cardiopulmonary bypass has been established the pericardium is opened anterior to the phrenic nerve using the robotic electrocautery instrument. (b) The pericardial incision is carried cephalad to the aortic reflection. Care must be taken to avoid phrenic nerve injury by keeping this incision directed toward anterior surface of the aorta. (c) Cardiac exposure for a robotic mitral valve repair is developed using pericardial retraction sutures placed in the lateral edge and for retraction brought through the chest wall via angiocatheters. A third retraction suture is placed through the pericardial edge anterior the aorta and pulled through the anterior chest wall, avoiding internal thoracic vessels. Retraction of the anterior pericardium facilitates trans-thoracic aortic clamping
Fig. 21.6
Inter-atrial groove dissection: prior to opening the left atrium and at the level of the right superior pulmonary vein, the fatty interatrial groove is dissected with the robotic electrocautery. At the same time the oblique sinus behind the IVS should be exposed. Both dissections help obviate both pulmonary vein injury and right atrial entry during the left atriotomy
Subsequently, the Chitwood aortic cross-clamp is positioned across the aorta (Fig. 21.7). To do this safely, the console surgeon exposes the transverse sinus with robotic instruments, while the patient-side assistant positions one arm of the clamp through the sinus (posterior to the aorta) and the other arm anteriorly. The endoscopic camera provides superb visualization of the right pulmonary artery and left atrial appendage, allowing careful clamp positioning with avoidance of structural injury.
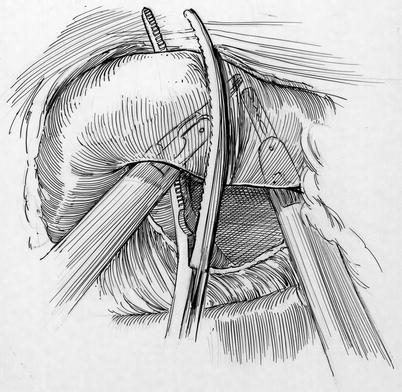
Fig. 21.7
Cross clamp deployment: the left robot instrument is lifting the aorta so that the posterior arm of the clamp can be passed through the transverse sinus safely. The right arm of the robot is also used to lift the aorta. Behind the aorta and near the tip the posterior clamp, the right pulmonary artery can be seen. In the distance the left atrial appendage should be visualized. Adequate visualization is the key to safe placement of the trans-thoracic aortic clamp. One should decrease pump flow during this maneuver
For antegrade cardioplegia administration, an angiocatheter (#14G, 5.5-in. with a small side-hole cut near the tip) is placed directly through the anterior chest wall (Fig. 21.8). The catheter should be aimed toward the aorta with care to avoid internal thoracic vessel injury. Thereafter, it is grasped with robotic instruments and directed visually just proximal to the cross-clamp and into the aortic root by the console surgeon. The stiff needle inside the angiocatheter may introduce unwanted “torque”. Therefore, the assistant should withdraw the needle just as the catheter tip crosses into the aortic lumen. The console surgeon may then advance an extra length of the now flexible catheter farther into the aorta before securing it to the skin and attaching the cardioplegia delivery system. Generally, it takes less than 10 min from the time cardiopulmonary bypass is initiated until aortic cross clamping and cardioplegia delivery. The ease and safety of the pericardiotomy, traction suture placement, inter-atrial groove dissection, and cross clamp positioning with decompressed heart easily justifies the few extra minutes of cardiopulmonary bypass time.
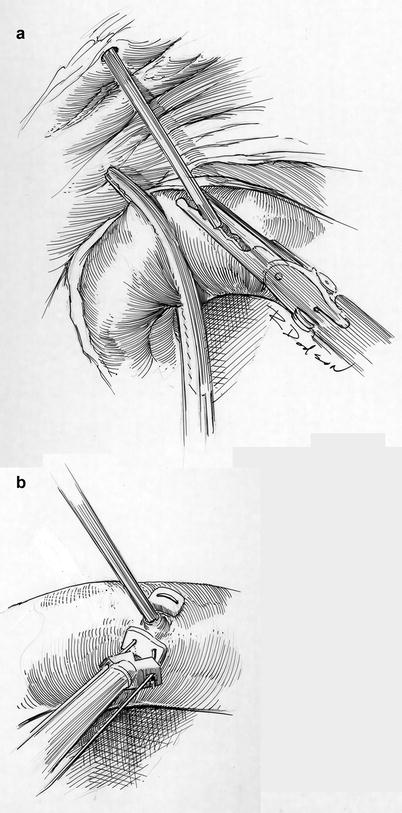
Fig. 21.8


Cardioplegia catheter insertion and closure. (a) Using robotic visualization and instruments, the console surgeon directs the catheter that has been placed through the anterior chest wall into the proximal aortic root. (b) Following cardiac de-airing the catheter is removed and the entrance site closed with a pledgeted 4-0 PTFE suture. This illustration shows extracorporeal tying of this closure suture
Stay updated, free articles. Join our Telegram channel
Full access? Get Clinical Tree
