Arterial blood sampling
An arterial blood sample is used to measure the arterial oxygen tension (PaO2), carbon dioxide tension (PaCO2), pH and bicarbonate/base excess levels, and haemoglobin (Hb) saturation (SaO2).
Familiarize yourself with the location and the use of the blood gas machine. Arterial blood is obtained either by percutaneous needle puncture or from an indwelling arterial line.
Radial artery
The radial artery is more accessible and more comfortable for the patient; it is best palpated between the bony head of the distal radius and the tendon of the flexor carpi radialis with the wrist dorsiflexed. The Allen test is used to identify impaired collateral circulation in the hand (a contraindication to radial artery puncture): the patient’s hand is held high, with the fist clenched and both the radial and ulnar arteries compressed. The hand is lowered, the fist is opened, and the pressure from the ulnar artery is released. Colour should return to the hand within 5 seconds.
Brachial artery
The brachial artery is best palpated medial to the biceps tendon in the antecubital fossa, with the arm extended and the palm facing up. The needle is inserted just above the elbow crease.
Femoral artery
The femoral artery is best palpated just below the midpoint of the inguinal ligament, with the leg extended. The needle is inserted below the inguinal ligament at a 90 degree angle.
The chosen puncture site should be cleaned. Local anaesthetic should be infiltrated (not into the artery). Use one hand to palpate the artery and the other hand to advance the heparin-coated syringe and needle (22–25 gauge) at a 60–90 degree angle to the skin, with gentle aspiration. A flush of bright red blood indicates successful puncture. Remove about 2–3 mL of blood, withdraw the needle, and ask an assistant to apply pressure to the puncture site for 5–15 minutes. Air bubbles should be removed. The sample is placed on ice and analysed within 15 minutes (to reduce oxygen consumption by white blood cells (WBCs)).
Complications
These include persistent bleeding, bruising, injury to the blood vessel, and local thrombosis.
Arterial line insertion: introduction
Indications
Contraindications
Initial measures
Arterial line insertion: over-the-wire technique (see Fig. 18.1)
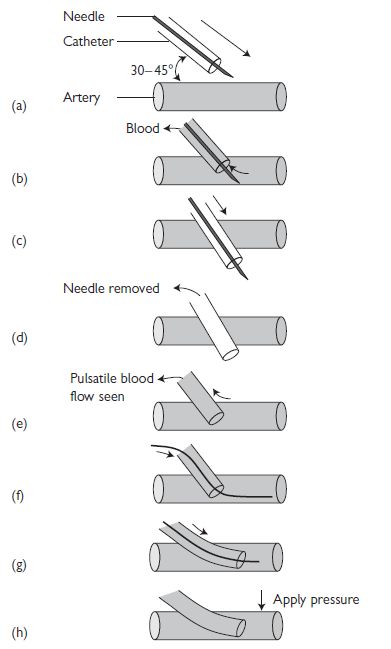
Fig. 18.1 Arterial line insertion: over-the-wire technique. Reproduced with permission from Ramrakha P, Moore K, and Sam M (2010). Oxford Handbook of Acute Medicine. 3rd ed. Oxford: Oxford University Press.
Arterial line insertion: over-the-needle technique
(see Fig. 18.2)
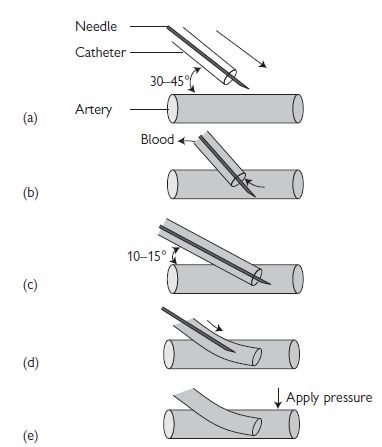
Fig. 18.2 Arterial line insertion: over-the-needle technique. Reproduced with permission from Ramrakha P, Moore K, and Sam M (2010). Oxford Handbook of Acute Medicine. 3rd edn. Oxford: Oxford University Press.
Complications
Central line insertion
You will need the following
Risks
General procedure
Measuring the central venous pressure (CVP): tips and pitfalls
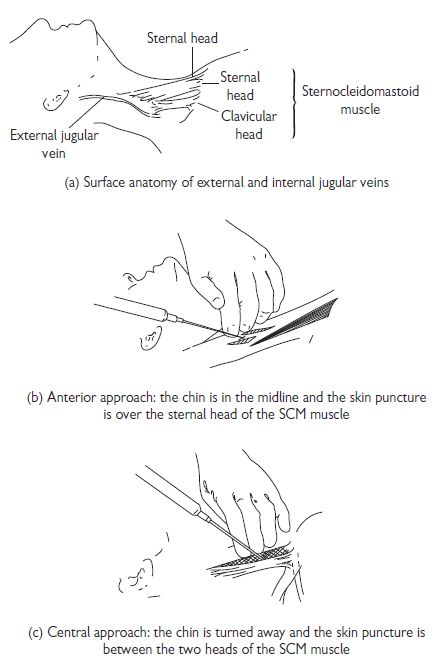
Internal jugular vein cannulation
The IJV runs just posterolateral to the carotid artery within the carotid sheath and lies medial to the sternocleidomastoid muscle (SCM) in the upper part of the neck, between the two heads of the SCM in its medial portion, and enters the subclavian vein near the medial border of the anterior scalene muscle (see Fig.18.3). There are three basic approaches to IJV cannulation: medial to SCM, between the two heads of the SCM, or lateral to the SCM. The approach used varies and depends on the experience of the operator and the institution.
Tips and pitfalls
Subclavian vein cannulation
The axillary vein becomes the subclavian vein (SCV) at the lateral border of the 1st rib and extends for 3–4 cm just deep to the clavicle. It is joined by the ipsilateral IJV to become the brachiocephalic vein behind the sternoclavicular joint (see Fig. 18.4). The subclavian artery and brachial plexus lie posteriorly, separated from the vein by the scalenus anterior muscle. The phrenic nerve and the internal mammary artery lie behind the medial portion of the SCV and, on the left, lies the thoracic duct.
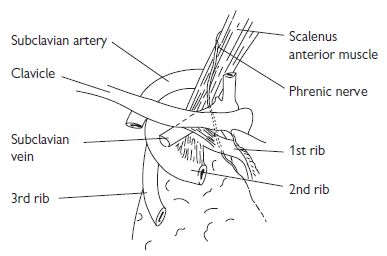
Fig. 18.4 The subclavian vein and surrounding structures.
Ultrasound-guided central venous catheterization (1)
Traditional central venous catheterization methods rely on anatomical landmarks to predict vein position. However, the relationship between such landmarks and vein position varies significantly in ‘normal’ individuals. Failure and complication rates using landmark methods are significant, and therefore serious complications may occur. Recent advances in portable ultrasound equipment have now made it possible to insert central venous catheters under two-dimensional (2D) ultrasound guidance.
Advantages of this technique include:
Guidelines from the National Institute for Clinical Excellence (September 2002) state: ‘Two-dimensional imaging ultrasound guidance is recommended as the preferred method for insertion of central venous catheters into the internal-jugular vein (IJV) in adults and children in elective situations’. However, training and equipment availability render such recommendations effectively useless in the UK at present.
Equipment/personnel needed
Preparation
Perform a preliminary non-sterile scan to access each IJV for patency and size.
Patient
Sterile precautions should be taken with patient’s head turned slightly away from the cannulation site. Head-down tilt (if tolerated) or leg elevation should be used to increase the filling and size of the IJV. Ensure adequate drapes to maintain a sterile field.
Excessive head rotation or extension may decrease the diameter of the vein.
Ultrasound equipment
Ultrasound-guided central venous catheterization (2)
Scanning
The most popular scanning orientation for IJV central catheter placement is the transverse plane:
When moving the probe, watch the screen—not your hands.
After identification of the internal jugular vein
Needle passage causes a ‘wavefront’ of tissue compression. This is used to judge the progress of the needle and position. Absence of visible tissue reaction indicates incorrect needle placement. Just before vessel entry, ‘tenting’ of the vein is usually observed.
One of the most difficult aspects to learn initially, is the steep needle angulation required, but this ensures that the needle enters the IJV in the ultrasound (US) beam and takes the shortest and most direct route through the tissues.
Needle pressure may oppose the vein walls, resulting in vein transfixion. Slow withdrawal of the needle with continuous aspiration can help result in lumen access.
Pass the guide wire into the jugular vein in the usual fashion.
Re-angling the needle from 60° to a shallower angle, e.g. 45°, may help guide-wire feeding. Scanning the vein in the longitudinal plane may demonstrate the catheter in the vessel but after securing and dressing the central venous catheter (CVC), an X-ray should still be obtained to confirm the CVC position, and exclude pneumothorax.
The most common error in measurement of CVP, particularly in CVP lines that have been in place for some time, is due to partial or complete line blockade. With the manometer connected, ensure that the line is free flowing; minor blockages can be removed by squeezing the rubber bung, with the proximal line being obliterated by acute angulation (i.e. bend the tube proximally). Measure the CVP at the mid-axillary line with the patient supine. CVP falls with upright or semi-upright recumbency, regardless of the reference point. If the CVP is high, lift the stand that holds the manometer so that the apparent CVP falls by 10 cm or so, and replace the CVP stand to ground level. If the saline or manometer reading rises to the same level, then the CVP reading is accurate. In other words, one ensures that the CVP manometer level both falls to and rises to the same level.
Pulmonary artery catheterization (1)
Indications
Pulmonary artery (PA) catheters (Swan–Ganz catheters) allow direct measurement of a number of haemodynamic parameters that aid clinical decision making in critically ill patients (evaluate right and left ventricular function, guide treatment, and provide prognostic information). The catheter itself has no therapeutic benefit and there have been a number of studies showing increased mortality (and morbidity) with their use. Consider inserting a PA catheter in any critically ill patient, after discussion with an experienced physician about whether the measurements will influence decisions on therapy (and not just to reassure yourself). Careful and frequent clinical assessment of the patient should always accompany measurements, and PA catheterization should not delay treatment of the patient.
General indications (not a comprehensive list) include:
Stay updated, free articles. Join our Telegram channel

Full access? Get Clinical Tree


