I.V. Access and Invasive Techniques
I.V. Access and Invasive Techniques
I.V. access basics
An I.V line is necessary to gain peripheral or central access to the patient’s venous circulation. An I.V. line is inserted to:
administer drugs and fluids
administer blood and blood products
obtain blood for laboratory tests
provide for insertion of a catheter into the central circulation for hemodynamic monitoring and electrical pacing.
Choosing an access site
During resuscitation attempts, obtain venous access at the site of the largest vein available that doesn’t require interrupting resuscitation (such as the antecubital or femoral vein).
Choose wisely, my son
The site you choose for I.V. access is based on the patient’s needs and condition. Factors include:
availability and condition of adequate peripheral veins
volume of fluid required and time available to administer fluids
type of fluid to be administered
purpose and duration of I.V. therapy.
Here are some suggestions for selecting a vein:
Keep in mind that the most prominent veins aren’t necessarily the best veins; they may be sclerotic from previous use.
Optimally, select a vein in the nondominant arm or hand.
Avoid selecting a vein in an edematous or impaired arm, if possible.
Never select a vein in the arm closest to an area that’s surgically compromised, such as veins compromised by a mastectomy or by placement of dialysis access.
For subsequent venipunctures, select sites above the previously used or injured vein.
I.V. safety
Regardless of the site you choose, you must take precautions to ensure safety for yourself and your patient. These include:
using standard precautions
cleaning the site using an antiseptic solution
disposing of needles appropriately
changing the I.V. site every 3 days or according to your facility’s policy
evaluating the site for infiltration, extravasation, or thrombosis.
It’s also important to change I.V. lines placed in the patient outside the hospital setting within 24 hours, if possible. Because these I.V. lines aren’t usually inserted under ideal circumstances, they’re more likely to cause infection or complications.
Basic venipuncture devices
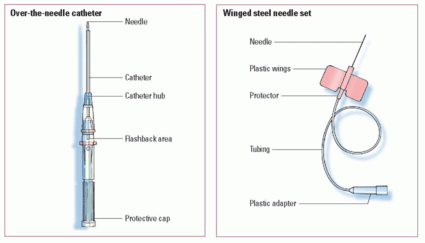
Two major types of venipuncture devices exist: over-the-needle catheters and winged steel needle sets. Which catheter you choose is based on what type of I.V administration is needed or what equipment is available. Over-the-needle catheters are preferred for long-term therapy (such as in a hospital stay) and winged steel needles may be preferred for short-term therapy such as administering medication for a procedure. (See
Comparing basic venous access devices, page 190.)
Over-the-needle catheters
The over-the-needle catheter can be used for long-term therapy and is often useful for an active or agitated patient.
Advantages of the over-the-needle catheter include:
Inadvertent puncture of the vein is less likely than with a winged steel needle set.
Patients are more comfortable.
Its radiopaque thread makes location easy.
The syringe attached to some units permits an easy check of blood return and prevents air from entering the vessel on insertion.
An activity-restricting device, such as an arm board, is rarely required.
One disadvantage of the over-the-needle catheter is that it requires expertise to insert. In addition, extra care is needed to ensure that both the needle and catheter are inserted into the vein.
Winged steel needle sets
The winged steel needle set is used for short-term I.V. therapy in a cooperative adult patient. It’s also used for therapy of any duration for an elderly patient with fragile or sclerotic veins. Advantages of the winged steel needle set include:
It’s the easiest intravascular device to insert because the needle is thin-walled and extremely sharp.
It’s ideal for I.V. push drugs, short-term therapy, or single-dose administration.
It’s available with a catheter that can be left in place such as an over-the-needle catheter.
The disadvantage of the winged steel needle set is that infiltration can easily occur if a rigid needle winged infusion device is used.
Establishing peripheral I.V. lines
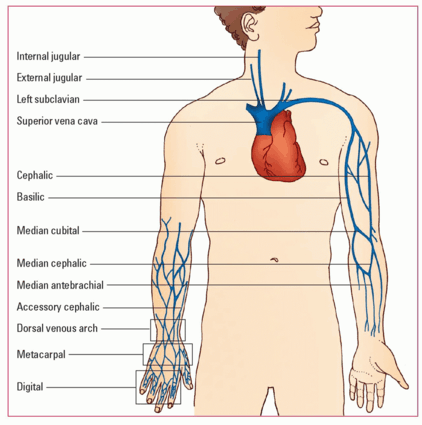
Peripheral venipuncture sites—located on the dorsal and ventral surfaces of the upper extremities—include the antecubital, metacarpal (hand), cephalic, basilic, and median veins. The leg veins shouldn’t be used routinely because of increased risk of thrombophlebitis, ulcers, and infection. The selection of the site depends on the type of solution to be infused; the frequency and duration of the infusion; the patency and location of accessible veins; and the patient’s age, size, and condition. The external jugular vein may also be used for rapid access in an emergency. (See
Comparing peripheral venipuncture sites, pages 192 and 193.)
Advantages of a peripheral I.V. line include:
It can be inserted rapidly by trained personnel.
It offers easy access to veins and rapid administration of solutions, blood, and drugs.
It allows continuous administration of drugs to produce rapid systemic changes.
It’s easy to monitor.
Disadvantages of a peripheral I.V. line include:
It’s an invasive vascular procedure that carries associated risks of bleeding, infiltration, and infection.
It can’t be used indefinitely.
Upper extremity veins
The largest veins of the arm are generally located in the antecubital fossa. Of these veins, the most commonly selected for I.V. access are the median cephalic and median basilic.
Up the ante for quick I.V. access
The antecubital fossa site is useful when you need to establish rapid I.V. access because its veins are easily accessed. You can also use this site for patients in circulatory collapse or cardiac arrest. The cephalic and basilic veins may also be accessible both above and below the antecubital fossa. If long-term therapy is anticipated, start with the most distal, adequate site possible, such as the dorsal hand veins. Don’t use the distal cephalic vein above the thumb and the veins of the inner wrist, to avoid damaging nerves.
What you need
Chlorhexidine solution
Gloves
Tourniquet
I.V. access device with safety shield
I.V. solution with attached and primed administration set
I.V. pole
Sharps container
Transparent semipermeable dressing
Catheter securement device or 1” hypoallergenic tape
I.V. start kit (available in some facilities)
How it’s done
Select the site and place the arm in a dependent position if possible.
Apply a tourniquet 4 to 6” (10 to 15 cm) above the intended puncture site to dilate the vein.
Leave the tourniquet in place for no longer than 3 minutes. If you’re unable to locate a vein and prepare the site in that time, release the tourniquet and reapply it after the site is prepared.
Put on clean gloves.
Clean the site with chlorhexidine solution using a back-and-forth scrubbing motion and allow it to dry.
If the patient is conscious, ask him to open and close his fist a few times to enhance your visualization of the veins.
Remove the cover from the access device and make sure the needle is smooth and intact.
Stabilize the vein by stretching the skin taut below the intended insertion site.
 Just the facts
 Memory jogger


