peritonsillar, retropharyngeal, or pharyngeal abscesses
tumors of the head or neck, space-occupying lesions
tenacious secretions in the airway, bacterial or viral infections
cerebral disorders (stroke)
trauma to the face, trachea, larynx, or mediastinum, resulting in blood into nasopharynx
aspiration of a foreign object, including blood (if ruptured esophageal varices) or bits of food
fire or inhalation burns on the head, face, or neck area
croup
epiglottiditis
laryngospasms, laryngeal edema related to endotracheal intubation (after extubation)
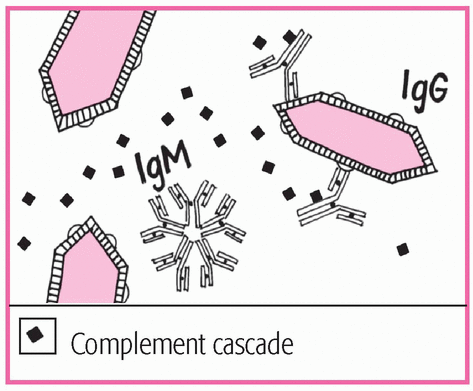
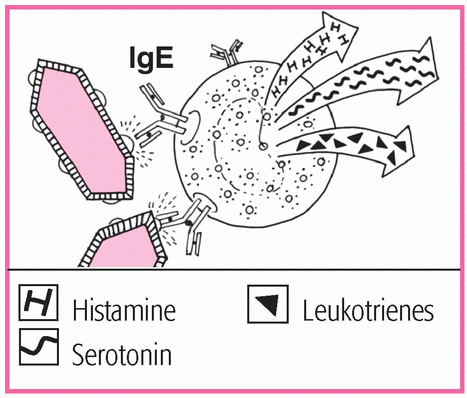
anaphylaxis.
Cardiac and respiratory arrest
Coma
Death
restlessness
choking
gasping for air
wheezing, whistling, or another unusual breath sound that indicates difficulty breathing
cyanosis or pallor
cessation of coughing; the individual can’t make any sounds
change in level of consciousness (LOC) or progression to unconsciousness
agitation, panic, or increasing anxiety
hypoxia and hypercapnia
cardiac arrest.
X-rays (such as chest and neck X-rays), bronchoscopy, and laryngoscopy reveal the type and site of the obstruction.
Computed tomography scanning may be ordered to rule out a tumor, a foreign body, or an infection or trauma.
|
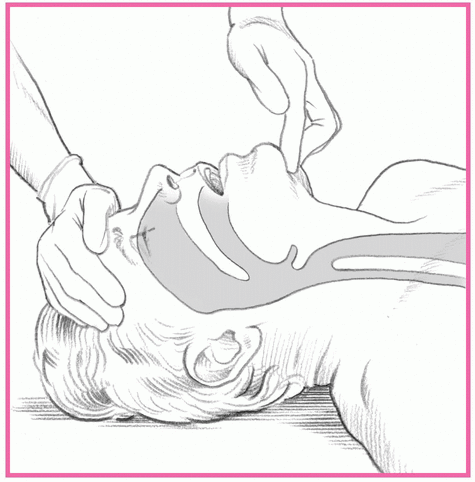
Place your hand closest to the patient’s head on his forehead.
Apply firm pressure—firm enough to tilt the patient’s head back.
Place the fingertips of your other hand under the bony portion of the patient’s lower jaw, near the chin.
Lift the patient’s chin. Be sure to keep his mouth partially open (as shown at right). Avoid placing your fingertips on the soft tissue under the patient’s chin because this may inadvertently obstruct the airway you’re trying to open.
|
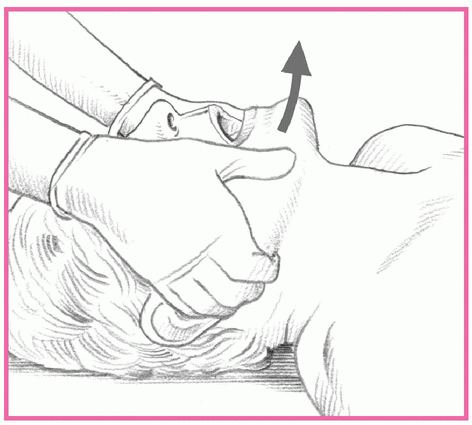
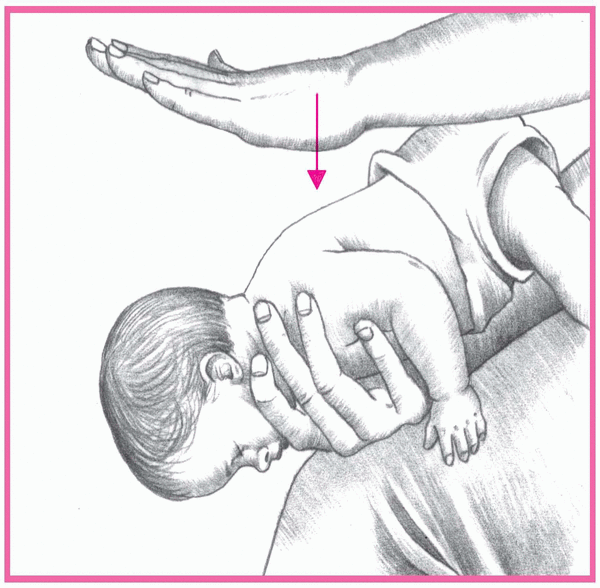
Kneel at the patient’s head with your elbows on the ground.
Rest your thumbs on the patient’s lower jaw near the corners of his mouth, pointing your thumbs toward his feet.
Place your fingertips around the lower jaw.
To open the airway, lift the lower jaw with your fingertips (as shown at right).
Ask the person who’s coughing or using the universal distress sign (clutching the neck between the thumb and fingers) if she’s choking. If she indicates that she is but can speak and cough forcefully, she has good air exchange and should be encouraged to continue to cough. Remain with the person and monitor her.
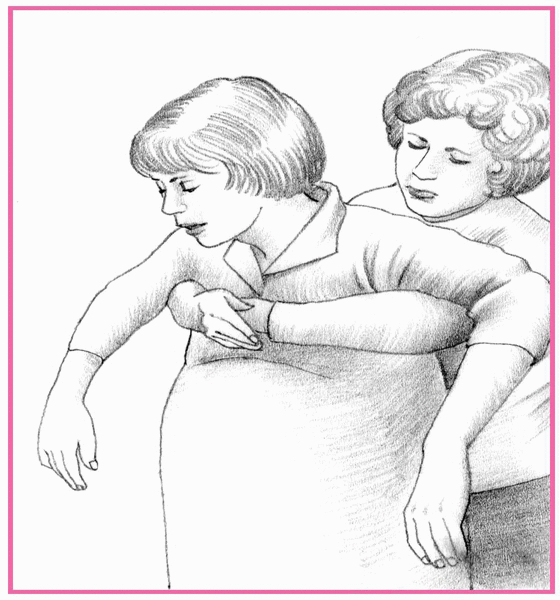
Ask the person, “Are you choking?” If the patient nods yes and has signs of severe airway obstruction, tell her that you’ll help dislodge the foreign body.
Stand behind the patient and wrap your arms around her waist. Make a fist with one hand, and place the thumb side against her abdomen in the midline, slightly above the umbilicus and well below the xiphoid process. Grasp your fist with the other hand (as shown below).
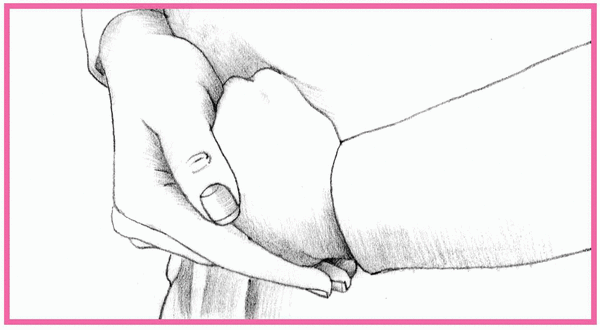
Squeeze the patient’s abdomen with quick inward and upward thrusts. Make each thrust a separate and distinct movement, forceful enough to create an artificial cough that will dislodge an obstruction (as shown below).

Make sure that you have a firm grasp on the patient because she may lose consciousness and need to be lowered to the floor. Support her head and neck to prevent injury, and continue as described.
Repeat the thrusts until the foreign body is expelled.
If the patient becomes unconscious, contact the emergency medical service (EMS) and follow the interventions for relieving an obstructed airway in an unconscious person. If the victim of an airway obstruction becomes unconscious, the lay rescuer should lower the patient to the ground and immediately contact the EMS and begin cardiopulmonary resuscitation (CPR). Studies demonstrate that chest thrusts generated higher sustained airway pressure than pressure generated by abdominal thrusts. For this reason, it’s believed that chest compressions alone may relieve the obstruction in the unconscious victim.
Lower the patient to the ground and immediately contact the EMS.
Begin CPR.
Each time the airway is opened using a head-tilt, chin-lift maneuver, look for an object in the patient’s mouth.
Remove the object, if present.
Attempt to ventilate the patient and follow with 30 chest compressions.
The blind finger sweep is no longer recommended by the American Heart Association; it should be used only when a foreign body can be seen in the mouth. Studies have shown that blind finger sweeps may result in injury to the patient’s mouth and throat or to the rescuer’s fingers, and there’s no evidence as to its effectiveness. In addition, the tongue-jaw lift is no longer used. Open the patient’s mouth using a head-tilt, chin-lift maneuver.
If the patient is conscious, stand behind her and place your arms under her armpits and around her chest.
Place the thumb side of your clenched fist against the middle of the sternum, avoiding the margins of the ribs and the xiphoid process. Grasp your fist with your other hand and perform a chest thrust with enough force to expel the foreign body. Continue until the patient expels the obstruction or loses consciousness (as shown below).
If the patient loses consciousness, carefully lower her to the floor.
Then, follow the same steps you would use for the unresponsive adult.
If the child is conscious and can stand but can’t cough or make a sound, perform abdominal thrusts using the same technique you would with an adult.
Use the same techniques you would for the unresponsive adult.
Place the conscious infant face down so that he’s straddling your arm with his head lower than his trunk. Rest your forearm on your thigh and deliver five forceful back blows with the heel of your hand between the infant’s shoulder blades (as shown below).
If you haven’t removed the obstruction, place your free hand on the infant’s back. Supporting his neck, jaw, and chest with your other hand, turn him over onto your thigh. Keep his head lower than his trunk.
Position your fingers. To do so, imagine a line between the infant’s nipples and place the index finger of your free hand on his sternum, just below this imaginary line. Then place your middle and ring fingers next to your index finger and lift the index finger off his chest. Deliver five quick chest thrusts as you would for chest compression at a rate of approximately one per second.
Never perform a blind finger sweep on a child or an infant because you risk pushing the foreign body farther back into the airway. Also, abdominal thrusts aren’t recommended for infants because they may damage the liver.
If the airway obstruction persists, repeat the five back blows and five chest thrusts until the obstruction is relieved or the infant becomes unresponsive.
Use the same techniques you would for the unresponsive adult.
Continue until the obstruction is relieved or help arrives.
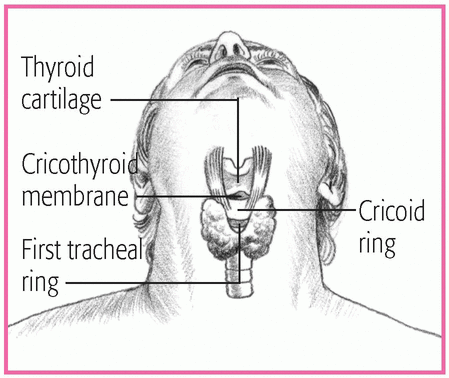
Locate the precise insertion site by sliding your thumb and fingers down to the thyroid gland. You’ll know you’ve located its outer borders when the space between your fingers and thumb widens.
Move your finger across the center of the gland, over the anterior edge of the cricoid ring.
|
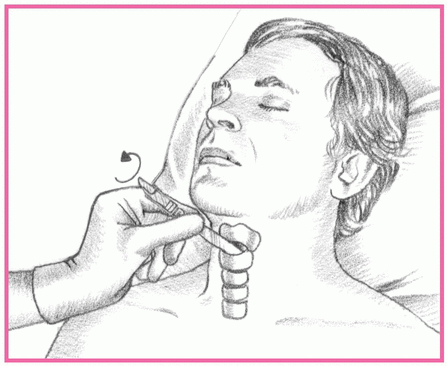
Make a horizontal incision, less than ½″ (1.3 cm) long, in the cricothyroid membrane just above the cricoid ring.
Insert a dilator to prevent tissue from closing around the incision. If a dilator isn’t available, insert the handle of the scalpel and rotate it 90 degrees (as shown at top of next column).
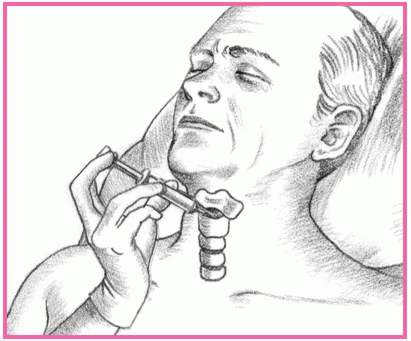
If a small tracheostomy tube (#6 or smaller) is available, insert it into the opening and secure it to help maintain a patent airway. If a tracheostomy tube isn’t available, tape the dilator or scalpel handle in place until a tracheostomy tube is available.
If the patient can breathe spontaneously, attach a humidified oxygen source to the tracheostomy tube with a T tube; if he can’t, attach a handheld resuscitation bag. You’ll need to inflate the cuff of the tracheostomy tube with a syringe to provide positive-pressure ventilation.
Auscultate bilaterally for breath sounds, and take the patient’s vital signs.
Dispose of the gloves properly and wash your hands.
Attach a 10-ml syringe to a 14G (or larger) through-the-needle or over-theneedle catheter. Then insert the catheter into the cricothyroid membrane just above the cricoid ring.
Direct the catheter downward at a 45-degree angle, as shown at top of next page, to the trachea to avoid damaging the vocal cords. Maintain negative pressure by pulling back the syringe plunger as you advance the catheter. You’ll know the catheter has entered the trachea when air enters the syringe.
When the catheter reaches the trachea, advance it and remove the needle and syringe. Tape the catheter in place.
Attach the catheter hub to one end of the I.V. extension tubing. At the other end, attach a hand-operated release valve or a pressure-regulating adjustment valve. Connect the entire assembly to an oxygen source.
Press the release valve to introduce oxygen into the trachea and inflate the lungs. When you can see that they’re inflated, release the valve to allow passive exhalation. Adjust the pressure-regulating valve to the minimum pressure needed for adequate lung inflation.
Auscultate bilaterally for breath sounds, and take the patient’s vital signs.
Dispose of the gloves properly and wash your hands.
COMPLICATION | PREVENTION | DETECTION | TREATMENT |
|---|---|---|---|
Aspiration |
|
|
|
Bleeding at tracheotomy site |
|
|
|
Infection at tracheotomy site |
|
|
|
Pneumothorax |
|
|
|
Subcutaneous emphysema |
|
|
|
Tracheal malacia |
|
|
|
Recognize that an upper airway obstruction is a medical emergency.
Assess for the cause of the obstruction.
Assess breath sounds.
Monitor chest X-rays and arterial blood gas results after the obstruction is relieved.
Observe for “seesaw” respirations, use of accessory muscles, or retractions.
Apply pulse oximetry to assess the patient’s oxygenation status, and administer oxygen, as needed.
Continually assess for stridor, cyanosis, and changes in LOC, and notify the practitioner immediately.
Perform abdominal thrusts if a foreign object obstruction is suspected.
Prepare for a cricothyrotomy if the setting is outside of the health care environment.
Prepare for ET intubation or a tracheotomy if an airway can’t be established.
Anticipate cardiac arrest if the obstruction isn’t cleared promptly.
polysaccharides (such as iron dextran), diagnostic chemicals (sodium dehydrocholate, radiographic contrast media), foods (chocolate, legumes, nuts, berries, seafood, egg albumin) and sulfite-containing food additives, insect venom (honeybees, wasps, hornets, yellow jackets, fire ants, and certain spiders) and, rarely, a ruptured hydatid cyst.
Death minutes to hours after the first symptoms (although a delayed or persistent reaction may occur for up to 24 hours)
Respiratory obstruction
Systemic vascular collapse
exposure to an antigen
feeling of impending doom or fright
apprehension
restlessness
cyanosis
|
|
Stay updated, free articles. Join our Telegram channel

Full access? Get Clinical Tree


