Chest Tube Insertion and Management

Chapter 72 Chest Tube Insertion and Management


The pleural cavity can require drainage when, in pathologic states, it contains air (pneumothorax), blood (hemothorax), serum (pleural effusion), lymph (chylothorax), or pus (empyema), or a combination of these. In the presence of these abnormal collections, the pleural cavity pressure may become positive, allowing the lung to collapse partially or fully, leading to hypoxemia. A common procedure used to drain air or fluid collections is the insertion of a chest tube (tube thoracostomy). A properly placed chest tube provides for drainage of air and/or fluid, reestablishes a negative intrapleural pressure, and allows the lung to reexpand within the pleural space. The correct management of a patient who needs a chest tube requires not only the skill to insert it safely, position it well, and minimize discomfort, but also the judgment to know when it is indicated and how to manage it properly after its placement. This requirement implies a sound knowledge of the principles of surgical drains and a working knowledge of the underwater seal drainage system being used.


Indications and Contraindications


Conditions associated with acute or severe respiratory compromise are considered absolute indications for chest tube placement and include tension pneumothorax, large symptomatic pneumothorax, hemothorax, empyema, and previous surgical violation of the pleural space (Box 72-1). In addition, under less clear-cut circumstances, appropriate judgment and experience will be required to help determine whether a chest tube is needed or not. Alternatives to chest tube placement, such as observation, thoracentesis, or formal operative drainage, must be considered and the choice individualized according to the clinical situation. Special caution is necessary when the patient’s preoperative assessment findings point to an increased possibility of coagulopathy, intrapleural adhesions, or abnormal intrathoracic anatomy. The only contraindications to chest tube placement are a fused pleural space and lack of operative personnel with adequate experience in use of the technique for a safe and effective procedure. In considering placement of a chest tube, either of these circumstances should prompt consultation with a thoracic surgeon.


Technique


The technique of chest tube insertion has been described in many publications. A focused yet comprehensive history and physical examination should precede any surgical procedure, even when it is done at the bedside. Chest radiographs and computed tomography (CT) scans, if available, should be thoroughly reviewed before and readily available during the procedure. When possible, a full discussion with the patient, including the specific indication, associated risks, alternatives, and postprocedural care, is indicated before proceeding with insertion of the pleural drain.


Selection of Drain Tube


At present, the most common tube used for chest drainage is a Silastic tube with multiple side holes. It usually has a linear radiopaque stripe running through the most proximal hole (allowing its location to be identified on chest radiographs) and markings to indicate distance in centimeters from the most proximal hole (Figure 72-1). These tubes range in size (gauge) up to 40 French (40F). Of note, some tube insertion kits come with a central trochar within the chest tube. Routine use of this trochar is unnecessary, can be dangerous, and is to be discouraged. Smaller chest tubes (14F or smaller) also are available, which can be placed using a Seldinger technique without the need for blunt dissection.


The size of the drain will depend on the indication for insertion and the size of the patient. In general, larger drains are more uncomfortable for the patient and more difficult to insert with use of local anesthesia. Conversely, smaller tubes usually are better tolerated by patients. Traditional consensus among experts has been that smaller chest tubes (14F or smaller) are more likely to clog with thick fluid or particulate matter, as encountered in a hemothorax or empyema, and are more prone to drainage problems from obstruction due to kinking of the tubing. Historically, a general rule has been that most collections are adequately drained with use of a 28F or 32F chest tube. Usually, a simple pneumothorax requires only a small chest tube (14F or smaller), although larger tubes (24F or larger) should be strongly considered for patients on positive-pressure ventilation.


Recently, however, a randomized controlled trial showed that in patients with pleural infection managed with use of smaller chest tubes (14F or smaller), duration of hospital stay, changes on the chest radiograph, and lung function at 3 months were no different from those in patients in whom larger chest tubes were used. In addition, no significant difference was observed in the frequency of either postprocedure death or requirement for thoracic surgery. Pain scores were substantially higher in patients receiving larger tubes. These results suggest that use of smaller-sized tubes may be preferable in the initial treatment of pleural infection.


Placement of long-term indwelling pleural drains also has become a commonly considered technique for the palliation of malignant pleural effusions. The specific technique and indications for use of these drains are discussed later in the chapter.


Drain Insertion Site and Patient Positioning


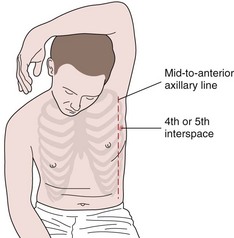
Generally, the optimal site for placement of a chest tube is through the fourth or fifth interspace in the anterior to midaxillary line just beyond the lateral edge of the pectoralis muscle and breast tissue (Figure 72-2). This insertion site has the advantage of relatively easy access and avoids the discomfort of a more posteriorly placed tube in patients who often are primarily lying supine in a hospital bed. In addition, it usually is high enough to avoid inadvertent subdiaphragmatic placement yet low enough to adequately drain fluid. Of note, in patients who are primarily lying supine in bed with free-flowing pleural fluid collections, the interspace level of placement of the chest drain is much less important than ensuring the posterior positioning of the tube within the pleural space. Placement of a chest tube in the second or third interspace anteriorly is to be avoided if possible. Such placement does not provide any advantage over the lateral position described previously and is significantly more painful and disfiguring for the patient.


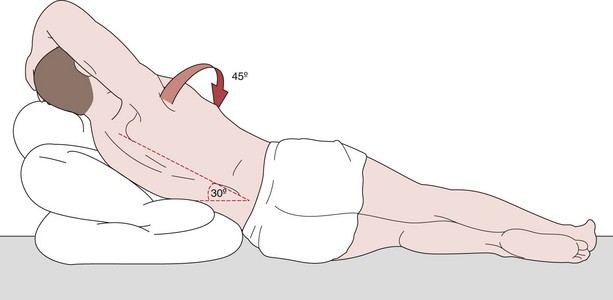
For elective chest drain insertion, the patient should be kept in a relatively comfortable position that facilitates placement of the tube in the location described earlier. Usually, this can be achieved by placing the patient supine or in a semi-Fowler position (with thorax and head elevated 30 to 45 degrees) with the involved side elevated approximately 30 to 45 degrees on wedges or pillows. To improve access to the lateral chest wall, the patient’s arm on the involved side is brought above the head (Figure 72-3). As with most thoracic procedures, the operator should stand at the patient’s back.


Preparation, Anesthesia, and Incision


Before positioning of the patient, all necessary equipment should be made available (Box 72-2). A deliberate pause should be taken to verify the patient’s identity and to confirm the procedure and correct operative side. When possible, the most recent chest radiograph should be posted in a readily visible location as a separate safety measure to avoid wrong-sided procedures.


The chest wall is cleansed with antiseptic solution and draped in such a way as to provide an operative field approximately 20 cm by 20 cm in size. The skin is infiltrated with 1% lidocaine at the chosen site of insertion with use of a 21-gauge needle. Further generous infiltration of the subcutaneous tissues can be done with use of a large-bore needle (18-gauge). Aspirating before injection with this needle will prevent inadvertent vascular injection, as well as indicating the direction and depth of the parietal pleura. The parietal pleura are extremely sensitive and must therefore be thoroughly anesthetized.


A 2-cm transverse incision is made with the scalpel. The incision usually is made one interspace below the interspace planned for insertion, to allow “tunneling” over the superior border of the lower rib. At this stage, one stitch of 0-0 silk suture can be placed at the posterior margin of the incision and tied down, leaving the two ends even and uncut. This suture will be used later to secure the chest tube. Placing the stitch at this point, before initial dissection and entry into the pleural space with its requisite drainage of fluid or air, is much easier. It allows for much more efficient securing of the chest tube once in place within the pleural cavity. In an obese patient, it may be necessary to increase the size of the initial skin incision to permit adequate palpation of the ribs and interspaces.


Drain Insertion


After completion of the initial incision and placement of the securing stitch, a curved Kelly clamp is used to dissect a tract for the chest tube within the subcutaneous and intercostal tissues. “Tunneling” of this tract over the superior border of the lower rib prevents damage to the intercostal neurovascular bundle that lies along the inferior border of each rib. It also reduces the likelihood of air leak at the time of chest tube removal and thereafter while the incision site heals.


Dissecting by use of the Kelly clamp is done with incremental spreading and advancement of the clamp to create a tract for the chest tube. It is important to dissect along only one tract, to avoid subsequent difficulties in finding the dissected path at the moment of tube insertion. This precaution is especially relevant in obese patients. The pleura can be very taut or thickened and can sometimes present significant resistance to entry. Extreme care must be taken on entering the pleural cavity with the Kelly clamp, to control its forward progress and prevent inadvertent entry into underlying structures. Entry into the pleural cavity is signaled by egress of air or fluid and sudden decrease in resistance to forward movement of the clamp. For the patient, breaching of the parietal pleura usually is the most uncomfortable part of the procedure, and it often is useful to provide further local anesthetic to the area before piercing the pleural cavity.


Once the parietal pleura have been breached, the clamp is withdrawn in the open position. The next step is to insert the operator’s index finger into the pleural cavity to ensure pleural entry (to exclude subdiaphragmatic placement) and assess for the presence of pleural adhesions and pleural lesions or nodularity (Figure 72-4). The chest tube can then be guided into place by use of the Kelly clamp, as illustrated in Figure 72-5

Only gold members can continue reading. Log In or Register to continue

Stay updated, free articles. Join our Telegram channel

Jun 12, 2016 | Posted by in RESPIRATORY | Comments Off on Chest Tube Insertion and Management

Full access? Get Clinical Tree

Get Clinical Tree app for offline access