Tunneled catheters
Non-tunneled catheters
Dialysis catheter with a cuff (permanent)
Dialysis catheters non-cuffed (acute not permanent)
Implantable access ports
Central line
Hickman
Swan-Ganz catheters
Broviac
Peripherally inserted central catheter (PICC)
Vascular access devices have single or multi-lumen catheters. Multi-lumen catheters allow for the simultaneous infusion of more than one blood product or medication. This advantage must be balanced against the increased morbidity associated with multiple lumen catheters as documented in several reports [11, 12]. Decisions regarding the diameter of the catheter depend on the patient’s access needs and the clinical scenario. Although large-bore catheters facilitate rapid infusion rates during emergency situations, they have an increased risk of catheter-related thrombosis. In general the smallest-diameter catheter that is feasible for the patient’s infusion needs should be chosen [13]. Smaller catheters can often be placed less traumatically and may have a lower risk of triggering venous stenosis [14].
Vascular Access Site Selection
Choosing the location of central VA depends on several factors including: operator skill and preference, catheter and device type, patient anatomy, and indications for placement [7, 15, 16]. The most common sites for central VA are the internal jugular, subclavian, and common femoral veins. Practitioners placing central VA should be familiar with the anatomic landmarks and understand the advantages and drawbacks of each location for central VA (Fig. 17.1). Specific techniques regarding placement will be discussed later.
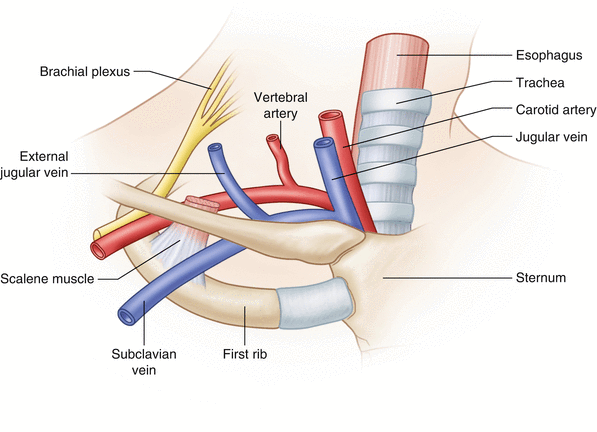
Fig. 17.1
Enlarged view of the anatomy of the subclavian and jugular vein area
Internal Jugular Vein Approach
The internal jugular vein remains the most common site for central VA with a 95–99 % success rate and few complications [17, 18]. Percutaneous access to the internal jugular vein is relatively straightforward compared to the subclavian vein. This technical advantage may explain the lower rate of lung injury (pneumothorax and hemothorax) after internal jugular vein access compared to the subclavian approach [7]. In contrast, a systematic review reported equivalent complication rates for internal jugular and subclavian vein catheters despite a historically higher incidence of complications associated with the subclavian vein approach [4]. The right internal jugular vein follows a straight course into the central venous circulation making the right side the preferred choice over the left side. Internal jugular vein catheterization also poses a lower risk of venous stenosis and thrombosis compared to the subclavian vein [19]. Minimizing the risk of catheter-associated venous stenosis is an important consideration in patients with chronic renal failure in whom central venous stenosis is a leading cause of arteriovenous access failure.
The few drawbacks of internal jugular vein access involve technical challenges associated with placement and patient comfort level. Patients with pain or inadequate sedation during access insertion often tense their sternocleidomastoid (SCM) muscle making it difficult to advance the catheter. Despite being in a compressible location, internal jugular vein puncture can result in a hematoma in a coagulopathic patient potentially compromising the airway. Once in place, non-TCs in the internal jugular vein can cause discomfort during movement of the head and neck.
Ultrasound guidance during VA placement can identify the target vein and provide real-time imaging of the needle entering the vein. Data suggest that using ultrasound to cannulate the internal jugular vein makes the procedure quicker and safer. Lemeris et al. showed that ultrasound guidance reduced failure of catheter placement and complication rates related to insertion by 86 and 57 %, respectively [20]. A large meta-analysis confirmed the enhanced safety profile ultrasound-guided central VA demonstrating significant reductions in the risk of: insertion failure (relative risk [RR] 0.32), complication rates from insertion (RR0.22), and the need for multiple insertion attempts (RR 0.60) [21]. In a prospective study of 900 patients, ultrasound-guided catheter placement in the internal jugular vein not only increased success rates and decreased complication rates but also reduced catheter-associated infections [18]. The well-documented safety track record of ultrasound prompted the UK National Institute for Clinical Excellence (NICE) (www.nice.org.uk) to recommend routine use of ultrasound guidance during internal jugular catheterization.
Subclavian Vein Approach
In the past, surgeons preferentially used the subclavian vein to establish central VA. The subclavian vein is unique in that the vein can be cannulated from an infraclavicular or supraclavicular approach. The supraclavicular technique poses a greater risk of complications, and some authors recommend that only experienced operators attempt this approach [17]. Relative contraindications include bilateral pulmonary disorders, high-pressure ventilation, and altered local anatomy (i.e., after sternotomy). Using ultrasonography to assist with supraclavicular cannulation significantly decreases the risk of placement failure and the need for multiple attempts by up to 86 % [20, 22]. Catheterization of the subclavian vein regardless of the approach has an overall success rate of 90–96 % [23, 24].
Compared to the internal jugular vein, the subclavian vein has a predictable course allowing reliable venipuncture using anatomical landmarks. The subclavian location for central VA has the advantage of easy access to the catheter and a more acceptable cosmetic appearance for the patient. Although observational studies suggest that subclavian vein access decreases infection risk, these results have not been validated in prospective trials [25].
The anatomic location of the subclavian vein has several drawbacks which limit its routine use for VA. The subclavian vein functions as the primary route for venous drainage from the arm. Thrombosis of the subclavian vein from catheter placement can cause acute arm pain and edema requiring treatment with anticoagulation, thrombolytic therapy, or catheter removal [26–28]. Long-term subclavian vein catheter placement increases the risk of venous stenosis which can compromise future arteriovenous access attempts in the same upper extremity [19]. The subclavian vein should therefore be avoided as the site for central VA in patients with renal dysfunction who may eventually require hemodialysis. An exception to this rule would be if the upper extremity were unsuitable for use as a site for dialysis access, for example, a patient with contracture of the arm following a stroke. Other complications associated with subclavian vein cannulation involve injuries that can be sustained during needle puncture. The reported rate of pneumothorax and hemothorax ranges from 0 to 12 % and seems to depend on operator experience [29].
Femoral Vein Approach
The common femoral vein is the easiest site to establish central venous access. With its relatively straight course and large lumen, the common femoral vein allows infusion and removal of large volumes of fluid such as that required in renal replacement therapy or plasmapheresis [7]. In most patients, percutaneous access to the common femoral vein is straightforward as the vein is close to the skin and relatively isolated from other vital structures. Despite its advantages, the common femoral vein is the least used access site due to the increased incidence of complications, especially infection and thrombosis [30, 31]. Morbid obesity can obscure the anatomic landmarks of the groin making catheterization of the common femoral vein more difficult. Moving the pannus cephalad and to the control lateral side with the aid of an assistant or tape can help determine the appropriate area for percutaneous access to the femoral vein. Similar to other VA sites, ultrasound guidance decreases the risk of failed femoral catheter placement by up to 71 % [20, 22]. Femoral catheters should be removed as soon as possible to minimize the risk of catheter-associated complications.
Alternative Venous Access
Although most surgeons do not place central VA at nonconventional locations, the surgeon must be aware that alternative techniques and access sites do exist. Over time, patients with prolonged central VA often develop stenosis and occlusions of the large veins en route to the central venous system. In these patients, the subclavian and internal jugular veins no longer provide an unobstructed pathway to the central venous system. In the past, overcoming this technical challenge often required open surgical exposure with direct catheter placement in the right atrium, superior vena cava (SVC), or inferior vena cava (IVC) [17]. More recently, central VA routes have been described involving percutaneous access to nonconventional veins including the external jugular, hepatic, intercostal, azygos, and IVC [32–35]. Other techniques involve catheter placement in collateral neck or chest veins or recanalization of chronically occluded veins [36]. Catheters placed at these unconventional sites follow an unusual course when visualized on abdominal or chest radiographs (Fig. 17.2). The distal tip of the catheters terminates in traditional locations such as the right atrium, the lower SVC, or the upper portion of the IVC [37]. Patients receiving long-term hemodialysis or total parental nutrition are more likely to eventually require alternative forms of central VA.

Fig. 17.2
(a) Venogram of the right chest intercostal veins with drainage into the vena cava. (b) Completion of catheter placement from subclavian, through the intercostal veins with catheter tip in the IVC
Preparation of the Patient
Consent
Informed consent should be obtained for all elective central VA insertion procedures. A discussion with the patient and/or healthcare proxy should include a description of the procedure as well as its indications, benefits, and acute and long-term complications (Table 17.2). In emergency situations, the consent is implied.
Table 17.2
Immediate and delayed complications
Immediate | Delayed |
|---|---|
Air embolism | Infection |
Great vessel perforation/puncture | Venous stenosis |
Catheter malposition | Thrombotic |
Pneumothorax |
Monitoring
Central VA procedures performed at the bedside or in the angiography suite require some form of monitoring. Cardiac telemetry and pulse oximetry can detect acute changes in the cardiorespiratory status of the patient, such as a dysrhythmia due to wire or catheter placement.
Positioning
Regardless of the access site, the patient’s position should fulfill two criteria: (1) maximize the comfort of the patient; and (2) allow the operator to remain comfortable throughout the procedure. The Trendelenburg position facilitates venous filling for internal jugular and subclavian access and may reduce the risk of air embolism [38–40]. Patients who cannot tolerate Trendelenburg but can follow commands should be asked to perform the Valsalva maneuver which temporarily increases the caliber of the internal jugular, subclavian, and femoral veins [41].
Sterile Technique
Minimizing the risk of infectious complications begins with patient preparation and choice of venue. VA procedures should be performed in an environment conducive to aseptic techniques. Randomized controlled trials suggest that prophylactic intravenous antibiotics reduce catheter-related infections (CRI) and sepsis in high-risk immunosuppressed cancer patients; however, current evidence does not support the routine use of antibiotics for central venous catheter placement [42, 43].
Aseptic preparation of the patient and members of the healthcare team plays an important role in infection control. Most institutions mandate the use of surgical masks and caps, sterile gloves and gowns, and a large full-body drape for all central line procedures. Observational studies support the use of these maximal barrier precautions and hand washing as effective measures to reduce the rate of central VA infections [44–46].
Skin preparation options include chlorhexidine, povidone-iodine, and alcohol-based solutions. A study comparing povidone-iodine without alcohol to 2 % chlorhexidine without alcohol reported equivocal findings regarding catheter colonization and catheter-related bacteremia [47]. Studies comparing chlorhexidine with alcohol to povidone-iodine with alcohol have been inconclusive. Consensus from several studies favors the use of chlorhexidine with alcohol for skin preparation [48, 49].
Use of Ultrasound
First described in 1978, ultrasound guidance for central VA now has a solid foundation of evidence supporting its use [22, 50, 51]. Several randomized trials show that using ultrasound for central VA reduces the time to cannulation and decreases the risk of complications and the number of failed attempts [20–22, 50–52]. By clarifying anatomy and providing real-time imaging, ultrasound guidance narrows the performance gap between experienced and inexperienced operators [53]. In the hands of skilled practitioners, ultrasound often proves to be the key to successful catheter placement in patients who are otherwise difficult to cannulate [54]. Current practice guidelines recommend using ultrasound guidance for central VA via the internal jugular and femoral veins when expertise and equipment are available [22, 52]. In contrast, cannulating the subclavian vein does not appear to benefit from ultrasound guidance. Recent studies on subclavian vein access using an axillary and infraclavicular approach have determined that ultrasound does not improve success rate and may increase the time of the procedure when compared to the traditional technique using anatomic landmarks [55–57].
Technique
Internal Jugular Vein
Central Venous Line
After the patient is positioned, the left and right internal jugular veins should be evaluated for patency using the ultrasound. A patent internal jugular vein appears to be a large, echolucent vessel that completely compresses when gentle pressure is applied through the ultrasound probe. The neck and infraclavicular area should then be prepped with chlorhexidine and draped using sterile technique.
The following describes a micropuncture technique; however, using the larger caliber needle provided in most central line kits is also acceptable. When the vein has been localized with ultrasound, the long axis of the probe is placed against the superior portion of the clavicle (Fig. 17.3a) with the image of the internal jugular vein centered on the monitor. Under ultrasound guidance, the area is infiltrated with lidocaine before puncturing the skin with a 21-gauge needle. The angle of puncture is important when using ultrasound guidance. The needle should be almost parallel to the probe, angled only a few degrees from vertical. This permits the tip of the needle to be visualized along its course from skin entry to venipuncture (Fig. 17.3b). The needle is exchanged over a 0.018-in. guidewire for the coaxial 3-French (F) and 5-F micropuncture sheath. The 0.018-in. wire and 3-F dilator are removed from the 5-F micropuncture sheath, and a 0.035-in. wire is inserted with the tip in the SVC. The 5-F sheath is then removed over the guidewire, and a dilator is inserted to dilate the skin track. The non-tunneled central venous catheter is placed over the guidewire and advanced into the SVC. The guidewire is removed and the catheter secured. All of the catheter lumen should be flushed, and the catheter may be locked with dilute heparinized saline depending on individual hospital protocol. A chest x-ray should be performed to confirm catheter tip location and evaluate for pneumothorax or hemothorax. Procedures performed with ultrasound guidance and under fluoroscopy do not usually require a final chest x-ray.
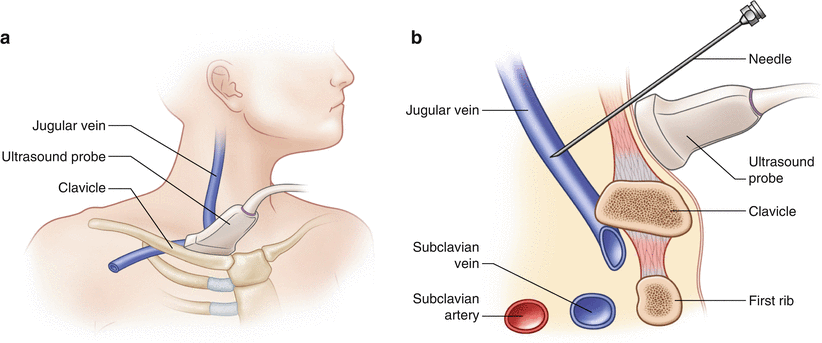
Fig. 17.3
(a) Ultrasound use to visualize the jugular vein prior to access placement. (b) Sagittal view of the jugular access. The ultrasound is positioned with the inferior portion resting against the clavicle and an acute angle of the needle to the probe to visual the track of the access needle as it enters the jugular vein
Chest Port Insertion
Single- or dual-lumen implantable ports are best suited for patients who require intermittent vascular access over a long period of time. Preparation and positioning are the same as described for central venous line placement. The long axis of the ultrasound probe is placed against the superior portion of the clavicle (Fig. 17.3a) with the image of the internal jugular centered on the monitor. Placing the ultrasound probe against the superior portion of the clavicle allows the needle to puncture the internal jugular vein approximately 1 cm above the clavicle. Vein puncture at this level allows the catheter to follow a gentle curve from the vein to its connection with the reservoir on the anterior chest. A higher vein puncture site may cause the catheter to kink, while a lower puncture risks injury to the great vessels and lung. After achieving ultrasound-guided access to the internal jugular vein as previously described, the micropuncture sheath, dilator, and 0.018-in. wire are left in place and temporarily secured to the drape.
The next several steps involve creation of the subcutaneous pocket and tunnel. An imaginary line at an angle of about 45° is drawn from the puncture site in the neck to the anterior chest below the clavicle (Fig. 17.4). This area will be the site of the subcutaneous pocket for the port. After establishing a field block with lidocaine, the skin is incised, and a 1-cm deep pocket is created on the anterior chest wall with blunt finger dissection. The overall size of the pocket should be limited to a few millimeters larger than the port itself. Keeping the subcutaneous pocket small minimizes the chance of the port moving or rotating. The pocket should extend to the level of the fascia for stable fixation points.
Fig. 17.4
Diagram demonstrates orientation for position of subcutaneous pocket. This can also be utilized for placement of a tunneled catheter
The pocket and the neck incision are then connected subcutaneously using the tunneling tool usually provided in the access kit. Attention is then returned to the neck access site. After removing the 3-F dilator and 0.018-in. wire, an 0.035-in. wire is advanced under fluoroscopic guidance into the SVC. Serial dilators are then passed over the wire before placing the peel-away sheath into the SVC. Most peel-away sheaths now have a protective cap, which prevents the sheath from entraining air when the wire and inner dilator are removed. If a protective cap is not in place, caution must be taken to avoid an air embolism when advancing the catheter into the peel-away sheath. The catheter tip should be positioned just within the right atrium. If the catheter triggers cardiac irritability on the monitor, it should be pulled back a few millimeters. The rationale for placing the catheter within the right atrium has to do with the fact that the patient is in a supine position. When the patient is upright, the heart will assume a lower position, and the tip of the catheter will most likely be located at the atrial-caval junction.
The peel-away sheath can then be partially removed to allow a small straight clamp to be placed on the catheter. The rest of the sheath is then peeled away, and a second clamp is placed on the catheter as it exits the tunnel into the subcutaneous port pocket. Placing these clamps establishes two fixed points on the catheter ensuring that the catheter position cannot be changed and that an appropriate length of catheter remains in the SVC. The catheter can then be attached to the port after trimming its excess length. The port is inserted into the pocket; the small straight clamps are removed; and the port is flushed. The skin incision can be closed with absorbable subcutaneous and subcuticular sutures. If vascular access is needed immediately, a Huber (non-coring) needle can be left in the port. A final fluoroscopic image should document the position of the catheter and port.
Tunneled Catheter Insertion
Most TCs are used for dialysis access, long-term TPN, or chemotherapy. Note that different catheters have been specifically designed for each of these needs. The risk of infection and thrombosis increases with the number of catheter lumens [11, 12]. Therefore, the lowest number of lumens necessary to fulfill the clinical needs should dictate catheter choice.
The technique for inserting a TC parallels the steps described for placing a chest port with a few pertinent details. For internal jugular vein placement, keeping the needle puncture site approximately 1 cm above the clavicle allows the catheter to take a gentle bend as it exits the subcutaneous tunnel and enters the vein. This prevents kinking of the catheter that invariably leads to catheter malfunction. After placing the micropuncture catheter in the vein, fluoroscopy can help choose the appropriate catheter length. The tip of the wire is advanced under fluoroscopy to the desired catheter location; the wire is then marked where it exits the skin, removed, and measured to determine the distance from the atrial-caval junction to the vein puncture site. This distance can be added to the distance from the puncture site to the anterior chest wall to determine the appropriate catheter length. The anterior chest wall is then anesthetized along the route toward the internal jugular puncture site. To minimize bleeding from the tunnel, a purse-string suture can be placed at the chosen chest wall exit site. A small incision is then made in the center of the purse-string suture, and the catheter is tunneled subcutaneously towards the internal jugular puncture site. The catheter is then placed using the peel-away sheath technique previously described. Fluoroscopy during and after catheter placement allows accurate placement of the catheter tip and ensures that the catheter is not kinked [58]. The catheter is then secured in place by tightening and tying the purse-string suture around the hub of the catheter.
Subclavian Vein
Infraclavicular Approach
The anatomic relationship between the subclavian vein and the clavicle changes with shoulder position [59–61]. Magnetic resonance imaging shows that passive retraction of the shoulders by placing a rolled towel between the shoulder blades compresses the subclavian vein between the first rib and clavicle which impedes successful cannulation of the vein [62]. The angle between the subclavian and internal jugular veins increases when the patient’s head is rotated to the contralateral side. This change in angle may increase the chance of passing the catheter from the subclavian into the ipsilateral internal jugular vein rather than into the SVC [62]. In other studies, having the patient’s head rotated towards the cannulation side failed to improve positioning of the catheter into the SVC [63, 64]. Trendelenburg position does not affect the caliber of the subclavian vein, which is held open in the flat, supine position by the fibrous attachments to the clavicle. Placing the patient in Trendelenburg still provides benefit by increasing venous filling and minimizing the risk of air embolism [65].
In preparation for subclavian vein cannulation, the patient is placed in a supine position in 10–15° of Trendelenburg. Adducting the patient’s ipsilateral arm will move the subclavian vein closer to the underside of the clavicle. The shoulders typically assume a more cephalad orientation with the patient in Trendelenburg position which can distort the anatomic landmarks. This tendency should be countered by the use of gentle caudal arm traction.
The goal of subclavian venipuncture is to pass the needle below the clavicle and above the first rib to puncture the subclavian vein as it courses over the first rib. The appropriate course for the needle passes immediately beneath the junction of the medial one-third and lateral two-thirds of the clavicle (Fig. 17.5). This junction or so-called “break” of the clavicle is the point at which the anterior convexity of the medial clavicle transitions into an anterior concavity laterally [65]. The needle should be inserted 1–2 cm inferior and lateral to this transition point, aiming the needle slightly deep to the sternal notch. The needle tip may initially come into contact with the clavicle. The needle should be “walked down” the clavicle to reach its underside. Keeping the needle parallel to the floor (the coronal plane) allows it to slide under the clavicle and enter the vein without injuring the lung or pleura. If the attempt is unsuccessful, these steps should be repeated with the needle pointed more cephalad.
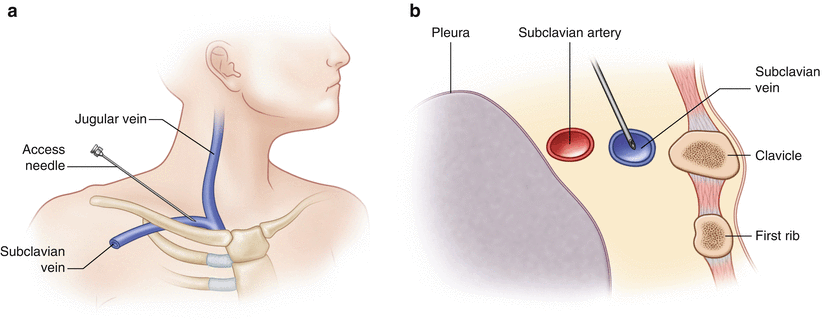
Fig. 17.5
(a) Supraclavicular approach to subclavian vein cannulation. (b) Cross-sectional view through the medial third of the clavicle. The micropuncture needle is directed anterior to avoid inadvertent injury to the subclavian artery and pleural of the lung
Kilbourne and colleagues examined video recordings of surgery and emergency medicine residents performing subclavian cannulation during trauma resuscitation. They identified six common technical errors, five of which involved anatomic considerations including cutaneous puncture too close to the clavicle, passage of the needle through the clavicular periosteum, too shallow a trajectory beneath the clavicle, failure to identify landmarks properly, and orientation of the needle in a cephalad direction away from the sternal notch. The final error was extravascular displacement of the needle after successful venipuncture but before introducing the guidewire [66]. Being aware of these errors can improve the teaching effectiveness of experienced operators and encourage safe practice among clinicians learning the procedure.
Supraclavicular Approach
Bannon and colleagues published an excellent description of subclavian vein cannulation using a supraclavicular approach (Fig. 17.5a, b) [67, 68]. The essential landmark for the supraclavicular approach is the lateral border of the clavicular head of the SCM muscle as it attaches to the clavicle. Turning the patient’s head to the contralateral side accentuates the posterior head of the SCM and provides unobstructed access to the subclavian vein [67]. The point of cutaneous puncture lies 1 cm superior and 1 cm lateral to the SCM attachment site. The junction of the SCM with the clavicle forms the claviculosternomastoid angle. The needle tip should be angled posteriorly 5–15° off a coronal plane and advanced along a line that bisects the claviculosternomastoid angle. This technique will lead to subclavian venipuncture between the clavicle and the anterior scalene muscle. Other authors suggest cutaneous puncture directly at the claviculosternomastoid angle. The needle is then advanced along the claviculosternomastoid angle bisector parallel and inferior to the clavicle to enter the vein at an insertion depth of 1–2 cm [63]. Anatomic data from three-dimensional computed tomography reconstructions suggest that, with the SCM-clavicular junction as a cutaneous puncture point, the needle should be oriented approximately 11° medially and 35° posteriorly as the needle is advanced approximately 1.4 cm to enter the vein. Unfortunately relatively large variation associated with these mean values limits their clinical utility [69]. In contrast to the infraclavicular approach, supraclavicular subclavian cannulation can be facilitated by ultrasound guidance.
Femoral Vein
The femoral vein is not routinely used for long-term permanent vascular access due to the higher rate of infection and thrombosis compared to the subclavian and internal jugular veins. Despite its drawbacks, femoral vein cannulation can be the only reasonable access site for patients with extensive upper extremity trauma and/or venous thrombosis and in dialysis patients with central venous occlusion (SVC and innominate vein). During cardiopulmonary resuscitation (CPR), the femoral vein has the advantage of allowing cannulation and access placement without interrupting CPR. Other indications for femoral vein access include the emergent need for hemodialysis or plasmapheresis.
To cannulate the femoral vein, the patient is placed in a supine position with the lower extremity extended and slightly abducted at the hip. If available, ultrasound should evaluate the patency of the common femoral vein before preparing the sterile field. A patent femoral vein should completely compress with pressure from the ultrasound probe; if it is not compressible, the contralateral femoral vein should be evaluated and considered for access. If ultrasound is not available, anatomic landmarks should be defined to facilitate femoral vein cannulation. The level of the inguinal ligament can be located by drawing an imaginary line from the anterior superior iliac spine to the top of the pubic tubercle. One or two fingerbreadths below this line mark the inferior border of the inguinal ligament. The maximal pulsation of the femoral artery should be identified, and the access needle should be inserted 1 cm medial to the femoral artery pulse. It is critical to ensure that the femoral vein is punctured below the level of the inguinal ligament. Needle puncture above the inguinal ligament is actually a puncture of the external iliac vein which quickly becomes a deep retroperitoneal structure making it difficult to compress and achieve hemostasis if bleeding occurs [65].
Morbid obesity poses a technical challenge for femoral vein access. A common pitfall is to confuse the inguinal crease formed by the overlying pannus with the inguinal ligament. With the pannus retracted cephalad, the anatomic landmarks marking the inguinal ligament can be identified. Failure to identify the true level of the inguinal ligament often results in an inappropriately low skin puncture which is associated with a higher rate of access failure or inadvertent arterial injury. The previously described micropuncture technique involving a 21-gauge needle, 0.018-in. wire, and coaxial 3- and 5-F catheters can be used for femoral venipuncture as well. Many central line kits also provide an introducer syringe with a wire lumen coming through the plunger of the syringe. The needle and attached syringe should be introduced at a nearly 90° angle. Once the vein has been punctured, the angle should be dropped to 45° to allow the wire to easily advance through the syringe and into the femoral vein. The syringe is then removed, and a small skin incision is made with an 11 blade scalpel. After dilating the skin tract with a series of over-the-wire dilatators, the catheter can be inserted, secured, and flushed. Hemodialysis and plasmapheresis catheters should be long enough to reach the IVC. Short catheters that terminate in the iliac venous system often fail to provide adequate venous flow and are more prone to thrombosis and malfunction.
Ultrasound guidance can increase the safety and speed of femoral venous catheter placement. Using a technique similar to that described for internal jugular vein cannulation, ultrasonography performed during the procedure can identify the femoral vein and provide real-time imaging of the needle puncturing the vein. The femoral vein typically appears as larger caliber, easily compressible structure anteromedial to the pulsatile femoral artery.
Complications
Central VA continues to evolve with improvements in catheter material technology and the widespread acceptance of safer insertion techniques. Despite these advances, central venous catheter placement can still cause acute and delayed complications (Table 17.1). Rare injuries, including brachial plexus and laryngeal palsy, have also been reported during short- and long-term follow-up of patients with central VA [58].
Acute Complications
Air Embolism/Foreign Body Embolism
Air embolism is a rare but potentially lethal complication that can occur during central VA via the internal jugular or subclavian vein. Although it is an entirely preventable problem, air embolism will occur if the practitioner fails to take precautions during central venous catheter placement. In the most common clinical scenario, air enters the vascular system through the needle, dilator, or sheath when the patient suddenly inhales or coughs. Acutely aspirating more than 50–100 mL of air directly into the right atrium and ventricle can cause a fatal obstruction of the right side of the heart. Studies have demonstrated that negative intrathoracic pressure can quickly entrain a large amount of air into the vascular system. A pressure difference of 4 cm H2O allows 90 mL/s of air to pass through a 4-cm, 18-gauge needle. Intubated patients have a lower risk of air embolism than spontaneously breathing patients due to the absence of negative intrathoracic pressure [7].
To minimize the risk of air embolism, the lumen of the needle, dilator, or sheath should be covered at all times. Asking the patient to hum during catheter insertion decreases the chance of sudden inhalation or coughing [37]. Some catheter manufacturers have developed a sealing valve for the peel-away sheath that prevents air aspiration once the wire and dilator have been removed. Symptomatic air emboli can cause tachyarrhythmias, chest pain, cardiovascular collapse, dyspnea, coughing, and hypoxemia. In the event of an air embolism, the patient should be turned onto their left side and placed into the Trendelenburg position. This maneuver is designed to trap the air in the right ventricular apex; however, its effectiveness has not been rigorously studied. Aspirating through the central venous catheter if it is in place can potentially remove some of the intracardiac air. The patient should also be placed on 100 % oxygen to increase resorption of the air pocket. Supportive measures including fluid resuscitation and adrenergic agents should be used as needed.
Misadventures involving the guidewire or catheter can result in foreign body embolization. During insertion, the guidewire can become knotted or entrapped inside the catheter leading to wire fracture and embolization. The catheter itself can also fracture and embolize due to the shear forces exerted by the wire [70–72]. Embolization of a wire or catheter segment can have severe consequences including perforation or infarction of the heart or occlusion of a great vessel. Retrieving an embolized foreign body can involve endovascular techniques using a loop snare device or open surgery to directly expose the affected vessel [73]. Removal of a small segment of catheter that fractured off and embolized is not always necessary if this foreign body does not pose an obvious danger [7]. Decisions about whether to intervene in these cases requires sound clinical judgment. Guidewires can also become entangled with a previously placed IVC filter causing displacement and structural compromise of the filter. Being aware of the IVC filter and using careful technique can usually prevent this complication [74].
Great Vessel Perforation/Inadvertent Arterial Catheter Placement
Iatrogenic cardiac perforation and inadvertent injury to the great vessels during central VA placement can result in hemothorax, cardiac tamponade, and mediastinal hematoma. Failure to recognize any of these conditions, alone or in combination, can be fatal. Vessel perforation and arterial misplacement that occur more frequently during internal radiographic signs of these complications include an atypical catheter course and tip position, pleural effusion, or widened mediastinum (Fig. 17.6). Jugular and femoral vein catheter insertion than with subclavian access [4, 30, 75, 76].
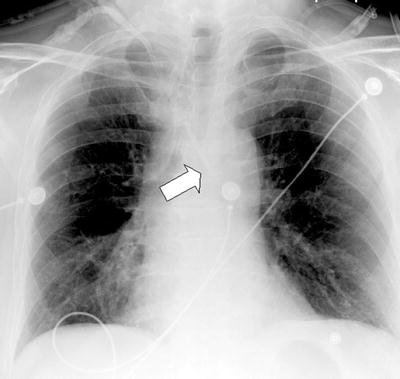
Fig. 17.6
Chest x-ray after placement of jugular line. Arrow demonstrates catheter tip crossing midline with respect to the trachea
Prospective studies report a 6 % incidence of carotid artery puncture during internal jugular vein access [77]. Higher rates of carotid injury (18–25 %) have been reported in the pediatric population [75, 78]. Approximately 40 % of carotid punctures cause a hematoma, and failure to control the bleeding with manual compression can lead to airway obstruction, dissection, arteriovenous fistula, cerebrovascular compromise, and death [77, 79–83]. Puncture of the subclavian artery has a slightly lower incidence, occurring in 0.5–4 % of patients undergoing central VA placement [4, 30]. Hemothorax resulting from inadvertent arterial injury complicates about 1 % of vascular access cases [4]. In an unusual case, a hemothorax following dialysis catheter insertion caused spinal cord infarction and quadriplegia [84].
Perforation or cannulation of the carotid or subclavian artery by large-bore catheters occurs in up to 1 % of central VA procedures [85–87]. This complication can have serious and potentially fatal consequences including hemorrhage and stroke [87–89]. Stroke and other neurological events occur in approximately 27 % of patients who sustain unintentional arterial catheterization with an associated mortality rate of 20–40 % [85, 86].
Minimizing the risk of arterial injury during central venous catheter insertion has two components:
1.
Avoiding needle puncture of the artery
2.
Recognizing arterial cannulation before dilating or placing a large-bore catheter
Ultrasound guidance offers the most effective safeguard against needle puncture of the artery. Visualizing the tip of the needle when entering the vein lumen with real-time ultrasound imaging significantly decreases the chance of arterial puncture [76, 90, 91]. It is important to understand that inadvertent arterial punctures can still occur even with the use of ultrasound guidance. These events usually involve incorrect identification of the vascular structures or manipulation of the needle after venipuncture. The needle can then penetrate the opposite wall of the vein and puncture the underlying artery. Bright red, pulsatile blood flow from the needle usually alerts the operator that an arterial puncture has occurred. Unfortunately, this warning sign is not always recognized especially in clinical circumstances involving hypotension and hypoxemia. If the location of the needle or micropuncture catheter is unclear, the catheter can be connected to a pressure transducer to confirm low venous pressures and the absence of arterial pulsations before dilating and placing a large-bore catheter [76, 92]. Other methods have been described to identify an arterial puncture; however, none are infallible [80, 93]. Perforation of the aorta during central VA can occur in conjunction with a SVC injury [94]. An injury at the pericardial reflection often leads to cardiac tamponade, which has a mortality rate exceeding 90 % [95, 96]. Aortic injuries can occur as a result of multiple venipuncture attempts or the improper use of large dilators [97, 98]. In a typical clinical scenario, forceful advancement of the dilator causes it to override the wire and perforate the central vein or SVC. The technique of frequently ensuring that the wire moves freely as the dilator is advanced can minimize the risk of this complication.
Recognizing and treating a great vessel injury require a high index of suspicion and prompt diagnostic imaging. A chest x-ray can be misleading while ultrasound provides limited visualization of intrathoracic structures. Diagnosing a central vessel injury can require a contrast-enhanced CT scan or catheter-directed angiography depending on the clinical urgency. Balloon tamponade can provide temporary vascular control while preparing for open surgical repair or endovascular intervention using a stent graft or closure device [99–102].
Pseudoaneurysms and arteriovenous fistulas represent rare complications of inadvertent arterial cannulation or vessel perforation [103, 104]. Arteriovenous fistulas have an incidence of 0.6 and 0.2 % after internal jugular and subclavian vein access, respectively [81, 105]. Clinical signs of an arteriovenous fistula include a palpable thrill or audible bruit in the neck. A pseudoaneurysm is a contained pocket of blood flow associated with an underlying arterial injury. Depending on the size and location, a pseudoaneurysm can present as a pulsatile mass or cause compressive symptoms on adjacent structures. Although fistulas and pseudoaneurysms can cause acute symptoms, they usually have a delayed clinical presentation [106]. Injury to the vertebral artery can also occur during subclavian or internal jugular vein access and may be associated with an adverse neurological event [107].
In the past, open surgical repair was the only treatment option for pseudoaneurysms and arteriovenous fistulas resulting from VA procedures. Endovascular intervention including the use of stent grafts now offers an effective and less invasive alternative in many cases [106, 108]. Ultrasound-guided thrombin injection has been reported in the treatment of a carotid artery pseudoaneurysm; however, this technique should be used with caution because of the potential for cerebral embolization [109].
Stay updated, free articles. Join our Telegram channel

Full access? Get Clinical Tree


