Chapter 8
Catheter Placement in Pediatric Patients
The transition from surgical placement of venous access devices to their placement in the interventional radiology suite has occurred with the pediatric population in the same way that it has occurred in the adult population.
Typically, the placement of venous access devices in the pediatric population is performed by interventional radiologists or pediatric radiologists who have an interest and training in interventional radiology. Although the basic techniques for the insertion of venous access devices in children do not differ from those used in adults, some differences do exist. This chapter outlines the placement of venous access devices in pediatric patients and highlights the differences.
CATHETER TYPES AND SELECTION
Long-term catheters are made from polyurethane or silicone rubber. A Dacron cuff on tunneled catheters allows tissue in-growth. Catheters and ports are available in the lower size ranges suitable for the pediatric population.
Catheters designed for the pediatric population include the Broviac catheter (Bard Access Systems, Salt Lake City, UT, U.S.A.), which was introduced in 1973.1 This is a single-lumen tunneled catheter whose diameter ranges from 2.7 to 6.6 French (F). Although the diameter of the intravenous portion of this catheter is small, the tunneled and external portions are larger and therefore less likely to break. If a double-lumen tunneled catheter is required, the 7 F Hickman catheter (Bard Access Systems) is adequate for children.2
Regarding port catheters, the Cook Minivital port (Cook, Inc., Bloomington, IN, U.S.A.), which has a 5 F catheter, is suited for implantation in the chest in children, whereas the Braun Celsite port (Braun, Evanston, IL, U.S.A.) is suitable for placement in the arm. Double-lumen ports are not placed in children because of size considerations. Older teenagers receive single- or double-lumen ports, as in adults.
Peripherally inserted central catheters (PICCs) for children are the same as for adults. For small double-lumen PICC catheters, Luther Medical Systems (Luther Medical Products, Inc., Tustin, CA, U.S.A.) manufactures 2.6, 3.5, and 5 F double-lumen PICCs, the smaller sizes of which are suitable for neonates. Single-lumen Cook 3 or 4 F PICC catheters work well in children.
Dialysis or pheresis catheters are available in a variety of sizes. In older children, catheters used in the adult population can be placed. For smaller children and neonates, double-lumen catheters as small as 8 F are available from Medcomp (Medcomp, Harleysville, PA, U.S.A.). Varying lengths are available. A split-tip dialysis catheter is available from Medcomp (Ash-Split). This catheter is available in 10 F and 18 cm (13 cm cuff-to-tip) or 24 cm (19 cm cuff-to-tip) lengths. On occasion, despite the variety of catheters available, it is necessary to cut and tailor a dialysis catheter to suit the child. We avoid this whenever possible because it can be difficult to fashion the catheter enough to give adequate flow rates for dialysis or pheresis.
Close collaboration with the clinical service is required to determine the most suitable access device for children. Ideally, the catheter with the smallest diameter and the least number of lumens should be used because infectious and thrombotic complications are more common with increased diameter and greater number of lumens.3,4 The access to be placed is determined by the treatment plan; however, consideration of cost, infection risks, supportive care needs, and the fears and phobias of patients and parents regarding needles should be considered.
Absolute contraindications for tunneled catheter and port placement include an active infection. A relative contraindication is thrombocytopenia or coagulopathy, and attempts should be made to correct coagulation abnormalities before placement. A platelet count greater than 50,000/mm3 is desired.
PATIENT PREPARATION AND SEDATION
Informed consent must be obtained from a parent or legal guardian. Occasionally, a child is a ward of the state, in which case consent is obtained by contacting the caseworker. Information can be obtained from the hospital social worker assigned to the child. Consent may be obtained from an older teenager if he or she is considered an emancipated minor.
In the younger patient, sedation is usually required even for PICC line placements or catheter exchange over a guidewire. Occasionally, in teenagers, a catheter can be placed using local anesthetic only. Frequently, even in the teenage population, sedation is required even for simple line procedures because many of these children have chronic illnesses and psychosocial issues.
Tunneled catheters, dialysis catheters, and ports always are placed at our institution with the patient under general anesthesia. Air embolism with serious complications can result from the patients being unable to hold their breath.5,6
Before conscious sedation, the risk factors as well as past and present medical history and past sedation history must be reviewed. Overall risks can be determined using the American Society of Anesthesia (ASA) classification system (Table 8–1).7,8 Usually, patients sedated in the interventional radiology suite are class 1 or 2. For higher classes, either the department of anesthesia or critical care medicine provides assistance with sedation and control of the airway. For all cardiac patients, cardiac anesthesia provides sedation.
At the Children’s Hospital of Philadelphia, most children who were allowed to drink clear fluids up to 2 hours before surgery had comparable gastric pH and residual gastric fluid values compared with children who were fasted longer.9 The guidelines for fasting, as recommended by the American Academy of Pediatrics Committee on Drugs (AAPCOD), are outlined in Table 8–2.7 For conscious sedation, the same fasting guidelines are used because unconscious sedation can occur unexpectedly. It is important that parents clearly understand the fasting guidelines because failure to follow them can result in the procedure being delayed or canceled. For class 1 or 2 patients, the sedatives used will depend in part on personnel preference and expertise with any given agent as well as patient factors.
Table 8–1 American Society of Anesthesiologists Physical Status Classification
Class | Patient |
|---|---|
Class 1 | Healthy patient |
Class 2 | Mild systemic disease |
Class 3 | Severe systemic disease |
Class 4 | Severe systemic disease that is a constant threat to life |
Class 5 | Moribund. Not expected to survive 24 hours with or without the surgery or procedure |
Table 8–2 Fasting Requirements Prior to Procedure
Fasting Guidelines | ||
|---|---|---|
Age | Clear Liquids | Semi-solids/Solids |
0–up to 6 months | 2 hours | 4 hours |
6–up to 36 months | 2 hours | 6 hours |
Older than 36 months | 2 hours | 8 hours |
Semi-solids includes breast milk.
Faster onset of sedation occurs by using the intravenous route. Three classes of drugs represent the most commonly used sedative agents: barbiturates, benzodiazepines, and narcotics (Table 8–3). Ketamine hydrochloride also has been described as being useful in providing sedative and analgesia in young children.10
At the Children’s Hospital of Philadelphia, toddlers and older children are given meperidine (Demerol) and pentobarbital (Nembutal) administered orally on call to radiology and receive intravenous sedation in the radiology department. Neonates receive intravenous sedation only, in the radiology department.
The JCAHO has adopted the AAPCOD’s recommended minimum standards for monitoring children. The level of monitoring should reflect the depth of sedation required to complete the study. Baseline vital signs (blood pressure, heart rate, respiratory rate, oxygenation) should be obtained and documented at a minimum of 5-minute intervals. Oxygen should be administered as needed. It is important to monitor the level of consciousness and perfusion because the status of these can change rapidly in a child.7,11 Discharge criteria (based on the AAPCOD recommendations) include the following: cardiovascular and airway status is stable and satisfactory, the child can be aroused easily, protective reflexes are intact, and age-appropriate actions can be performed (e.g., talking, sitting up). In the very young child or handicapped child, the presedation level of responses should be present.7,11 Hydration of the child must be adequate. Inpatients are transferred back to their clinical service; consequently, monitoring of the patient is also transferred.
Antagonist drugs for the sedatives given should be readily available in the radiology department (Table 8–4). In addition, full pediatric code facilities must be available, and it is helpful for personnel to be certified in Pediatric Advanced Life Support (PALS).
TECHNIQUES FOR CATHETER INSERTION
Tunneled Catheters
The placement of tunneled catheters and ports by the radiology department is well described.5,12–16 We prefer internal jugular access rather than the subclavian route in all cases. This avoids the potential “pinch-off” syndrome, which can occur as the result of the catheter being caught between the first rib and clavicle. Ultimately, the catheter may fracture and embolize.17 In addition, studies have shown a greater incidence of central venous thrombosis and stenosis when the subclavian vein is used compared with when the internal jugular vein is used.18–20 This is important in the dialysis patient because arm grafts may be needed. Avoiding placement of catheters in the subclavian vein prevents subclavian vein stenoses. Also, the internal jugular vein is much more easily punctured than the subclavian vein, particularly in the very young child.
Sterile technique is used for all procedures. All personnel wear hat and mask. The operator performs a surgical scrub before putting on gown and gloves. The patient’s skin is cleaned with povidone-iodine. The use of prophylactic antibiotics remains controversial, and several studies suggest that they are not of benefit.21,22 At Children’s Hospital, we do not use prophylactic antibiotics in the placement of tunneled catheters, dialysis catheters, or ports.
Table 8–4 Narcotic and Benzodiazepine Antagonists
Sedative Antagonists | ||
|---|---|---|
Drug | Effect | Dose/Route |
Naloxone hydrochloride | Narcotic antagonist | 0.005–0.01 mg/kg/dose IV. May repeat in 2 to 3 minutes. Titrate to reversal. Maximum dose 2 mg |
Flumazenil | Benzodiazepine antagonist | 20 kg initial–0.01 mg/kg IV over 15 seconds. Maximum 0.2 mg repeat–0.005 mg/kg after 1 minute |
20–10 kg initial–0.2 mg over 15 seconds IV repeat–0.2 mg after 1 minute. Maximum cumulative dose 1 mg | ||
The right internal jugular vein is preferred because it provides a more direct route into the right atrium (RA) and therefore helps prevent sheath kinking. The vein should be accessed as low as possible to prevent an acute angle as the catheter turns toward the skin exit site. The vein should be accessed between the two heads of the sternocleidomastoid muscle because it is painful to bring a catheter through the muscle. Alternatively, a posterior approach into the vein can be used by commencing at a point just lateral to the lateral border of the lateral head of the sternocleidomastoid. The vein is localized using a small portable battery-powered ultrasound machine with a 3-inch screen (Siterite; Dymax, Pittsburgh, PA, U.S.A.).
Buffered lidocaine (9 mL of 1% lidocaine and 1 mL of sodium bicarbonate) is used to anesthetize the puncture site. Buffered lidocaine dramatically reduces the burning sensation associated with injecting lidocaine. This is of greater significance when dealing with patients in whom conscious sedation is being used. A no. 11 scalpel blade is used to make a dermatotomy.
A 21-gauge needle, 2 to 4 cm long, is used for entry into the vein (Micropuncture; Cook, Inc.). The needle is advanced under ultrasound guidance into the vein. Once the needle is seen resting on the vein, a short, sharp jab is used to enter the vein. A double-wall puncture is not performed, particularly if the carotid artery lies under the vein rather than at its lateral aspect. The vein wall can be resistant to entry, and the walls may coapt. Entry into the vein usually is felt as a “give” or “popping” sensation. A slip-lock syringe may be attached and blood aspirated to confirm intravascular placement. Alternatively, a short length of vena-tubing may be attached to the needle and the syringe attached to the vena-tubing. The syringe should not be attached directly to the needle while making the puncture because to do so is an awkward setup to control. If blood return is not obtained, the needle should be withdrawn slightly during aspiration.
The .018-inch mandril guidewire from the micropuncture set is advanced under fluoroscopic guidance into the inferior vena cava (IVC). The needle is removed and the dilator placed. The intravascular length of the catheter is measured by kinking the wire when the tip is in the RA (for dialysis catheters or catheters placed for chemotherapy) or at the superior vena cava (SVC)-RA junction (PICC lines). A forceps then is used to mark the skin exit site. Under fluoroscopic guidance, the wire is withdrawn to the level of the forceps. The wire then is clamped at this point. The distance between the clamp and the kink is the intravascular length for the catheter.
An 80-cm-long, .035-inch Rosen wire (Cook, Inc.) then is inserted and the tip placed in the IVC. Passage of any wire through the heart should be monitored fluoroscopically, and the anesthetist should be informed of such passage.
Following this, the exit site is chosen in the deltopectoral groove level. In older teenage girls, care should be taken to avoid breast tissue. The site is anesthetized with 1% lidocaine with epinephrine, a dermatotomy is made, and then the entire length of the tunnel is anesthetized through the dermatotomy with a 22-gauge Chiba needle (Cook, Inc.) or the micropuncture needle. The tunnel should not be punctured multiple times because to do so might increase the risk of infection. Initially, blunt dissection of the tunnel is made using a curved forceps, followed by the tunneling device with the lead end exiting the venotomy site in the neck. The catheter is brought through the tunnel, and its cuff is placed 1 to 2 cm into the tunnel. The catheter is cut as determined by the previously measured wire. The catheter then is pulled further into the tunnel because it is usually easier to pull back the catheter from the RA than to later advance it. The catheter should be flushed and the clamps closed.
The neck venotomy site may need to be progressively dilated, depending on the diameter of the catheter. The peel-away sheath then is inserted over the wire under fluoroscopic guidance to ensure that the sheath is following the line of the wire (i.e., advancing coaxially). When a left internal jugular vein approach is used, making a gentle curve in the sheath is useful to facilitate passage over curves.
At this point, respiration is suspended by the anesthetist, the wire and inner dilator of the peel-away sheath are removed, and the catheter is immediately inserted. Respiration is resumed as soon as the catheter is within the peel-away sheath. Intermittent fluoroscopy checks of the passage of the catheter should be made to ensure correct position. The sheath is removed in its entirety if the catheter is in adequate position. If the catheter is in farther than desired, it can be pulled back under fluoroscopic guidance until the tip is at the desired level.
HELPFUL HINTS
It is useful to hold gentle pressure over the neck entry site and to “jiggle” the catheter as it is pulled back to prevent pulling it back too far. The length of the catheter should be checked under fluoroscopy to ensure that no kinks are present. Each port of the catheter should be aspirated, flushed, and primed with heparin solution.
HELPFUL HINTS
Difficulty in passing the catheter through the peel-away sheath is usually due to the sheath being kinked. Peeling away some of the sheath will allow further catheter advancement. A hydrophilic guidewire can be inserted through the catheter and the catheter placed through the peel-away sheath over the hydrophilic guidewire.
The skin venotomy site is closed with an inverted 4–0 Vicryl subcuticular suture and Steri-strips. The catheter is secured at the skin exit site with a 2-0 or 3-0 nonresorbable suture (such as Prolene). A sterile nonocclusive dressing then is applied because infectious complications are greater with occlusive dressings. In teenagers, the suture may be removed in 10 to 14 days when the cuff has become incorporated. In younger children, the suture is left in place for extra stability.
Dialysis Catheters
Uncuffed or temporary dialysis catheters can be functional for up to 2 months in children.23 Rigid short-term catheters should be placed with the tip in the SVC, not in the RA as usual because perforation and cardiac tamponade, although rare, have been reported.24 For long-term dialysis, cuffed tunneled catheters are needed.
Access is obtained as described in the preceding section. The catheter length should be measured with the guidewire, and a subcutaneous tunnel is created; however, instead of trimming the catheter to length, the length is chosen before creation of the tunnel because dialysis catheters are designed with staggered tips and therefore should not be cut. For example, if the intravascular length of the catheter is measured to be 16 cm, the tunnel for a 13.5 F, 36-cm-long Bard dialysis catheter should be 5 cm long. This is calculated as follows: The cuff-to-tip length of the catheter is 19 cm. Therefore, 19 cm — 16 cm = 3 cm. Two centimeters is added for the cuff. The overall length of the tunnel is therefore 5 cm. To determine the tunnel length correctly, the catheter cuff-to-tip length must be known. Ideally, the subcutaneous tunnel should be 5 cm or longer.
On occasion, in infants, the dialysis catheter has to be trimmed. This involves staggering the ends and creating additional side holes so that adequate flow rates for dialysis can be achieved.
The remainder of the procedure is the same. The tip of the catheter must be placed in the proximal RA. The arterial port should be facing into the RA because, theoretically, if the arterial port faces the lateral right atrial wall, during aspiration it may “suck up” against the wall and therefore prevent adequate flow rates. This does not apply to newer-design catheters such as the “splittip” or dual Tesio dialysis catheters.
Ports
Ports are placed in the arm or in the chest, depending on the age and size of the child, patient or guardian preference, and institutional bias. Children over the age of 10 are candidates for arm ports. Exceptions may occur; for example, a large 8-year-old may be a suitable candidate for an arm port, whereas a small 13-year-old may not be suitable. Judgment on the radiologist’s part is required for determining the suitability of the child for arm port placement.
Ports are available with pre-attached catheters or where a catheter must be attached. The former are generally suitable for a leftsided approach, when tortuous vessels may lead to the catheter being too short.
For chest placement, access into the internal jugular vein and tunneling of the catheter are performed as described previously. For arm placement, access into the basilic vein is obtained with a micropuncture set. The port pocket is created over the medial aspect of the arm, above the elbow, and over the humerus.12,16
A subcutaneous pocket is created over the anterolateral chest wall, inferior to the clavicle but superior to breast tissue. It is important to ensure that the port hub is not resting on the clavicle. A no. 11 or no. 15 scalpel blade may be used to make an incision. An incision of only 2 to 3 cm is needed for pediatric ports. The incision should be made over a rib interspace for the port to rest on a rib to provide stability accessing the port. The incision, the port pocket, and the tunnel should be anesthetized with 1% lidocaine with epinephrine. Multiple punctures of the skin should be avoided. Blunt dissection with a sponge forceps, curved hemostats, or what is a very effective tool, the operator’s little finger, is used to fashion the pocket. Residual fibrous bands can be cut with scissors. Retractors are used to allow better visualization of the pocket. Bleeding sites can be controlled with a Bovie or with suture ligation. Usually, packing the pocket with saline-soaked gauze for a few minutes will control minor bleeding or general ooze. Curved hemostats are used to start the tunnel. At this point, the port is placed in the pocket to ensure that an adequate fit and adjustments to the pocket can be made. When the pocket is completed, lavage with saline will ensure hemostasis.
To anchor the port in the pocket, either resorbable (e.g., 3-0 Vicryl) or nonresorbable (e.g., 3-0 Prolene) sutures can be used. A stitch is placed in each corner of the pocket to anchor the port later.
A tunneling device is brought through the tunnel, the catheter is attached to the device, and the catheter is brought through the tunnel. The catheter should be clamped to prevent blood loss during catheter insertion. A peel-away sheath is inserted and the catheter advanced under fluoroscopic guidance until the tip is in the proximal RA. The back end of the catheter is cut and attached to the port, and the locking mechanism is secured. The port is accessed, aspirated, and flushed to ensure integrity of the connection. The sutures to anchor the port should be brought through the openings on the port reservoir; then the port is placed in the pocket and the sutures tied.
The deep tissues of the pocket are closed with interrupted inverted 3-0 Vicryl sutures, and the subcuticular tissues are closed with a running 4-0 Vicryl suture. The deep sutures take the tension off the wound and should bring the wound together. Steristrips and a sterile bandage then are applied. The skin neck puncture site is closed with a 4-0 deep Vicryl suture.
If the port is required for immediate use, it is accessed with a noncoring needle (Huber needle), flushed with heparin, and left accessed. If it is not required immediately, it is accessed and flushed with heparin, and then the needle is removed. Generally, because of soft-tissue swelling over the area, the port cannot be accessed for 7 to 10 days afterward.
The same technique is used to fashion a pocket for an arm port. The pocket should be made over bone, in this case the humerus. The basilic vein or alternatively the brachial vein is accessed. A tunnel is not needed for arm ports. The port should be placed in the patient’s nondominant arm.
The placement of preattached ports is similar except the port must be placed in its pocket, the catheter portion brought through the tunnel, and the catheter trimmed to the appropriate length, determined by measuring with a wire. Port removal is done by anesthetizing along the scar, making the incision along the scar, and bluntly dissecting out the port. The pocket should be lavaged and hemostasis ensured. The pocket is closed with deep 3-0 Vicryl interrupted, inverted sutures and with a running 4-0 Vicryl subcuticular suture. Port removal in the younger child may need to be done with general anesthesia.
Peripherally Inserted Central Catheters
In the adult population, better results are achieved with placement of PICCs in the interventional radiology suite than at the bedside.25 However, because it is more expensive to place PICCs in interventional radiology, placement at the bedside should continue for pediatric patients. If this fails, the PICC can be placed in interventional radiology. Success rates as high as 98% have been reported for placement of PICCs in pediatric patients by interventional radiologists.26–28 Lower success rates are expected in children younger than 1 year and in children weighing less than 5 kg.27,29
In neonates, infants, and younger children, venographic guidance is used. About 5 mL of contrast per kilogram can be used. Sterile technique is necessary, but a full surgical scrub is not. Buffered lidocaine with sodium bicarbonate is preferred for local anesthesia. The arm is placed abducted and externally rotated. A tourniquet is applied on the arm. While the nonionic contrast is injected, a suitable vein is selected, preferably the basilic vein. If the brachial vein is used, care must be taken to avoid puncturing the brachial artery. The vein is cannulated with a 21-gauge needle under fluoroscopic guidance. When the needle is on the vein, contrast within the vein will be displaced. Once the needle has entered the vein, an .018-inch mandril guidewire is advanced centrally, the needle is removed, a dermatotomy is done, and the appropriately sized peel-away sheath is inserted. Measurements are made from the cavoatrial junction to the skin insertion site, and the PICC is trimmed to length. If the catheter has a transition portion from the hub that is a French size larger than the catheter, it can be buried within the subcutaneous tissues and vein to prevent bleeding. The PICC then is inserted through the peelaway sheath and advanced centrally. If a double-wall puncture rather than a singlewall puncture is made, the 0.018-inch wire is used to probe while slowly withdrawing the needle about 1 mm at a time under fluoroscopic guidance. Before withdrawing the needle, the wire must be pulled back into it. Remember that the wire can be advanced easily as far as the axilla and yet be in a perivascular location. The tourniquet is released as soon as the wire is in a central vein or if the wire appears to be hanging up at it.
If there is difficulty advancing the PICC, a hydrophilic guidewire (the diameter determined by the lumen size; for example, a 3.5 F double-lumen catheter takes a 0.014- inch wire) can be advanced and the PICC inserted over the wire, through the peelaway sheath. There is a tendency for venospasm to occur, most commonly in neonates and infants (Fig. 8–1). In these cases, it may be useful to attach a Tuohy-Borst adapter onto the PICC and inject saline as the catheter is advanced over the wire and through the peel-away sheath. Injection of nitroglycerin (3–5 μg/kg) via the catheter has been recommended in cases of persistent venospasm.26 In addition, there can be a problem advancing catheters from the cephalic into the subclavian vein secondary to spasm or because of the right angle that can be present at this junction. Frequently, catheter placement via the cephalic vein must be done over a hydrophilic wire.
In older children, ultrasound guidance can be used to access the vein. The procedure is performed as described. Note that usually it is not necessary to aspirate blood from the needle because, when the tourniquet is tied, blood will drip rapidly from the needle once it is in the vein. The advantage of placing PICCs in interventional radiology is that access is obtained higher in the arm than when placed on the floor, where access is usually at the elbow. This enables the child to bend his or her elbow. The PICC should be placed in the nondominant arm if possible. The PICC is secured with 2-0 or 3-0 Prolene, and a sterile dressing is applied. In neonates, infants, and younger children, a “no-no” is applied to prevent the arm bending and to protect the PICC.
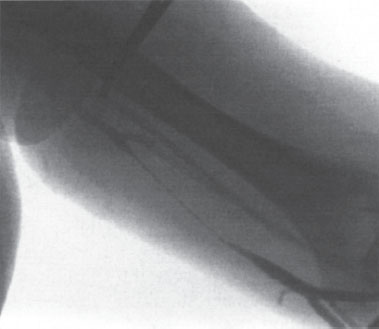
Figure 8–1 Follow-up venogram demonstrating venospasm, which occurred after one pass with a 21-gauge needle into the basilic vein in a 16-year-old boy.


