2 Arterial and Venous Access and Hemostasis for PCI 
Percutaneous Femoral or Radial Artery Approach
Because femoral access is the most commonly used technique in the United States and because of the need for large-diameter interventional equipment, the femoral artery approach is often preferred to the radial artery approach. However, in recent years most labs using 6F guide catheters can easily employ the radial approach for both the diagnostic and the subsequent PCI. The radial approach has significantly fewer access-related complications and, in some studies, better late outcomes. The discussion of the radial technique will follow the femoral approach although operators familiar with current clinical data would advocate “radial first” when possible. Conditions in which radial (or, rarely, brachial) artery access should be favored are listed in Table 2-1.
Table 2-1 Conditions in Which Radial Artery Access Should Be Favored
Femoral Artery Puncture Technique
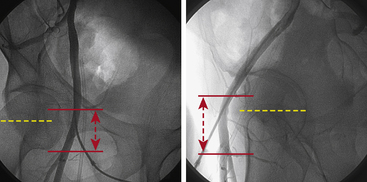
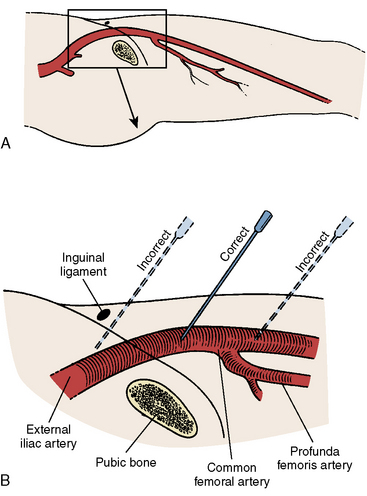
The proper position for femoral artery puncture should be in the common femoral artery, defined as that segment above the femoral artery bifurcation and below the internal epigastric artery (Fig. 2-1). This target zone can be identified by visualizing the head of the femur with a metal marker indicating the planned path of the needle by fluoroscopy. In a manner identical to diagnostic vascular access, the operator locates the artery and administers local anesthesia (see The Cardiac Catheterization Handbook, 5th ed., Chapter 2). Single front wall puncture (Fig. 2-2) is highly desirable for two reasons:
1. Reduces chances of bleeding in the setting of potent anticoagulation and antiplatelet agents.
2. Facilitates successful vascular closure device placement; if a second site puncture occurs, a vascular closure device cannot be used with confidence in obtaining hemostasis.
Key Points for Femoral Arterial Access for Interventional Procedures
1. Consider radial access first because of its lower rate of femoral bleeding complications.
2. In obese patients, place a hemostat or marker over the planned puncture site and fluoroscopically visualize the femoral head.
3. Consider using a Doppler needle or other ultrasound guidance for deep or difficult femoral punctures.
4. If anticipating need for large bore equipment (e.g., rotablator or two stents for treating a bifurcation), use a ≥7F arterial sheath.
Percutaneous Femoral Vein Puncture
Femoral vein puncture is performed like the arterial puncture, as described in The Cardiac Catheterization Handbook, 5th edition, chapter 2. Indications for femoral venous sheath placement in patients undergoing PCI include the need for additional intravenous access for fluids and medications, a temporary pacemaker, or pulmonary artery pressure monitoring. Caution should be used to avoid inadvertent additional arterial punctures. For this reason, if femoral vein access is needed, start with the vein access before arterial puncture. If the artery is inadvertently accessed, place the arterial sheath and then angle slightly more medially with the next puncture.
Radial Artery Access for PCI
While the fundamental principles of catheter manipulation remain the same as those used in femoral procedures, TRI is technically more variable. Basic changes in approach by both the operator and the catheterization lab staff are required to overcome the “radial first” learning curve. Some of the practical challenges encountered when learning to perform TRI and strategies to overcome them are highlighted in Table 2-2.
Table 2-2 Challenges to Starting a Radial Program
| Patient setup |
| Prep wrist with patient’s arm at his or her side (radial artery parallel to femoral artery) |
| Prep femoral artery simultaneously in case of crossover |
| Use either a rectangular platform or 2 “banjo” arm boards underneath patient’s arm to create a working space distal to patient’s hand |
| Place towels on working space to elevate working space to level of wrist |
| For left radial cases, elevate left arm using pillows to bring left radial above left groin or have patient bring left arm across body after obtaining left radial artery access |
| Radial artery access |
| Small-caliber artery |
| Check contralateral radial artery |
| Spasm |
| Intra-arterial nitroglycerin, calcium channel blockers |
| Patient sedation |
| Use smaller French size catheters |
| Repeat access |
| Check patency of artery (ultrasonography or reverse Allen test*); obtain access more proximally |
| Traversing the radiobrachial region |
| Radiobrachial angiogram for any resistance to advancing the wire or catheter |
| Radial loop: use 0.014-inch hydrophilic wires to traverse and straighten loop |
| Consider femoral access bailout if unable to traverse radial loop or if there is significant patient discomfort |
| Traversing the chest arteries |
| Have patient take a deep breath to straighten subclavian/innominate arteries and subclavian/innominate-aortic junction to direct catheter to ascending aorta |
| For extreme z-curves, use hydrophilic 0.035-inch wires to direct catheters into ascending aorta |
| Engaging the coronary arteries |
| Judkins curves: use longer JR curve (e.g., JRS), shorter JL curve (e.g., JL3.5) |
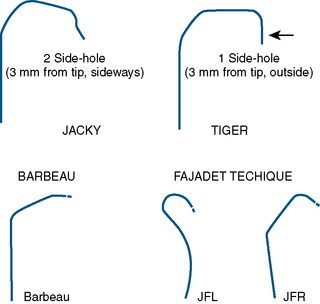
| Specialized curves (e.g., Kimny, Tiger, Jacky, Ikari, Amplatz) |
| Previous CABG: use left wrist with JR4/JL4 catheters, multipurpose catheter, or specialized curves |
From Rao SV, Cohen MG, Kandzari DE, et al. The transradial approach to percutaneous coronary intervention: historical perspective, current concepts, and future directions. J Am Coll Cardiol 2010;55:2187–2195.
Clinical Evidence Favoring TRI
With its superficial location, complications at the site of radial puncture are less common, noticed earlier, and easier to manage. Rates of major bleeding are significantly lower for transradial procedures, even in populations at high risk for arterial access complications, such as females and the elderly (Fig. 2-3). Data from patients of all ages suggest that this reduction in bleeding may translate into reduced rates of death and ischemic events. In addition, patient comfort and satisfaction are enhanced by transradial access, as patients can sit up immediately postprocedure and ambulate as soon as their sedation has worn off. Compared with femoral technique, transradial catheterization leads to improved quality of life postprocedure and is preferred by patients.
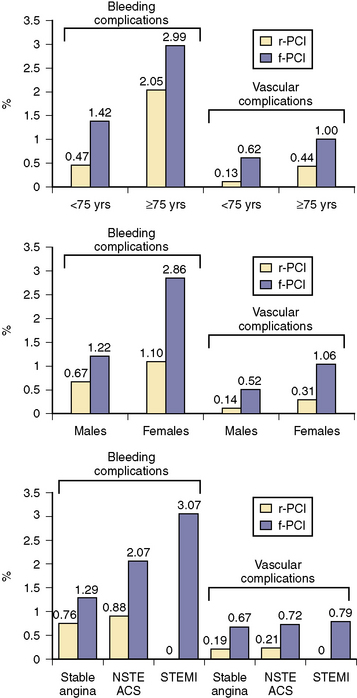
Figure 2-3 Bleeding and vascular complications in radial and femoral PCI.
(Adapted from Rao SV, Ou FS, Wang TY, et al. Trends in the prevalence and outcomes of radial and femoral approaches to percutaneous coronary intervention: a report from the National Cardiovascular Data Registry. JACC Cardiovasc Interv 2008;1:379–386.)
Patient Selection for TRI
In general, TRI is avoided in patients in whom:
a. The radial artery is being considered for use in coronary artery bypass graft surgery or in whom hemodialysis via an AVF may be necessary, as well as in patients with an existing AVF.
b. There is known upper extremity vascular disease, such as severe atherosclerosis, extreme tortuosity, or vascular anomalies, or those with vasospastic disorders, including Raynaud’s or Buerger’s disease.
c. The procedures will likely to require 7F or larger guide catheters.
Anatomy for Radial Access
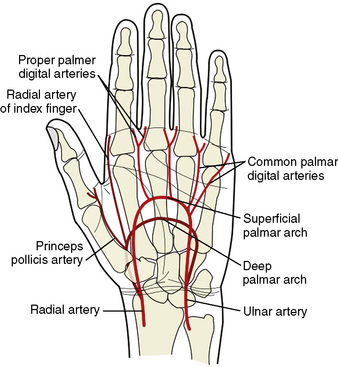
Knowledge of the anatomy of the vessels of the upper extremity and aortic arch is essential information for becoming a TRI operator. The aortic arch gives off the great vessels: the innominate artery on the right and the common carotid and subclavian arteries on the left. The innominate artery becomes the right subclavian artery after the takeoff of the right common carotid. The lateral margin of the first rib demarcates the transition from subclavian artery to axillary artery. At the inferior border of the teres major muscle, the axillary artery continues as the brachial artery, which then bifurcates in most patients into the radial and ulnar arteries below the elbow. Some patients will have an anatomic variant in which the radial artery originates higher than the elbow. The radial artery then continues along the lateral aspect of the forearm into the wrist, where it passes over the scaphoid and trapezium bones and divides into the deep and superficial palmar arches. The flexor retinaculum overlies this area of the wrist. The deep and superficial branches of the radial artery communicate with corresponding divisions of the ulnar artery to complete the two palmar arches and provide dual, collateral blood flow to the hand in most patients (Fig. 2-4). Operators should familiarize themselves with the relevant anatomy to avoid cannulation of the radial artery too distally and to prepare for anatomic variants that may make traversing the path from radial artery to ascending aorta challenging.
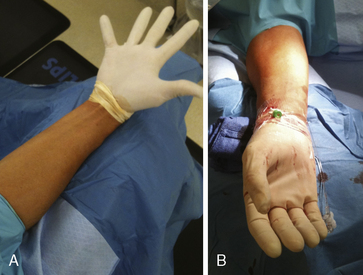
Use of the Allen’s Test
A strong recommendation for the radial procedure is the performance of the Allen’s test. The Allen’s test assesses the adequacy of the palmar arch and ulnar flow. It is performed as follows: The patient makes a fist pushing blood from the hand. The radial and ulnar arteries are compressed and simultaneously occluded. When the hand is opened, the palm appears blanched. Release of the ulnar artery should result in return of pink hand color within 8 to 10 seconds. (Fig. 2-5)

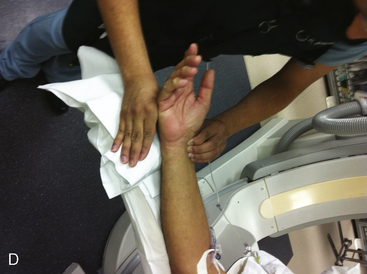
Another and more objective measurement of satisfactory ulnar flow can be documented by pulse oximetry. Using the pulse oximeter, the pulse wave is displayed with both arteries open (Fig. 2-6a). The radial artery is then compressed and the pulse wave of ulnar flow observed (Figs. 2-6b, 2-6c). A reverse Allen’s test can also be performed by occluding the ulnar artery. It is recommended for patients with a history of previously accessed radial arteries either for catheterization or arterial blood gases. The results of the oximetric Allen’s test are divided into four grades of waveforms: type A, no change in pulse wave; type B, damping of waveform that returns to normal within 2 minutes; type C, loss of phasic pulse waveform that returns within 2 minutes; type D, loss of pulse waveform without recovery within 2 minutes. Although use of the Allen’s test and grading of the results for patient selection safety concerns may not be well supported by data, in some areas, this may be considered standard of community practice. In such cases, radial artery cannulation is recommended with types A or B results, can be considered with type C results, and contraindicated with type D results.
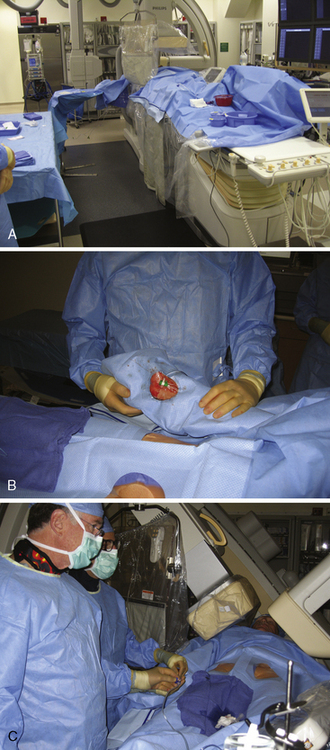
Room and Patient Setup
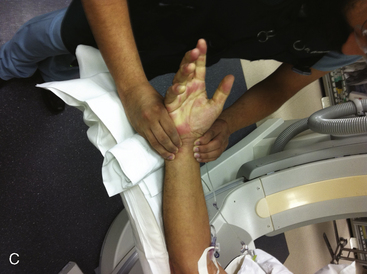
For either right or left radial approaches, correct positioning and preparation of the patient’s arm are important for successful arterial access (Fig. 2-7). The arm board, typically a rectangular or banjo-shaped board, is securely placed under the patient’s torso to provide support for the patient’s arm and catheterization equipment. After the distal forearm has been shaved, the arm is placed on the arm board. In some labs the arm is placed at the patient’s side, such that the radial and femoral arteries are in parallel. In other labs, the arm is moved to the patient’s side after arterial access. This placement next to the leg decreases operator radiation exposure and removes the need for specialized drapes. For right radial cases, towels are stacked underneath and around the patient’s arm to provide a level work space that is at the same elevation as the anterior surface of the patient’s body. The wrist is supinated and hyperextended slightly, using a rolled towel or other soft object placed under the wrist. Over-hyperextension of the wrist should be avoided, as the arterial pulsation can be blunted by this maneuver. The arm can be stabilized with tape or an elastic bandage. An optional short (elbow to hand), cushioned arm board typically used for arterial pressure lines can also help to secure the wrist in an optimal position (Fig. 2-8). The short arm board is especially useful for left radial cases and allows for adduction of the whole arm toward the operator while maintaining correct positioning of the wrist.
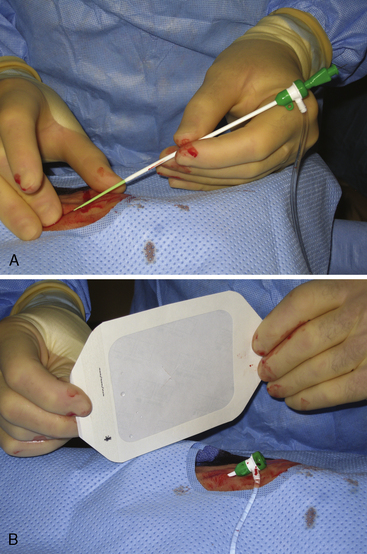
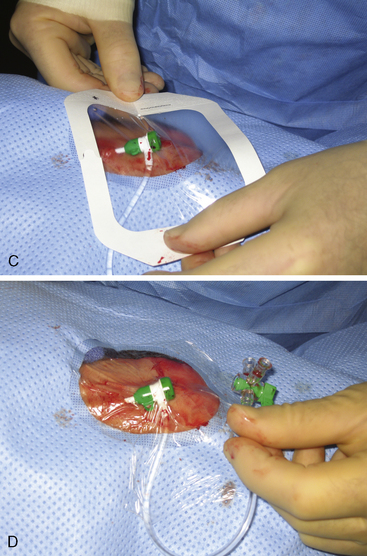
After proper positioning of the patient’s arm, a sterile field is created. A sterile top drape with a circular adhesive cutout in the middle is placed over the wrist, exposing the most distal portion of the forearm where the point of maximal radial arterial pulsation is felt. Several sterile towels are then draped around the sides of the exposed area. An innovative way to keep the patient’s hand both sterile and free of blood during the procedure is to place a sterile glove on the patient’s hand prior to the top drape (Fig. 2-9). The femoral artery should be prepped and draped simultaneously in the event of conversion to a transfemoral approach (although converting from one radial to the other is frequently a better option) or the urgent need for a balloon pump.
Radial Artery Access and Sheath Introduction
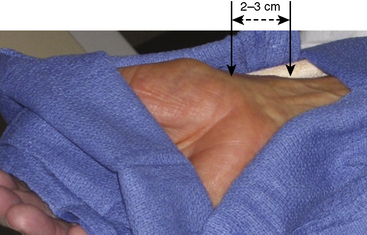
Once draped, the radial pulse is palpated. The ideal puncture site is 1 to 2 cm proximal to the radial styloid, the bony prominence of the distal radius. Sites near the radial styloid risk puncture of the radial artery after its bifurcation and may make threading the guidewire difficult through a stretched and flattened radial artery. Extremely proximal punctures are more difficult to compress and can result in hematoma formation. A small amount (no more than 1 mL) of local anesthetic is injected subcutaneously, raising a small wheal similar to a tuberculosis skin test. Larger amounts of anesthetic can obscure the pulse. The course of the radial artery is fixed with the index and middle fingers of the nondominant hand. Using the other hand, the micropuncture catheter-over-needle system is inserted with the bevel facing up at a 30- to 45-degree angle to the skin along the direction of the radial artery until a flashback of blood is visualized. The system is advanced until the back wall of the vessel is punctured and blood flow stops. This is known as a “through and through” technique (Fig. 2-10). Occasionally, no flashback of blood is observed, although the operator is confident of an intra-arterial puncture. The catheter-needle system should continue to be advanced to complete the back wall puncture in this situation. The needle is then removed, and the catheter is withdrawn until its tip is intraluminal, as confirmed by freely flowing blood. A 0.018- or 0.025-inch straight-tip or slightly angulated guidewire is gently inserted using a twirling motion. There should be no or little resistance to wire introduction: if resistance is encountered, fluoroscopy should be used to immediately visualize the position of the wire. Once the wire is securely and freely in the vessel, the cannula is removed over the wire. Figure 2-11 shows the steps for radial sheath insertion.
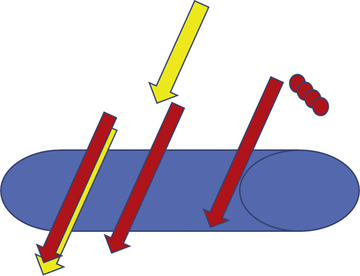
Figure 2-10 “Through and through” technique for radial puncture.
(Reprinted from Nguyen TN, Colombo A, Hu D, et al., eds. Practical handbook of advance interventional cardiology, 3rd ed. Copyright (2008) with permission from Blackwell.)
Concomitant Medications
Medications are crucial adjuncts to successful TRI, as the radial artery is very vasoactive, and flow around the sheath at the site of radial access is sluggish, increasing the risk for thrombus formation. Anxiety and high sympathetic tone are significant contributors to vasospasm, making the use of local anesthetic, sedation, and analgesia important factors in keeping patients comfortable and relaxed. Once access is achieved, intra-arterial injection of a spasmolytic agent, such as nitroglycerin, verapamil, diltiazem, adenosine, or papaverine, is essential for minimizing vasospasm and discomfort. Calcium channel blockers may be longer lasting than nitrates, although they are also associated with an intense burning sensation and should be diluted to mitigate discomfort. Spasmolytics can be repeated as necessary throughout the procedure during catheter exchanges, if hemodynamics allow. For anticoagulation, weight-adjusted unfractionated heparin (UFH) 40 to 70 U/kg up to 5000 U is administered to prevent thromboembolic complications and radial artery occlusion. This can be given immediately after insertion of the radial artery sheath, although some operators prefer to wait until successful passage of a guidewire into the ascending aorta has been achieved in case of need to convert to the femoral approach. Administration of UFH intravenously is preferred, as it causes less discomfort than intra-arterial injection. A sample regimen of drugs and doses used in our lab is provided in Table 2-3.
Table 2-3 Medical Regimen for Radial Catheterization
| Before Procedure |
| After Sheath Insertion (Before Catheter Insertion) |
| After Procedure and Before Sheath Removal |
Angiographic Catheter Selection
Careful catheter selection for the radial approach is important. Table 2-4 lists the most commonly used catheters. The standard preformed diagnostic Judkins or Amplatz catheter shapes may be used but require more manipulation for selective engagement of the coronary ostia. For selective engagement of the left coronary ostium, a Judkins left 3.5 catheter is typically used. Several catheters that can be used to approach both the left and the right coronary arteries have been developed (Fig. 2-12). A decrease in catheter exchanges has been shown to decrease the incidence of spasm. Use of the left radial artery approach provides easier manipulation of the standard preformed Judkins shapes with minimal effort. The left arm should be brought over the abdomen so that the operator can work from his or her usual position on the right side of the patient.
Table 2-4 Most Commonly Used Catheters for Radial Coronary Angiography
| Right Coronary Artery |
| Left Coronary Artery |
| Vein Grafts |