FIGURE 5-1 Normal anatomy of brachial, radial, and ulnar arteries.
• Focal: narrowed segment <10 mm in length (Fig. 5-2)
• Diffuse: narrowed segment ≥10 mm in length (Fig. 5-3)
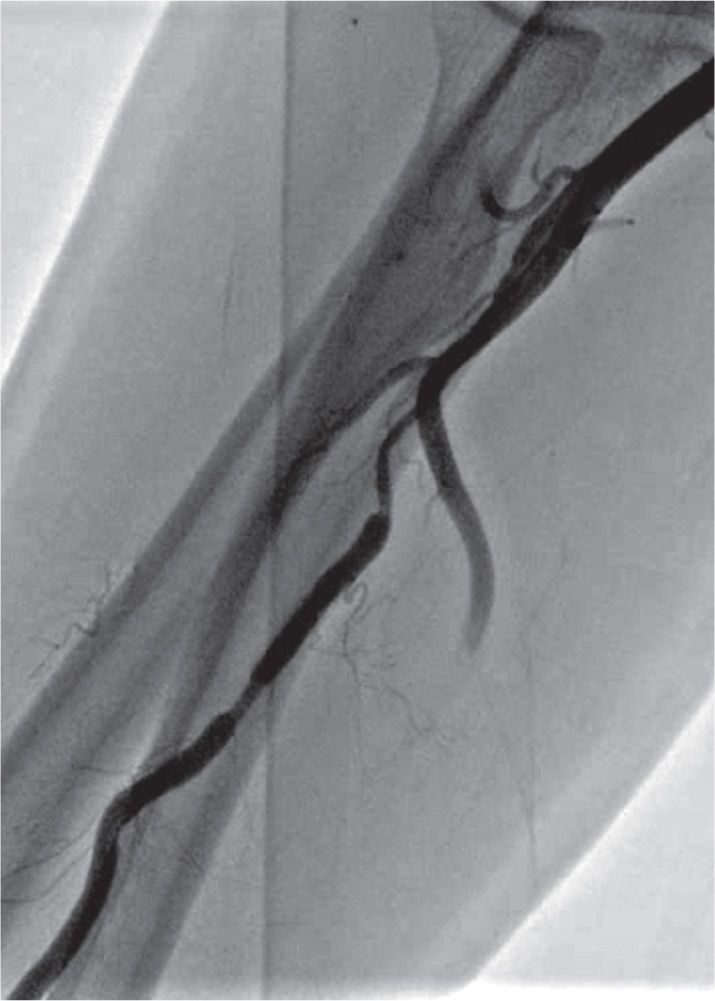
FIGURE 5-2 Focal spasm of RA.
Identification and Management of Radial Artery Spasm
• If a patient complains of significant local pain in the region of RA during the passage of a guidewire and/or a catheter, RAS should be suspected.
• Perform a radial angiography through the side port of the introducer sheath or through the catheter itself to define the anatomy and detect spasm.
• If RAS is confirmed, an additional dose of spasmolytic cocktail should be given, and another radial angiography should be performed after a short period (30 seconds to 1 minute) to confirm that the spasm is relieved.
• If RAS contributes at this stage, the affected segment should be crossed carefully using a 0.025″ J-shaped hydrophilic guidewire or a soft-tip 0.014″ percutaneous transluminal coronary angioplasty (PTCA) guidewire. Once it is done successfully, a diagnostic or guide catheter should be negotiated over it. Instead of the usual pushing movement, use a slow, cork-screw movement to break the spasm. Once the tip of the catheter crosses the affected segment, the rest of the procedure can be completed in the regular manner.
• If spasm develops in RA with the initial catheter, downsizing the catheter (to a 4F instead of 5F diagnostic catheter, or a 5F instead of 6F guide catheter) helps to work past the spasm successfully.
• Beginners have relatively higher incidence of RAS. Multiple attempts for RA puncture are the most common cause. Sometimes the RA pulse becomes feeble or disappears because of severe spasm. Subcutaneous injection of nitroglycerine should be given; it helps return the RA pulse in most instances.
• Significant tortuosity, calcification, or atherosclerosis of RA segment may create difficulty in passing a guidewire and/or catheter. Repeated push of the assembly against this resistance is usually counterproductive and can lead to reactive focal or diffuse RAS. A repeat cocktail and the use of aforementioned steps to negotiate the assembly usually bring success.
• Anatomical variations of the RA, particularly the anomalous origin of the RA from high brachial or axillary artery and radio-brachial loops, are most commonly misinterpreted as RAS. Whenever the RA has high brachial or axillary artery origin, its caliber is almost invariably small. This leads to significant resistance to passage of assembly through this segment. Downsizing the catheter resolves the problem to a great extent. The method of working through loops is discussed later in the chapter. Very rarely after completion of a diagnostic procedure or an intervention, the catheter is severely gripped in RAS segment. Even a gentle attempt to pull the catheter gives agonizing pain to the patient. In this rare situation, a short course of general anesthesia is helpful. Once the patient is anesthetized, the catheter can usually be easily removed without pain.
BOX 5-1 Classification of Radial Artery Spasm
Grade I: Mild spasm
The patient experiences minimal pain and/or discomfort along the course of RA during and/or immediately after the procedure.
Grade II: Moderate spasm
The patient experiences significant pain and discomfort along the course of RA during and/or immediately after the procedure. However, catheter movement is possible to complete the procedure.
Grade III: Severe spasm
The patient experiences severe pain and discomfort along the course of RA during catheter movement despite the administration of at least two successive doses of spasmolytic cocktail, compelling the operator to terminate the procedure and cross over to other access site.
Grade IV: Very severe spasm
The patient experiences very severe pain and discomfort along the course of RA associated with catheter entrapment despite the administration of at least two successive doses of spasmolytic cocktail.
Tortuosity
Tortuosity is an important issue particularly while dealing with patients above 70 years, long-standing diabetics, hypertensives, and females2,5–7 (Fig. 5-4).
• It is an important cause of resistance to the movement of a guidewire and/or a catheter.
• RA angiogram should define its severity and extent.
• Once it is diagnosed, it should be crossed using a 0.025″ or 0.032″ J-shaped hydrophilic guidewire or a 0.014″ soft-tip PTCA guidewire. The catheter should be negotiated slowly and carefully over the wire, using cork-screw movement under fluoroscopic guidance. Once the tortuous segment is crossed, the procedure can be completed in the usual manner.
• Sometimes, a repeat dose of cocktail helps working through a tortuous segment in small RA with or without spasm.5,8
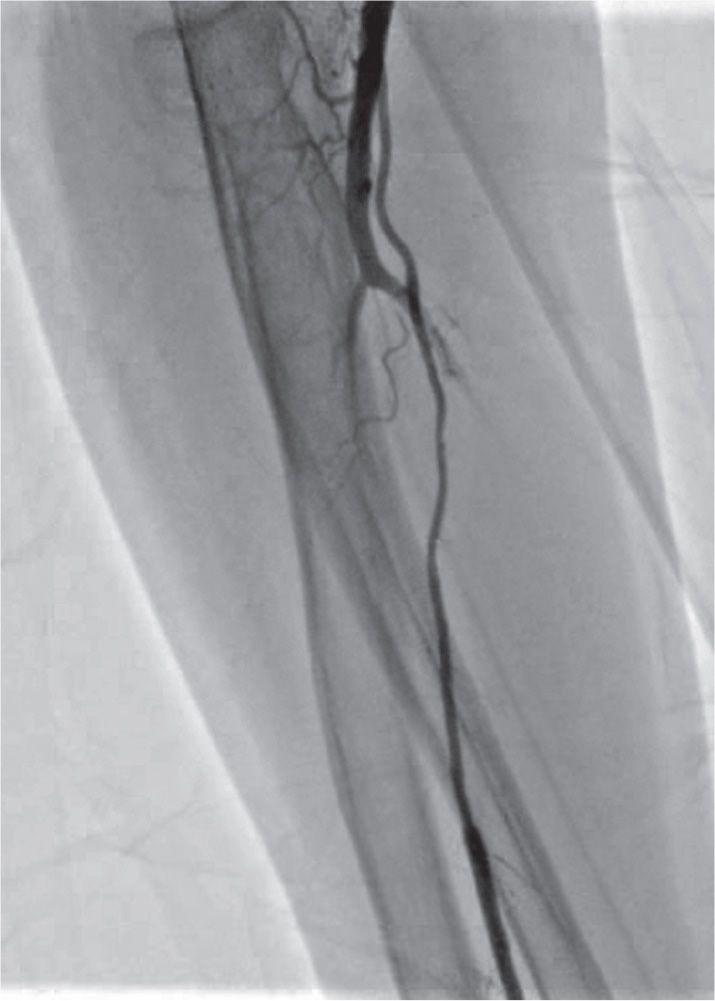
FIGURE 5-3 Diffuse spasm of RA.

FIGURE 5-4 Severe tortuosity of RA.
Perforation
This complication should be identified and managed promptly, as it is the commonest cause of large forearm hematoma.2,8–11 In our series, the incidence was 0.1%.11
Classification of Radial–Brachial Perforation
We have developed a classification for radial–brachial perforations (Box 5-2), which should be useful in clinical practice.
Identification and Management
• Resistance to the passage of a guidewire and/or a catheter felt by an operator associated with a complaint of significant local pain and discomfort in the radial and/or brachial region by a patient, with or without development of expanding forearm hematoma, makes this diagnosis.
• Immediate removal of the assembly and injection of diluted contrast through side port of an introducer sheath confirms the site and size of perforation.
• A radial operator might have an apprehension to work through it. In that case, we recommend abandoning the procedure, reversing the effect of heparin, and giving manual compression at the local site for a sufficiently longer time to prevent a large hematoma. Sealing of perforation can be confirmed by injecting diluted contrast through the side port of the introducer sheath. The procedure may be completed after several hours or next day using a contralateral radial or a femoral route.
• We recommend the following technique to work past the perforation.10 The steps are as follows (Fig. 5-5):
• Identify the site and size of perforation by injecting diluted contrast through the side port of introducer sheath.
• Use a floppy-tip 0.014″ PTCA wire and carefully cross the affected area. Park the wire higher in the brachial or axillary region.
• Negotiate a diagnostic or guide catheter over the wire and stop when the tip of the catheter reaches the perforated segment.
• Gently negotiate the catheter using a slow cork-screw movement (instead of the usual push) to reduce the friction in the perforated segment. Once the tip crosses the affected segment, the movement of the catheter becomes smooth and the procedure can be completed in the usual manner.
• If there is resistance in the movement of the catheter tip at the perforation site, remove the catheter immediately and downsize it (i.e., a 4F diagnostic catheter instead of 5F, or a 5F guide catheter instead of 6F). This strategy facilitates the successful crossing of the affected segment with less friction.
• Once the diagnostic or interventional procedure is over, the catheter is pulled back and an injection of diluted contrast is made through the catheter itself or the side port of introducer sheath, to confirm appropriate sealing of the perforated segment. It is important to understand that the catheter functions as an internal hemostatic device to help seal the perforated segment.
BOX 5-2 Classification of Radial–Brachial Perforation
Grade I
Small perforation (<1 mm arterial rent, or side-branch diameter on radial angiography) confirmed by minimal extravasation of contrast, usually self-limiting and not associated with muscular infiltration and significant hematoma.
Grade II
Moderate perforation (1 to 2 mm arterial rent, or side-branch diameter on radial angiography) confirmed by significant extravasation of contrast and associated with muscular infiltration and expanding hematoma.
Grade III
Large perforation (>2 mm arterial rent or side-branch diameter on radial angiography) confirmed by rapid and significant extravasation of contrast and associated with large muscular infiltration and rapidly expanding hematoma.
Grade IV
Free RA rupture.
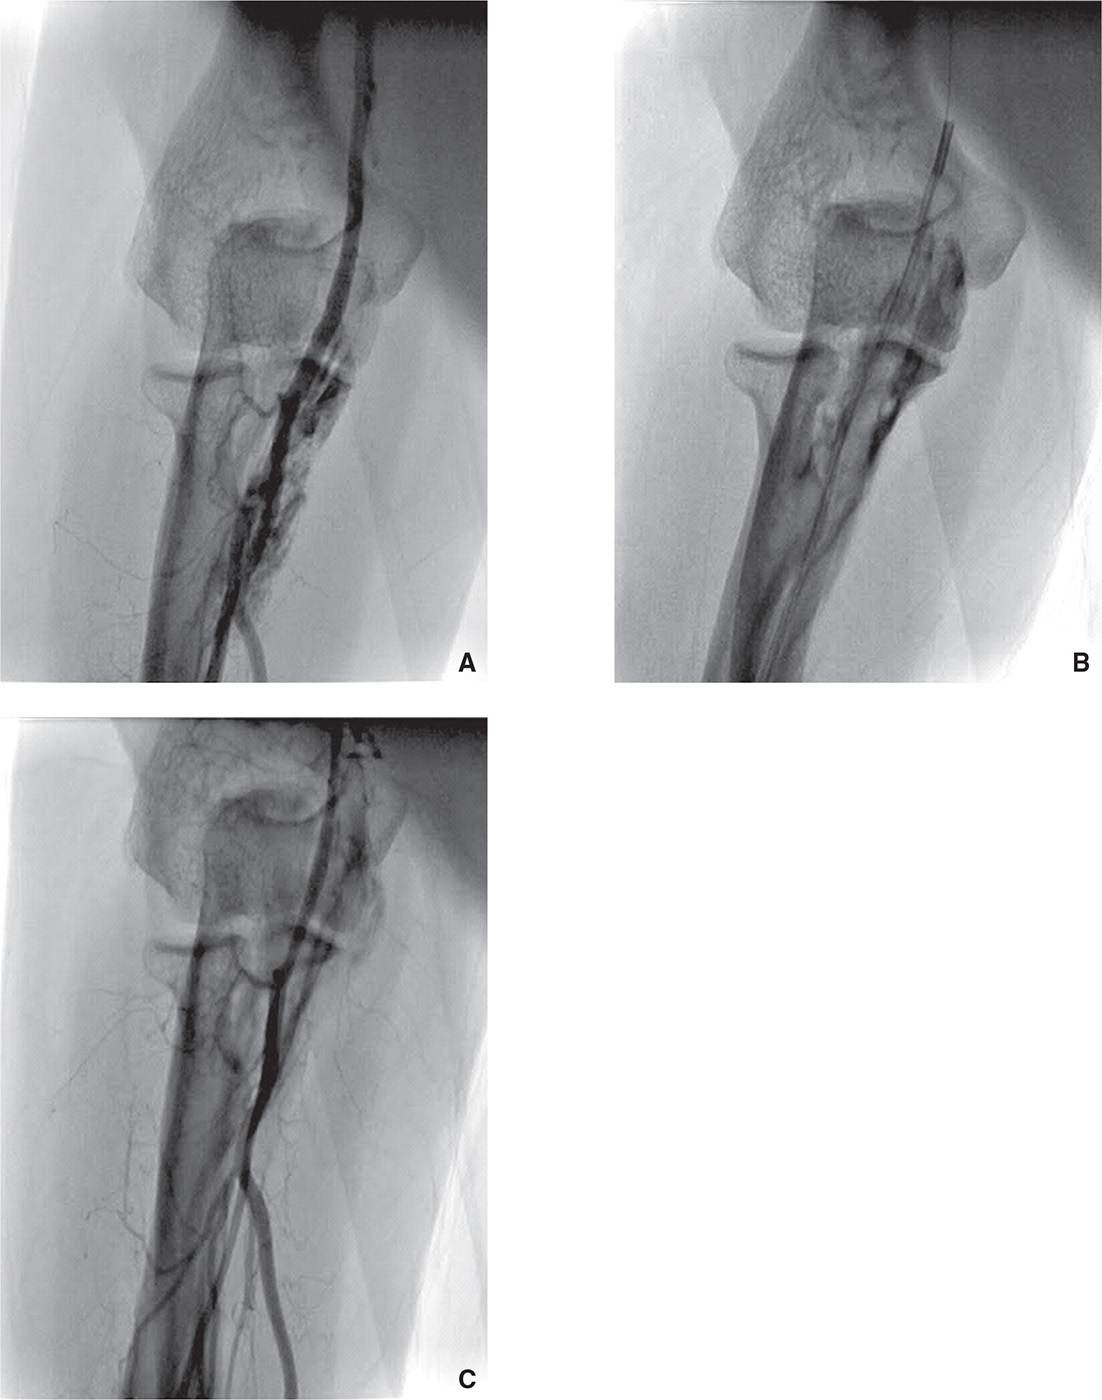
FIGURE 5-5 A: Grade II perforation with significant extravasation of contrast. B: It was crossed with a 0.014″ balance middleweight (BMW) PTCA guidewire and a 5F Judkins right no. 4 guide catheter. C: Postprocedure angiogram revealed completely sealed perforation.
Loops and Curvatures
These are important anatomical variations to understand and manage.2,5–8,12
Stay updated, free articles. Join our Telegram channel

Full access? Get Clinical Tree


